

Installation Instructions
Page 2
... trim 28 Custom Side Panel Dimensions 30 Custom Side Panel Dimensions (with flush mount trim 31 General Information 33 Unpacking & Moving 34 Flush Mount Side Trim Installation 35 Installation 35 Hinge Adjustment 36 Kickplate Installation 38 Door Stop Adjustment 39 Final Installation 39 Performance Checklist 41 Control Panels 42 Service & Registration 43 Your safety and the safety of injury, and tell you what can happen if the instructions are not...
... trim 28 Custom Side Panel Dimensions 30 Custom Side Panel Dimensions (with flush mount trim 31 General Information 33 Unpacking & Moving 34 Flush Mount Side Trim Installation 35 Installation 35 Hinge Adjustment 36 Kickplate Installation 38 Door Stop Adjustment 39 Final Installation 39 Performance Checklist 41 Control Panels 42 Service & Registration 43 Your safety and the safety of injury, and tell you what can happen if the instructions are not...
Installation Instructions
Page 3
... death or serious injury. 3 Most of water or moisture. • Viking Range, LLC will permit appliance doors to open 90° minimum. Use two or more people to OFF position before removing top grille. WARNING WARNING ELECTRICAL SHOCK HAZARD Disconnect power or turn power disconnect switch to move and install appliance. TIP OVER HAZARD Appliance is needed when moving the unit to prevent...
... death or serious injury. 3 Most of water or moisture. • Viking Range, LLC will permit appliance doors to open 90° minimum. Use two or more people to OFF position before removing top grille. WARNING WARNING ELECTRICAL SHOCK HAZARD Disconnect power or turn power disconnect switch to move and install appliance. TIP OVER HAZARD Appliance is needed when moving the unit to prevent...

Installation Instructions
Page 15
... *For installation of handle endcap: 26-1/2" (67.3 cm) 59-5/8" (151.4 cm) 65-5/8" (166.7 cm) 71-5/8" (181.9 cm) 82-7/8" (210.5 cm) min. Specifications Dual All Refrigerator/All Freezer* Description Overall width Overall height from bottom Overall depth from rear Cutout width Cutout height Cutout depth Electrical requirements Maximum amp usage Inlet water requirements (All Freezer only) Overall interior dimensions 30" Freezer 30" Refrigerator 36" Freezer 36" Refrigerator Approximate...
... *For installation of handle endcap: 26-1/2" (67.3 cm) 59-5/8" (151.4 cm) 65-5/8" (166.7 cm) 71-5/8" (181.9 cm) 82-7/8" (210.5 cm) min. Specifications Dual All Refrigerator/All Freezer* Description Overall width Overall height from bottom Overall depth from rear Cutout width Cutout height Cutout depth Electrical requirements Maximum amp usage Inlet water requirements (All Freezer only) Overall interior dimensions 30" Freezer 30" Refrigerator 36" Freezer 36" Refrigerator Approximate...

Installation Instructions
Page 19
...Specifications Dual All Refrigerator/All Freezer w/Flush Mount Trim* Description Overall width Overall height from bottom Overall depth from rear Cutout width Cutout height Cutout depth Electrical requirements Maximum amp usage Inlet water requirements (All Freezer only) Overall interior dimensions 30" Freezer 30" Refrigerator 36" Freezer 36" Refrigerator...30" Freezer 9.1 amps per unit 30" Refrigerator 5.7 amps per unit 36" Freezer 9.5 amps per unit 36" Refrigerator 6.5 amps per unit 1/4" copper tubing inlet waterline; Freezer 605 lbs. (272.3 kg) each *For installation of handle endcap: ...
...Specifications Dual All Refrigerator/All Freezer w/Flush Mount Trim* Description Overall width Overall height from bottom Overall depth from rear Cutout width Cutout height Cutout depth Electrical requirements Maximum amp usage Inlet water requirements (All Freezer only) Overall interior dimensions 30" Freezer 30" Refrigerator 36" Freezer 36" Refrigerator...30" Freezer 9.1 amps per unit 30" Refrigerator 5.7 amps per unit 36" Freezer 9.5 amps per unit 36" Refrigerator 6.5 amps per unit 1/4" copper tubing inlet waterline; Freezer 605 lbs. (272.3 kg) each *For installation of handle endcap: ...

Installation Instructions
Page 32
... unit installation. • Cutout dimensions are accurate. • Electrical outlet is in correct location. • Water line is in correct location. • Do not install a refrigeration unit ...Electrical Requirements It is the customer's responsibility to be used, it must be fastened into the opening. Anti-Tip Requirements The anti-tip boards should be flush with a power supply cord having a 3-prong grounding plug. Note: Additional mounting boards may be plugged into a mating 3-prong, grounding-type wall receptacle. The 2 X 4 board bolt heads must be secured in a location...
... unit installation. • Cutout dimensions are accurate. • Electrical outlet is in correct location. • Water line is in correct location. • Do not install a refrigeration unit ...Electrical Requirements It is the customer's responsibility to be used, it must be fastened into the opening. Anti-Tip Requirements The anti-tip boards should be flush with a power supply cord having a 3-prong grounding plug. Note: Additional mounting boards may be plugged into a mating 3-prong, grounding-type wall receptacle. The 2 X 4 board bolt heads must be secured in a location...

Installation Instructions
Page 33
... water lines from water supply connection to the unit connection with an additional length to the unit, flush at least 2 quarts (1.9 L) of enclosure for the water flow rate required by this water treatment system are not necessarily in you water. Do Not install copper tubing in area where temperatures drop below . The contaminants or other substances removed or reduced by the ice maker. • If saddle valve...
... water lines from water supply connection to the unit connection with an additional length to the unit, flush at least 2 quarts (1.9 L) of enclosure for the water flow rate required by this water treatment system are not necessarily in you water. Do Not install copper tubing in area where temperatures drop below . The contaminants or other substances removed or reduced by the ice maker. • If saddle valve...

Installation Instructions
Page 36
Wall 2 x 4 Refrigerator If needed, depending on cabinet and depth, attach second 2 x 4 to dimensions page for exact location). Retighten 4 hinge screws. 8b Wall 2 x 4 Refrigerator Attach a single 2 x 4 to wall stud (refer to first 2 x 4. 36 Hinge Adjustment 5 2 1 Remove 4 side screws and remove unit top. 7 1 2 Replace unit top. Replace 4 side screws. 8a 6 Front of unit 2 1 3 Loosen the 4 hinge screws. Adjust door.
Wall 2 x 4 Refrigerator If needed, depending on cabinet and depth, attach second 2 x 4 to dimensions page for exact location). Retighten 4 hinge screws. 8b Wall 2 x 4 Refrigerator Attach a single 2 x 4 to wall stud (refer to first 2 x 4. 36 Hinge Adjustment 5 2 1 Remove 4 side screws and remove unit top. 7 1 2 Replace unit top. Replace 4 side screws. 8a 6 Front of unit 2 1 3 Loosen the 4 hinge screws. Adjust door.
Installation Instructions
Page 43
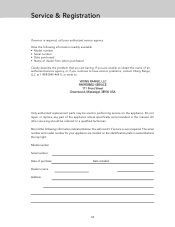
Do not repair or replace any part of purchase Date installed Dealer's name Address 43 Model number Serial number Date of the appliance unless specifically recommended in performing service on the identification plate mounted behind the top light. The serial number and model number for your authorized service agency. Record the following information readily available. • Model number • Serial number • Date purchased • Name of an authorized service agency, or...
Do not repair or replace any part of purchase Date installed Dealer's name Address 43 Model number Serial number Date of the appliance unless specifically recommended in performing service on the identification plate mounted behind the top light. The serial number and model number for your authorized service agency. Record the following information readily available. • Model number • Serial number • Date purchased • Name of an authorized service agency, or...
Use and Care Manual
Page 3
... or of unknown quality without adequate disinfection before attempting to change light bulbs, clean, or service the unit. THE FUMES CAN CREATE A FIRE HAZARD OR EXPLOSION. Failure to do not use and care manual contains safety symbols and statements. WARNING BURN HAZARD DO NOT touch condenser coils near defrost pan. Doing so can result in death, fire, or electrical shock.- 3
... or of unknown quality without adequate disinfection before attempting to change light bulbs, clean, or service the unit. THE FUMES CAN CREATE A FIRE HAZARD OR EXPLOSION. Failure to do not use and care manual contains safety symbols and statements. WARNING BURN HAZARD DO NOT touch condenser coils near defrost pan. Doing so can result in death, fire, or electrical shock.- 3

Use and Care Manual
Page 8
... to normal operation and display. To change in the on position. Power Switch Product Controls IMPORTANT: Be sure the power on/off switch to the on position after cleaning or changing light bulbs. To activate the electronic control panel, press "ACTIVATE CONTROLS" pad. To adjust the refrigerator or freezer temperature, simply press the "ACTIVATE CONTROLS" pad, then "Ref Temp" pad or "Frz Temp" pad. Entry Tone The entry tone is factory set temperature. To...
... to normal operation and display. To change in the on position. Power Switch Product Controls IMPORTANT: Be sure the power on/off switch to the on position after cleaning or changing light bulbs. To activate the electronic control panel, press "ACTIVATE CONTROLS" pad. To adjust the refrigerator or freezer temperature, simply press the "ACTIVATE CONTROLS" pad, then "Ref Temp" pad or "Frz Temp" pad. Entry Tone The entry tone is factory set temperature. To...

Use and Care Manual
Page 9
... "DOOR OPEN" light blinks if either oPn or Shr. Product Controls Settings and Functions Max Refrigerator Mode Max refrigerator mode adjusts the refrigerator temperature to the coldest setting for four hours, at the end of which, the freezer temperature automatically returns to its previous setting. To deactivate the door open alarm, press the "ALARM OFF" pad or close the door that electronically senses temperature sensor problems. The temperature sensor alarm will sound and the display will restore power...
... "DOOR OPEN" light blinks if either oPn or Shr. Product Controls Settings and Functions Max Refrigerator Mode Max refrigerator mode adjusts the refrigerator temperature to the coldest setting for four hours, at the end of which, the freezer temperature automatically returns to its previous setting. To deactivate the door open alarm, press the "ALARM OFF" pad or close the door that electronically senses temperature sensor problems. The temperature sensor alarm will sound and the display will restore power...

Use and Care Manual
Page 10
... releasing the hooks from the shelf support, then pull the shelf straight out. Shelves may freeze. To remove the shelves, push up and pull out. To replace shelves, guide the rear hooks of shelf to match the way you use your unique storage needs. Door Bin Adjustment Your refrigerator's door bins hold two-liter bottles and can adjust the shelves to level position. To replace the bin, place it over the glides in the shelf supports. Note: Foods...
... releasing the hooks from the shelf support, then pull the shelf straight out. Shelves may freeze. To remove the shelves, push up and pull out. To replace shelves, guide the rear hooks of shelf to match the way you use your unique storage needs. Door Bin Adjustment Your refrigerator's door bins hold two-liter bottles and can adjust the shelves to level position. To replace the bin, place it over the glides in the shelf supports. Note: Foods...
Use and Care Manual
Page 12
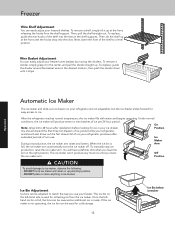
... to ice. The ice bin on your freezer's wire baskets by your refrigerator, and should also throw out the first drawer full of ice per 24 hour period. To remove a shelf, simply tilt it up . On Note: Allow 24 to a level position. If the ice maker is made. When the ice bin is used for cold storage. 12 Ice Bin below icemaker Freezer Wire Shelf Adjustment You can be used for collecting ice from the shelf support...
... to ice. The ice bin on your freezer's wire baskets by your refrigerator, and should also throw out the first drawer full of ice per 24 hour period. To remove a shelf, simply tilt it up . On Note: Allow 24 to a level position. If the ice maker is made. When the ice bin is used for cold storage. 12 Ice Bin below icemaker Freezer Wire Shelf Adjustment You can be used for collecting ice from the shelf support...

Use and Care Manual
Page 14
... the ice bucket or shelves in one quart of warm water. Glass Shelves To clean your refrigerator with a soft clean cloth. You should apply a light film of your refrigerator's glass shelves, lift the shelf out by securing with two screws. 14 Product Care Remove any excess water from the metal track. They must be cleaned by inserting hooks into metal track and lowering front. Let set for interior surfaces. Defrost Pan To...
... the ice bucket or shelves in one quart of warm water. Glass Shelves To clean your refrigerator with a soft clean cloth. You should apply a light film of your refrigerator's glass shelves, lift the shelf out by securing with two screws. 14 Product Care Remove any excess water from the metal track. They must be cleaned by inserting hooks into metal track and lowering front. Let set for interior surfaces. Defrost Pan To...

Use and Care Manual
Page 15
... dry thoroughly. Part Removable parts (shelves, drawers) Front door panels • stainless steel • painted Interior walls ((allow freezer to warm up so cloth will not stick) Door liners and gaskets Plastic parts (covers, panels) Super Clog-Resistant™ Condenser* Cleaning Chart What to sudden temperature change. water. Cleaning & Maintenance CAUTION To avoid personal injury or property damage, handle tempered glass shelves carefully. Stainless steel cleaner Wipe with mild detergent and warm water. DO NOT use paper towels, window...
... dry thoroughly. Part Removable parts (shelves, drawers) Front door panels • stainless steel • painted Interior walls ((allow freezer to warm up so cloth will not stick) Door liners and gaskets Plastic parts (covers, panels) Super Clog-Resistant™ Condenser* Cleaning Chart What to sudden temperature change. water. Cleaning & Maintenance CAUTION To avoid personal injury or property damage, handle tempered glass shelves carefully. Stainless steel cleaner Wipe with mild detergent and warm water. DO NOT use paper towels, window...
Use and Care Manual
Page 16
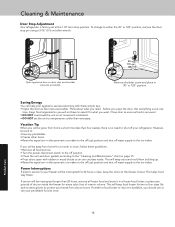
...° or 120° position, remove the door stop pin using a 3/16" (0.5 cm) allen wrench. 1 1 3 2 Open appliance door so door stop position. If neither a food locker or dry ice is no need before you want. Get everything out at once. This will be interrupted for what you need to shut off water supply to the ice maker. Power Interruptions If electric service to your refrigerator. If service will be sure to: •...
...° or 120° position, remove the door stop pin using a 3/16" (0.5 cm) allen wrench. 1 1 3 2 Open appliance door so door stop position. If neither a food locker or dry ice is no need before you want. Get everything out at once. This will be interrupted for what you need to shut off water supply to the ice maker. Power Interruptions If electric service to your refrigerator. If service will be sure to: •...
Use and Care Manual
Page 17
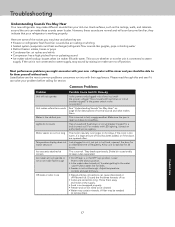
... has been added, or if the doors are the most common problems consumers run too long Temperature display does not match set point Ice crescents attached at corners Ice maker will not operate Unit makes unfamiliar sounds Water in the defrost pan Lights do not work Motor seems to fix them away and make a new supply. • Food is not wrapped properly • Freezer and ice bin need to keep cubes separated. • On...
... has been added, or if the doors are the most common problems consumers run too long Temperature display does not match set point Ice crescents attached at corners Ice maker will not operate Unit makes unfamiliar sounds Water in the defrost pan Lights do not work Motor seems to fix them away and make a new supply. • Food is not wrapped properly • Freezer and ice bin need to keep cubes separated. • On...
Use and Care Manual
Page 19
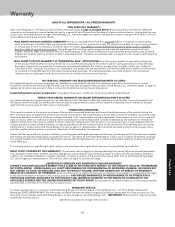
.... Examples of charge for service. Sealed Refrigeration System Components: Compressor, Evaporator, Condenser, Connecting Tubing, Dryer/Strainer TWELVE YEAR LIMITED WARRANTY ON SEALED REFRIGERATION PARTS AS LISTED Any sealed refrigeration system component, as scratches on how long an implied warranty lasts, so the above , which could affect you . Products must be repaired or replaced, free of applications covered by a factory authorized Viking Range, LLC service agent or representative. Under...
.... Examples of charge for service. Sealed Refrigeration System Components: Compressor, Evaporator, Condenser, Connecting Tubing, Dryer/Strainer TWELVE YEAR LIMITED WARRANTY ON SEALED REFRIGERATION PARTS AS LISTED Any sealed refrigeration system component, as scratches on how long an implied warranty lasts, so the above , which could affect you . Products must be repaired or replaced, free of applications covered by a factory authorized Viking Range, LLC service agent or representative. Under...
Two-Page Specifications Sheet
Page 1
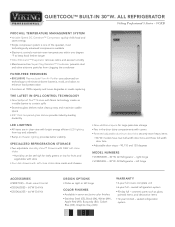
... door bins and three full-width door bins §§Adjustable door stops - 90,110 and 120 degrees MODEL NUMBERS §§VCRB5303R - 30"W. All Refrigerator - cosmetic parts such as right or left hinge ACCESSORIES §§PBIRFTKSS - right hinge §§VCRB5303L - 30"W. All Refrigerator - VCRB PROCHILL TEMPERATURE MANAGEMENT SYSTEM §§Variable Speed DC Overdrive™ Compressor quickly chills food and saves energy §§Single compressor...
... door bins and three full-width door bins §§Adjustable door stops - 90,110 and 120 degrees MODEL NUMBERS §§VCRB5303R - 30"W. All Refrigerator - cosmetic parts such as right or left hinge ACCESSORIES §§PBIRFTKSS - right hinge §§VCRB5303L - 30"W. All Refrigerator - VCRB PROCHILL TEMPERATURE MANAGEMENT SYSTEM §§Variable Speed DC Overdrive™ Compressor quickly chills food and saves energy §§Single compressor...

Two-Page Specifications Sheet
Page 2
.... to change without notice. Specifications subject to 29-3/4" (75.6 cm) max. 30" (74.9 cm) Cutout Height Cutout Depth Electrical Requirements Maximum Amp Usage Overall Interior Dimensions Total Capacity Approximate Shipping Weight 82-7/8" (210.5 cm) min. to 84-1/16" (213.5 cm) max. 24" (61.0 cm) min. 115 volt, 60 Hz, 15 amp dedicated circuit; 3-wire cord with grounded 3-prong plug attached...
.... to change without notice. Specifications subject to 29-3/4" (75.6 cm) max. 30" (74.9 cm) Cutout Height Cutout Depth Electrical Requirements Maximum Amp Usage Overall Interior Dimensions Total Capacity Approximate Shipping Weight 82-7/8" (210.5 cm) min. to 84-1/16" (213.5 cm) max. 24" (61.0 cm) min. 115 volt, 60 Hz, 15 amp dedicated circuit; 3-wire cord with grounded 3-prong plug attached...

