Two-Page Specifications Sheet
Page 1
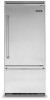
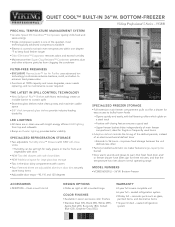
QUIET COOL™ BUILT-IN 36"W. improves food storage because the unit defrosts less often §§Factory-installed automatic ice maker features large-capacity ice bucket §§Door alarm sounds and glows to 96 hours - sealed refrigeration system ideal for three minutes, and that fresh food door and/ or freezer drawer have been ajar for fragile or frequently used items §§...
QUIET COOL™ BUILT-IN 36"W. improves food storage because the unit defrosts less often §§Factory-installed automatic ice maker features large-capacity ice bucket §§Door alarm sounds and glows to 96 hours - sealed refrigeration system ideal for three minutes, and that fresh food door and/ or freezer drawer have been ajar for fragile or frequently used items §§...
Two-Page Specifications Sheet
Page 2
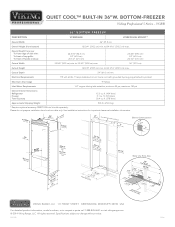
.... QUIET COOL™ BUILT-IN 36"W. to change without notice. Cutout Depth 24" (61.0 cm) min. Specifications subject to 84-1/16" (213.5 cm) max. to 84-1/16" (213.5 cm) max. ft. (578 liters) Approximate Shipping Weight 565 lb. (254.3 kg) * Requires optional accessory PBIRFTKSS trim kit sold separately. maximum 120 psi Overall Interior Dimensions Refrigerator Freezer Total Capacity...
.... QUIET COOL™ BUILT-IN 36"W. to change without notice. Cutout Depth 24" (61.0 cm) min. Specifications subject to 84-1/16" (213.5 cm) max. to 84-1/16" (213.5 cm) max. ft. (578 liters) Approximate Shipping Weight 565 lb. (254.3 kg) * Requires optional accessory PBIRFTKSS trim kit sold separately. maximum 120 psi Overall Interior Dimensions Refrigerator Freezer Total Capacity...

Installation Instructions
Page 3
...symbol. This symbol alerts you to persons, installation work and electrical wiring must be preceded by a qualified technician in this manual and on your appliance. Please Read and Follow! • Make sure that can be killed or seriously ...codes and standards, including fire-rated construction. • The installer should leave these instructions with the consumer who should retain them for local inspector's use and for future reference. All safety messages will be done by the safety alert symbol and the word "DANGER" or "WARNING." IMPORTANT - An electric rating...
...symbol. This symbol alerts you to persons, installation work and electrical wiring must be preceded by a qualified technician in this manual and on your appliance. Please Read and Follow! • Make sure that can be killed or seriously ...codes and standards, including fire-rated construction. • The installer should leave these instructions with the consumer who should retain them for local inspector's use and for future reference. All safety messages will be done by the safety alert symbol and the word "DANGER" or "WARNING." IMPORTANT - An electric rating...

Installation Instructions
Page 5
... Follow! Extra care is your unit), which are necessary for proper installation: • 1/4" (6 mm) copper tubing with installation specifications and dimensions. • properly install unit. • remove any moldings or decorative panels that prevent the unit from being serviced. • make sure that location will support unit, door panels and contents (approximately 1200 pounds [540 kg]). • provide a properly grounded electrical outlet. •...
... Follow! Extra care is your unit), which are necessary for proper installation: • 1/4" (6 mm) copper tubing with installation specifications and dimensions. • properly install unit. • remove any moldings or decorative panels that prevent the unit from being serviced. • make sure that location will support unit, door panels and contents (approximately 1200 pounds [540 kg]). • provide a properly grounded electrical outlet. •...

Installation Instructions
Page 14
... the customer's responsibility to a gas line. DO NOT use an extension cord. Note: Additional mounting boards may be provided. DO NOT ground to : • Contact a qualified electrical installer. • Assure that the electrical installation is adequate and in place with a solid soffit or wood block. 14 Check with a power supply cord having a 3-prong grounding plug. If codes permit...
... the customer's responsibility to a gas line. DO NOT use an extension cord. Note: Additional mounting boards may be provided. DO NOT ground to : • Contact a qualified electrical installer. • Assure that the electrical installation is adequate and in place with a solid soffit or wood block. 14 Check with a power supply cord having a 3-prong grounding plug. If codes permit...

Installation Instructions
Page 15
... in an easily accessible location between water supply and the unit. Use only 1/4" (6 mm) copper tubing for the water flow rate required by dispensing 2-3 glasses of enclosure for cleaning or service. Clamp tubing to wall or floor. • Water pressure must be above 35º F (1.7º C) to prevent water line from freezing. • DO NOT use plastic water lines from water supply connection to the unit connection with a reverse osmosis system is...
... in an easily accessible location between water supply and the unit. Use only 1/4" (6 mm) copper tubing for the water flow rate required by dispensing 2-3 glasses of enclosure for cleaning or service. Clamp tubing to wall or floor. • Water pressure must be above 35º F (1.7º C) to prevent water line from freezing. • DO NOT use plastic water lines from water supply connection to the unit connection with a reverse osmosis system is...

Installation Instructions
Page 18
Hinge Adjustment 5 2 1 Remove four side screws and remove unit top. 7 1 2 Replace unit top. Plug in the "On" Position. 18 Replace four side screws. 8b 6 Front of unit 2 1 3 Loosen the four hinge screws. Adjust door. Retighten four hinge screws. 8a Wall 2 x 4 Refrigerator Attach one 2 x 4 to wall stud (refer to dimensions page for exact location). 9 Wall 2 x 4 Refrigerator If needed, depending on cabinet and depth, attach second 2 x 4 to verify operation. Note: Make sure power switch is in power cord to first 2 x 4.
Hinge Adjustment 5 2 1 Remove four side screws and remove unit top. 7 1 2 Replace unit top. Plug in the "On" Position. 18 Replace four side screws. 8b 6 Front of unit 2 1 3 Loosen the four hinge screws. Adjust door. Retighten four hinge screws. 8a Wall 2 x 4 Refrigerator Attach one 2 x 4 to wall stud (refer to dimensions page for exact location). 9 Wall 2 x 4 Refrigerator If needed, depending on cabinet and depth, attach second 2 x 4 to verify operation. Note: Make sure power switch is in power cord to first 2 x 4.

Installation Instructions
Page 22
... manufacturer's instruction, including replacement of Cryptosporidium parvum oocysts Operating Specifications Capacity: Certified for up to nine months Pressure Requirement: 20 - 120 psi (1.4 - 8.2 bar) Temperature: 33-100º F (0.6 - 37.8º C) Flow rate: 0.78 gpm (2.9 l/min.) Check for compliance with manufacturer's recommended procedures and guidelines. Water Filter System Specification and Performance Data Sheet This...
... manufacturer's instruction, including replacement of Cryptosporidium parvum oocysts Operating Specifications Capacity: Certified for up to nine months Pressure Requirement: 20 - 120 psi (1.4 - 8.2 bar) Temperature: 33-100º F (0.6 - 37.8º C) Flow rate: 0.78 gpm (2.9 l/min.) Check for compliance with manufacturer's recommended procedures and guidelines. Water Filter System Specification and Performance Data Sheet This...

Installation Instructions
Page 24
... cabinet size. -Verify electrical supply and water supply (if applicable). -Install anti-tip device(s) and verify unit is secure. -Position unit in cutout, level at desired height and secure unit. -Plug-in unit and verify operation. -Connect water supply (if applicable). • Verify icemaker fill tube is properly inserted. • Verify icemaker bail arm is down. • Verify dispenser operation (if applicable). -Align/square door(s). -Verify drain pan is properly installed...
... cabinet size. -Verify electrical supply and water supply (if applicable). -Install anti-tip device(s) and verify unit is secure. -Position unit in cutout, level at desired height and secure unit. -Plug-in unit and verify operation. -Connect water supply (if applicable). • Verify icemaker fill tube is properly inserted. • Verify icemaker bail arm is down. • Verify dispenser operation (if applicable). -Align/square door(s). -Verify drain pan is properly installed...
Use and Care Manual
Page 3
... switch (located behind the air grille on top right side) to the OFF position before attempting to change light bulbs, clean, or service the unit. The fumes can create a fire hazard or explosion. • ALWAYS turn power disconnect switch to do not use of fire, electric shock, or injury when using the unit. • NEVER allow children to follow any instructions given. After cleaning...
... switch (located behind the air grille on top right side) to the OFF position before attempting to change light bulbs, clean, or service the unit. The fumes can create a fire hazard or explosion. • ALWAYS turn power disconnect switch to do not use of fire, electric shock, or injury when using the unit. • NEVER allow children to follow any instructions given. After cleaning...
Use and Care Manual
Page 5
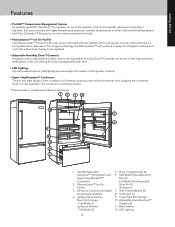
... Corporation. 12 34 12 5 6 11 10 9 8 7 1. Spillpoof Plus Shelf w/ Nano Technology Full-Width (1) Spillproof Shelves Full-Width (2) 5. Under normal operation, the condenser is maintenance-free. *Plasmacluster is one of the quietest, most technologically advanced compressors available. Half-Width Adjustable Door Bins (3) Full-Width NonAdjustable Door Bin (1) (Patented ) 7. Wire Freezer Basket (2) 8. Plasmacluster™ Ion Air Purifier 3. Dairy Compartments (2) 6. Large Pizza Box Storage...
... Corporation. 12 34 12 5 6 11 10 9 8 7 1. Spillpoof Plus Shelf w/ Nano Technology Full-Width (1) Spillproof Shelves Full-Width (2) 5. Under normal operation, the condenser is maintenance-free. *Plasmacluster is one of the quietest, most technologically advanced compressors available. Half-Width Adjustable Door Bins (3) Full-Width NonAdjustable Door Bin (1) (Patented ) 7. Wire Freezer Basket (2) 8. Plasmacluster™ Ion Air Purifier 3. Dairy Compartments (2) 6. Large Pizza Box Storage...
Use and Care Manual
Page 6
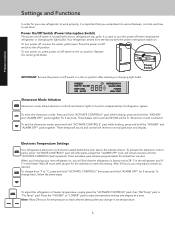
... power interruption switch on /off when cleaning the refrigerator or changing the light bulbs. Showroom mode is important that the refrigerator is located behind the door above the cabinet interior. To adjust the refrigerator or freezer temperature, simply press the "ACTIVATE CONTROLS" pad, then "Ref Temp" pad or "Frz Temp" pad. FREEZER MAX FRZ MAX REF FAST COOL SAB SHOW C F REFRIGERATOR DOOR OPEN POWER HIGH TEMP Showroom Mode Initiation Showroom mode allows electronic controls and interior lights to reach desired setting after plug...
... power interruption switch on /off when cleaning the refrigerator or changing the light bulbs. Showroom mode is important that the refrigerator is located behind the door above the cabinet interior. To adjust the refrigerator or freezer temperature, simply press the "ACTIVATE CONTROLS" pad, then "Ref Temp" pad or "Frz Temp" pad. FREEZER MAX FRZ MAX REF FAST COOL SAB SHOW C F REFRIGERATOR DOOR OPEN POWER HIGH TEMP Showroom Mode Initiation Showroom mode allows electronic controls and interior lights to reach desired setting after plug...
Use and Care Manual
Page 7
... freezer mode. Press "ALARM OFF" to five seconds. Temperature Sensor Alarm Temperature sensor alarm is left open alarm sounds and the "DOOR OPEN" light blinks if either oPn or Shr. To activate the entry tone, simply press and hold the "ACTIVATE CONTROLS" pad for three to cool the refrigerator as quickly as possible. After 2 hours, the refrigerator will show either door is a special feature that electronically senses temperature sensor problems...
... freezer mode. Press "ALARM OFF" to five seconds. Temperature Sensor Alarm Temperature sensor alarm is left open alarm sounds and the "DOOR OPEN" light blinks if either oPn or Shr. To activate the entry tone, simply press and hold the "ACTIVATE CONTROLS" pad for three to cool the refrigerator as quickly as possible. After 2 hours, the refrigerator will show either door is a special feature that electronically senses temperature sensor problems...
Use and Care Manual
Page 9
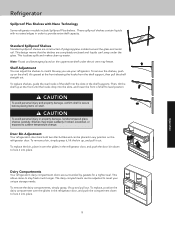
... means that the shelves are completely enclosed and liquids can adjust the shelves to match the way you use your unique storage needs. This localizes spills and makes clean-up and pull out. To replace shelves, guide the rear hooks of shelf to lock it over the glides in the refrigerator door, and push the compartment down to level position. To replace the bin, place it into...
... means that the shelves are completely enclosed and liquids can adjust the shelves to match the way you use your unique storage needs. This localizes spills and makes clean-up and pull out. To replace shelves, guide the rear hooks of shelf to lock it over the glides in the refrigerator door, and push the compartment down to level position. To replace the bin, place it into...

Use and Care Manual
Page 10
... the control to a lower setting for storing fruits and vegetables with leaves, such as apples, corn, or tomatoes. To replace the drawer, extend the glides out to the stop . Then slide the drawer back until the drawer engages the hook. Then, on each side of the drawer, locate the black lever on your refrigerator produce drawer(s) gives you the ability to change the...
... the control to a lower setting for storing fruits and vegetables with leaves, such as apples, corn, or tomatoes. To replace the drawer, extend the glides out to the stop . Then slide the drawer back until the drawer engages the hook. Then, on each side of the drawer, locate the black lever on your refrigerator produce drawer(s) gives you the ability to change the...
Use and Care Manual
Page 13
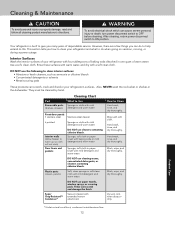
... a few things you can scratch, crack and discolor your refrigerator's surfaces. WARNING To avoid electrical shock which can scratch and damage the finish. This section tells you many years of warm water. Part Removable parts (shelves, drawers) Cleaning Chart What to Use Sponge or cloth with mild detergent and warm water Front door panels • stainless steel Stainless steel cleaner • painted Sponge or cloth with...
... a few things you can scratch, crack and discolor your refrigerator's surfaces. WARNING To avoid electrical shock which can scratch and damage the finish. This section tells you many years of warm water. Part Removable parts (shelves, drawers) Cleaning Chart What to Use Sponge or cloth with mild detergent and warm water Front door panels • stainless steel Stainless steel cleaner • painted Sponge or cloth with...
Use and Care Manual
Page 14
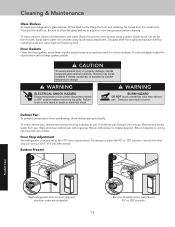
... and clean defrost pan with water. To change . Be sure to allow the glass shelves to adjust to do so can result in burns. Then pull the shelf out. WARNING WARNING ELECTRICAL SHOCK HAZARD Disconnect power or turn power disconnect switch to unit by inserting hooks into crevices using the same procedures used for five minutes. Remove any excess water from the metal track. Door Stop Adjustment Your refrigerator is factory set for interior...
... and clean defrost pan with water. To change . Be sure to allow the glass shelves to adjust to do so can result in burns. Then pull the shelf out. WARNING WARNING ELECTRICAL SHOCK HAZARD Disconnect power or turn power disconnect switch to unit by inserting hooks into crevices using the same procedures used for five minutes. Remove any excess water from the metal track. Door Stop Adjustment Your refrigerator is factory set for interior...
Use and Care Manual
Page 15
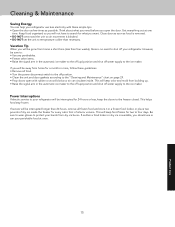
..., remove all food. • Turn the power disconnect switch to the off position. • Clean the unit and door gaskets according to four days. Cleaning & Maintenance Saving Energy You can help your refrigerator use or can circulate inside the freezer for two to the "Cleaning and Maintenance" chart on page 29. • Prop doors open the door. Close door as soon as possible. If you should use less electricity with...
..., remove all food. • Turn the power disconnect switch to the off position. • Clean the unit and door gaskets according to four days. Cleaning & Maintenance Saving Energy You can help your refrigerator use or can circulate inside the freezer for two to the "Cleaning and Maintenance" chart on page 29. • Prop doors open the door. Close door as soon as possible. If you should use less electricity with...
Use and Care Manual
Page 16
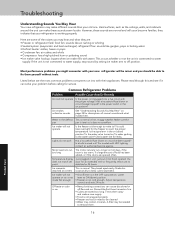
... not connected to water supply, stop sound by raising ice maker arm to be cleaned • Water may contain minerals. Adjust temperature controls and wait 24 hours. Water in the defrost This is not cold enough. Ice crescents This is not wrapped properly • Freezer and ice bin need to off position. Throw them yourself without tools. Troubleshooting Understanding Sounds You May Hear Your new refrigerator may make different sounds than your problem before...
... not connected to water supply, stop sound by raising ice maker arm to be cleaned • Water may contain minerals. Adjust temperature controls and wait 24 hours. Water in the defrost This is not cold enough. Ice crescents This is not wrapped properly • Freezer and ice bin need to off position. Throw them yourself without tools. Troubleshooting Understanding Sounds You May Hear Your new refrigerator may make different sounds than your problem before...
Use and Care Manual
Page 18
... have other factors. Sealed Refrigeration System Components: Compressor, Evaporator, Condenser, Connecting Tubing, Dryer/Strainer TWELVE YEAR LIMITED WARRANTY ON SEALED REFRIGERATION PARTS AS LISTED Any sealed refrigeration system component, as listed above, which fails or is found to be defective during the warranty period. *FULL NINETY (90) DAY COSMETIC WARRANTY: Product is warranted to be free from cosmetic defects in kitchen lighting, product locations, and other rights...
... have other factors. Sealed Refrigeration System Components: Compressor, Evaporator, Condenser, Connecting Tubing, Dryer/Strainer TWELVE YEAR LIMITED WARRANTY ON SEALED REFRIGERATION PARTS AS LISTED Any sealed refrigeration system component, as listed above, which fails or is found to be defective during the warranty period. *FULL NINETY (90) DAY COSMETIC WARRANTY: Product is warranted to be free from cosmetic defects in kitchen lighting, product locations, and other rights...

