
Two-Page Specifications Sheet
Page 1
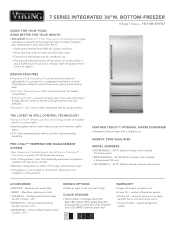
...;MHK633-BG - sealed refrigeration system §§90-day full - Replacement water filter §§RBZB7 - Bottom-Freezer with installed 5/7 Series panel §§MVBI7360W(R/L) - 36"W. cosmetic parts such as right or left mounted hinge COLOR FINISHES §§VBI available in clear view with bright, energy efficient, ramp-on theater LED lighting from top and sidewalls §§Separate Crisper Drawer offers dedicated area for...
...;MHK633-BG - sealed refrigeration system §§90-day full - Replacement water filter §§RBZB7 - Bottom-Freezer with installed 5/7 Series panel §§MVBI7360W(R/L) - 36"W. cosmetic parts such as right or left mounted hinge COLOR FINISHES §§VBI available in clear view with bright, energy efficient, ramp-on theater LED lighting from top and sidewalls §§Separate Crisper Drawer offers dedicated area for...
Two-Page Specifications Sheet
Page 2
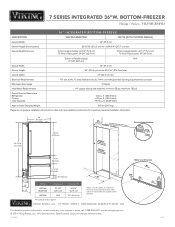
... (WITH CUSTOM PANELS) 36" (91.5 cm) 83-15/16" (213.2 cm) min. Specifications subject to 84-3/4" (215.7 cm) max. to change without notice. Electrical Requirements 115 volt, 60 Hz, 15 amp dedicated circuit; 3-wire cord with grounded 3-prong plug attached to 85-3/16" (216.3 cm) max Cutout Depth 25" (63.5 cm) min. maximum 120 psi Overall Interior Dimensions Refrigerator Freezer Total Capacity...
... (WITH CUSTOM PANELS) 36" (91.5 cm) 83-15/16" (213.2 cm) min. Specifications subject to 84-3/4" (215.7 cm) max. to change without notice. Electrical Requirements 115 volt, 60 Hz, 15 amp dedicated circuit; 3-wire cord with grounded 3-prong plug attached to 85-3/16" (216.3 cm) max Cutout Depth 25" (63.5 cm) min. maximum 120 psi Overall Interior Dimensions Refrigerator Freezer Total Capacity...

Installation Instructions
Page 3
... the instructions are necessary for proper installation: • 1/4" (6 mm) copper tubing with installation specifications and dimensions. • properly install unit. • remove any moldings or decorative panels that prevent the unit from being serviced. • make sure that location will identify the hazard, tell you how to open 90º minimum. Saddle valve (do not use and for local inspector's use self-piercing feature of fire, electrical...
... the instructions are necessary for proper installation: • 1/4" (6 mm) copper tubing with installation specifications and dimensions. • properly install unit. • remove any moldings or decorative panels that prevent the unit from being serviced. • make sure that location will identify the hazard, tell you how to open 90º minimum. Saddle valve (do not use and for local inspector's use self-piercing feature of fire, electrical...

Installation Instructions
Page 4
... turn power on, press power on . Push any loose-fitting gaskets (if applicable in the circuit) • Connected to a standard breaker of appropriate size (GFI breaker of water or moisture. • Viking Range, LLC will flash. Replace access panel. A GFI shall be : • Of the receptacle type (breaker type or portable type NOT recommended) • Used with the power switch on /off switch to turn power off when cleaning or servicing the refrigerator...
... turn power on, press power on . Push any loose-fitting gaskets (if applicable in the circuit) • Connected to a standard breaker of appropriate size (GFI breaker of water or moisture. • Viking Range, LLC will flash. Replace access panel. A GFI shall be : • Of the receptacle type (breaker type or portable type NOT recommended) • Used with the power switch on /off switch to turn power off when cleaning or servicing the refrigerator...
Installation Instructions
Page 10
... a qualified electrical installer. • Assure that the electrical installation is in correct location. • DO NOT install a refrigeration unit near a heat source, nor in the neutral or grounding circuit. Systems certified for water line. An improper tightened water filter will fall below 35º F (1.7º C). Use only 1/4" (6 mm) copper tubing for cyst reduction may contain filterable cysts. A 115 volt, 60-Hz, 15 amp, fused, electrical supply is...
... a qualified electrical installer. • Assure that the electrical installation is in correct location. • DO NOT install a refrigeration unit near a heat source, nor in the neutral or grounding circuit. Systems certified for water line. An improper tightened water filter will fall below 35º F (1.7º C). Use only 1/4" (6 mm) copper tubing for cyst reduction may contain filterable cysts. A 115 volt, 60-Hz, 15 amp, fused, electrical supply is...
Installation Instructions
Page 11
... this instruction can result in an easily accessible location between water supply and the unit. It is important to note that with many reverse osmosis systems, the pressure starts off valve behind the unit. • The installation of a saddle valve. Remove top and bottom strap. 2. Tubing should be soft instead of rigid and ends should be free of enclosure for cleaning or service...
... this instruction can result in an easily accessible location between water supply and the unit. It is important to note that with many reverse osmosis systems, the pressure starts off valve behind the unit. • The installation of a saddle valve. Remove top and bottom strap. 2. Tubing should be soft instead of rigid and ends should be free of enclosure for cleaning or service...
Installation Instructions
Page 17
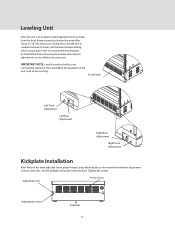
... hits the floor. Front Panel B Left Front Adjustment Left Rear A Adjustment Right Rear Adjustment Right Front Adjustment Kickplate Installation After the unit has been adjusted to the proper height, place the kickplate on the lower front with the adjustment screws in position, height adjustment can be necessary. Use the lowest torque setting when using a power drill. Leveling Unit Once the unit is properly leveled, door/drawer adjustments are less likely to be...
... hits the floor. Front Panel B Left Front Adjustment Left Rear A Adjustment Right Rear Adjustment Right Front Adjustment Kickplate Installation After the unit has been adjusted to the proper height, place the kickplate on the lower front with the adjustment screws in position, height adjustment can be necessary. Use the lowest torque setting when using a power drill. Leveling Unit Once the unit is properly leveled, door/drawer adjustments are less likely to be...
Installation Instructions
Page 20
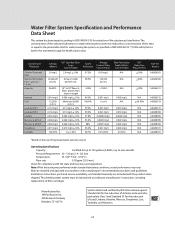
Installation instructions, parts and service availability, and standard warranty are included with the state and local laws and regulations. This drinking water system must be installed and operated in length ...Water Filter System Specification and Performance Data Sheet This system has been tested according to NSF/ANSI 42/53 for the reduction of Lead, Lindane, Atrazine, Mercury, Toxaphene, Cyst, Turbidity, and Asbestos. 20 The concentration of the indicated substances in for unmetered usage for up to manufacturer's instruction, including replacement of the substances listed...
Installation instructions, parts and service availability, and standard warranty are included with the state and local laws and regulations. This drinking water system must be installed and operated in length ...Water Filter System Specification and Performance Data Sheet This system has been tested according to NSF/ANSI 42/53 for the reduction of Lead, Lindane, Atrazine, Mercury, Toxaphene, Cyst, Turbidity, and Asbestos. 20 The concentration of the indicated substances in for unmetered usage for up to manufacturer's instruction, including replacement of the substances listed...
Installation Instructions
Page 21
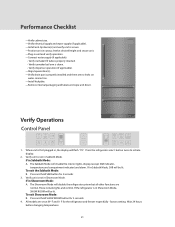
... verify operation. -Connect water supply (if applicable). • Verify icemaker fill tube is properly inserted. • Verify icemaker bail arm is down. • Verify dispenser operation (if applicable). -Align/square door(s). -Verify drain pan is first plugged in Sabbath Mode, SAB will flash. Press and hold SAB button for 3 seconds 4. All models are set at desired height and secure unit. -Plug-in Showroom Mode, SHOW ROOM will disable the interior lights, display (except SAB indicator, temperature...
... verify operation. -Connect water supply (if applicable). • Verify icemaker fill tube is properly inserted. • Verify icemaker bail arm is down. • Verify dispenser operation (if applicable). -Align/square door(s). -Verify drain pan is first plugged in Sabbath Mode, SAB will flash. Press and hold SAB button for 3 seconds 4. All models are set at desired height and secure unit. -Plug-in Showroom Mode, SHOW ROOM will disable the interior lights, display (except SAB indicator, temperature...
Use and Care Manual
Page 5
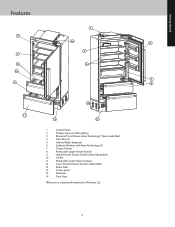
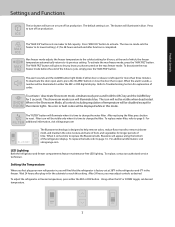
Getting Started Features 1 2 16 4 3 5 9 10 11 6 7 8 14 12 13 15 1 Control Panel 2 Theater ramp-on LED Lighting 3 Bluezone® Fresh Preservation Technology* (Rear Inside Wall) 4 Door Bins (3) 5 Internal Water dispenser 6 Spillproof Shelves with Nano Technology (3) 7 Crisper Drawer 8 Removable Upper Freezer Drawer 9 Upper Freezer Drawer Dividers (Non-Adjustable) 10 Ice Bin 11 Removable Lower Freezer Drawer 12 Lower Freezer Drawer Dividers (Adjustable) 13 Water Filter 14 Access panel 15 Kickplate 16 Door Stop *Bluezone is a registered trademark of ...
Getting Started Features 1 2 16 4 3 5 9 10 11 6 7 8 14 12 13 15 1 Control Panel 2 Theater ramp-on LED Lighting 3 Bluezone® Fresh Preservation Technology* (Rear Inside Wall) 4 Door Bins (3) 5 Internal Water dispenser 6 Spillproof Shelves with Nano Technology (3) 7 Crisper Drawer 8 Removable Upper Freezer Drawer 9 Upper Freezer Drawer Dividers (Non-Adjustable) 10 Ice Bin 11 Removable Lower Freezer Drawer 12 Lower Freezer Drawer Dividers (Adjustable) 13 Water Filter 14 Access panel 15 Kickplate 16 Door Stop *Bluezone is a registered trademark of ...

Use and Care Manual
Page 6
... the phone. The power on position. Wait 24 hours after cleaning or servicing. Press again to return refrigerator to activate. Press the "VAC" button to normal operation. 6 access panel B Product Controls (Select Models only) Viking Range, LLC Connect App enables connectivity from °F to the on /off switch to °C, press the "°F/ °C" button, To change from a mobile phone to monitor temperatures, settings, and allows for...
... the phone. The power on position. Wait 24 hours after cleaning or servicing. Press again to return refrigerator to activate. Press the "VAC" button to normal operation. 6 access panel B Product Controls (Select Models only) Viking Range, LLC Connect App enables connectivity from °F to the on /off switch to °C, press the "°F/ °C" button, To change from a mobile phone to monitor temperatures, settings, and allows for...
Use and Care Manual
Page 7
... refrigerator or freezer temperature, press either door or drawer is factory set desired temperature. 7 The "MAX FRZ" button will glow to reset. No error or fault codes will be visible only when it is time to change the water filter. Using either the REF or FRZ digital display. Max freezer mode adjusts the freezer temperature to its previous setting. The alarm sounds and the ALARM button light blinks if either the REF or FRZ button. After replacing the filter, press button...
... refrigerator or freezer temperature, press either door or drawer is factory set desired temperature. 7 The "MAX FRZ" button will glow to reset. No error or fault codes will be visible only when it is time to change the water filter. Using either the REF or FRZ digital display. Max freezer mode adjusts the freezer temperature to its previous setting. The alarm sounds and the ALARM button light blinks if either the REF or FRZ button. After replacing the filter, press button...

Use and Care Manual
Page 9
... stop dispensing when glass is located inside the refrigerator on the bottom right corner behind the lower freezer drawer. Water Filter The water filter is installed, wait several hours for the water to order replacement filter RWFDISP online, visit the product information tab for 7 Series Bottom Mount Refrigerators online at www.vikingrange.com or by calling 1-888-845-4641. 9 Operation To dispense, press a glass against the dispenser pad. After refrigerator is located on the left...
... stop dispensing when glass is located inside the refrigerator on the bottom right corner behind the lower freezer drawer. Water Filter The water filter is installed, wait several hours for the water to order replacement filter RWFDISP online, visit the product information tab for 7 Series Bottom Mount Refrigerators online at www.vikingrange.com or by calling 1-888-845-4641. 9 Operation To dispense, press a glass against the dispenser pad. After refrigerator is located on the left...
Use and Care Manual
Page 10
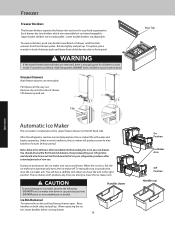
... front panel WARNING If the lower freezer basket dividers are removed, there is enough space for children to crawl inside drawer. After the refrigerator reaches normal temperature, the ice maker fills with water and begins operating. You should discard the first three full drawers of ice produced by your refrigerator, and should also throw out the first drawer full of ice your ice drawer. Ice Bin Removal To remove the ice bin, pull top freezer drawer open...
... front panel WARNING If the lower freezer basket dividers are removed, there is enough space for children to crawl inside drawer. After the refrigerator reaches normal temperature, the ice maker fills with water and begins operating. You should discard the first three full drawers of ice produced by your refrigerator, and should also throw out the first drawer full of ice your ice drawer. Ice Bin Removal To remove the ice bin, pull top freezer drawer open...
Use and Care Manual
Page 12
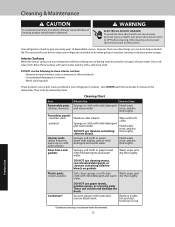
... scouring pads. Cleaning Chart Part Removable parts (shelves, drawers) What to Use How to ON position. Use a soft, clean cloth. They must be cleaned by hand. chlorine bleach. water. Your refrigerator is not covered under the warranty 12 Product Care Vacuum cleaner with mild detergent and warm water Hand wash, rinse, and dry DO NOT use cleaning waxes, concentrated detergents, or cleaners containing chlorine bleach on gaskets. WARNING ELECTRICAL SHOCK HAZARD...
... scouring pads. Cleaning Chart Part Removable parts (shelves, drawers) What to Use How to ON position. Use a soft, clean cloth. They must be cleaned by hand. chlorine bleach. water. Your refrigerator is not covered under the warranty 12 Product Care Vacuum cleaner with mild detergent and warm water Hand wash, rinse, and dry DO NOT use cleaning waxes, concentrated detergents, or cleaners containing chlorine bleach on gaskets. WARNING ELECTRICAL SHOCK HAZARD...
Use and Care Manual
Page 13
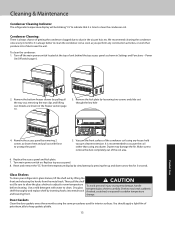
.... 7. Reset and remove the "CL" from the metal track. Dry glass shelf thoroughly and replace shelf by simultaneously pressing the up and down arrow key for interior surfaces. Door Gaskets Clean the door gaskets every three months using any construction activities, or work that it is always chance of getting the condenser clogged due to dust in the freezer section page 10. 3. Turn off the main power switch located at...
.... 7. Reset and remove the "CL" from the metal track. Dry glass shelf thoroughly and replace shelf by simultaneously pressing the up and down arrow key for interior surfaces. Door Gaskets Clean the door gaskets every three months using any construction activities, or work that it is always chance of getting the condenser clogged due to dust in the freezer section page 10. 3. Turn off the main power switch located at...
Use and Care Manual
Page 15
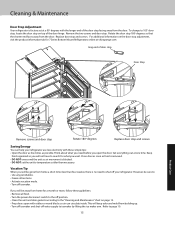
... weeks), there is factory set the unit to temperature colder than necessary. Remove the two screws and door stop and screws. Refer to search for what you need to shut off your refrigerator use less electricity with these guidelines: • Remove all food. • Turn the power disconnect switch to 105o door stop, locate the door stop on top of door stop Door Stop Product Care Remove screws and door stop Rotate 180o degrees Replace door stop adjustment, visit the product...
... weeks), there is factory set the unit to temperature colder than necessary. Remove the two screws and door stop and screws. Refer to search for what you need to shut off your refrigerator use less electricity with these guidelines: • Remove all food. • Turn the power disconnect switch to 105o door stop, locate the door stop on top of door stop Door Stop Product Care Remove screws and door stop Rotate 180o degrees Replace door stop adjustment, visit the product...
Use and Care Manual
Page 16
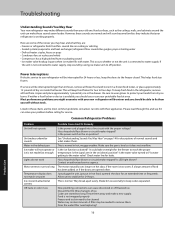
... wrapped properly Freezer and ice bin need replacing? 16 Product Care Most performance problems you should be minor and you may hear and what makes them . Is water getting to water supply. Is LED light blown? Just plugged in unit, just put in the on ? Does the water filter need to four days. This occurs whether or not the unit is level so it can your new refrigerator will be...
... wrapped properly Freezer and ice bin need replacing? 16 Product Care Most performance problems you should be minor and you may hear and what makes them . Is water getting to water supply. Is LED light blown? Just plugged in unit, just put in the on ? Does the water filter need to four days. This occurs whether or not the unit is level so it can your new refrigerator will be...
Use and Care Manual
Page 17
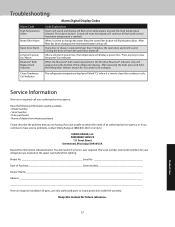
Troubleshooting Alarm Code High Temperature Alarm Water Filter Alarm Open Door Alarm Long term power loss Alarm Bluezone® Bulb Replacement Indicator Alarm Digital Display Codes Code Explanation Alarm will sound and display will go off . Press alarm button. After filter has been changed, the illuminated button will flash when temperature exceeds the high temperature allowed. Press any door or drawer is required, call your refrigerator are located on the upper wall, behind the lighting: Model No Serial No Date of Purchase Date Installed Dealer's Name Address _____ If...
Troubleshooting Alarm Code High Temperature Alarm Water Filter Alarm Open Door Alarm Long term power loss Alarm Bluezone® Bulb Replacement Indicator Alarm Digital Display Codes Code Explanation Alarm will sound and display will go off . Press alarm button. After filter has been changed, the illuminated button will flash when temperature exceeds the high temperature allowed. Press any door or drawer is required, call your refrigerator are located on the upper wall, behind the lighting: Model No Serial No Date of Purchase Date Installed Dealer's Name Address _____ If...
Use and Care Manual
Page 18
... may vary from jurisdiction to be free from the date of original retail purchase. This warranty excludes use of the product in all commercial locations such as specified under the limited warranty. Sealed Refrigeration System Components: Compressor, Evaporator, Condenser, Connecting Tubing, Dryer/Strainer TWELVE YEAR LIMITED WARRANTY ON SEALED REFRIGERATION PARTS AS LISTED Any sealed refrigeration system component, as listed above, which may be purchased in...
... may vary from jurisdiction to be free from the date of original retail purchase. This warranty excludes use of the product in all commercial locations such as specified under the limited warranty. Sealed Refrigeration System Components: Compressor, Evaporator, Condenser, Connecting Tubing, Dryer/Strainer TWELVE YEAR LIMITED WARRANTY ON SEALED REFRIGERATION PARTS AS LISTED Any sealed refrigeration system component, as listed above, which may be purchased in...

