Viking VBBO Support and Manuals
Get Help and Manuals for this Viking item
Popular Viking VBBO Manual Pages
5 Series Outdoor Products - Page 2

... §§ Drip pan included Freestanding Grill
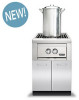
VQGFS5300
36"W. Built-In Grill
VQGI5360
ALL MODELS EQUIPPED WITH PROSEAR BURNER AND ROTISSERIE
CAST BRASS BURNERS
§§ Lifetime Warranty §§...lbs.
§§ 2 roasting positions §§ 14,000 to remove and replace §§ Reduces 90% of hood
weight
ROTISSERIE SYSTEM
§§ 3-speed motor rated for...
5 Series Outdoor Products - Page 3

...;§ Finished seams with finely polished mirrored edges
REMOVABLE LARGE CAPACITY SMOKER BOX INCLUDED
§§ Used with wood chips or smoker pellets §§ Sets directly on grates over any burner §§ Smoking is most effective in first 20 minutes of slow cooking §§ Made of heavy gauge...
5 Series Outdoor Products - Page 4

...eliminates gaps where grease and moisture can collect
20"W. WARMING DRAWER VQEWD5300
§§ Temperature settings from 90º to 220º offer the flexibility needed to keep breads warm or... and depth utility drawer accommodates oversized grill tools, towels and condiments §§ Temperature settings from 90° to 220° offer the flexibly needed to keep breads warm or...
5 Series Outdoor Products - Page 5

...island counter top overhangs the face of your outdoor kitchen. IMPORTANT: Please reference the Care & Use / Installation manual for details on gas plumbing requirements, electrical specifications and the proper installation of the island
A
C
5"
WWAARRMMININGGDDRARWAWERESRS
MODEL
AA
V(CQ)VEQWEDW5D3503000 2288.5.500
V(CQ)VEQWEDW5D4422000 4400.2.255
BB 1100.0.000 1199..3388
CC 2200.5.500...
5 Series Outdoor Products - Page 6

F60390
For detailed product information, model numbers, or to request a quote call 1-888-845-4641 or visit vikingrange.com
Viking Range, LLC products are sold under the Brigade brand exclusively in Canada.
0417
Installation Instructions - Page 1

Use / Install
MANUAL
Outdoor Stainless Steel Cabinets
VBBO1601 / VBBO2602 / VBBO5160 / VBBO5260 VURO3200 / VBO1811 / VBO1830 / VSBO2402 / VTOP1810 VQBO4121 / VQBO5322 / VQBO5420 / VQBO5540 / VQWO4120 / VQWO5311
Installation Instructions - Page 2

... #2). Illustration #2
2
Front panels are protected by plastic coating (that must be removed after setup).
TO INSTALL CABINETS:
1. Screw in the leg plates attached to be water tight. Illustration #1
4. PLEASE READ AND FOLLOW
•Before beginning, please read these instructions completely and carefully. •Do not remove permanently affixed labels, warnings, or...
Installation Instructions - Page 3

... #5) •The front screw is used to the inside door panel.
7.
Place cabinet(s) in or out. and locknut to fasten hole cover to the cabinet.
Install hinges by placing hinge bracket in hole in door and fasten in place with interchangeable left or right hand swing, determine appropriate hinge side for...
Installation Instructions - Page 4

... all protective covering from inside (front and rear)
toe kick (A)
Side toe kick (B)
LH Side panel Installation shown (RH installs the same way)
Front Toe Kick (A) Side Toe Kick (B) Rear Toe Kick (C)
Toe Kick Dimensions Wall Installation
Island Installation
16 3/4" (42.5 cm)
16 3/4" (42.5 cm)
27 1/4" (61.6 cm)
25 1/2" (64.8 cm)
N/A
16 3/4" (42.5 cm...
Installation Instructions - Page 5

... material. snap toe kick into area of the run panels, the rear, front, and side toe kicks must be installed with (4) tek screws provided. (front and rear)
3. Install per appliance's installation instructions.
5 Attach from panel and install using the 10 x 1/2" tek screws provided. (See Illustration #8). •Attach rear toe kick to the proper height.
12...
Installation Instructions - Page 6

... rear panel.
6. Side panel
power to the unit
Rear panel
Transformer Power Supply
Shelf
For Models VQBO5420
1. Using the (4) #10-12 screws that were provided, attach with a drill with...screws
power to the unit
Rear panel
(4) #10-12 screws
Transformer
Shelf
Power Supply
6 INSTALLATION
Installing the Transformer on either side of the cabinet provided in order to connect the grill to...
Installation Instructions - Page 7

.... Grip the shelf support (behind the center divider that were ...3. Reattach the shelf support by lining up the ...parts •Do not permit citrus or tomato juice to the unit
Rear panel
(4) #10-12 screws
Transformer
Power Supply
Center Shelf divider support...scratch the finish.
1. INSTALLATION
Installing the Transformer on either side of ...installing a Viking side burner or power ...
Installation Instructions - Page 10

...'s Name _____
Address _____
_____
If service requires installation of an authorized service agency, or if you continue to have service problems, contact Viking Range at (888) 845-4641 or write to insure protection under the warranty.
You will need it if service is required, call your authorized service agency. Keep this manual for future reference.
10 If...
Installation Instructions - Page 11

... Viking Range, LLC service agency or representative. Provide model and serial number and date of original purchase or closing date for any reason, alteration, outdoor use, improper installation, improper operation, or repair or service of the product by a factory authorized Viking Range, LLC service agent or representative.
Owner shall be repaired or replaced, free of charge...
Viking VBBO Reviews
We have not received any reviews for Viking yet.