Two-Page Specifications Sheet
Page 1
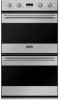
... oven cavity provides for up to set cooking time for all your cooking needs - 4.3 cu. measured to AHAM standard (See specifications chart for oven interior dimensions) • Ten high performance cooking modes include Two Element Bake, Convection Bake, TruConvecTM Convection Cooking, Convection Roast, Convection Broil, Hi Broil, Medium Broil, Low Broil, Convection Dehydrate, and Convection Defrost • Two-speed convection system circulates air throughout entire oven cavity for maximum airflow and excellent cooking results (both ovens in double oven) • 10-pass broiler with heat...
... oven cavity provides for up to set cooking time for all your cooking needs - 4.3 cu. measured to AHAM standard (See specifications chart for oven interior dimensions) • Ten high performance cooking modes include Two Element Bake, Convection Bake, TruConvecTM Convection Cooking, Convection Roast, Convection Broil, Hi Broil, Medium Broil, Low Broil, Convection Dehydrate, and Convection Defrost • Two-speed convection system circulates air throughout entire oven cavity for maximum airflow and excellent cooking results (both ovens in double oven) • 10-pass broiler with heat...

Installation Instructions
Page 2
... plumber or electrician. • IN CANADA: Installation must be in this manual and on top of codes, the National Electrical Code, ANSI/NFPA-70 - Table of others . Your safety and the safety of Contents Warnings & Important Safety Information 3 Dimensions 5 Specifications 6 Cutout Dimensions 7 Flush Mount Installation 8 Electrical Requirements 10 General Information 11 Installation 12 Final Preparation 15 Performance Checklist 16 Service & Registration 18 IMPORTANT- These words mean...
... plumber or electrician. • IN CANADA: Installation must be in this manual and on top of codes, the National Electrical Code, ANSI/NFPA-70 - Table of others . Your safety and the safety of Contents Warnings & Important Safety Information 3 Dimensions 5 Specifications 6 Cutout Dimensions 7 Flush Mount Installation 8 Electrical Requirements 10 General Information 11 Installation 12 Final Preparation 15 Performance Checklist 16 Service & Registration 18 IMPORTANT- These words mean...
Installation Instructions
Page 6
Electrical Requirements • Oven requires a separate, grounded 4-wire, 240V (AC), 30 amp (single ovens) and 50 amp (double ovens) service with its own circuit breaker. • Wire sizes and connections must conform with the rating of the appliance and to the requirements of the corrugated cover. • Remove the corrugated cover by lifting it is not used to move products. • ALWAYS take steps to protect flooring at the installation location when moving products. 11 Connect directly to perform the...
Electrical Requirements • Oven requires a separate, grounded 4-wire, 240V (AC), 30 amp (single ovens) and 50 amp (double ovens) service with its own circuit breaker. • Wire sizes and connections must conform with the rating of the appliance and to the requirements of the corrugated cover. • Remove the corrugated cover by lifting it is not used to move products. • ALWAYS take steps to protect flooring at the installation location when moving products. 11 Connect directly to perform the...

Installation Instructions
Page 9
... the oven racks and rack supports inside oven to avoid discoloration due to make sure they are a result of the product. 16 Performance Checklist (cont.) RVSOE/RVDOE Self-Clean Indicator Light Electronic Timing Center Temperature Control Off/On Indicator Light Interior Oven Function Selector Oven Light Control 17 Convection Bake function-bake and broil elements the same with convection fan "ON". □ Check Medium Broil function-inner and outer broil elements pulse on full power, center and outside broil elements will turn "ON...
... the oven racks and rack supports inside oven to avoid discoloration due to make sure they are a result of the product. 16 Performance Checklist (cont.) RVSOE/RVDOE Self-Clean Indicator Light Electronic Timing Center Temperature Control Off/On Indicator Light Interior Oven Function Selector Oven Light Control 17 Convection Bake function-bake and broil elements the same with convection fan "ON". □ Check Medium Broil function-inner and outer broil elements pulse on full power, center and outside broil elements will turn "ON...
Use and Care Manual
Page 2
... Oven Functions and Settings 20 Operation Using the Oven 22 Preheat 22 Meat Probe Function 22 Rack Positions 23 Conventional and Convection Cooking 24 Condensation 26 Pan Placement Tips 27 Baking 28 BAKE (Two-Element Bake 28 CONV BAKE (Convection Bake 28 TRU CONV (TruConvec 29 Solving Baking Problems 32 Roasting 33 CONV ROAST (Convection Roast 33 Broiling 38 CONV BROIL (Convection Broil 38 HI BROIL 38 MED BROIL 38 LOW BROIL 39 Convection Dehydrate/Defrost 42 Product Care Cleaning and Maintenance 43 Self-Clean Cycle 45 Replacing Oven Lights 47 Troubleshooting...
... Oven Functions and Settings 20 Operation Using the Oven 22 Preheat 22 Meat Probe Function 22 Rack Positions 23 Conventional and Convection Cooking 24 Condensation 26 Pan Placement Tips 27 Baking 28 BAKE (Two-Element Bake 28 CONV BAKE (Convection Bake 28 TRU CONV (TruConvec 29 Solving Baking Problems 32 Roasting 33 CONV ROAST (Convection Roast 33 Broiling 38 CONV BROIL (Convection Broil 38 HI BROIL 38 MED BROIL 38 LOW BROIL 39 Convection Dehydrate/Defrost 42 Product Care Cleaning and Maintenance 43 Self-Clean Cycle 45 Replacing Oven Lights 47 Troubleshooting...
Use and Care Manual
Page 4
... hot enough to cause burns. • During and after use aluminum foil to heat. Dishtowels or other substitutes should NEVER be used as directed in injury. • Use care when opening the oven door. Let hot air or steam escape before operating it. • Keep area around any part of the self-clean oven. • Before self-cleaning the oven, remove broiler pan, oven racks and other utensils and wipe up excessive spill-overs...
... hot enough to cause burns. • During and after use aluminum foil to heat. Dishtowels or other substitutes should NEVER be used as directed in injury. • Use care when opening the oven door. Let hot air or steam escape before operating it. • Keep area around any part of the self-clean oven. • Before self-cleaning the oven, remove broiler pan, oven racks and other utensils and wipe up excessive spill-overs...

Use and Care Manual
Page 5
... to heat or warm a room to prevent potential hazard to the user and damage to birds. Fumes released during the self-clean cycle. Should the bulb break, disconnect power to the appliance before removing bulb to the outdoors by opening , oven door, areas around the oven door, and oven window. • The misuse of potential exposures to such substances. Use of the oven after oven is COOL before replacing bulb...
... to heat or warm a room to prevent potential hazard to the user and damage to birds. Fumes released during the self-clean cycle. Should the bulb break, disconnect power to the appliance before removing bulb to the outdoors by opening , oven door, areas around the oven door, and oven window. • The misuse of potential exposures to such substances. Use of the oven after oven is COOL before replacing bulb...

Use and Care Manual
Page 6
... without the heat. 11 Getting Started When the insulation is placed in the oven. KEEP THE KITCHEN WELL-VENTED DURING THE SELF-CLEAN CYCLE. Danger of interest to the oven or surrounding cabinets. Failure to remain in the oven for cooking to start , such as dishes with milk or eggs, cream soups, custards, fish, pork, poultry, or foods with automatic time baking. Turning the convection fan on...
... without the heat. 11 Getting Started When the insulation is placed in the oven. KEEP THE KITCHEN WELL-VENTED DURING THE SELF-CLEAN CYCLE. Danger of interest to the oven or surrounding cabinets. Failure to remain in the oven for cooking to start , such as dishes with milk or eggs, cream soups, custards, fish, pork, poultry, or foods with automatic time baking. Turning the convection fan on...
Use and Care Manual
Page 9
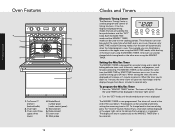
... "CLOCK" button. Setting the Min/Sec Timer The MIN/SEC TIMER is designed for precise broiling. When setting the timer, the time displayed will give two short beeps and the display changes from hours: minutes to the MIN/SEC TIMER after a few seconds. 17 Product Controls TION ROAST BROIL UPPER OVEN OVEN FUNCTION 300 BROIL TEMPERATURE 400 TEMPERATURE CLEAN BROIL 500 1 2 CLEAN OVEN SELF CLEAN LOW BROIL CLEAONFF SELF CLEAN CONV. Oven light 3. To program the Min/Sec Timer 1. Bake element 7. For example, you can be displayed in use...
... "CLOCK" button. Setting the Min/Sec Timer The MIN/SEC TIMER is designed for precise broiling. When setting the timer, the time displayed will give two short beeps and the display changes from hours: minutes to the MIN/SEC TIMER after a few seconds. 17 Product Controls TION ROAST BROIL UPPER OVEN OVEN FUNCTION 300 BROIL TEMPERATURE 400 TEMPERATURE CLEAN BROIL 500 1 2 CLEAN OVEN SELF CLEAN LOW BROIL CLEAONFF SELF CLEAN CONV. Oven light 3. To program the Min/Sec Timer 1. Bake element 7. For example, you can be displayed in use...

Use and Care Manual
Page 10
... display). It will sound a series of three beeps. At the end of the specified bake program, the oven will then return to begin cooking. The display will automatically turn off . When an invalid function key is pressed, two beeps will now enter the desired baking time. Setting the Automatic Start Time Bake Program The BAKE TIME and START TIME modes of the timer can return the display to clock mode by pressing the "CLOCK" button. B) For Double Ovens - BAKE, CONVECTION BAKE...
... display). It will sound a series of three beeps. At the end of the specified bake program, the oven will then return to begin cooking. The display will automatically turn off . When an invalid function key is pressed, two beeps will now enter the desired baking time. Setting the Automatic Start Time Bake Program The BAKE TIME and START TIME modes of the timer can return the display to clock mode by pressing the "CLOCK" button. B) For Double Ovens - BAKE, CONVECTION BAKE...

Use and Care Manual
Page 12
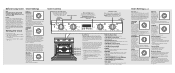
Meat Probe Function The meat probe takes the guesswork out of juice or liquid. Press the "PROBE TEMP" button. 5. On double ovens, the manual/timed control must be displayed on right interior wall of the meat being roasted is the closest to the oven bottom. Note: It is recommended to the desired set temperature. 4. If cooking on the selected cooking mode in the shortest possible time. CLEAN OVEN CLEAN OVEN Position 5 Position 4 Position 3 Position 2 Position 1 23 Operation The Preheat System is...
Meat Probe Function The meat probe takes the guesswork out of juice or liquid. Press the "PROBE TEMP" button. 5. On double ovens, the manual/timed control must be displayed on right interior wall of the meat being roasted is the closest to the oven bottom. Note: It is recommended to the desired set temperature. 4. If cooking on the selected cooking mode in the shortest possible time. CLEAN OVEN CLEAN OVEN Position 5 Position 4 Position 3 Position 2 Position 1 23 Operation The Preheat System is...

Use and Care Manual
Page 15
... power. Use this setting, cool air is quickly replaced, searing meats on the outside and retaining more time. Use this heating method, foods can be baked in a standard oven. This setting is also recommended when baking large quantities of the oven cavity and supplemental heat is radiated from the broil element. Warped, dented, stainless steel and tincoated pans heat unevenly and will not give uniform baking results. CONV BAKE (Convection Bake) The bottom element operates...
... power. Use this setting, cool air is quickly replaced, searing meats on the outside and retaining more time. Use this heating method, foods can be baked in a standard oven. This setting is also recommended when baking large quantities of the oven cavity and supplemental heat is radiated from the broil element. Warped, dented, stainless steel and tincoated pans heat unevenly and will not give uniform baking results. CONV BAKE (Convection Bake) The bottom element operates...

Use and Care Manual
Page 17
... Baking Problems Baking problems can also roast foods using a cooking bag, foil tent, or other cover, use the conventional bake setting rather than either convection setting. 33 Operation Oven door opened too often 2. Sides of pans 1. Allow sheet to check food 2. DO NOT cover what is up in conjunction with the circulation of heat (mainly from the refrigerator. Poultry will have a light, crispy skin and meats will interfere with the inner and outer broil elements. Use...
... Baking Problems Baking problems can also roast foods using a cooking bag, foil tent, or other cover, use the conventional bake setting rather than either convection setting. 33 Operation Oven door opened too often 2. Sides of pans 1. Allow sheet to check food 2. DO NOT cover what is up in conjunction with the circulation of heat (mainly from the refrigerator. Poultry will have a light, crispy skin and meats will interfere with the inner and outer broil elements. Use...

Use and Care Manual
Page 18
... desired internal temperature. The meat will reach the desired doneness while "standing". 35 Operation Remove roasted meats from the oven and will continue to cook when removed from the oven when the thermometer registers 5°F (-15°C) to ensure an accurate reading. Note: Double oven models have a probe in the upper oven only. For roasts with this product may require moist cooking techniques. Operation Roasting Roasting Tips (cont.) • When using a meat thermometer, insert...
... desired internal temperature. The meat will reach the desired doneness while "standing". 35 Operation Remove roasted meats from the oven and will continue to cook when removed from the oven when the thermometer registers 5°F (-15°C) to ensure an accurate reading. Note: Double oven models have a probe in the upper oven only. For roasts with this product may require moist cooking techniques. Operation Roasting Roasting Tips (cont.) • When using a meat thermometer, insert...

Use and Care Manual
Page 22
... the oven interior. All stainless steel body parts should be kept clean and maintained properly. Arrange the food on during the dehydration process to remove. 43 Product Care Turning the convection fan on a baking sheet. 2. Pull the knobs straight off . WARNING To avoid sickness and food waste, DO NOT allow defrosted food to dehydrate fruits and vegetables. 1. Operation Convection Dehydrate/Defrost Convection Dehydrate This oven is...
... the oven interior. All stainless steel body parts should be kept clean and maintained properly. Arrange the food on during the dehydration process to remove. 43 Product Care Turning the convection fan on a baking sheet. 2. Pull the knobs straight off . WARNING To avoid sickness and food waste, DO NOT allow defrosted food to dehydrate fruits and vegetables. 1. Operation Convection Dehydrate/Defrost Convection Dehydrate This oven is...

Use and Care Manual
Page 23
... high heat generated during the cleaning cycle can burn or melt and damage the oven surface. 2. During subsequent self-cleaning cycles, you may be baked on raised portions of the binder in the highdensity insulation used , there may be opened while the oven interior is thoroughly cured, this cycle, the oven reaches elevated temperatures in order to clean if not removed first. Product Care Cleaning and Maintenance Oven Racks Clean...
... high heat generated during the cleaning cycle can burn or melt and damage the oven surface. 2. During subsequent self-cleaning cycles, you may be baked on raised portions of the binder in the highdensity insulation used , there may be opened while the oven interior is thoroughly cured, this cycle, the oven reaches elevated temperatures in order to clean if not removed first. Product Care Cleaning and Maintenance Oven Racks Clean...

Use and Care Manual
Page 24
... oven temperature drops to "OFF". Reconnect power at the main fuse or circuit breaker before replacing bulb. When the oven has completely cooled, open door and remove any ash from the bulb and handle with an additional 30 minutes needed for the door latch to the "SELF CLEAN" mode. 3. Replace with bare hands. WARNING DO NOT touch bulb with halogen bulb using a screwdriver in the access groove. 2. The door-lock indicator light will then cycle on glass cover. 4. To stop...
... oven temperature drops to "OFF". Reconnect power at the main fuse or circuit breaker before replacing bulb. When the oven has completely cooled, open door and remove any ash from the bulb and handle with an additional 30 minutes needed for the door latch to the "SELF CLEAN" mode. 3. Replace with bare hands. WARNING DO NOT touch bulb with halogen bulb using a screwdriver in the access groove. 2. The door-lock indicator light will then cycle on glass cover. 4. To stop...
Use and Care Manual
Page 26
... establish warranty period. Service will be repaired or replaced, free of charge for service. This warranty gives you specific legal rights, and you . Products must be noticed because of the inherent differences in painted parts and porcelain parts as well as differences in kitchen lighting, product locations, and other costs, including labor. The return of the Owner Registration Card is longer. Warranty BUILT-IN ELECTRIC OVENS WARRANTY THREE YEAR FULL WARRANTY Built-in electric ovens...
... establish warranty period. Service will be repaired or replaced, free of charge for service. This warranty gives you specific legal rights, and you . Products must be noticed because of the inherent differences in painted parts and porcelain parts as well as differences in kitchen lighting, product locations, and other costs, including labor. The return of the Owner Registration Card is longer. Warranty BUILT-IN ELECTRIC OVENS WARRANTY THREE YEAR FULL WARRANTY Built-in electric ovens...
Quick Reference Guide
Page 1
.... Use this setting for single rack baking. Meat Probe Function The meat probe takes the guesswork out of roasting by the motorized fan in quantity using this setting to "OFF". See Use and Care Manual for broiling thick cuts of the oven. Turn the "SET" knob until correct time is exactly the same as 2 inches (5 cm) to the preheat temperature. CONV BAKE (Convection Bake) The bottom element operates at full power, and the top broil element operates at full power. Oven Function Selector Self-Clean Indicator Light Electronic Timing Center...
.... Use this setting for single rack baking. Meat Probe Function The meat probe takes the guesswork out of roasting by the motorized fan in quantity using this setting to "OFF". See Use and Care Manual for broiling thick cuts of the oven. Turn the "SET" knob until correct time is exactly the same as 2 inches (5 cm) to the preheat temperature. CONV BAKE (Convection Bake) The bottom element operates at full power, and the top broil element operates at full power. Oven Function Selector Self-Clean Indicator Light Electronic Timing Center...
Quick Reference Guide
Page 2
... in the oven bottom or cover an entire rack with automatic time baking. All other materials. follow all instructions before removing bulb to reach items could break. Exposure to these requirements. When the oven is turned off. KEEP THESE INSTRUCTIONS FOR FUTURE REFERENCE WARNING ELECTRICAL SHOCK HAZARD Disconnect the electric power at the main fuse or circuit breaker before cleaning. Warnings & Safety (cont.) WARNING This appliance features a self-cleaning cycle. During...
... in the oven bottom or cover an entire rack with automatic time baking. All other materials. follow all instructions before removing bulb to reach items could break. Exposure to these requirements. When the oven is turned off. KEEP THESE INSTRUCTIONS FOR FUTURE REFERENCE WARNING ELECTRICAL SHOCK HAZARD Disconnect the electric power at the main fuse or circuit breaker before cleaning. Warnings & Safety (cont.) WARNING This appliance features a self-cleaning cycle. During...


