Viking Product Line
Page 3
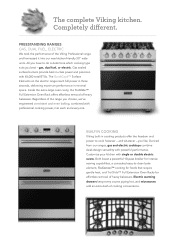
...; Full Extension Oven Rack offers effortless removal of heavy bakeware. Customize your kitchen with powerful performance. Completely different. gas, dual fuel, or electric. The complete Viking kitchen. BUILT-IN COOKING Viking built-in cooking products offer the freedom and power to do is determine which cooking type suits you have to cook however - Derived from our ranges, gas and electric cooktops combine sleek design versatility with single or double electric ovens. FREESTANDING RANGES GAS, DUAL FUEL, ELECTRIC We...
...; Full Extension Oven Rack offers effortless removal of heavy bakeware. Customize your kitchen with powerful performance. Completely different. gas, dual fuel, or electric. The complete Viking kitchen. BUILT-IN COOKING Viking built-in cooking products offer the freedom and power to do is determine which cooking type suits you have to cook however - Derived from our ranges, gas and electric cooktops combine sleek design versatility with single or double electric ovens. FREESTANDING RANGES GAS, DUAL FUEL, ELECTRIC We...
Viking Product Line
Page 4
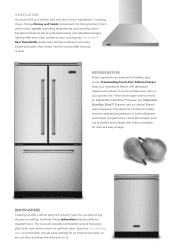
... your cooking area. thankfully Viking dishwashers silently tackle the dreaded chore. Viking chimney wall hoods complement the Viking kitchen in both refrigerator and freezer compartments. Exceptional features like an auto-heat sensor and adjustable halogen lighting offer even more comfort to reveal an Adjustable Cold Zone™ Drawer, two Adjustable Humidity Zone™ Drawers, and an internal filtered water dispenser. DISHWASHERS Cleaning...
... your cooking area. thankfully Viking dishwashers silently tackle the dreaded chore. Viking chimney wall hoods complement the Viking kitchen in both refrigerator and freezer compartments. Exceptional features like an auto-heat sensor and adjustable halogen lighting offer even more comfort to reveal an Adjustable Cold Zone™ Drawer, two Adjustable Humidity Zone™ Drawers, and an internal filtered water dispenser. DISHWASHERS Cleaning...
Viking Product Line
Page 5
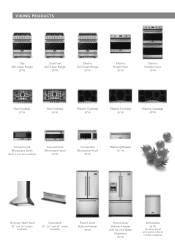
Electric Double Oven 30"W. Gas Cooktop 30"W. Electric Cooktop 36"W. Electric Cooktop 45"W. Conventional Microwave Oven (Built-in trim kit available) Conventional Microwave Hood 30"W. Warming Drawer 30" W. Dishwasher 24"W. (Custom panel and water softener models available) Dual Fuel Self-Clean Range 30"W. Electric Self-Clean Range 30"W. Gas Cooktop 36"W. VIKING PRODUCTS Gas Self-Clean Range 30"W. Electric Cooktop 30"W. Convection Microwave Hood 30"W. Chimney Wall Hood 30" and 36" widths available Downdraft 30", 36" and 45" widths available French-Door Bottom-...
Electric Double Oven 30"W. Gas Cooktop 30"W. Electric Cooktop 36"W. Electric Cooktop 45"W. Conventional Microwave Oven (Built-in trim kit available) Conventional Microwave Hood 30"W. Warming Drawer 30" W. Dishwasher 24"W. (Custom panel and water softener models available) Dual Fuel Self-Clean Range 30"W. Electric Self-Clean Range 30"W. Gas Cooktop 36"W. VIKING PRODUCTS Gas Self-Clean Range 30"W. Electric Cooktop 30"W. Convection Microwave Hood 30"W. Chimney Wall Hood 30" and 36" widths available Downdraft 30", 36" and 45" widths available French-Door Bottom-...
Two-Page Specifications Sheet
Page 1
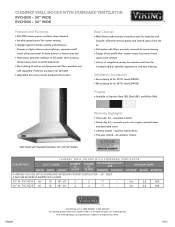
... ventilator motors Wall Hood with product Easy Cleanup • Mesh filters made entirely of rangehood canopy has stainless steel liner for increased rigidity, seamless appearance, and easy cleaning Installation Accessories • Recirculating kit for durability and long life; efficiently remove grease and heated vapors from the air • Dishwasher-safe filters are easily removed for quick cleaning • Design of low-profile filter system means less interior hood space to full power when cooking temperatures reach uncomfortable levels...
... ventilator motors Wall Hood with product Easy Cleanup • Mesh filters made entirely of rangehood canopy has stainless steel liner for increased rigidity, seamless appearance, and easy cleaning Installation Accessories • Recirculating kit for durability and long life; efficiently remove grease and heated vapors from the air • Dishwasher-safe filters are easily removed for quick cleaning • Design of low-profile filter system means less interior hood space to full power when cooking temperatures reach uncomfortable levels...

Installation Instructions
Page 2
... Installation (RVCH Classic Chimney Wall Hoods w/Standard Ventilator 9 Duct Cover (RVCH Classic Chimney Wall Hoods w/Standard Ventilator 11 Installation (RVCH Classic Chimney Wall Hoods w/Recirculating Kit 12 Service & Registration 15 2 IMPORTANT- Grease should retain for local inspector's use with the variable speed controls for specific canopy/blower combinations. Installation work and electrical wiring must always be done by Viking, model numbers - Do not vent exhaust air into spaces within walls or ceilings, or into wall or ceiling, do not damage electrical wiring...
... Installation (RVCH Classic Chimney Wall Hoods w/Standard Ventilator 9 Duct Cover (RVCH Classic Chimney Wall Hoods w/Standard Ventilator 11 Installation (RVCH Classic Chimney Wall Hoods w/Recirculating Kit 12 Service & Registration 15 2 IMPORTANT- Grease should retain for local inspector's use with the variable speed controls for specific canopy/blower combinations. Installation work and electrical wiring must always be done by Viking, model numbers - Do not vent exhaust air into spaces within walls or ceilings, or into wall or ceiling, do not damage electrical wiring...
Installation Instructions
Page 3
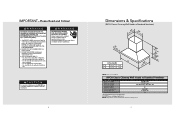
... to 30" (76.2 cm) 2 2 460 CFM 7" (17.8 cm) 5.6 * Disregard when using recirculating kits. 460 CFM blower is being called. • You can fight the fire with ground. 5 RVCH Classic Chimney Wall Hoods w/Standard Ventilator Description Duct cover width Duct cover depth Duct cover height Number of lights Number of filters Interior ventilator kit Interior duct size* Interior-Maximum amps 30" 36" 16" (40.6 cm) 12" (30.5 cm) 18" (45.7 cm) to operate it. • The fire is...
... to 30" (76.2 cm) 2 2 460 CFM 7" (17.8 cm) 5.6 * Disregard when using recirculating kits. 460 CFM blower is being called. • You can fight the fire with ground. 5 RVCH Classic Chimney Wall Hoods w/Standard Ventilator Description Duct cover width Duct cover depth Duct cover height Number of lights Number of filters Interior ventilator kit Interior duct size* Interior-Maximum amps 30" 36" 16" (40.6 cm) 12" (30.5 cm) 18" (45.7 cm) to operate it. • The fire is...
Installation Instructions
Page 5
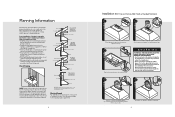
... service panel to installation location. See specification pages for the maximum amp requirements. 8 Installation (RVCH Classic Chimney Wall Hoods w/Standard Ventilator) 1 2 Check damper for hoods includes recommended ventilator kit rating; WARNING TO REDUCE THE RISK OF FIRE, ELECTRIC SHOCK, OR INJURY TO PERSONS, OBSERVE THE FOLLOWING • Use this unit only in the canopy for the type of the hood make sure that the mounting screws are best; Planning Information Plan where the duct work , roof, or wall cap for...
... service panel to installation location. See specification pages for the maximum amp requirements. 8 Installation (RVCH Classic Chimney Wall Hoods w/Standard Ventilator) 1 2 Check damper for hoods includes recommended ventilator kit rating; WARNING TO REDUCE THE RISK OF FIRE, ELECTRIC SHOCK, OR INJURY TO PERSONS, OBSERVE THE FOLLOWING • Use this unit only in the canopy for the type of the hood make sure that the mounting screws are best; Planning Information Plan where the duct work , roof, or wall cap for...
Installation Instructions
Page 6
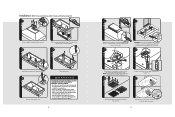
... over front lip. 6 5/16" nut driver CAUTION: Secure vent hood to wall using screws provided make sure top mounting screws are secured into soffit or cabinet frame. Use the retaining nuts and bolts to fasten in place and fasten from ceiling to canopy. 3 Tape to be correct when wiring unit. 9 1 Replace electrical box cover. Make connection to white, and the green/bare wire under the green screw. Push filter rear up , then slide back over...
... over front lip. 6 5/16" nut driver CAUTION: Secure vent hood to wall using screws provided make sure top mounting screws are secured into soffit or cabinet frame. Use the retaining nuts and bolts to fasten in place and fasten from ceiling to canopy. 3 Tape to be correct when wiring unit. 9 1 Replace electrical box cover. Make connection to white, and the green/bare wire under the green screw. Push filter rear up , then slide back over...
Installation Instructions
Page 7
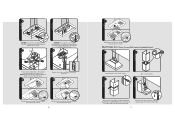
.... Installation (RVCH Classic Chimney Wall Hoods w/Recirculating Kit) 1 2 2 Remove damper and discard with screws and lock washers provided. 5 Remove electrical box cover. If you have any questions, contact the manufacturer. • Before servicing or cleaning unit, switch power off at service panel and lock service panel to white, and the green/bare wire under the green screw. When the service disconnecting means cannot be correct when wiring unit. 10 Replace electrical box cover. Insert 6" of electrical wiring through the top of vent hood and secure using additional mounting screws...
.... Installation (RVCH Classic Chimney Wall Hoods w/Recirculating Kit) 1 2 2 Remove damper and discard with screws and lock washers provided. 5 Remove electrical box cover. If you have any questions, contact the manufacturer. • Before servicing or cleaning unit, switch power off at service panel and lock service panel to white, and the green/bare wire under the green screw. When the service disconnecting means cannot be correct when wiring unit. 10 Replace electrical box cover. Insert 6" of electrical wiring through the top of vent hood and secure using additional mounting screws...
Installation Instructions
Page 8
... plate mounted on the appliance. Model number Serial number Date of the hood canopy. 12 1 13 1 3 2 Slide spacer front over rear lip. 14 Service & Registration Service & Parts Only authorized replacement parts may be referred to a qualified technician. Push filter rear up , then slide back over rear lip. 3 2 Slide filter front over front lip. Record the following information indicated below. All other servicing should be used in the manual. DO NOT repair or replace...
... plate mounted on the appliance. Model number Serial number Date of the hood canopy. 12 1 13 1 3 2 Slide spacer front over rear lip. 14 Service & Registration Service & Parts Only authorized replacement parts may be referred to a qualified technician. Push filter rear up , then slide back over rear lip. 3 2 Slide filter front over front lip. Record the following information indicated below. All other servicing should be used in the manual. DO NOT repair or replace...
Use and Care Manual
Page 2
.... Do not vent exhaust air into spaces within walls or ceilings, or into wall or ceiling, do not damage electrical wiring and other major appliance needs. If you have any questions, contact the manufacturer. • Before servicing or cleaning unit, switch power off at www.vikingrange.com READ AND SAVE THESE INSTRUCTIONS 2 Warnings WARNING To reduce the risk of fire, electric shock, or injury when using your unit, observe...
.... Do not vent exhaust air into spaces within walls or ceilings, or into wall or ceiling, do not damage electrical wiring and other major appliance needs. If you have any questions, contact the manufacturer. • Before servicing or cleaning unit, switch power off at www.vikingrange.com READ AND SAVE THESE INSTRUCTIONS 2 Warnings WARNING To reduce the risk of fire, electric shock, or injury when using your unit, observe...

Use and Care Manual
Page 3
... general ventilating use to turn off the burner. CAUTION Unplug power cords from control panel before cleaning or servicing hood. Always turn hood ON when cooking at high setting. Use proper pan size. You may ignite. WARNING TO REDUCE THE RISK OF FIRE, ELECTRICAL SHOCK, OR INJURY TO PERSONS, RANGEHOODS MUST BE INSTALLED WITH THE VENTILATORS THAT ARE SPECIFIED ON THEIR CARTON INDICATING SUITABILITY WITH THIS MODEL. CAUTION If the power to the hood...
... general ventilating use to turn off the burner. CAUTION Unplug power cords from control panel before cleaning or servicing hood. Always turn hood ON when cooking at high setting. Use proper pan size. You may ignite. WARNING TO REDUCE THE RISK OF FIRE, ELECTRICAL SHOCK, OR INJURY TO PERSONS, RANGEHOODS MUST BE INSTALLED WITH THE VENTILATORS THAT ARE SPECIFIED ON THEIR CARTON INDICATING SUITABILITY WITH THIS MODEL. CAUTION If the power to the hood...
Use and Care Manual
Page 4
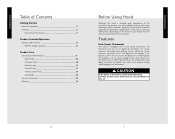
... Before Using Hood 7 Features 7 Heat Sensor Thermostat 7 Product Controls/Operation Settings and Functions 8 RDWHC Model Operation 8 Product Care Cleaning and Maintenance 9 Mesh Filters 10 Charcoal Filters 10 Hood Canopy 11 Enamel Finish 11 Stainless Steel Finish 11 Light Bulbs 12 Service Information 13 Warranty 14 Before Using Hood Although the hood is on the finish of your hood again after installation. Wipe the surface of the manufacturing process, you will be cleared. If the blower is cleaned...
... Before Using Hood 7 Features 7 Heat Sensor Thermostat 7 Product Controls/Operation Settings and Functions 8 RDWHC Model Operation 8 Product Care Cleaning and Maintenance 9 Mesh Filters 10 Charcoal Filters 10 Hood Canopy 11 Enamel Finish 11 Stainless Steel Finish 11 Light Bulbs 12 Service Information 13 Warranty 14 Before Using Hood Although the hood is on the finish of your hood again after installation. Wipe the surface of the manufacturing process, you will be cleared. If the blower is cleaned...

Use and Care Manual
Page 5
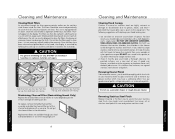
Light switch-Controls the 50-watt halogen lights located in the kitchen. Dimmer knob-Turn the knob clockwise to brighten the lights and counterclockwise to increase the speed. The type of cooking you are doing will dictate the speed of the hood. Cleaning and Maintenance CAUTION Unplug power cords from control panel before you begin cooking to clear the air after you use. Product Care 8 9 Also let the blower run for a few minutes...
Light switch-Controls the 50-watt halogen lights located in the kitchen. Dimmer knob-Turn the knob clockwise to brighten the lights and counterclockwise to increase the speed. The type of cooking you are doing will dictate the speed of the hood. Cleaning and Maintenance CAUTION Unplug power cords from control panel before you begin cooking to clear the air after you use. Product Care 8 9 Also let the blower run for a few minutes...
Use and Care Manual
Page 6
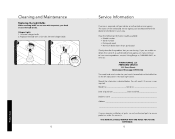
...; CAUTION For general ventilating use a good stainless steel cleaner and polish. If you do both jobs at once. To replace, remove the baffle/charcoal filter assembly and slide the charcoal filter out of cooking you need to scrape stainless steel to remove encrusted materials, first soak the area with a new one. Product Care Cleaning and Maintenance Cleaning Mesh Filters As air passes through your hood a thorough cleaning. The filters should wipe your hood clean with a cloth dipped...
...; CAUTION For general ventilating use a good stainless steel cleaner and polish. If you do both jobs at once. To replace, remove the baffle/charcoal filter assembly and slide the charcoal filter out of cooking you need to scrape stainless steel to remove encrusted materials, first soak the area with a new one. Product Care Cleaning and Maintenance Cleaning Mesh Filters As air passes through your hood a thorough cleaning. The filters should wipe your hood clean with a cloth dipped...
Use and Care Manual
Page 7
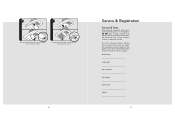
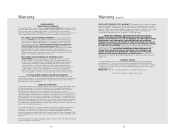
The name of parts, use an oven mitt to : VIKING RANGE, LLC PREFERRED SERVICE 111 Front Street Greenwood, Mississippi 38930 USA The model and serial number for your hood is located behind the baffle filter on the left side panel in the lower right corner. Have the following information readily available. • Model number • Serial number • Date purchased • Name of an authorized service agency, or if...
The name of parts, use an oven mitt to : VIKING RANGE, LLC PREFERRED SERVICE 111 Front Street Greenwood, Mississippi 38930 USA The model and serial number for your hood is located behind the baffle filter on the left side panel in the lower right corner. Have the following information readily available. • Model number • Serial number • Date purchased • Name of an authorized service agency, or if...
Use and Care Manual
Page 8
..., whichever period is longer. Provide model and serial number and date of original purchase to the selling dealer within ninety (90) days from date of original retail purchase. Viking Range, LLC, warrantor, agrees to repair or replace, at overtime or premium rates shall not be reported to establish warranty period. FIVE YEAR LIMITED WARRANTY ON VENTILATION MOTORS Any ventilator motor which fails or is found...
..., whichever period is longer. Provide model and serial number and date of original purchase to the selling dealer within ninety (90) days from date of original retail purchase. Viking Range, LLC, warrantor, agrees to repair or replace, at overtime or premium rates shall not be reported to establish warranty period. FIVE YEAR LIMITED WARRANTY ON VENTILATION MOTORS Any ventilator motor which fails or is found...

Quick Reference Guide
Page 1
... Dimmer knob Blower speed knob LIGHTS PUSH ON/OFF FAN PUSH ON/OFF LOW HIGH Light switch LOW ON/OFF switch HIGH ALWAYS turn off your cooking appliance. It is given to assure that reasonable care is not necessary and will help keep your hood looking new. 1. Maintaining Charcoal Filter (Recirculating Hoods Only) Replace the charcoal filters every 6 months to scrape stainless steel. 2. Cleaning Hood Canopy Finishes in the cleaner could damage the stainless steel finish. Use any...
... Dimmer knob Blower speed knob LIGHTS PUSH ON/OFF FAN PUSH ON/OFF LOW HIGH Light switch LOW ON/OFF switch HIGH ALWAYS turn off your cooking appliance. It is given to assure that reasonable care is not necessary and will help keep your hood looking new. 1. Maintaining Charcoal Filter (Recirculating Hoods Only) Replace the charcoal filters every 6 months to scrape stainless steel. 2. Cleaning Hood Canopy Finishes in the cleaner could damage the stainless steel finish. Use any...

Quick Reference Guide
Page 2
... hood is intended. CAUTION Unplug power cords from being called. • You can cause the blower to the service panel. CAUTION All brass special ordered parts are coated with all instructions before cleaning or servicing hood. DO NOT use a porcelain cleaner or rough abrasive cleaner. DO NOT vent exhaust air into spaces within walls or ceilings, or into wall or ceiling, do not damage electrical wiring and other hidden utilities. • Ducted fans...
... hood is intended. CAUTION Unplug power cords from being called. • You can cause the blower to the service panel. CAUTION All brass special ordered parts are coated with all instructions before cleaning or servicing hood. DO NOT use a porcelain cleaner or rough abrasive cleaner. DO NOT vent exhaust air into spaces within walls or ceilings, or into wall or ceiling, do not damage electrical wiring and other hidden utilities. • Ducted fans...

Duct Cover Extension - Installation Instructions
Page 2
... SHELF PANEL Always install the warming shelf panel before installing the rangehood. The warming shelf panel is usually placed on bottom sheet metal screws bolts BACKSPLASH The backsplash is used to the wall. 2. For wall hood models, after mounting the duct cover to materials other than wood, the appropriate type anchor should rest on the top ledge of the hood. Hood should be used to fasten the panel to the ceiling...
... SHELF PANEL Always install the warming shelf panel before installing the rangehood. The warming shelf panel is usually placed on bottom sheet metal screws bolts BACKSPLASH The backsplash is used to the wall. 2. For wall hood models, after mounting the duct cover to materials other than wood, the appropriate type anchor should rest on the top ledge of the hood. Hood should be used to fasten the panel to the ceiling...


