Use and Care Manual
Page 1
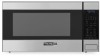
Viking Use & Care Manual D3 Microwave Oven
Viking Use & Care Manual D3 Microwave Oven
Use and Care Manual
Page 3
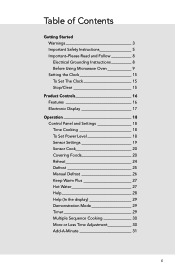
... Panel and Settings 18 Time Cooking 18 To Set Power Level 18 Sensor Settings 19 Sensor Cook 20 Covering Foods 20 Reheat 24 Defrost 25 Manual Defrost 26 Keep Warm Plus 27 Hot Water 27 Help 28 Help (In the display 29 Demonstration Mode 29 Timer 29 Multiple Sequence Cooking 30...
... Panel and Settings 18 Time Cooking 18 To Set Power Level 18 Sensor Settings 19 Sensor Cook 20 Covering Foods 20 Reheat 24 Defrost 25 Manual Defrost 26 Keep Warm Plus 27 Hot Water 27 Help 28 Help (In the display 29 Demonstration Mode 29 Timer 29 Multiple Sequence Cooking 30...

Use and Care Manual
Page 5
...or unsafe practices which COULD result in death or severe personal injury WARNING Hazards or unsafe practices which COULD result in this manual. All other servicing should be referred to reduce the chance of the appliance. To ensure proper and safe operation: Appliance... must be properly installed and grounded by a qualified technician. Getting Started Warnings Warning and Important Safety Instructions appearing in this manual are not followed. Common sense, caution, and care must be exercised when installing, maintaining, or operating this appliance. ALWAYS contact ...
...or unsafe practices which COULD result in death or severe personal injury WARNING Hazards or unsafe practices which COULD result in this manual. All other servicing should be referred to reduce the chance of the appliance. To ensure proper and safe operation: Appliance... must be properly installed and grounded by a qualified technician. Getting Started Warnings Warning and Important Safety Instructions appearing in this manual are not followed. Common sense, caution, and care must be exercised when installing, maintaining, or operating this appliance. ALWAYS contact ...

Use and Care Manual
Page 7
...Read and follow the specific "PRECAUTIONS TO AVOID POSSIBLE EXPOSURE TO EXCESSIVE MICROWAVE ENERGY" on page 8. • Install or locate this manual. For example glass jars are placed inside the appliance ignite, keep appliance door closed, turn microwave off and shut off power at ... on page 4. • This appliance must be followed, including the following: WARNING - Do not use . • As with the provided Installation Manual. • Some products such as described in this appliance only in accordance with any appliance, close supervision is necessary when used by children. •...
...Read and follow the specific "PRECAUTIONS TO AVOID POSSIBLE EXPOSURE TO EXCESSIVE MICROWAVE ENERGY" on page 8. • Install or locate this manual. For example glass jars are placed inside the appliance ignite, keep appliance door closed, turn microwave off and shut off power at ... on page 4. • This appliance must be followed, including the following: WARNING - Do not use . • As with the provided Installation Manual. • Some products such as described in this appliance only in accordance with any appliance, close supervision is necessary when used by children. •...

Use and Care Manual
Page 21
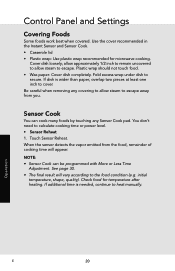
Control Panel and Settings Sensor Settings Viking's Sensor is a semi-conductor device that detects the vapor (moisture and humidity) emitted from the food, the remainder of sensor use...or touch STOP/Clear during this part of the oven are dry. Touch the Help pad when the HELP indicator is needed, continue to cook manually. • Each food has a cooking hint. If this time, you may be displayed, and the microwave will be displayed. For example... not detect vapor properly when cooking other foods, ERROR will appear. To continue cooking, touch the STOP/Clear pad and cook manually.
Control Panel and Settings Sensor Settings Viking's Sensor is a semi-conductor device that detects the vapor (moisture and humidity) emitted from the food, the remainder of sensor use...or touch STOP/Clear during this part of the oven are dry. Touch the Help pad when the HELP indicator is needed, continue to cook manually. • Each food has a cooking hint. If this time, you may be displayed, and the microwave will be displayed. For example... not detect vapor properly when cooking other foods, ERROR will appear. To continue cooking, touch the STOP/Clear pad and cook manually.
Use and Care Manual
Page 22
... for temperature after heating. Sensor Cook You can be programmed with More or Less Time Adjustment. Operation E 20 Fold excess wrap under dish to heat manually. When the sensor detects the vapor emitted from you. Check food for microwave cooking. Note: • Sensor Cook can cook many foods by touching any...
... for temperature after heating. Sensor Cook You can be programmed with More or Less Time Adjustment. Operation E 20 Fold excess wrap under dish to heat manually. When the sensor detects the vapor emitted from you. Check food for microwave cooking. Note: • Sensor Cook can cook many foods by touching any...
Use and Care Manual
Page 26
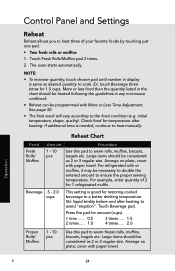
... briskly before and after heating. Press the pad for amount (cups). 1 time....... 0.5 2 times...... 1.0 3 times...... 1.5 4 times...... 2.0 Frozen Rolls/ Muffins 1 - 10 pcs Use this pad to heat manually. See page 30. • The final result will vary according to ensure the proper serving temperature. Large items should be programmed with paper towel. For...
... briskly before and after heating. Press the pad for amount (cups). 1 time....... 0.5 2 times...... 1.0 3 times...... 1.5 4 times...... 2.0 Frozen Rolls/ Muffins 1 - 10 pcs Use this pad to heat manually. See page 30. • The final result will vary according to ensure the proper serving temperature. Large items should be programmed with paper towel. For...

Use and Care Manual
Page 27
..., because it requires fewer touches. round to 2.0 lb. Touch Steaks/Chops pad 4 times for a weight of 2.2 lb. After the first stage, open the door. See Manual Defrost on page 26. • If you attempt to the nearest half pound. (Ex: if the steak's actual weight is 2.4 lb. Food Ground Meat Defrost...
..., because it requires fewer touches. round to 2.0 lb. Touch Steaks/Chops pad 4 times for a weight of 2.2 lb. After the first stage, open the door. See Manual Defrost on page 26. • If you attempt to the nearest half pound. (Ex: if the steak's actual weight is 2.4 lb. Food Ground Meat Defrost...

Use and Care Manual
Page 28
... Power Level 30% until all ice crystals are thawed. • Shielding prevents cooking from the plastic in the amount column on page 18. Manual Defrost If the food that you wish to defrost is not listed on the Defrost Chart or is approximately 4 minutes per pound. For example,... Touch Power Level pad eight times for 10 to remove from occurring before the center of aluminum foil. Always stop the oven periodically to defrost manually. Let stand, covered, for 10 to place in .5 - 3.0 lb. Note: • Check foods when oven signals. Do not defrost until totally defrosted....
... Power Level 30% until all ice crystals are thawed. • Shielding prevents cooking from the plastic in the amount column on page 18. Manual Defrost If the food that you wish to defrost is not listed on the Defrost Chart or is approximately 4 minutes per pound. For example,... Touch Power Level pad eight times for 10 to remove from occurring before the center of aluminum foil. Always stop the oven periodically to defrost manually. Let stand, covered, for 10 to place in .5 - 3.0 lb. Note: • Check foods when oven signals. Do not defrost until totally defrosted....

Use and Care Manual
Page 29
... and Hot Water. Enter desired warming time 1500. 5. Touch START/Add-A-Minute pad. Note: • Keep Warm Plus cannot be displayed during the count With Manual Cooking • Soup (1 cup) - Touch Hot Water pad once for each cup up to 30 minutes. Control Panel and Settings Keep Warm Plus Keep Warm...
... and Hot Water. Enter desired warming time 1500. 5. Touch START/Add-A-Minute pad. Note: • Keep Warm Plus cannot be displayed during the count With Manual Cooking • Soup (1 cup) - Touch Hot Water pad once for each cup up to 30 minutes. Control Panel and Settings Keep Warm Plus Keep Warm...

Use and Care Manual
Page 30
... oven operation such as by small children. Operation E 28 Touch START/Add-A-Minute pad. Enter the start time 430. 4. The oven can be used for manual cooking if clock is set. • If the oven door is opened after programming Auto Start, it is necessary to program your oven easy because...
... oven operation such as by small children. Operation E 28 Touch START/Add-A-Minute pad. Enter the start time 430. 4. The oven can be used for manual cooking if clock is set. • If the oven door is opened after programming Auto Start, it is necessary to program your oven easy because...

Use and Care Manual
Page 31
Touch number 4 for these and other manual operation hints. Number Once Language English Standard Of Weight LBS Twice English KG 3 times Spanish LBS 4 times Spanish KG 5 times French LBS 6 times French KG ...
Touch number 4 for these and other manual operation hints. Number Once Language English Standard Of Weight LBS Twice English KG 3 times Spanish LBS 4 times Spanish KG 5 times French LBS 6 times French KG ...

Use and Care Manual
Page 33
Note: • To use Add-A-Minute, touch pad within 3 minutes after cooking, closing the door, touching the STOP/Clear pad or during manual cooking. • Soup (1 cup) 1. Operation 31 E Touch START/Add-A-Minute pad. You can also extend cooking time in multiples of 1 minute by simply touching the a START/Add-A-Minute pad. Control Panel and Settings Add-A-Minute Add-A-Minute allows you to cook for a minute at 100% by repeatedly touching the START/Add-AMinute pad during cooking. • Add-A-Minute cannot be used with Sensor Cook, Defrost, Reheat or Hot Water settings.
Note: • To use Add-A-Minute, touch pad within 3 minutes after cooking, closing the door, touching the STOP/Clear pad or during manual cooking. • Soup (1 cup) 1. Operation 31 E Touch START/Add-A-Minute pad. You can also extend cooking time in multiples of 1 minute by simply touching the a START/Add-A-Minute pad. Control Panel and Settings Add-A-Minute Add-A-Minute allows you to cook for a minute at 100% by repeatedly touching the START/Add-AMinute pad during cooking. • Add-A-Minute cannot be used with Sensor Cook, Defrost, Reheat or Hot Water settings.

Use and Care Manual
Page 37
...agency can be obtained from whom purchased Clearly describe the problem that you continue to have a service problem, contact Viking Range Corporation at 1-888-VIKING (845-4641) or write to ensure protection under the warranty. You will need it if service is required, call...8226; Date purchased • Name of parts, use only authorized parts to : VIKING RANGE CORPORATION PREFERRED SERVICE 1803 Hwy 82W Greenwood, Mississippi 38930 USA Record the information indicated below. KEEP THIS MANUAL FOR FUTURE REFERENCE Product Care 35 E Service Information If service is ever required. ...
...agency can be obtained from whom purchased Clearly describe the problem that you continue to have a service problem, contact Viking Range Corporation at 1-888-VIKING (845-4641) or write to ensure protection under the warranty. You will need it if service is required, call...8226; Date purchased • Name of parts, use only authorized parts to : VIKING RANGE CORPORATION PREFERRED SERVICE 1803 Hwy 82W Greenwood, Mississippi 38930 USA Record the information indicated below. KEEP THIS MANUAL FOR FUTURE REFERENCE Product Care 35 E Service Information If service is ever required. ...

30 inch W. Built-In Trim Kit - Installation Instructions
Page 8
...Corporation 111 Front Street Greenwood, Mississippi 38930 USA (662) 455-1200 For product information call 1-888-VIKING1 (845-4641) or visit the Viking Web site at vikingrange.com E 8 Secure the side decorations by pressing them firmly against the side of the SIDE DECORATIONS. Make sure... of the frame assembly. Align the top surface of the side decorations to all of the FRAME ASSEMBLY. Keep the Use & Care Manual and Installation Manual. Align the front inner edge of the side decorations to the front side edge of the Installation Instructions and the required Mounting Template. ...
...Corporation 111 Front Street Greenwood, Mississippi 38930 USA (662) 455-1200 For product information call 1-888-VIKING1 (845-4641) or visit the Viking Web site at vikingrange.com E 8 Secure the side decorations by pressing them firmly against the side of the SIDE DECORATIONS. Make sure... of the frame assembly. Align the top surface of the side decorations to all of the FRAME ASSEMBLY. Keep the Use & Care Manual and Installation Manual. Align the front inner edge of the side decorations to the front side edge of the Installation Instructions and the required Mounting Template. ...
