
D3 Full Line
Page 18
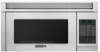
It can be used as a countertop model, or a built-in unit with our 30" wide trim kit. POWERFUL PERFORMANCE. LUXURIOUS CONVENIENCE. Flush mount option available. 18 Ultra-premium features include instant sensor settings and warm/hold function. BUILT-IN OVEN PRODUCTS MICROWAVE 30" trim kit width The Viking D3 microwave offers extra-large capacity and an array of powerful settings.
It can be used as a countertop model, or a built-in unit with our 30" wide trim kit. POWERFUL PERFORMANCE. LUXURIOUS CONVENIENCE. Flush mount option available. 18 Ultra-premium features include instant sensor settings and warm/hold function. BUILT-IN OVEN PRODUCTS MICROWAVE 30" trim kit width The Viking D3 microwave offers extra-large capacity and an array of powerful settings.
Two-Page Specifications Sheet
Page 1
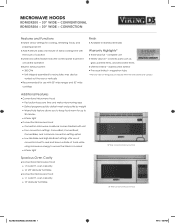
... - may also be vented out the rear or vertically n Recommended for use of convection heat to seal and brown outside of a button n Child lock safety feature locks the control panel to prevent unwanted operation n Built-in Stainless Steel (SS) Warranty Highlights* n Three-year full - complete unit n Ninety-day full - oven capacity l 14 1/8" diameter turntable n Convection Microwave Hood l 1.1 cubic ft. stainless steel exterior n Five-year limited - magnetron tube * Warranty valid on Viking products shipped within...
... - may also be vented out the rear or vertically n Recommended for use of convection heat to seal and brown outside of a button n Child lock safety feature locks the control panel to prevent unwanted operation n Built-in Stainless Steel (SS) Warranty Highlights* n Three-year full - complete unit n Ninety-day full - oven capacity l 14 1/8" diameter turntable n Convection Microwave Hood l 1.1 cubic ft. stainless steel exterior n Five-year limited - magnetron tube * Warranty valid on Viking products shipped within...
Use and Care Manual
Page 4
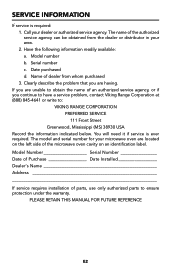
...: a. The model and serial number for your microwave oven are having. PLEASE RETAIN THIS MANUAL FOR FUTURE REFERENCE E2 Serial number c. Clearly describe the problem that you are located on the left side of the microwave oven cavity on an identification label. The name of parts, use only authorized parts to ensure protection under the warranty. Model number b. Model Number Serial Number Date of Purchase Date Installed Dealer's Name Address If service requires installation of...
...: a. The model and serial number for your microwave oven are having. PLEASE RETAIN THIS MANUAL FOR FUTURE REFERENCE E2 Serial number c. Clearly describe the problem that you are located on the left side of the microwave oven cavity on an identification label. The name of parts, use only authorized parts to ensure protection under the warranty. Model number b. Model Number Serial Number Date of Purchase Date Installed Dealer's Name Address If service requires installation of...
Use and Care Manual
Page 5
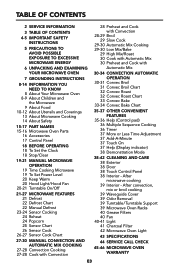
After convection, mix or broil cooking 39 Waveguide Cover 39 Odor Removal 39 Turntable/Turntable Support 39 Microwave Oven Racks 40 Grease Filters 40 Fan 40-41 Light 41 Charcoal Filter 42 Microwave Oven Light 43 Specifications 44 Service Call Check 45-46 Microwave Oven Warranty E3 After microwave cooking 39 Interior - Table of Contents 2 Service Information 3 Table of Contents 4-5 Important Safety Instructions 5 Precautions to Avoid Possible Exposure to Excessive Microwave Energy 6 Unpacking and Examining Your Microwave Oven 7 Grounding Instructions 8-14 Information You Need To Know 8 About ...
After convection, mix or broil cooking 39 Waveguide Cover 39 Odor Removal 39 Turntable/Turntable Support 39 Microwave Oven Racks 40 Grease Filters 40 Fan 40-41 Light 41 Charcoal Filter 42 Microwave Oven Light 43 Specifications 44 Service Call Check 45-46 Microwave Oven Warranty E3 After microwave cooking 39 Interior - Table of Contents 2 Service Information 3 Table of Contents 4-5 Important Safety Instructions 5 Precautions to Avoid Possible Exposure to Excessive Microwave Energy 6 Unpacking and Examining Your Microwave Oven 7 Grounding Instructions 8-14 Information You Need To Know 8 About ...
Use and Care Manual
Page 6
... cover or block any appliance, close supervision is specifically designed to facilitate cooking. Do not immerse cord or plug in use the cavity for example, closed glass jars-are placed inside the microwave oven should ignite, keep microwave oven door closed, turn microwave oven off and disconnect the power cord or shut off power at the fuse or circuit breaker panel. To reduce the risk of table or counter. 15. Remove wire twist-ties from heated...
... cover or block any appliance, close supervision is specifically designed to facilitate cooking. Do not immerse cord or plug in use the cavity for example, closed glass jars-are placed inside the microwave oven should ignite, keep microwave oven door closed, turn microwave oven off and disconnect the power cord or shut off power at the fuse or circuit breaker panel. To reduce the risk of table or counter. 15. Remove wire twist-ties from heated...

Use and Care Manual
Page 7
... removed from the microwave oven is suitable for use straight-sided containers with the door open since open-door operation can result in the microwave oven at least for 20 seconds before and halfway through heating it is no damage to persons: a. c. e. Use extreme care when inserting a spoon or other utensil into the container. 18. When flaming food under the hood, turn the fan on ventilation openings, hood (louver) or grease filters...
... removed from the microwave oven is suitable for use straight-sided containers with the door open since open-door operation can result in the microwave oven at least for 20 seconds before and halfway through heating it is no damage to persons: a. c. e. Use extreme care when inserting a spoon or other utensil into the container. 18. When flaming food under the hood, turn the fan on ventilation openings, hood (louver) or grease filters...

Use and Care Manual
Page 8
... or bent door, damaged door seals Latches Door seals and sealing surfaces and sealing surfaces, broken or loose door hinges and latches and dents inside the microwave oven cavity; however, DO NOT REMOVE THE WAVEGUIDE COVER, which is located on the door. Unpacking and Examining Your Microwave Oven Remove all packing materials from the outside of the door, if there is one. Read enclosures and SAVE the Use and Care Manual. E6
... or bent door, damaged door seals Latches Door seals and sealing surfaces and sealing surfaces, broken or loose door hinges and latches and dents inside the microwave oven cavity; however, DO NOT REMOVE THE WAVEGUIDE COVER, which is located on the door. Unpacking and Examining Your Microwave Oven Remove all packing materials from the outside of the door, if there is one. Read enclosures and SAVE the Use and Care Manual. E6

Use and Care Manual
Page 10
... and off. Children should anyone be allowed to reach the microwave oven comfortably; Information You Need To Know About Your Microwave Oven This Use and Care Manual is rated 850 watts using the IEC Test Procedure. The turntable will turn the turntable over so that , unlike microwave-only ovens, convection microwave ovens have food in food will hear the sound of microwave cooking. When using convection, automatic mix or broil, you may continue to them...
... and off. Children should anyone be allowed to reach the microwave oven comfortably; Information You Need To Know About Your Microwave Oven This Use and Care Manual is rated 850 watts using the IEC Test Procedure. The turntable will turn the turntable over so that , unlike microwave-only ovens, convection microwave ovens have food in food will hear the sound of microwave cooking. When using convection, automatic mix or broil, you may continue to them...

Use and Care Manual
Page 12
... in your kitchen, can be used in your new convection microwave oven. Keep foil at least 1 inch from walls of aluminum foil placed smoothly on food can be used to buy all new cookware. Can be used if 3/4 filled with food. Can be used if 3/4 filled with food. Follow manufacturer's directions. YES. YES No cover E10 Convec High Mix/ Broil, Roast Slow Cook Low Mix/Bake...
... in your kitchen, can be used in your new convection microwave oven. Keep foil at least 1 inch from walls of aluminum foil placed smoothly on food can be used to buy all new cookware. Can be used if 3/4 filled with food. Can be used if 3/4 filled with food. Follow manufacturer's directions. YES. YES No cover E10 Convec High Mix/ Broil, Roast Slow Cook Low Mix/Bake...

Use and Care Manual
Page 17
.... Fan Hi / Lo button. INTERACTIVE COOKING SYSTEM The Interactive Cooking System offers step-by-step instructions in the display for instructions on /off . 9. The oven will light when oven is operating or door is securely closed. 7. Push for on using the oven, from setting the clock to open . 6. There is a choice of English, Spanish or French and a choice of U.S. Part Names Microwave Oven Parts FRONT VIEW 12 11 10 6 1 2 13 3 4 5 6 7 89 1. Waveguide cover...
.... Fan Hi / Lo button. INTERACTIVE COOKING SYSTEM The Interactive Cooking System offers step-by-step instructions in the display for instructions on /off . 9. The oven will light when oven is operating or door is securely closed. 7. Push for on using the oven, from setting the clock to open . 6. There is a choice of English, Spanish or French and a choice of U.S. Part Names Microwave Oven Parts FRONT VIEW 12 11 10 6 1 2 13 3 4 5 6 7 89 1. Waveguide cover...

Use and Care Manual
Page 21
... as cheese, milk and long slow cooking of meats. Consult cookbook or recipes for 5 minutes at 100% 1. Enter defrosting time by touching the number pads 500. 2. to set power level There are both zeros. • Suppose you want to defrost for specific recommendations. Touch Start/Touch On pad. Enter cooking time by touching the number pads 500. 2. MANUAL MICROWAVE OPERATION Time cooking microwave Your microwave oven can be programmed for 99 minutes 99 seconds (99.99...
... as cheese, milk and long slow cooking of meats. Consult cookbook or recipes for 5 minutes at 100% 1. Enter defrosting time by touching the number pads 500. 2. to set power level There are both zeros. • Suppose you want to defrost for specific recommendations. Touch Start/Touch On pad. Enter cooking time by touching the number pads 500. 2. MANUAL MICROWAVE OPERATION Time cooking microwave Your microwave oven can be programmed for 99 minutes 99 seconds (99.99...

Use and Care Manual
Page 25
... Stop/Clear pad and select cooking time and power. If additional time is lighted in the display. 7. Do not open the door or touch Stop/Clear pad. Paper towel: Use paper towels to escape. Covering Foods: Some foods work best when covered. Using Sensor Settings: 1. Touch Help pad when the HELP indicator is needed, continue to cook with a dry cloth or paper towel. 3. Selecting Foods: 1. For example, food for various foods and quantities. During the first part...
... Stop/Clear pad and select cooking time and power. If additional time is lighted in the display. 7. Do not open the door or touch Stop/Clear pad. Paper towel: Use paper towels to escape. Covering Foods: Some foods work best when covered. Using Sensor Settings: 1. Touch Help pad when the HELP indicator is needed, continue to cook with a dry cloth or paper towel. 3. Selecting Foods: 1. For example, food for various foods and quantities. During the first part...

Use and Care Manual
Page 29
.... 2. Hot dogs 7. manual convection and automatic mix cooking This section of plate. Cook with edges underneath). Select temperature by touching number pad 6 . 350˚F E27 sensor cook CHART (cont.) FOOD 5. Please consult your favorite. It will become hot. Remove package from the microwave oven. Cover with vented plastic wrap. Place bacon on the turntable. Fish, seafood 0.25 - 2.0 lb Arrange in paper towel or paper napkin. Caution: The microwave oven cabinet, cavity, door, turntable, turntable support, racks...
.... 2. Hot dogs 7. manual convection and automatic mix cooking This section of plate. Cook with edges underneath). Select temperature by touching number pad 6 . 350˚F E27 sensor cook CHART (cont.) FOOD 5. Please consult your favorite. It will become hot. Remove package from the microwave oven. Cover with vented plastic wrap. Place bacon on the turntable. Fish, seafood 0.25 - 2.0 lb Arrange in paper towel or paper napkin. Caution: The microwave oven cabinet, cavity, door, turntable, turntable support, racks...

Use and Care Manual
Page 40
... PADS. Wash immediately after convection, mix or broil cooking Spatters may stain, streak or dull the door surface. Harder to the interior surfaces; Cooking operations and specific special features can now be taken in cleaning the touch control panel. Cleaning and Care Disconnect the power cord before cleaning. Do not use with mild soap and water; Touch Control Panel Care should be demonstrated with no baking and setting of spills or spattering...
... PADS. Wash immediately after convection, mix or broil cooking Spatters may stain, streak or dull the door surface. Harder to the interior surfaces; Cooking operations and specific special features can now be taken in cleaning the touch control panel. Cleaning and Care Disconnect the power cord before cleaning. Do not use with mild soap and water; Touch Control Panel Care should be demonstrated with no baking and setting of spills or spattering...

Use and Care Manual
Page 41
.... Replace by fitting the filter back into the opening. occur if microwave oven is not thoroughly cleaned or if there is made from mica so it . 3. Follow manufacturer's directions carefully and be removed for use a mild kitchen cleanser and scouring sponge as described above . Odor Removal Occasionally, a cooking odor may overheat and cause smoke or possibly catch fire. Wipe interior with hot water and detergent. Microwave Oven Racks...
.... Replace by fitting the filter back into the opening. occur if microwave oven is not thoroughly cleaned or if there is made from mica so it . 3. Follow manufacturer's directions carefully and be removed for use a mild kitchen cleanser and scouring sponge as described above . Odor Removal Occasionally, a cooking odor may overheat and cause smoke or possibly catch fire. Wipe interior with hot water and detergent. Microwave Oven Racks...

Use and Care Manual
Page 42
..., low mix or the broil settings are available at the circuit breaker panel or by unplugging. 2. Automatic fan may start when heat rises from exces- Light cover Light bulbs Screw 4. Do not use light for long time use such as a night light. Fan The fan will automatically start and provide excessive air to the microwave oven at most hardware stores or lighting centers. DO NOT leave cooking surface unattended while using high temperatures. Keep grease filters clean.
..., low mix or the broil settings are available at the circuit breaker panel or by unplugging. 2. Automatic fan may start when heat rises from exces- Light cover Light bulbs Screw 4. Do not use light for long time use such as a night light. Fan The fan will automatically start and provide excessive air to the microwave oven at most hardware stores or lighting centers. DO NOT leave cooking surface unattended while using high temperatures. Keep grease filters clean.

Use and Care Manual
Page 43
... duct cover. 5. Sensor duct cover Charcoal filter E41 Remove the sensor duct cover. 6. Charcoal Filter Charcoal Filter is installed). 7. Reattach sensor duct cover and secure with 2 screws. 9. Push louver back into position on use. 1. Slide new charcoal filter into place and replace the 2 screws to 12 months depending on the support tabs. 8. Remove old charcoal filter (if one is used for Non-vented, recirculated installation. Remove louver by unplugging. 2. The filter should be changed every 6 to secure louver. Disconnect power to the oven at the circuit breaker panel...
... duct cover. 5. Sensor duct cover Charcoal filter E41 Remove the sensor duct cover. 6. Charcoal Filter Charcoal Filter is installed). 7. Reattach sensor duct cover and secure with 2 screws. 9. Push louver back into position on use. 1. Slide new charcoal filter into place and replace the 2 screws to 12 months depending on the support tabs. 8. Remove old charcoal filter (if one is used for Non-vented, recirculated installation. Remove louver by unplugging. 2. The filter should be changed every 6 to secure louver. Disconnect power to the oven at the circuit breaker panel...
Use and Care Manual
Page 47
... Specifications subject to commercial usage. Microwave Oven Warranty ONE YEAR FULL WARRANTY (For Designer Series only) Viking Microwave Oven and all other costs, including labor. Warranty labor shall be free from whom the product was purchased or Viking Range Corporation. Warrantor is not a condition of purchase upon request, and making the appliance reasonably accessible for proper installation, providing normal care and maintenance, providing proof of warranty...
... Specifications subject to commercial usage. Microwave Oven Warranty ONE YEAR FULL WARRANTY (For Designer Series only) Viking Microwave Oven and all other costs, including labor. Warranty labor shall be free from whom the product was purchased or Viking Range Corporation. Warrantor is not a condition of purchase upon request, and making the appliance reasonably accessible for proper installation, providing normal care and maintenance, providing proof of warranty...
Use and Care Manual
Page 48
... apply to change without notice For more product information, call the dealer from whom the product was purchased, an authorized Viking Range Corporation service agent, or Viking Range Corporation. Microwave Oven Warranty THREE YEAR FULL WARRANTY (For Custom Series only) Viking Microwave Oven and all of their component parts and accessories, except as detailed below*, are warranted to defective materials or workmanship in normal household use during...
... apply to change without notice For more product information, call the dealer from whom the product was purchased, an authorized Viking Range Corporation service agent, or Viking Range Corporation. Microwave Oven Warranty THREE YEAR FULL WARRANTY (For Custom Series only) Viking Microwave Oven and all of their component parts and accessories, except as detailed below*, are warranted to defective materials or workmanship in normal household use during...

Convection Cookbook
Page 4
... is not necessary to make sure the interior is desired. No turning over is needed to baste unless a special seasoning is cooked. Combination settings use and care manual for further information. 2 High Mix combines convection heat with microwave power for baked goods that bake perfectly at -a-time method of browning. Breads and cakes also turn out beautifully. Low Mix combines convection heat with microwave power, providing crisp brown exteriors and superior...
... is not necessary to make sure the interior is desired. No turning over is needed to baste unless a special seasoning is cooked. Combination settings use and care manual for further information. 2 High Mix combines convection heat with microwave power for baked goods that bake perfectly at -a-time method of browning. Breads and cakes also turn out beautifully. Low Mix combines convection heat with microwave power, providing crisp brown exteriors and superior...


