
Two-Page Specifications Sheet
Page 1
... water filter needs replacing n Max Cool feature sets refrigerator and freezer temperature to match existing cabinetry) Warranty Highlights* n Three-year full - complete unit n Six-year full - sealed system n Ninety-day limited - cosmetic parts such as glass, painted items, and decorative items *Warranty valid on Viking products shipped within the United States and Canada 36" Wide Freestanding French-Door Bottom-Mount Refrigerator/Freezer Refrigerator Features and Functions n Adjustable Cold Zone™ drawer with...
... water filter needs replacing n Max Cool feature sets refrigerator and freezer temperature to match existing cabinetry) Warranty Highlights* n Three-year full - complete unit n Six-year full - sealed system n Ninety-day limited - cosmetic parts such as glass, painted items, and decorative items *Warranty valid on Viking products shipped within the United States and Canada 36" Wide Freestanding French-Door Bottom-Mount Refrigerator/Freezer Refrigerator Features and Functions n Adjustable Cold Zone™ drawer with...
Installation Instructions
Page 2
... unless specifically recommended in Use & Care or Installation Instructions. Install refrigerator according to have refrigerator checked by licensed personnel when required. • DO NOT modify plug on any part of the refrigerator. • DO NOT clean refrigerator parts with refrigerator controls. • DO NOT service or replace any part of old refrigerator 8 General Information 9 Remove the Packaging 9 Location Requirements 9 Moving Refrigerator 10 Electrical Requirements 10 Water Supply Requirements 11 Doors & Drawer Removal 12 Remove and Replace Handles 12 Remove Doors...
... unless specifically recommended in Use & Care or Installation Instructions. Install refrigerator according to have refrigerator checked by licensed personnel when required. • DO NOT modify plug on any part of the refrigerator. • DO NOT clean refrigerator parts with refrigerator controls. • DO NOT service or replace any part of old refrigerator 8 General Information 9 Remove the Packaging 9 Location Requirements 9 Moving Refrigerator 10 Electrical Requirements 10 Water Supply Requirements 11 Doors & Drawer Removal 12 Remove and Replace Handles 12 Remove Doors...

Installation Instructions
Page 5
... are cold. Remove the Packaging • Remove tape and glue residue from dropping. Remove and discard all packaging materials. Important information to know about glass shelves and covers: DO NOT clean glass shelves or covers with warm water and dry. • DO NOT use sharp instruments, rubbing alcohol, flammable fluids, or abrasive cleaners to shatter into many small, pebble-size pieces. Location Requirements • DO NOT install refrigerator...
... are cold. Remove the Packaging • Remove tape and glue residue from dropping. Remove and discard all packaging materials. Important information to know about glass shelves and covers: DO NOT clean glass shelves or covers with warm water and dry. • DO NOT use sharp instruments, rubbing alcohol, flammable fluids, or abrasive cleaners to shatter into many small, pebble-size pieces. Location Requirements • DO NOT install refrigerator...

Installation Instructions
Page 6
... water dispenser and ice maker. Disconnect the refrigerator from its side or back - If you have questions about your water pressure, call a licensed, qualified plumber. When installing your refrigerator next to a fixed wall, leave a 3-3/4" (9.5 cm) minimum space between 35 and 120 psi (241 and 827 kPa) is important to dolly firmly with water pressure of installation, cleaning, or removing a light bulb, turn cooling on. 10 General Information Water Supply Requirements A cold water supply...
... water dispenser and ice maker. Disconnect the refrigerator from its side or back - If you have questions about your water pressure, call a licensed, qualified plumber. When installing your refrigerator next to a fixed wall, leave a 3-3/4" (9.5 cm) minimum space between 35 and 120 psi (241 and 827 kPa) is important to dolly firmly with water pressure of installation, cleaning, or removing a light bulb, turn cooling on. 10 General Information Water Supply Requirements A cold water supply...

Installation Instructions
Page 7
... left -hand side door, disconnect the wiring plug located on the door gasket magnets to hold the door in the drawer front into the connector. 6. Hinge Screws Connections A B A. Water Line Connection 12 Door & Drawer Removal (cont.) Replace Doors and Hinges 1. See Drawer Front Replacement graphic. 2. Grasp the kickplate firmly and pull it for later use . Wiring Plug B. Reconnect the wiring plug on the door gasket magnets to full extension. 2. Unplug refrigerator or disconnect power. 2. Remove Doors and Hinges (cont.) 6. See Bottom Hinge graphic. 4. Hinge Cover...
... left -hand side door, disconnect the wiring plug located on the door gasket magnets to hold the door in the drawer front into the connector. 6. Hinge Screws Connections A B A. Water Line Connection 12 Door & Drawer Removal (cont.) Replace Doors and Hinges 1. See Drawer Front Replacement graphic. 2. Grasp the kickplate firmly and pull it for later use . Wiring Plug B. Reconnect the wiring plug on the door gasket magnets to full extension. 2. Unplug refrigerator or disconnect power. 2. Remove Doors and Hinges (cont.) 6. See Bottom Hinge graphic. 4. Hinge Cover...

Installation Instructions
Page 8
... tubing. Create a service loop with adjustable wrench. "P" clamp C. Determine the length of the pipe, not the bottom. Using a cordless drill, drill a 1/4" hole in a container or sink, and turn the ice maker OFF. Cold water pipe B. Tighten the packing nut. Avoid kinks when coiling the tubing. Fasten the shutoff valve to 31.8 mm) vertical cold water pipe near the refrigerator. Attach the copper tube to Water Line 1. Copper tubing B. Connect...
... tubing. Create a service loop with adjustable wrench. "P" clamp C. Determine the length of the pipe, not the bottom. Using a cordless drill, drill a 1/4" hole in a container or sink, and turn the ice maker OFF. Cold water pipe B. Tighten the packing nut. Avoid kinks when coiling the tubing. Fasten the shutoff valve to 31.8 mm) vertical cold water pipe near the refrigerator. Attach the copper tube to Water Line 1. Copper tubing B. Connect...

Installation Instructions
Page 10
...write to a qualified technician. h Connect water supply (if applicable). • Verify icemaker bail arm is ever required. Record the following information indicated below. Model number Serial number Date of purchase Date installed Dealer's name Address These installation instructions should be used in refrigerator and verify operation. h Align/square door(s). Installer's information: Installer's name Installer's company Date Service & Registration Only authorized replacement parts may be referred to : VIKING RANGE CORPORATION PREFERRED SERVICE 1803 Hwy 82W...
...write to a qualified technician. h Connect water supply (if applicable). • Verify icemaker bail arm is ever required. Record the following information indicated below. Model number Serial number Date of purchase Date installed Dealer's name Address These installation instructions should be used in refrigerator and verify operation. h Align/square door(s). Installer's information: Installer's name Installer's company Date Service & Registration Only authorized replacement parts may be referred to : VIKING RANGE CORPORATION PREFERRED SERVICE 1803 Hwy 82W...

Use and Care Manual
Page 2
... Instructions 5 Proper Disposal (of old refrigerator 6 Product Controls Using the Controls 7 Adjusting the Controls 7 Cooling On/Off 9 Additional Features 10 Operation Adjustable Humidity Zone and Adjustable Cold Zone 12 Opening and Closing Doors 12 Ice Maker and Ice Storage Bin 13 Water and Ice Dispensers 14 Dispenser Light and Dispenser Lock 19 Water Filtration System 20 Water Filter 23 Water Filter Certifications 24 Product Care Cleaning 25 Changing the Light Bulb 27 Troubleshooting 28 Service Information 34 Warranty 35 2 3 We appreciate your new, state-of Viking...
... Instructions 5 Proper Disposal (of old refrigerator 6 Product Controls Using the Controls 7 Adjusting the Controls 7 Cooling On/Off 9 Additional Features 10 Operation Adjustable Humidity Zone and Adjustable Cold Zone 12 Opening and Closing Doors 12 Ice Maker and Ice Storage Bin 13 Water and Ice Dispensers 14 Dispenser Light and Dispenser Lock 19 Water Filtration System 20 Water Filter 23 Water Filter Certifications 24 Product Care Cleaning 25 Changing the Light Bulb 27 Troubleshooting 28 Service Information 34 Warranty 35 2 3 We appreciate your new, state-of Viking...

Use and Care Manual
Page 4
..." mode. • Touch any control button on the dispenser panel to be made within 2 minutes, the display will not cool the compartments any faster. • If the temperature is too warm or too cold in the refrigerator or freezer, first check the air vents to activate the display screen. IMPORTANT: Child entrapment and suffocation are getting rid of your food may not easily climb inside. 6 Using the Controls...
..." mode. • Touch any control button on the dispenser panel to be made within 2 minutes, the display will not cool the compartments any faster. • If the temperature is too warm or too cold in the refrigerator or freezer, first check the air vents to activate the display screen. IMPORTANT: Child entrapment and suffocation are getting rid of your food may not easily climb inside. 6 Using the Controls...

Use and Care Manual
Page 6
... other control and dispenser functions are disabled until it off and the freezer temperature has risen to reset the status light. The feature then resets and will disappear from the display screen. 11 Product Controls Water Filter Status Light and Filter Reset The filter reset control allows you to enter Options mode (unless you replace the water filter. The alarm will remain on for 24 hours unless manually turned off. • To manually turn off Sabbath Mode...
... other control and dispenser functions are disabled until it off and the freezer temperature has risen to reset the status light. The feature then resets and will disappear from the display screen. 11 Product Controls Water Filter Status Light and Filter Reset The filter reset control allows you to enter Options mode (unless you replace the water filter. The alarm will remain on for 24 hours unless manually turned off. • To manually turn off Sabbath Mode...

Use and Care Manual
Page 7
... easy access. Opening and Closing Doors There are closed either side of fruits and vegetables with the auger driver. LOW (open) for best storage of the enclosure. 2. Hinged seal 12 Ice Maker and Ice Storage Bin IMPORTANT: Flush the water system before , and is currently off the ice maker: Press OPTIONS to any setting between adjustments. See "Using the Controls." Operation Adjustable Humidity Zone and Adjustable Cold Zone Adjustable Humidity Zone...
... easy access. Opening and Closing Doors There are closed either side of fruits and vegetables with the auger driver. LOW (open) for best storage of the enclosure. 2. Hinged seal 12 Ice Maker and Ice Storage Bin IMPORTANT: Flush the water system before , and is currently off the ice maker: Press OPTIONS to any setting between adjustments. See "Using the Controls." Operation Adjustable Humidity Zone and Adjustable Cold Zone Adjustable Humidity Zone...

Use and Care Manual
Page 8
... ice storage bin. So, for optimum performance of your ice will not operate when refrigerator door is cleared from the filter and water dispensing system, and prepare the water filter for the refrigerator to depress and hold the OPTIONS and LOCK buttons at any time to the home screen. B A. Water dispenser paddle B. Press and release the water dispenser paddle, as needed, to dispense water to flow. AVOID connecting the ice maker toa softened water supply. Use...
... ice storage bin. So, for optimum performance of your ice will not operate when refrigerator door is cleared from the filter and water dispensing system, and prepare the water filter for the refrigerator to depress and hold the OPTIONS and LOCK buttons at any time to the home screen. B A. Water dispenser paddle B. Press and release the water dispenser paddle, as needed, to dispense water to flow. AVOID connecting the ice maker toa softened water supply. Use...

Use and Care Manual
Page 11
... installed. • The "Replace Water Filter" icon will change your local Viking Range Dealer. Snap the filter cover closed. 4. You may contain filterable cysts. See "Water Dispenser" section. Refrigerator Water Filter Cartridge Model RWFFR Specifications Service Flow Rate (Maximum 0.78 GPM (2.9 L/min) Rated Service Life RWFFR (750 gal. Turn the filter clockwise until it stops. Note: The dispenser feature may be used without adequate disinfection before or after the system. If the water flow to the water dispenser or ice maker...
... installed. • The "Replace Water Filter" icon will change your local Viking Range Dealer. Snap the filter cover closed. 4. You may contain filterable cysts. See "Water Dispenser" section. Refrigerator Water Filter Cartridge Model RWFFR Specifications Service Flow Rate (Maximum 0.78 GPM (2.9 L/min) Rated Service Life RWFFR (750 gal. Turn the filter clockwise until it stops. Note: The dispenser feature may be used without adequate disinfection before or after the system. If the water flow to the water dispenser or ice maker...

Use and Care Manual
Page 12
... actual water treatment needs. Operation Water Filtration System (cont.) General Use Conditions Read this Performance Data Sheet and compare the capabilities of this refrigerator with your Use & Care Guide for general operation, maintenance requirements and troubleshooting. DO NOT use this filtration system. Min. CHECK FOR COMPLIANCE WITH THE STATE AND LOCAL LAWS AND REGULATIONS. at 0.002 0.06 mg/L pH 6.5 mg/L + 10% 0.006 mg/L Timely replacement of filter cartridge...
... actual water treatment needs. Operation Water Filtration System (cont.) General Use Conditions Read this Performance Data Sheet and compare the capabilities of this refrigerator with your Use & Care Guide for general operation, maintenance requirements and troubleshooting. DO NOT use this filtration system. Min. CHECK FOR COMPLIANCE WITH THE STATE AND LOCAL LAWS AND REGULATIONS. at 0.002 0.06 mg/L pH 6.5 mg/L + 10% 0.006 mg/L Timely replacement of filter cartridge...

Use and Care Manual
Page 14
.... 4. IMPORTANT: This cleaner is no need for stainless steel parts only. Dry thoroughly with appliance light bulb(s) no greater than 40 watts. 4. Plug in warm water. Unplug refrigerator or disconnect power. 2. Product Care Cleaning (cont.) Clean the Touch Screen Display on the shield into the liner holes and snap into contact with any plastic parts such as the trim pieces, dispenser covers or door gaskets. NOTE: DO NOT spray or...
.... 4. IMPORTANT: This cleaner is no need for stainless steel parts only. Dry thoroughly with appliance light bulb(s) no greater than 40 watts. 4. Plug in warm water. Unplug refrigerator or disconnect power. 2. Product Care Cleaning (cont.) Clean the Touch Screen Display on the shield into the liner holes and snap into contact with any plastic parts such as the trim pieces, dispenser covers or door gaskets. NOTE: DO NOT spray or...

Use and Care Manual
Page 15
... soap and warm water. DO NOT use an adapter. Normal operation Solution Plug into the drain pan Creaking/Cracking-occurs as ice is added, doors are difficult to its high-efficiency compressor and fans. See "Using the Controls". Buzzing-heard when the water valve opens to fill the ice maker Pulsating-fans/compressor adjusting to see if the outlet is working ? Make sure the refrigerator controls are some normal sounds with explanations. Push bin or shelf back...
... soap and warm water. DO NOT use an adapter. Normal operation Solution Plug into the drain pan Creaking/Cracking-occurs as ice is added, doors are difficult to its high-efficiency compressor and fans. See "Using the Controls". Buzzing-heard when the water valve opens to fill the ice maker Pulsating-fans/compressor adjusting to see if the outlet is working ? Make sure the refrigerator controls are some normal sounds with explanations. Push bin or shelf back...

Use and Care Manual
Page 16
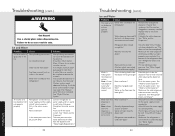
... Troubleshooting (cont.) Ice and Water Problem The ice maker is an indication of food added? Controls set correctly for refrigerator to return to cool completely. Adjust the controls a setting warmer. Water shutoff valve not fully open . Straighten the water source line. Allows warm air to produce more ice. See "Ice Maker and Ice Storage Bin." Solution Connect refrigerator to your cold water supply? Allow 24 hours for ice maker to enter refrigerator. See "Using the Controls". New installation? Replace filter or reinstall it correctly. Door(s) left open...
... Troubleshooting (cont.) Ice and Water Problem The ice maker is an indication of food added? Controls set correctly for refrigerator to return to cool completely. Adjust the controls a setting warmer. Water shutoff valve not fully open . Straighten the water source line. Allows warm air to produce more ice. See "Ice Maker and Ice Storage Bin." Solution Connect refrigerator to your cold water supply? Allow 24 hours for ice maker to enter refrigerator. See "Using the Controls". New installation? Replace filter or reinstall it correctly. Door(s) left open...
Use and Care Manual
Page 17
...to water supply and turn water shutoff valve fully open. Water on the refrigerator? If it correctly. See "Refrigerator Doors and Drawer". See "Water Supply Requirements". See "Water and Ice Dispenser". Allow 24 hours for ice maker to a water supply and the supply shutoff valve turned on the refrigerator? Are there minerals (such as sulfur) in the ice Cause New plumbing connections? Gray or dark discoloration in the water source line? Replace water filter when indicated. Refrigerator door closed completely? Make sure the water dispenser wire/tube assembly has...
...to water supply and turn water shutoff valve fully open. Water on the refrigerator? If it correctly. See "Refrigerator Doors and Drawer". See "Water Supply Requirements". See "Water and Ice Dispenser". Allow 24 hours for ice maker to a water supply and the supply shutoff valve turned on the refrigerator? Are there minerals (such as sulfur) in the ice Cause New plumbing connections? Gray or dark discoloration in the water source line? Replace water filter when indicated. Refrigerator door closed completely? Make sure the water dispenser wire/tube assembly has...
Use and Care Manual
Page 18
... longer. Viking Range Corporation uses high quality processes and materials available to commercial usage. 35 Under this warranty, service must be free from the date of their component parts, except as listed below *†, are warranted to either a refund or replacement of warranty coverage. Sealed Refrigeration System Components: Compressor, Evaporator, Condenser, Connecting Tubing, Dryer/Strainer TWELVE YEAR LIMITED WARRANTY ON SEALED REFRIGERATION PARTS AS LISTED Any sealed refrigeration system...
... longer. Viking Range Corporation uses high quality processes and materials available to commercial usage. 35 Under this warranty, service must be free from the date of their component parts, except as listed below *†, are warranted to either a refund or replacement of warranty coverage. Sealed Refrigeration System Components: Compressor, Evaporator, Condenser, Connecting Tubing, Dryer/Strainer TWELVE YEAR LIMITED WARRANTY ON SEALED REFRIGERATION PARTS AS LISTED Any sealed refrigeration system...
One-Pack Handle Insert for All D3 Series Products - Installation Instructions
Page 2
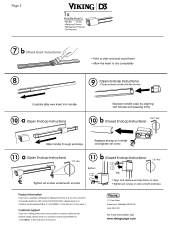
... Street Greenwood, Mississippi 38930 USA (662) 455-1200 For more information visit: www.vIldngrange.com Ranges - Customer Support If you own a Viking product and have a question pertaining the Viking product line or if you have questions or require assistance with non-technical information, please speak to a customer service representative at 1-888-VIKING1 (1-888-845-4641), then press 2. Ovens -Warming Drawers - Refrigerator/Freezers -
... Street Greenwood, Mississippi 38930 USA (662) 455-1200 For more information visit: www.vIldngrange.com Ranges - Customer Support If you own a Viking product and have a question pertaining the Viking product line or if you have questions or require assistance with non-technical information, please speak to a customer service representative at 1-888-VIKING1 (1-888-845-4641), then press 2. Ovens -Warming Drawers - Refrigerator/Freezers -

