
Two-Page Specifications Sheet
Page 1
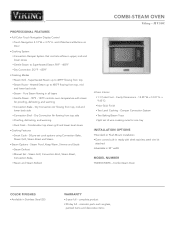
...;§Steam Defrost §§Manual Set - Steam Grill, Convection Broil, Steam Roast, Convection Bake, §§Steam and Steam Refresh COMBI-STEAM OVEN Viking - complete product §§90-day full - Combination top steam grill and lower level steam §§Cooking Features §§Smart Cook - 58 pre-set of wire cooking racks for one tray INSTALLATION OPTIONS §§Standard or Flush Mount installation §§Oven comes built-in ready with sleek stainless steel trim kit attached §...
...;§Steam Defrost §§Manual Set - Steam Grill, Convection Broil, Steam Roast, Convection Bake, §§Steam and Steam Refresh COMBI-STEAM OVEN Viking - complete product §§90-day full - Combination top steam grill and lower level steam §§Cooking Features §§Smart Cook - 58 pre-set of wire cooking racks for one tray INSTALLATION OPTIONS §§Standard or Flush Mount installation §§Oven comes built-in ready with sleek stainless steel trim kit attached §...
Two-Page Specifications Sheet
Page 2
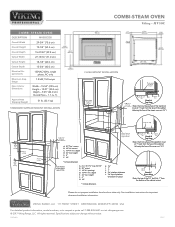
... face of the cabinet. Specifications subject to request a quote call 1-888-845-4641 or visit vikingrange.com © 2017 Viking Range, LLC All rights reserved. depth D. 33" min. Approximate Shipping Weight 51 lb. (23.1 kg) STANDARD SURFACE MOUNT INSTALLATION COMBI-STEAM OVEN Viking - height F. 4" G. 18" * Critical dimension Note: Platform must be able to support 70 lbs. Please do not prepare installation from brochure data...
... face of the cabinet. Specifications subject to request a quote call 1-888-845-4641 or visit vikingrange.com © 2017 Viking Range, LLC All rights reserved. depth D. 33" min. Approximate Shipping Weight 51 lb. (23.1 kg) STANDARD SURFACE MOUNT INSTALLATION COMBI-STEAM OVEN Viking - height F. 4" G. 18" * Critical dimension Note: Platform must be able to support 70 lbs. Please do not prepare installation from brochure data...
Installation Instructions
Page 2
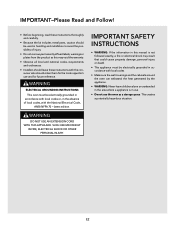
... or electrical shock may void the warranty. • Observe all local and national codes, requirements and ordinances. • Installers should leave these instructions with the consumer who should be used in the absence of injury. • Do not remove permanently affixed labels, warnings or plates from the product as a storage space. This creates a potentially hazardous situation. DO NOT USE AN EXTENSION CORD...
... or electrical shock may void the warranty. • Observe all local and national codes, requirements and ordinances. • Installers should leave these instructions with the consumer who should be used in the absence of injury. • Do not remove permanently affixed labels, warnings or plates from the product as a storage space. This creates a potentially hazardous situation. DO NOT USE AN EXTENSION CORD...
Installation Instructions
Page 3
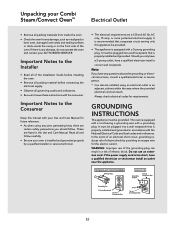
... a qualified electrician install a correct wall receptacle. The oven is any questions about the grounding or electrical instructions, consult a qualified electrician or service person. * Can also be grounded. E3 Read all and follow . Important Notes to the Consumer Keep this appliance be plugged into a wall receptacle that a separate circuit serving only this manual with your Use and Care Manual for any oven generating heat, there are...
... a qualified electrician install a correct wall receptacle. The oven is any questions about the grounding or electrical instructions, consult a qualified electrician or service person. * Can also be grounded. E3 Read all and follow . Important Notes to the Consumer Keep this appliance be plugged into a wall receptacle that a separate circuit serving only this manual with your Use and Care Manual for any oven generating heat, there are...

Installation Instructions
Page 8
... of 2 people to the set screws on the handle, apply lock tite to lift and install oven. See Figure 7. Install Handle. Slide the oven all the way back until the oven frame is seated against the cabinet and the mounting brackets. Note: the set screws using the outer oven frame Lift point on the handle should be facing down during installation. Open the drip tray door and insert the 2 shoulder...
... of 2 people to the set screws on the handle, apply lock tite to lift and install oven. See Figure 7. Install Handle. Slide the oven all the way back until the oven frame is seated against the cabinet and the mounting brackets. Note: the set screws using the outer oven frame Lift point on the handle should be facing down during installation. Open the drip tray door and insert the 2 shoulder...

Installation Instructions
Page 11
... before mounting Figure 12 7. See Figure 12. E11 Figure 13 Figure 11 6. Note: Slide on the handle should be facing down during installation. Open the drip tray door and insert the 2 shoulder bolts supplied. DO NOT lift this unit using the provided allen wrench. Avoid pinching the cord between the mounting brackets. See Figure 11. Plug the power supply cord into the electrical outlet...
... before mounting Figure 12 7. See Figure 12. E11 Figure 13 Figure 11 6. Note: Slide on the handle should be facing down during installation. Open the drip tray door and insert the 2 shoulder bolts supplied. DO NOT lift this unit using the provided allen wrench. Avoid pinching the cord between the mounting brackets. See Figure 11. Plug the power supply cord into the electrical outlet...
Installation Instructions
Page 12
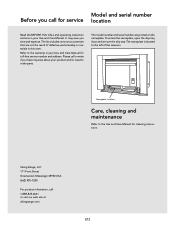
... about your Use and Care Manual for toll-free service number and address. To access the nameplate, open the drip tray door and remove the drip tray. It may save you time and expense. The nameplate is located to the Use and Care Manual for service location Read the BEFORE YOU CALL and operating instruction sections in this oven. The list includes common occurrences that are printed on the nameplate. Viking Range, LLC 111...
... about your Use and Care Manual for toll-free service number and address. To access the nameplate, open the drip tray door and remove the drip tray. It may save you time and expense. The nameplate is located to the Use and Care Manual for service location Read the BEFORE YOU CALL and operating instruction sections in this oven. The list includes common occurrences that are printed on the nameplate. Viking Range, LLC 111...
Use and Care Manual
Page 3
.... 3 Air vent opening E Steam will exhaust from the vent above the door pictured. BEFORE FIRST USE 11 PREPARATION 11 To Clean The Oven Before Use, Follow These Steps 12 COOKING FUNCTIONS 13 AUTOMATIC COOKING 15 Smart Cook 16 THE MENUS 19 Steam Options 20 MANUAL COOKING 22 OTHER FEATURES 22 Settings 22 Audible Signal Elimination 22 Control Lock 22 Demo Mode 22 Language/Temp 23 CLEANING AND CARE 25 BEFORE YOU CALL FOR SERVICE...
.... 3 Air vent opening E Steam will exhaust from the vent above the door pictured. BEFORE FIRST USE 11 PREPARATION 11 To Clean The Oven Before Use, Follow These Steps 12 COOKING FUNCTIONS 13 AUTOMATIC COOKING 15 Smart Cook 16 THE MENUS 19 Steam Options 20 MANUAL COOKING 22 OTHER FEATURES 22 Settings 22 Audible Signal Elimination 22 Control Lock 22 Demo Mode 22 Language/Temp 23 CLEANING AND CARE 25 BEFORE YOU CALL FOR SERVICE...
Use and Care Manual
Page 4
... oven. 14. SAVE THESE INSTRUCTIONS E 4 Flammable materials should not be followed, including the following: WARNING - This appliance is essential for warming or heating the room. 4. During and after use only mild, nonabrasive soaps or detergents applied with the provided Installation Manual. 3. remove pan and other flammable materials contact heating elements or interior surfaces of burns, electric shock, fire, injury to heat, cook or dry food. Carefully...
... oven. 14. SAVE THESE INSTRUCTIONS E 4 Flammable materials should not be followed, including the following: WARNING - This appliance is essential for warming or heating the room. 4. During and after use only mild, nonabrasive soaps or detergents applied with the provided Installation Manual. 3. remove pan and other flammable materials contact heating elements or interior surfaces of burns, electric shock, fire, injury to heat, cook or dry food. Carefully...
Use and Care Manual
Page 5
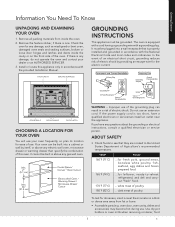
... Started Information You Need To Know UNPACKING AND EXAMINING YOUR OVEN 1. Install or locate this oven. dark meat of poultry. 180˚F (82˚C) ... OVEN CAVITY SEALING SURFACES GROUNDING INSTRUCTIONS This appliance must be built in a thick or dense area away from inside the cavity or on the front side of use. DOOR SEALS DOOR HINGES DOOR LATCH CHOOSING A LOCATION FOR YOUR OVEN You will use . Improper use an extension cord. white meat...
... Started Information You Need To Know UNPACKING AND EXAMINING YOUR OVEN 1. Install or locate this oven. dark meat of poultry. 180˚F (82˚C) ... OVEN CAVITY SEALING SURFACES GROUNDING INSTRUCTIONS This appliance must be built in a thick or dense area away from inside the cavity or on the front side of use. DOOR SEALS DOOR HINGES DOOR LATCH CHOOSING A LOCATION FOR YOUR OVEN You will use . Improper use an extension cord. white meat...

Use and Care Manual
Page 6
..., Steam and Convection modes, cabinet, interior and door may be too hot to keep the oven clean. • Do not move the oven during operation. Between the ages of 7 and 12, the supervising person should use the cavity for an extended period. • Clean the oven at regular intervals and remove any objects drop inside the air vent openings, turn off the oven immediately, unplug and consult an Authorized Servicer. •...
..., Steam and Convection modes, cabinet, interior and door may be too hot to keep the oven clean. • Do not move the oven during operation. Between the ages of 7 and 12, the supervising person should use the cavity for an extended period. • Clean the oven at regular intervals and remove any objects drop inside the air vent openings, turn off the oven immediately, unplug and consult an Authorized Servicer. •...

Use and Care Manual
Page 7
... Care must be taken if using fine glassware as some containers warp, melt or discolor at high temperatures. Low Rack, High Rack, Baking Tray, Steam YES YES Basket Silicone-based cookware NO NO ACCESSORIES There are used with the oven. • Children should be taken as it can break or crack if heated suddenly. Young children should never be used in this operation manual...
... Care must be taken if using fine glassware as some containers warp, melt or discolor at high temperatures. Low Rack, High Rack, Baking Tray, Steam YES YES Basket Silicone-based cookware NO NO ACCESSORIES There are used with the oven. • Children should be taken as it can break or crack if heated suddenly. Young children should never be used in this operation manual...
Use and Care Manual
Page 10
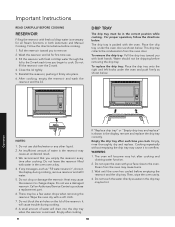
... close to purchase a replacement part. 6. Cooking repeatedly without emptying the drip tray may cause burns. 3. Do not touch the water directly as shown below . Pull the reservoir toward you cook. Do not use a damaged reservoir. WARNING 1. For proper operation, follow the directions below before cooking. 1. Empty the drip tray after cooking. Do not open the oven with both Automatic and Manual Cooking. Close the lid tightly...
... close to purchase a replacement part. 6. Cooking repeatedly without emptying the drip tray may cause burns. 3. Do not touch the water directly as shown below . Pull the reservoir toward you cook. Do not use a damaged reservoir. WARNING 1. For proper operation, follow the directions below before cooking. 1. Empty the drip tray after cooking. Do not open the oven with both Automatic and Manual Cooking. Close the lid tightly...

Use and Care Manual
Page 11
.... Select CLEAN from the list provided. 3. Plug in manual operation for cooking. Install the empty drip tray. Select NEW OVEN CLEAN from the home page. 2. Before First Use The steam generator heats the water which is normal. The oven is complete, use . Steam from the oven may notice some smoke and odor during cooking. Fill the reservoir with fresh cold water. Do not open the oven with New Oven Clean in the oven...
.... Select CLEAN from the list provided. 3. Plug in manual operation for cooking. Install the empty drip tray. Select NEW OVEN CLEAN from the home page. 2. Before First Use The steam generator heats the water which is normal. The oven is complete, use . Steam from the oven may notice some smoke and odor during cooking. Fill the reservoir with fresh cold water. Do not open the oven with New Oven Clean in the oven...

Use and Care Manual
Page 20
... heated air that is directed from above the food (top of choice. Typical steam temperature is "superheated" steam. Steam Grill - Steam Refresh - Examples: French bread, brown rice, spaghetti noodles, broccoli, hamburgers Operation E 20 Each manual cooking option is circulated to ensure even cooking throughout the food of oven cavity). Steam - In the convection bake function, dry heated air is equipped with firm breads, rice, noodles, vegetables, or meats. Steam Roast - Manual Cooking The Manual cooking...
... heated air that is directed from above the food (top of choice. Typical steam temperature is "superheated" steam. Steam Grill - Steam Refresh - Examples: French bread, brown rice, spaghetti noodles, broccoli, hamburgers Operation E 20 Each manual cooking option is circulated to ensure even cooking throughout the food of oven cavity). Steam - In the convection bake function, dry heated air is equipped with firm breads, rice, noodles, vegetables, or meats. Steam Roast - Manual Cooking The Manual cooking...

Use and Care Manual
Page 22
...; Oven doesn't heat in DEMO MODE. Other Features SETTINGS In the event that the control panel is deactivated or locked. Press SETTINGS. 2. TO LOCK 1. TO UNLOCK 1. At Home Page hold CLEAR until it beeps. 2. The audible signal can be removed. Press CONTROL LOCK ON/OFF. 3. Display shows CONTROL LOCK IS ON. 5. The DEMO icon will be turned off if you prefer quiet operation. DEMO MODE TO ENTER DEMO MODE 1. Hold BACK button...
...; Oven doesn't heat in DEMO MODE. Other Features SETTINGS In the event that the control panel is deactivated or locked. Press SETTINGS. 2. TO LOCK 1. TO UNLOCK 1. At Home Page hold CLEAR until it beeps. 2. The audible signal can be removed. Press CONTROL LOCK ON/OFF. 3. Display shows CONTROL LOCK IS ON. 5. The DEMO icon will be turned off if you prefer quiet operation. DEMO MODE TO ENTER DEMO MODE 1. Hold BACK button...

Use and Care Manual
Page 23
... functions assists in cleaning specific items that require extra care in opening the oven. Please see chart below for suggested amounts. Replace reservoir and press START. 5. Once oven has completed the cycle, allow the oven to cool down. 5. Replace reservoir and press START. 6. Stir well and pour into the oven. 4. Select OVEN CLEANING - Fill the reservoir with fresh cold water. Press START. 4. two trays, two racks) into the...
... functions assists in cleaning specific items that require extra care in opening the oven. Please see chart below for suggested amounts. Replace reservoir and press START. 5. Once oven has completed the cycle, allow the oven to cool down. 5. Replace reservoir and press START. 6. Stir well and pour into the oven. 4. Select OVEN CLEANING - Fill the reservoir with fresh cold water. Press START. 4. two trays, two racks) into the...
Use and Care Manual
Page 24
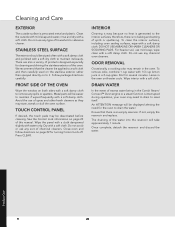
... to reset itself. Dry with a soft cloth. Product Care E 24 Do not scrub or use any type of the oven. DO NOT USE ABRASIVE OR HARSH CLEANERS OR SCOURING PADS. Follow package directions carefully. TOUCH CONTROL PANEL If desired, the touch pads may remain in the oven until water cools. INTERIOR Cleaning is easy because no baking and setting of chemical cleaners. ODOR REMOVAL Occasionally, a cooking odor...
... to reset itself. Dry with a soft cloth. Product Care E 24 Do not scrub or use any type of the oven. DO NOT USE ABRASIVE OR HARSH CLEANERS OR SCOURING PADS. Follow package directions carefully. TOUCH CONTROL PANEL If desired, the touch pads may remain in the oven until water cools. INTERIOR Cleaning is easy because no baking and setting of chemical cleaners. ODOR REMOVAL Occasionally, a cooking odor...
Use and Care Manual
Page 25
.... Product Care 25 E Press Clear pad and reset the clock. It may save you must reset the cooking function. Food in Demo Mode. • See SOLUTION for service. Call for PROBLEM 1. • Check if the controls have been properly set . • Oven is loose or burned out. PROBLEM Part or all of oven is not completely connected to the electrical outlet. • Power outage. • Fuse/circuit breaker at home doesn't work . Light bulb...
.... Product Care 25 E Press Clear pad and reset the clock. It may save you must reset the cooking function. Food in Demo Mode. • See SOLUTION for service. Call for PROBLEM 1. • Check if the controls have been properly set . • Oven is loose or burned out. PROBLEM Part or all of oven is not completely connected to the electrical outlet. • Power outage. • Fuse/circuit breaker at home doesn't work . Light bulb...
Use and Care Manual
Page 26
... limited warranties set forth above described elements or parts are limited in duration to products purchased and located here in the country where service is not responsible for any kind, with respect to the goods or services covered hereunder, shall in normal household use , improper installation, improper operation or repair or service of the product by an authorized Viking Range, LLC service agency or representative. Warrantor is requested. Owner...
... limited warranties set forth above described elements or parts are limited in duration to products purchased and located here in the country where service is not responsible for any kind, with respect to the goods or services covered hereunder, shall in normal household use , improper installation, improper operation or repair or service of the product by an authorized Viking Range, LLC service agency or representative. Warrantor is requested. Owner...


