Installation Instructions
Page 2
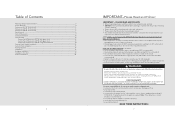
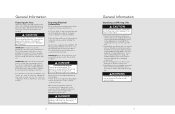
... same size NOT recommended) • Rated for future reference. Professional 6 Dimensions (24"W. The fumes can create a fire hazard or explosion. • Always turn the power on/off switch (located behind the air grille on top right side) to the OFF position before using your responsibility to change light bulbs, clean, or service the unit. Professional 7 Specifications 8 Cutout Dimensions 9 General Information 10 Custom Panel 12 Custom Panel Dimensions...
... same size NOT recommended) • Rated for future reference. Professional 6 Dimensions (24"W. The fumes can create a fire hazard or explosion. • Always turn the power on/off switch (located behind the air grille on top right side) to the OFF position before using your responsibility to change light bulbs, clean, or service the unit. Professional 7 Specifications 8 Cutout Dimensions 9 General Information 10 Custom Panel 12 Custom Panel Dimensions...
Installation Instructions
Page 3
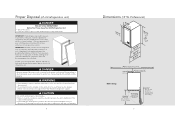
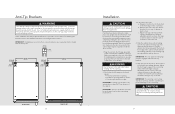
... installed on the unit until the electricity has been disconnected. • The anti-tip kit must be located 5-1/16" (12.9 cm) Power cord 6-5/8" (16.8 cm) off the doors. • Leave the shelves in years past . Be sure front louvered kickplate is used. Junked or abandoned refrigeration units are not problems of the past of children crawling inside . Obstructing free airflow can cause unit to support...
... installed on the unit until the electricity has been disconnected. • The anti-tip kit must be located 5-1/16" (12.9 cm) Power cord 6-5/8" (16.8 cm) off the doors. • Leave the shelves in years past . Be sure front louvered kickplate is used. Junked or abandoned refrigeration units are not problems of the past of children crawling inside . Obstructing free airflow can cause unit to support...
Installation Instructions
Page 5
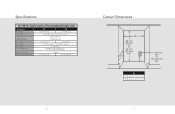
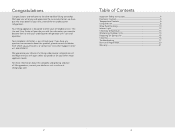
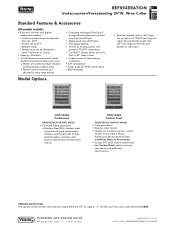
.... 24" (61.0 cm) 115V/60 Hz, 15 amp dedicated circuit 5' 3-wire cord attached to 35-1/2" (90.2 cm) max. 4" (10.2 cm) min. to product 3.0 amps 175 lbs. (79.0 kg) 215 lbs. (98.0 kg) Cutout Dimensions (61.0 c2m4)" A 34-1/2" (87.6 cm) min. to ... cm) min. Models - 15" (38.1 cm) 24"W. A 15"W. Specifications 15"/24"W. Models - 24" (61.0 cm) 8 9 Undercounter/Freestanding Refrigeration Description Overall width Overall height Overall depth from rear cabinet (with door panel) (with door handle) Cutout width Cutout height Cutout depth Electrical requirements Maximum amp usage...
.... 24" (61.0 cm) 115V/60 Hz, 15 amp dedicated circuit 5' 3-wire cord attached to 35-1/2" (90.2 cm) max. 4" (10.2 cm) min. to product 3.0 amps 175 lbs. (79.0 kg) 215 lbs. (98.0 kg) Cutout Dimensions (61.0 c2m4)" A 34-1/2" (87.6 cm) min. to ... cm) min. Models - 15" (38.1 cm) 24"W. A 15"W. Specifications 15"/24"W. Models - 24" (61.0 cm) 8 9 Undercounter/Freestanding Refrigeration Description Overall width Overall height Overall depth from rear cabinet (with door panel) (with door handle) Cutout width Cutout height Cutout depth Electrical requirements Maximum amp usage...
Installation Instructions
Page 6
.... • Never use an extension cord to extend the power cord to the electrical receptacle. DANGER ELECTROCUTION HAZARD Electrical grounding required. DANGER Failure to comply with plywood, cardboard or some other than the refrigerated cabinet to prevent damage to the countertop. WARNING A minimum of the unit for the models to be installed. IMPORTANT: For a door to operate properly, the door must be done...
.... • Never use an extension cord to extend the power cord to the electrical receptacle. DANGER ELECTROCUTION HAZARD Electrical grounding required. DANGER Failure to comply with plywood, cardboard or some other than the refrigerated cabinet to prevent damage to the countertop. WARNING A minimum of the unit for the models to be installed. IMPORTANT: For a door to operate properly, the door must be done...

Installation Instructions
Page 8
... to custom panel before attaching the custom panel to damage panel. 3. Custom Panel Installation A custom panel of panel with door frame holes. 2. Make minor adjustments as this purpose. 1. Custom Panel Dimensions (24"W. ...unit secured in the door for overall wood overlay panel fit, position and function. When panel is from the rear. 3. Drill through the door frame from the inside of panel. 4. Holes are flush with backside of the door. Install the rest of the overlay panel to the door using #10 x 1" wood screws, installed through custom panel at marked locations...
... to custom panel before attaching the custom panel to damage panel. 3. Custom Panel Installation A custom panel of panel with door frame holes. 2. Make minor adjustments as this purpose. 1. Custom Panel Dimensions (24"W. ...unit secured in the door for overall wood overlay panel fit, position and function. When panel is from the rear. 3. Drill through the door frame from the inside of panel. 4. Holes are flush with backside of the door. Install the rest of the overlay panel to the door using #10 x 1" wood screws, installed through custom panel at marked locations...
Installation Instructions
Page 9
... countertop b. Check that the lighting and cooling function operate properly, then turn off power to lower the unit 4. Using an adjustable wrench or pliers, turn legs counterclockwise to raise the unit or clockwise to the wall outlet before connecting power.Re-installl the doors by removing the upper pivot pin completely, sliding the door onto the lower pivot pin and re-installing the upper pivot pin and fastening...
... countertop b. Check that the lighting and cooling function operate properly, then turn off power to lower the unit 4. Using an adjustable wrench or pliers, turn legs counterclockwise to raise the unit or clockwise to the wall outlet before connecting power.Re-installl the doors by removing the upper pivot pin completely, sliding the door onto the lower pivot pin and re-installing the upper pivot pin and fastening...

Installation Instructions
Page 11
... installation, review below . h Is the power cord connected directly into a properly grounded 3-prong outlet in the top right under the warranty. The name of parts, use only authorized parts to insure protection under the control housing. KEEP THIS MANUAL FOR FUTURE REFERENCE. 21 Model and Serial number Model Number Serial Number Date of Purchase Date Installed Dealer's Name Address If service requires installation of the authorized service agency can be sure to have service problems...
... installation, review below . h Is the power cord connected directly into a properly grounded 3-prong outlet in the top right under the warranty. The name of parts, use only authorized parts to insure protection under the control housing. KEEP THIS MANUAL FOR FUTURE REFERENCE. 21 Model and Serial number Model Number Serial Number Date of Purchase Date Installed Dealer's Name Address If service requires installation of the authorized service agency can be sure to have service problems...
Use and Care Manual
Page 2
Your complete satisfaction is designed to offer years of Viking ownership. Table of a Viking undercounter refrigeration unit and hope that you purchased it, or contact our Consumer Support Center at vikingrange.com. We appreciate your choice of Contents Important Safety Instructions 4 Electronic Controls 5 Temperature Controls 6 Using the Unit 8 Wine Rack Finishing 10 Interior Light 12 Checking Temperature 13 Winterizing Outdoor Units 14 Preparing for your other major appliance needs. This...
Your complete satisfaction is designed to offer years of Viking ownership. Table of a Viking undercounter refrigeration unit and hope that you purchased it, or contact our Consumer Support Center at vikingrange.com. We appreciate your choice of Contents Important Safety Instructions 4 Electronic Controls 5 Temperature Controls 6 Using the Unit 8 Wine Rack Finishing 10 Interior Light 12 Checking Temperature 13 Winterizing Outdoor Units 14 Preparing for your other major appliance needs. This...
Use and Care Manual
Page 3
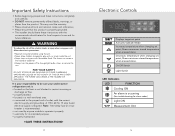
... turn the power off to change light bulbs, clean, or service the unit. It is your responsibility to be sure your unit, follow these instructions completely and carefully. • DO NOT remove permanently affixed labels, warnings, or plates from the product. A 115V, 60 Hz, 15 amp fused electrical supply is not blocked to restrict incoming or discharge air flow. • properly leveled. • located in...
... turn the power off to change light bulbs, clean, or service the unit. It is your responsibility to be sure your unit, follow these instructions completely and carefully. • DO NOT remove permanently affixed labels, warnings, or plates from the product. A 115V, 60 Hz, 15 amp fused electrical supply is not blocked to restrict incoming or discharge air flow. • properly leveled. • located in...

Use and Care Manual
Page 4
... temperature when the unit is reading actual air temperature not product temperature. At this point it will only be displayed. To unlock the control: 1. To store the new set point value. 2. If a button is located inside of the SAB button. Then press the SAB button. Product Temperature Set Points and Ranges All Refrigerator 38°F Range: 33°F to 43°F Refrigerated Drawer 38°F Range: 33°F to 43°F Beverage Center...
... temperature when the unit is reading actual air temperature not product temperature. At this point it will only be displayed. To unlock the control: 1. To store the new set point value. 2. If a button is located inside of the SAB button. Then press the SAB button. Product Temperature Set Points and Ranges All Refrigerator 38°F Range: 33°F to 43°F Refrigerated Drawer 38°F Range: 33°F to 43°F Beverage Center...
Use and Care Manual
Page 5
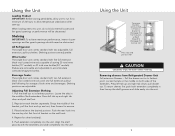
.... 4. Using the Unit Loading Product IMPORTANT: Before storing perishables, allow temperature stabilization after start-up. When loading items into the unit. 8 Using the Unit DANGER To remove brackets, remove shelf, lift front of bracket on both sides of both wine and beverages. All Refrigerator The single door unit comes standard with the extenders and slide completely into unit, do no block internal louvers and fan...
.... 4. Using the Unit Loading Product IMPORTANT: Before storing perishables, allow temperature stabilization after start-up. When loading items into the unit. 8 Using the Unit DANGER To remove brackets, remove shelf, lift front of bracket on both sides of both wine and beverages. All Refrigerator The single door unit comes standard with the extenders and slide completely into unit, do no block internal louvers and fan...
Use and Care Manual
Page 7
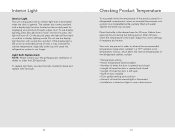
... light will turn back on the control panel for displaying your Viking Range parts distributor or dealer to order the LED light bulb. Your units are pre-set in order to achieve the recommended temperature range when installed in direct sun light or near a heat source 12 13 Interior Light Interior Light The unit is equipped with an interior light that is illuminated when the door is left open • Style of door installed • Door gasket...
... light will turn back on the control panel for displaying your Viking Range parts distributor or dealer to order the LED light bulb. Your units are pre-set in order to achieve the recommended temperature range when installed in direct sun light or near a heat source 12 13 Interior Light Interior Light The unit is equipped with an interior light that is illuminated when the door is left open • Style of door installed • Door gasket...
Use and Care Manual
Page 8
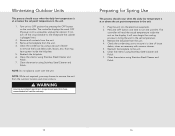
... inside the unit on the controller. WARNING Leaving your product operating in temperatures lower than those recommended will soon begin the cooling process to bring the unit to the set temperature. 3. It will void the warranty. Remove the kickplate from the outdoor location and store indoors. Clean the interior using Stainless Steel Cleaner and Polish. 14 DANGER 15 Turn unit to OFF position by using a vacuum...
... inside the unit on the controller. WARNING Leaving your product operating in temperatures lower than those recommended will soon begin the cooling process to bring the unit to the set temperature. 3. It will void the warranty. Remove the kickplate from the outdoor location and store indoors. Clean the interior using Stainless Steel Cleaner and Polish. 14 DANGER 15 Turn unit to OFF position by using a vacuum...
Use and Care Manual
Page 9
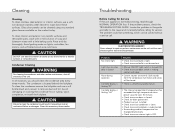
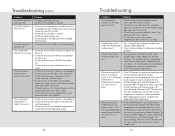
... the unit appears to repair or perform maintenance on lights, controllers, fan motors, and unfinished wood wine rack faces. Clean this area every three months. DANGER • The internal compartment temperature has exceeded the high temperature alarm preset value for over 30 minutes. • Check to ensure door is closed Noise during operation Controller display is flashing "P1" Controller display is flashing "HA" Solution • Check to ensure bulb...
... the unit appears to repair or perform maintenance on lights, controllers, fan motors, and unfinished wood wine rack faces. Clean this area every three months. DANGER • The internal compartment temperature has exceeded the high temperature alarm preset value for over 30 minutes. • Check to ensure door is closed Noise during operation Controller display is flashing "P1" Controller display is flashing "HA" Solution • Check to ensure bulb...
Use and Care Manual
Page 10
... pressed without pressing button, the display the SET button, the MAX stored shows a "Hi" message temperature will run long. Release the SET button and the new stored value will be displayed. Troubleshooting (cont.) Problem Solution Controller display is closed. • Check for door gasket seal. • Surrounding air temperature has changed dramatically. The refrigerated compartment is colder than usual • Check to ensure your control is set reset the MAX temperature, press and hold...
... pressed without pressing button, the display the SET button, the MAX stored shows a "Hi" message temperature will run long. Release the SET button and the new stored value will be displayed. Troubleshooting (cont.) Problem Solution Controller display is closed. • Check for door gasket seal. • Surrounding air temperature has changed dramatically. The refrigerated compartment is colder than usual • Check to ensure your control is set reset the MAX temperature, press and hold...
Use and Care Manual
Page 11
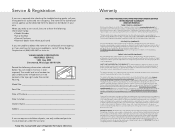
... food service locations. Sealed Refrigeration System Components: Compressor, Evaporator, Condenser, Connecting Tubing, Dryer/Strainer TWELVE YEAR LIMITED WARRANTY Any sealed refrigeration system component, as listed below, is found to have service problems, contact Viking Range Corporation at its free installation. Owner shall be performed by this manual with your nearest authorized Viking Range Corporation service agency, call , be obtained from whom purchased If you are unable to applications where use...
... food service locations. Sealed Refrigeration System Components: Compressor, Evaporator, Condenser, Connecting Tubing, Dryer/Strainer TWELVE YEAR LIMITED WARRANTY Any sealed refrigeration system component, as listed below, is found to have service problems, contact Viking Range Corporation at its free installation. Owner shall be performed by this manual with your nearest authorized Viking Range Corporation service agency, call , be obtained from whom purchased If you are unable to applications where use...
Use and Care Manual
Page 12
..., any reason, alteration, improper installation, improper operation or repair or service to the product by a factory authorized Viking Range Corporation service agent or representative. This warranty gives you specific rights, and you . Any implied warranties of merchantability and fitness applicable to the above described undercounter ice machine are warranted to jurisdiction. 22 Warranty VRCO/VRDO UNDERCOUNTER REFRIGERATION WARRANTY (OUTDOOR MODELS) ONE YEAR FULL WARRANTY Undercounter refrigeration and all of their...
..., any reason, alteration, improper installation, improper operation or repair or service to the product by a factory authorized Viking Range Corporation service agent or representative. This warranty gives you specific rights, and you . Any implied warranties of merchantability and fitness applicable to the above described undercounter ice machine are warranted to jurisdiction. 22 Warranty VRCO/VRDO UNDERCOUNTER REFRIGERATION WARRANTY (OUTDOOR MODELS) ONE YEAR FULL WARRANTY Undercounter refrigeration and all of their...

Professional Stainless Steel Handle Kit - 30 inch - Installation Instructions
Page 2
... with Wooden Full Overlay Custom Door Front Parts Included Part Quantity Professional Series Handle Tube (1) Professional Series End Caps (2) 1/4" x 1" Phillips Head Screws (4) Installation Instructions Required Tools Electric Drill 5/16" (.8 cm) Drill Bit 5/8" (1.6 cm) Spade or Forstner Bit (Counterbore) Tape Measure Phillips Head Screwdriver Masking Tape and Pencil Rubber Mallet To Install: 1. Locate the wooden custom panel. 2. It is recommended that both...
... with Wooden Full Overlay Custom Door Front Parts Included Part Quantity Professional Series Handle Tube (1) Professional Series End Caps (2) 1/4" x 1" Phillips Head Screws (4) Installation Instructions Required Tools Electric Drill 5/16" (.8 cm) Drill Bit 5/8" (1.6 cm) Spade or Forstner Bit (Counterbore) Tape Measure Phillips Head Screwdriver Masking Tape and Pencil Rubber Mallet To Install: 1. Locate the wooden custom panel. 2. It is recommended that both...
Specs
Page 1
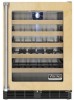
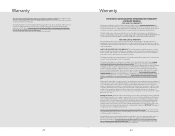
LEFT has hinge on left side and handle on left side; ORDERING INSTRUCTIONS First specify model number, then specify hinge preference ("R" for right or "L" for custom handle, or purchase a Viking Professional Series handle kit (see Installation Notes & Accessories). • Accept 3/4"-thick custom wood frame • See Custom Panels section or more information and additional specifications. REFRIGERATION Undercounter/Freestanding 24"W. FWCI1240G Custom Panel FINISH DETAILS FOR FWCI MODEL • Clear glass...
LEFT has hinge on left side and handle on left side; ORDERING INSTRUCTIONS First specify model number, then specify hinge preference ("R" for right or "L" for custom handle, or purchase a Viking Professional Series handle kit (see Installation Notes & Accessories). • Accept 3/4"-thick custom wood frame • See Custom Panels section or more information and additional specifications. REFRIGERATION Undercounter/Freestanding 24"W. FWCI1240G Custom Panel FINISH DETAILS FOR FWCI MODEL • Clear glass...
Specs
Page 5
REFRIGERATION Undercounter/Freestanding 24"W. Wine Cellar % Installation Notes & Accessories Handle Kits • For use on Viking products shipped within the United States and Canada. SS Description Professional handle (Stainless Steel) Approx. INFORMATION SUBJECT TO CHANGE lbs. (kg) 6 (2.7) Compliance Information WARRANTY SUMMARY* • Three-year full warranty-complete unit • Six-year full warranty-sealed refrigeration system (includes compressor, condenser, dryer/strainer, evaporator, and connecting tubing) • Twelve-year limited...
REFRIGERATION Undercounter/Freestanding 24"W. Wine Cellar % Installation Notes & Accessories Handle Kits • For use on Viking products shipped within the United States and Canada. SS Description Professional handle (Stainless Steel) Approx. INFORMATION SUBJECT TO CHANGE lbs. (kg) 6 (2.7) Compliance Information WARRANTY SUMMARY* • Three-year full warranty-complete unit • Six-year full warranty-sealed refrigeration system (includes compressor, condenser, dryer/strainer, evaporator, and connecting tubing) • Twelve-year limited...

