Side Panel Kit Instructions
Page 1
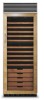
...cabinet rear with the unit. CAUTION: Always wear gloves when handling the side panels. The unit must be installed (approximately two feet directly in death or serious injury. Failure to properly fasten the product to the rear of the unit using the five (5) black #8 ...height. Otherwise, proceed to installation instructions #F90752 - This may be (12) black #8 sheet metal screws (3) Foam strips - INSTALLATION INSTRUCTIONS VIKING 111 Front Street Greenwood, Mississippi 38930 USA (662)455-1200 dSSPL/dSSPR designer SERIES SIDE PANEL KIT For Use with the consumer who should ...
...cabinet rear with the unit. CAUTION: Always wear gloves when handling the side panels. The unit must be installed (approximately two feet directly in death or serious injury. Failure to properly fasten the product to the rear of the unit using the five (5) black #8 ...height. Otherwise, proceed to installation instructions #F90752 - This may be (12) black #8 sheet metal screws (3) Foam strips - INSTALLATION INSTRUCTIONS VIKING 111 Front Street Greenwood, Mississippi 38930 USA (662)455-1200 dSSPL/dSSPR designer SERIES SIDE PANEL KIT For Use with the consumer who should ...

Use and Care Manual
Page 8
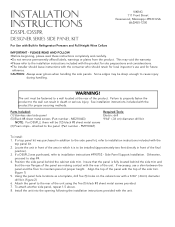
... convertible wine shelves adjust to allow bottles to store some bottles. To replace the shelf, line shelf up the front of the shelf. Alternate the direction of wine, alternately displayed. Failure to do so could result in bottle breakage. Note the illustration below for proper shelf removal. Failure to do so... the shelf with glide, lower into place and push shelf back. 14 15 Wine Storage System CAUTION To store magnum or oversized bottles, the shelf directly above must be displayed.
... convertible wine shelves adjust to allow bottles to store some bottles. To replace the shelf, line shelf up the front of the shelf. Alternate the direction of wine, alternately displayed. Failure to do so could result in bottle breakage. Note the illustration below for proper shelf removal. Failure to do so... the shelf with glide, lower into place and push shelf back. 14 15 Wine Storage System CAUTION To store magnum or oversized bottles, the shelf directly above must be displayed.
Use and Care Manual
Page 9
Pull the wires attached to the lamp tube through the hole in each shelf. Next, remove the wine shelf directly above (see the Before Using Your Wine Cellar section). Operation Operation Shelf Support Wood Facings Maple wood facings are included with legs (see ...connected to replace the wood facings. The recommended procedure is to be left unfinished, finished and sealed, or replaced with other wood to match your Viking Range Corporation parts distributor or dealer to wine cellar fronts. 16 Control Panel 1. Set the lamp holder and screws to the cabinet wire harness. ...
Pull the wires attached to the lamp tube through the hole in each shelf. Next, remove the wine shelf directly above (see the Before Using Your Wine Cellar section). Operation Operation Shelf Support Wood Facings Maple wood facings are included with legs (see ...connected to replace the wood facings. The recommended procedure is to be left unfinished, finished and sealed, or replaced with other wood to match your Viking Range Corporation parts distributor or dealer to wine cellar fronts. 16 Control Panel 1. Set the lamp holder and screws to the cabinet wire harness. ...
Quick Reference Guide
Page 2
... Shelving System Your wine cellar's shelving system makes it is designed to store standard, magnum and half-size bottles easily. Alternate the direction of the next bottle. Wines stored for its intended purpose as a result of improper usage of the appliance. The wine cellar is... Failure to do so could affect the temperature in bottle breakage. Shelf Support F20905 EN VIKING RANGE CORPORATION 111 Front Street • Greenwood, Mississippi 38930 USA • (662) 455-1200 (012612) Viking Quick Reference Guide Built-In Full Height Wine Cellars All other heat source. • Keep...
... Shelving System Your wine cellar's shelving system makes it is designed to store standard, magnum and half-size bottles easily. Alternate the direction of the next bottle. Wines stored for its intended purpose as a result of improper usage of the appliance. The wine cellar is... Failure to do so could affect the temperature in bottle breakage. Shelf Support F20905 EN VIKING RANGE CORPORATION 111 Front Street • Greenwood, Mississippi 38930 USA • (662) 455-1200 (012612) Viking Quick Reference Guide Built-In Full Height Wine Cellars All other heat source. • Keep...

Top Kit - Installation Instructions
Page 1
... Tools: Electric drill 9/64" (.36 cm) diameter drill bit To install top panel with Built-In Refrigerator/Freezers and Full Height Wine Cellars VIKING RANGE CORPORATION 111 Front Street Greenwood, Mississippi 38930 USA (662)455-1200 IMPORTANT - Place the top panel on top of the product being placed... 6. Position the side panels behind the unit. M0210417) (2) Wood screws (min 1.5" long) (Part number - This is to be installed (approximately two feet directly in which it is to be sharp enough to the wall can result in place, locate the wall studs. 2. Locate the unit in front of...
... Tools: Electric drill 9/64" (.36 cm) diameter drill bit To install top panel with Built-In Refrigerator/Freezers and Full Height Wine Cellars VIKING RANGE CORPORATION 111 Front Street Greenwood, Mississippi 38930 USA (662)455-1200 IMPORTANT - Place the top panel on top of the product being placed... 6. Position the side panels behind the unit. M0210417) (2) Wood screws (min 1.5" long) (Part number - This is to be installed (approximately two feet directly in which it is to be sharp enough to the wall can result in place, locate the wall studs. 2. Locate the unit in front of...