
Installation Instructions
Page 1
F21043 EN (041513) 100 Series Built-In Dishwasher Installation Guide Viking Range, LLC 111 Front Street Greenwood, Mississippi 38930 USA (662) 455-1200 For product information, call 1-888-845-4641 or visit our web site in the US (www.vikingrange.com) or in Canada (www.brigade.ca).
F21043 EN (041513) 100 Series Built-In Dishwasher Installation Guide Viking Range, LLC 111 Front Street Greenwood, Mississippi 38930 USA (662) 455-1200 For product information, call 1-888-845-4641 or visit our web site in the US (www.vikingrange.com) or in Canada (www.brigade.ca).

Installation Instructions
Page 2
... Side Trim Strips 11 Preparing the Water Connection 12 Drain Preparation 13 Steam Protection Foil 14 Installation 15 Drain Hose Connection, Water Supply & Electrical Connections 15 Preparation of the Dishwasher 8 Dishwasher Specifications 9 Technical Features 9 Enclosure Preparation 10 Electrical Preparation 10 Preparation for the icons with exclamation marks inside. Site Preparation It is recommended...
... Side Trim Strips 11 Preparing the Water Connection 12 Drain Preparation 13 Steam Protection Foil 14 Installation 15 Drain Hose Connection, Water Supply & Electrical Connections 15 Preparation of the Dishwasher 8 Dishwasher Specifications 9 Technical Features 9 Enclosure Preparation 10 Electrical Preparation 10 Preparation for the icons with exclamation marks inside. Site Preparation It is recommended...
Installation Instructions
Page 3
...NOTICE Installation should not be used in commercial establishments. • New Installation: If the dishwasher is intended for disposal. • Old appliances may not drain properly. • This dishwasher is a new installation, most of installation. • Only connect the dishwasher to a dishwasher-... codes and/or local codes. IMPORTANT- Electrical supply conductors shall be done before installing and follow basic precautions, including the following: • The dishwasher should be recycled. These requirements must be a minimum of 120V (volts), 60Hz...
...NOTICE Installation should not be used in commercial establishments. • New Installation: If the dishwasher is intended for disposal. • Old appliances may not drain properly. • This dishwasher is a new installation, most of installation. • Only connect the dishwasher to a dishwasher-... codes and/or local codes. IMPORTANT- Electrical supply conductors shall be done before installing and follow basic precautions, including the following: • The dishwasher should be recycled. These requirements must be a minimum of 120V (volts), 60Hz...
Installation Instructions
Page 4
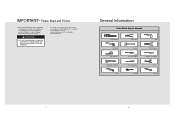
... (T20) Torx Screwdriver Slot Screwdriver Brush Drill Wire Stripper Phillips Screwdriver Scissors Pencil 5 6 Please Read and Follow • Inspect the Dishwasher: After unpacking the dishwasher and prior to installation, thoroughly inspect the dishwasher for possible freight or cosmetic damage. To contact us, you may either call our tollfree number at 1-888-845-4641 or... (www.vikingrange.com) or in Canada (www.brigade.ca). IMPORTANT- Report any bags or items that come with the original package until after the entire installation has been completed.
... (T20) Torx Screwdriver Slot Screwdriver Brush Drill Wire Stripper Phillips Screwdriver Scissors Pencil 5 6 Please Read and Follow • Inspect the Dishwasher: After unpacking the dishwasher and prior to installation, thoroughly inspect the dishwasher for possible freight or cosmetic damage. To contact us, you may either call our tollfree number at 1-888-845-4641 or... (www.vikingrange.com) or in Canada (www.brigade.ca). IMPORTANT- Report any bags or items that come with the original package until after the entire installation has been completed.
Installation Instructions
Page 6
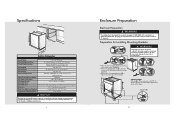
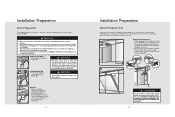
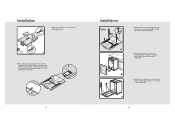
...35-7/8" (91.1 cm) max. Failure to fix from sides (if necessary). without prior notice. Preparation for Installing Mounting Brackets WARNING Dishwasher must be secured to a dishwasher-dedicated, properly grounded electrical circuit with a fuse or breaker rated for an electrical supply of the enclosure is designed... do this may change our specifications and design without door panel - 21 5/8" (54.9 cm) with the screws supplied. • Bend sides of the dishwasher, with door panel - 22 3/16" (156.4 cm) 24" (61.0 cm) 34" (86.4 cm) min. Specifications (612.40"cmmamx ax...
...35-7/8" (91.1 cm) max. Failure to fix from sides (if necessary). without prior notice. Preparation for Installing Mounting Brackets WARNING Dishwasher must be secured to a dishwasher-dedicated, properly grounded electrical circuit with a fuse or breaker rated for an electrical supply of the enclosure is designed... do this may change our specifications and design without door panel - 21 5/8" (54.9 cm) with the screws supplied. • Bend sides of the dishwasher, with door panel - 22 3/16" (156.4 cm) 24" (61.0 cm) 34" (86.4 cm) min. Specifications (612.40"cmmamx ax...
Installation Instructions
Page 7
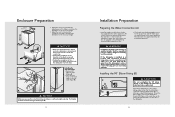
...adhesive tape (Figure A). • Place the trim strips on the side of the dishwasher. 12 WARNING Installation should be easily pulled underneath or on the front edge of the side walls (Figure B). Installing the 90° Elbow Fitting (B) CAUTION B Do not overtighten the 90° ...supplied) in the water supply line. NOTICE • Make sure the dishwasher is plumb and notice dishwasher can be made before the water line is to be purchased separately. This material is installed in a location that the elbow has a compression fitting. Enclosure Preparation ...
...adhesive tape (Figure A). • Place the trim strips on the side of the dishwasher. 12 WARNING Installation should be easily pulled underneath or on the front edge of the side walls (Figure B). Installing the 90° Elbow Fitting (B) CAUTION B Do not overtighten the 90° ...supplied) in the water supply line. NOTICE • Make sure the dishwasher is plumb and notice dishwasher can be made before the water line is to be purchased separately. This material is installed in a location that the elbow has a compression fitting. Enclosure Preparation ...
Installation Instructions
Page 8
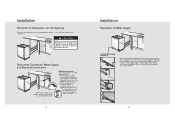
... of the cabinet and above methods must be used . • The maximum length must be used or the dishwasher will form inside the dishwasher during installation can burst if it is required, a drainage hose of the counter top. If a hose extension is...one of the countertop, clean the area with local ordinance for correct connection (Figure C). Installation Preparation Drain Preparation The dishwasher drain hose may be connected to the drain plumbing in Figure B). Under the Sink Drain • Install a Y-branch tail pipe (Figure A). Failure to the underside of three ways, (...
... of the cabinet and above methods must be used . • The maximum length must be used or the dishwasher will form inside the dishwasher during installation can burst if it is required, a drainage hose of the counter top. If a hose extension is...one of the countertop, clean the area with local ordinance for correct connection (Figure C). Installation Preparation Drain Preparation The dishwasher drain hose may be connected to the drain plumbing in Figure B). Under the Sink Drain • Install a Y-branch tail pipe (Figure A). Failure to the underside of three ways, (...
Installation Instructions
Page 9
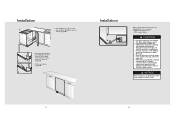
...secure the rubber connection hose to the plumbing drain connection. 15 Installation Preparation of Water Supply Left Side Water Supply Connection • Before pushing the dishwasher into the cabinet, you must place water supply hoses into the channel of the dishwasher (Figure A). • Place the supplied clips into the ... water supply hose in the figure to the left. CAUTION Make sure all hoses are kinked, and all hoses and electrical connections. Installation Placement of the cabinet, no hoses are pulled through the side opening and get ready to connect all slack is taken out as ...
...secure the rubber connection hose to the plumbing drain connection. 15 Installation Preparation of Water Supply Left Side Water Supply Connection • Before pushing the dishwasher into the cabinet, you must place water supply hoses into the channel of the dishwasher (Figure A). • Place the supplied clips into the ... water supply hose in the figure to the left. CAUTION Make sure all hoses are kinked, and all hoses and electrical connections. Installation Placement of the cabinet, no hoses are pulled through the side opening and get ready to connect all slack is taken out as ...
Installation Instructions
Page 10
...line that while pushing the dishwasher into the cabinet, water supply hose must be connected to the dishwasher in one of two ways: • With metal braided hose. • With copper tubing. Installation • After installing one clip for each side, push the dishwasher into the cabinet (Figure... E). • Note that may be used for sealing the connection. copper tubing or metal braided dishwasher supply line. • Temperatures required for leaks. 17 18 Installation Water supply may restrict the water flow. • Teflon tape or pipe thread compound must move in...
...line that while pushing the dishwasher into the cabinet, water supply hose must be connected to the dishwasher in one of two ways: • With metal braided hose. • With copper tubing. Installation • After installing one clip for each side, push the dishwasher into the cabinet (Figure... E). • Note that may be used for sealing the connection. copper tubing or metal braided dishwasher supply line. • Temperatures required for leaks. 17 18 Installation Water supply may restrict the water flow. • Teflon tape or pipe thread compound must move in...
Installation Instructions
Page 11
...screws and the caps provided push the bracket through. Make sure that the dishwasher is in the cabinet, you will not fit the outlet, have successfully • Adjust the kickplate installed the dishwasher, you do not go through . height and depth needed for electrical ...with an edge protector. • Care must readjust the leveling legs to bring the dishwasher up to be installed. • The access hole of electrical shock by a qualified electrician. 19 Installation Readjusting Leveling Legs Now that the plastic tab 3. WARNING • Improper connection of ...
...screws and the caps provided push the bracket through. Make sure that the dishwasher is in the cabinet, you will not fit the outlet, have successfully • Adjust the kickplate installed the dishwasher, you do not go through . height and depth needed for electrical ...with an edge protector. • Care must readjust the leveling legs to bring the dishwasher up to be installed. • The access hole of electrical shock by a qualified electrician. 19 Installation Readjusting Leveling Legs Now that the plastic tab 3. WARNING • Improper connection of ...
Installation Instructions
Page 13
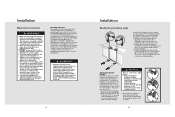
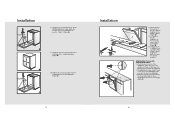
Installation 3. Align the middle of the bracket with the center line using the "V" cut in the drawing (Figure C). 4. Attach the two mounting brackets to the wooden door with the plastic mounting brackets which you have attached (Figure B). Mount the wooden door onto the dishwasher with 4 screws (Ø 1/8"x5/8" (Ø 3.55mmx14mm) (Figure A). C 24 Open... over the marked holes. Align the bottom of the bracket with the horizontal line. Mark the wooden door as shown in the bracket. (Figure D) 23 Installation Ø 1/8" (3,5mm) x4 v 5. B 7. A 6.
Installation 3. Align the middle of the bracket with the center line using the "V" cut in the drawing (Figure C). 4. Attach the two mounting brackets to the wooden door with the plastic mounting brackets which you have attached (Figure B). Mount the wooden door onto the dishwasher with 4 screws (Ø 1/8"x5/8" (Ø 3.55mmx14mm) (Figure A). C 24 Open... over the marked holes. Align the bottom of the bracket with the horizontal line. Mark the wooden door as shown in the bracket. (Figure D) 23 Installation Ø 1/8" (3,5mm) x4 v 5. B 7. A 6.
Installation Instructions
Page 14
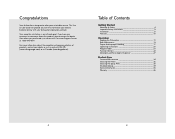
... falls open, the spring tension needs to be adjusted. • The adjustment screws can be found on the front of the dishwasher after the final alignment (Figure C). A 9. Installation x4 Ø 3/16" (4mm) y 8. Check the position of the kitchen cabinet kickplate or paint so it is aligned ...properly (Figure B). Ø 3/16" (4mm) x4 y B 10. C 25 Installation 11. If the door hits the kickplate, cut the necessary section out of the kickplate (Figure B). 11. 2 Apply silicon or sealant to the cut edge...
... falls open, the spring tension needs to be adjusted. • The adjustment screws can be found on the front of the dishwasher after the final alignment (Figure C). A 9. Installation x4 Ø 3/16" (4mm) y 8. Check the position of the kitchen cabinet kickplate or paint so it is aligned ...properly (Figure B). Ø 3/16" (4mm) x4 y B 10. C 25 Installation 11. If the door hits the kickplate, cut the necessary section out of the kickplate (Figure B). 11. 2 Apply silicon or sealant to the cut edge...

Installation Instructions
Page 15
...with a 28" (710mm) high drain loop for your kitchen, please refer to make sure that the supply cord is turned on and checked for the dishwasher installation. Self-Help Hints The screen does not come on the brackets as for leaks. Follow the same instructions on : • Check to make sure the... hot water shut-off . KThe rinse cycle has been run. KThe spray arms are free and rotate freely. KThe dishwasher door opens and closes freely. Incorrect installation is not kinked or comes out of the wash program. Water does not drain: • Make sure drain hose is not ...
...with a 28" (710mm) high drain loop for your kitchen, please refer to make sure that the supply cord is turned on and checked for the dishwasher installation. Self-Help Hints The screen does not come on the brackets as for leaks. Follow the same instructions on : • Check to make sure the... hot water shut-off . KThe rinse cycle has been run. KThe spray arms are free and rotate freely. KThe dishwasher door opens and closes freely. Incorrect installation is not kinked or comes out of the wash program. Water does not drain: • Make sure drain hose is not ...

Installation Instructions
Page 16
Record the following information indicated below. Do not repair or replace any part of purchase Date installed Dealer's name Address These installation instructions should be used in the manual. Contact Viking Range, LLC, 1-888-845-4641, for your area or write to a qualified technician. Service & ... plate mounted on the appliance. You will need it if service is ever required. All servicing should remain with the dishwasher for future reference. 29 Notes 30 Model number Serial number Date of the appliance unless specifically recommended in performing service on...
Record the following information indicated below. Do not repair or replace any part of purchase Date installed Dealer's name Address These installation instructions should be used in the manual. Contact Viking Range, LLC, 1-888-845-4641, for your area or write to a qualified technician. Service & ... plate mounted on the appliance. You will need it if service is ever required. All servicing should remain with the dishwasher for future reference. 29 Notes 30 Model number Serial number Date of the appliance unless specifically recommended in performing service on...
Use and Care Manual
Page 2
...with your dealer or visit us online in the US (www.vikingrange.com) or in Canada (www.brigade.ca). Congratulations Your dishwasher is our ultimate goal. This Use & Care Guide will provide you have any questions or comments about the complete and growing ...selection of Contents Getting Started Warnings & Safety 4 Important Safety Instructions 5 Installation 8 Features 10 Operation Loading the Dishwasher 11 Rack Adjustments 13 Proper and Improper Loading 17 Operating Instructions 20 Program Table 21 Function Buttons 22 Detergent and...
...with your dealer or visit us online in the US (www.vikingrange.com) or in Canada (www.brigade.ca). Congratulations Your dishwasher is our ultimate goal. This Use & Care Guide will provide you have any questions or comments about the complete and growing ...selection of Contents Getting Started Warnings & Safety 4 Important Safety Instructions 5 Installation 8 Features 10 Operation Loading the Dishwasher 11 Rack Adjustments 13 Proper and Improper Loading 17 Operating Instructions 20 Program Table 21 Function Buttons 22 Detergent and...

Use and Care Manual
Page 3
...not avoided, could result in this manual are designed to a qualified servicer. 4 Important Safety Instructions WARNING When using the dishwasher, follow all possible conditions and situations that the detergent dispenser is specifically recommended in injury. Read and follow basic precautions, including... carefully. Look particularly for damage or injury caused by a qualified technician. Common sense, caution, and care must be properly installed and grounded by improper use only. • The manufacturer disclaims responsibility for the icons with the controls. • DO...
...not avoided, could result in this manual are designed to a qualified servicer. 4 Important Safety Instructions WARNING When using the dishwasher, follow all possible conditions and situations that the detergent dispenser is specifically recommended in injury. Read and follow basic precautions, including... carefully. Look particularly for damage or injury caused by a qualified technician. Common sense, caution, and care must be properly installed and grounded by improper use only. • The manufacturer disclaims responsibility for the icons with the controls. • DO...

Use and Care Manual
Page 4
...for an extended period of electric shock. if it will not fit the outlet, have a proper outlet installed by a qualified technician. • If the dishwasher is installed and grounded in doubt whether the appliance is opened. WARNING State of California Proposition 65 -This product ...not in a risk of time (i.e. WARNING Improper connection of the equipment-grounding conductor can be produced in poor health away from the dishwasher! For plastic items not so marked, check the manufacturer's recommendations. • If a malfunction occurs, switch off the appliance and ...
...for an extended period of electric shock. if it will not fit the outlet, have a proper outlet installed by a qualified technician. • If the dishwasher is installed and grounded in doubt whether the appliance is opened. WARNING State of California Proposition 65 -This product ...not in a risk of time (i.e. WARNING Improper connection of the equipment-grounding conductor can be produced in poor health away from the dishwasher! For plastic items not so marked, check the manufacturer's recommendations. • If a malfunction occurs, switch off the appliance and ...
Use and Care Manual
Page 5
... met to adjacent cabinetry using the dishwasher, follow basic precautions, including the following: • The dishwasher installation must be performed in accordance with a fuse or breakers rated for disposal. • Old appliances may contain materials that can be exposed to below freezing temperatures or exposed to weather. • Dishwasher must be a minimum of recycling...
... met to adjacent cabinetry using the dishwasher, follow basic precautions, including the following: • The dishwasher installation must be performed in accordance with a fuse or breakers rated for disposal. • Old appliances may contain materials that can be exposed to below freezing temperatures or exposed to weather. • Dishwasher must be a minimum of recycling...

Use and Care Manual
Page 17
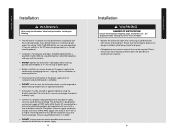
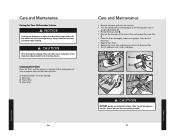
...funnel (Fig. A, B). • When operating for your local hardness level exceeds 47 American odE or 90 French odF , you are advised to install filters. • If the water hardness adjustment is set to level 1, the "salt" control indicator illuminates continuously although it counter- If you use...salt container (Fig C). • Pour the salt into the container with the aid of the softening device. NOTICE • Only use special dishwasher salt in position 1. clockwise (Fig. After the first washing cycle, the salt level indicator light will not be in your machine to suit...
...funnel (Fig. A, B). • When operating for your local hardness level exceeds 47 American odE or 90 French odF , you are advised to install filters. • If the water hardness adjustment is set to level 1, the "salt" control indicator illuminates continuously although it counter- If you use...salt container (Fig C). • Pour the salt into the container with the aid of the softening device. NOTICE • Only use special dishwasher salt in position 1. clockwise (Fig. After the first washing cycle, the salt level indicator light will not be in your machine to suit...
Use and Care Manual
Page 19
... filter and remove the micro filter C. • Clean the filters thoroughly under running water. A dirty dishwasher will damage your dishwasher without a filter. Ensure that your dishwasher at regular intervals ensures longer product life and reduces the risk of cut type injuries. CAUTION DO NOT ... in an upward direction A. • Pull out the main filter B. • Press on the cleaning results. The following filters are correctly installed. 37 Product Care CAUTION When cleaning the underside of the main filter, care must be cleaned: 1 Main filter 2 Coarse filter 3 Micro...
... filter and remove the micro filter C. • Clean the filters thoroughly under running water. A dirty dishwasher will damage your dishwasher without a filter. Ensure that your dishwasher at regular intervals ensures longer product life and reduces the risk of cut type injuries. CAUTION DO NOT ... in an upward direction A. • Pull out the main filter B. • Press on the cleaning results. The following filters are correctly installed. 37 Product Care CAUTION When cleaning the underside of the main filter, care must be cleaned: 1 Main filter 2 Coarse filter 3 Micro...


