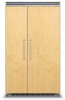

Professional Stainless Steel Handle Kit - 28 inch - Installation Instructions
Page 1
Viking Installation Guide Viking Range Corporation 111 Front Street Greenwood, Mississippi 38930 USA (662) 455-1200 For product information, call 1-888-VIKING1 (845-4641) or visit the Viking Web site at vikingrange.com F20660 EN (041609J) PHK28 Professional Series Handle Kit For Use with DFRB5 All Refrigerators and DFFB5 All Freezers
Viking Installation Guide Viking Range Corporation 111 Front Street Greenwood, Mississippi 38930 USA (662) 455-1200 For product information, call 1-888-VIKING1 (845-4641) or visit the Viking Web site at vikingrange.com F20660 EN (041609J) PHK28 Professional Series Handle Kit For Use with DFRB5 All Refrigerators and DFFB5 All Freezers
Professional Stainless Steel Handle Kit - 28 inch - Installation Instructions
Page 2
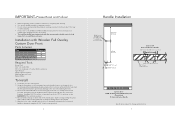
...cm) 5/16" (.8 cm) Ø through the door in the hole locations. Align the holes in the endcaps with the holes on installing the refrigerator/freezer door panel. • The installer should retain for local inspector's use and future reference. Using the 5/16"(.8 cm) drill bit, drill completely ...through -holes 3/4" (1.8 cm) Full Overlay Panel Custom Door DFRB All Refrigerator/DFFB All Freezer (Front View) Professional Series Handle Specifications subject to the DFRB5 or DFFB5 Installation Instructions for more information on the...
...cm) 5/16" (.8 cm) Ø through the door in the hole locations. Align the holes in the endcaps with the holes on installing the refrigerator/freezer door panel. • The installer should retain for local inspector's use and future reference. Using the 5/16"(.8 cm) drill bit, drill completely ...through -holes 3/4" (1.8 cm) Full Overlay Panel Custom Door DFRB All Refrigerator/DFFB All Freezer (Front View) Professional Series Handle Specifications subject to the DFRB5 or DFFB5 Installation Instructions for more information on the...

Installation Instructions
Page 7
...) Overall depth from rear Cutout width Cutout height Standard Cutout depth Electrical requirements Maximum amp usage Inlet water requirements Overall interior dimensions Refrigerator Freezer Total capacity Approximate shipping weight 42" Side-By-Side VCSB/CVCSB 42" (106.7 cm) 82-3/4" (210.2 cm) min...Overall depth from rear Cutout width Cutout height Standard Cutout depth Electrical requirements Maximum amp usage Inlet water requirements Overall interior dimensions Refrigerator Freezer Total capacity Approximate shipping weight 48" Side-By-Side VCSB/CVCSB 48" (121.9 cm) 82-3/4" (210.2 cm)...
...) Overall depth from rear Cutout width Cutout height Standard Cutout depth Electrical requirements Maximum amp usage Inlet water requirements Overall interior dimensions Refrigerator Freezer Total capacity Approximate shipping weight 42" Side-By-Side VCSB/CVCSB 42" (106.7 cm) 82-3/4" (210.2 cm) min...Overall depth from rear Cutout width Cutout height Standard Cutout depth Electrical requirements Maximum amp usage Inlet water requirements Overall interior dimensions Refrigerator Freezer Total capacity Approximate shipping weight 48" Side-By-Side VCSB/CVCSB 48" (121.9 cm) 82-3/4" (210.2 cm)...

Installation Instructions
Page 9
...15 amp dedicated circuit; 3-wire cord with grounded 3-prong plug attached to product 9.9 amps Inlet water requirements Overall interior dimensions Refrigerator Freezer Total capacity Approximate shipping weight 1/4" copper tubing inlet waterline; minimum 20 psi; Overall depth from bottom) 82-3/4" (210...15 amp dedicated circuit; 3-wire cord with grounded 3-prong plug attached to product 9.9 amps Inlet water requirements Overall interior dimensions Refrigerator Freezer Total capacity Approximate shipping weight 1/4" copper tubing inlet waterline; ft. (823 liters) 580 lbs. (263 kg) 9...
...15 amp dedicated circuit; 3-wire cord with grounded 3-prong plug attached to product 9.9 amps Inlet water requirements Overall interior dimensions Refrigerator Freezer Total capacity Approximate shipping weight 1/4" copper tubing inlet waterline; minimum 20 psi; Overall depth from bottom) 82-3/4" (210...15 amp dedicated circuit; 3-wire cord with grounded 3-prong plug attached to product 9.9 amps Inlet water requirements Overall interior dimensions Refrigerator Freezer Total capacity Approximate shipping weight 1/4" copper tubing inlet waterline; ft. (823 liters) 580 lbs. (263 kg) 9...

Installation Instructions
Page 14
... door 24" (61.0 cm) Finished Wall 24-3/4" (62.9 cm) Standard Side trim 2-3/8" (6.0 cm) 27/32" (0.2 cm) Face of cabinet frame Face of door/drawer 3/4" (.6 cm) * Refrigerator foam cabinet can vary in 24" (61.0 cm) deep cabinets, the door face protrudes 2-3/4" (7.0 cm) from the cabinet face. The handle protrudes an additional 2-15...
... door 24" (61.0 cm) Finished Wall 24-3/4" (62.9 cm) Standard Side trim 2-3/8" (6.0 cm) 27/32" (0.2 cm) Face of cabinet frame Face of door/drawer 3/4" (.6 cm) * Refrigerator foam cabinet can vary in 24" (61.0 cm) deep cabinets, the door face protrudes 2-3/4" (7.0 cm) from the cabinet face. The handle protrudes an additional 2-15...
Installation Instructions
Page 21
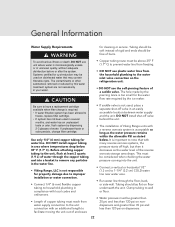
...you are accurate. • Electrical outlet is in correct location. • Water line is in correct location. • DO NOT install a refrigeration unit near a heat source, nor in the neutral or grounding circuit. DO NOT have a fuse in a location where the surrounding temperature will ...and through doorways. • Floors can support unit's weight plus food weight (approximately 1200 pounds [540 kg] per unit). • Floors underneath refrigerator are level with surrounding finished floor. • Rear wall is solid and is able to support two horizontally mounted 2 x 4s (...
...you are accurate. • Electrical outlet is in correct location. • Water line is in correct location. • DO NOT install a refrigeration unit near a heat source, nor in the neutral or grounding circuit. DO NOT have a fuse in a location where the surrounding temperature will ...and through doorways. • Floors can support unit's weight plus food weight (approximately 1200 pounds [540 kg] per unit). • Floors underneath refrigerator are level with surrounding finished floor. • Rear wall is solid and is able to support two horizontally mounted 2 x 4s (...
Installation Instructions
Page 22
... hole made by the ice maker. • If saddle valve is not used, place a separate shut-off valve behind the unit. • The installation of Viking Range units with a reverse osmosis system is required. • If water filtration system has been allowed to note that may be above 35º... must be greater than 20 psi and less than 120 psi on nondispensers and greater than 35 psi and less than 120 psi on the refrigeration unit. • DO NOT use the self-piercing feature of unknown quality, without adequate disinfection before or after the system. Clamp tubing to wall or...
... hole made by the ice maker. • If saddle valve is not used, place a separate shut-off valve behind the unit. • The installation of Viking Range units with a reverse osmosis system is required. • If water filtration system has been allowed to note that may be above 35º... must be greater than 20 psi and less than 120 psi on nondispensers and greater than 35 psi and less than 120 psi on the refrigeration unit. • DO NOT use the self-piercing feature of unknown quality, without adequate disinfection before or after the system. Clamp tubing to wall or...

Installation Instructions
Page 24
... trim pieces and a hardware kit with the cabinets, the flush mount side trim must be installed first. Remove the side trim on the refrigerator and discard the trim and screws. Step 1 - Installation 1 2 Place unit in front of the unit's machine compartment. Step 3 - Using the screws included in the machine...
... trim pieces and a hardware kit with the cabinets, the flush mount side trim must be installed first. Remove the side trim on the refrigerator and discard the trim and screws. Step 1 - Installation 1 2 Place unit in front of the unit's machine compartment. Step 3 - Using the screws included in the machine...
Installation Instructions
Page 25
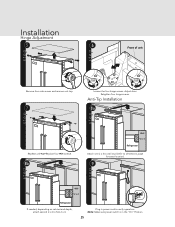
Adjust door. Anti-Tip Installation 8a Wall 2 x 4 Refrigerator Attach one 2 x 4 to wall stud (refer to dimensions page for exact location). 9 Wall 2 x 4 Refrigerator If needed, depending on cabinet and depth, attach second 2 x 4 to verify operation. HInestaadllaintieon Hinge Adjustment 5 2 1 Remove four side screws and remove unit top. 7 1 2 Replace unit top. Retighten four hinge screws. Replace four side screws. 8b 6 Front of unit 2 1 3 Loosen the four hinge screws. Plug in the "On" Position. 25 Note: Make sure power switch is in power cord to first 2 x 4.
Adjust door. Anti-Tip Installation 8a Wall 2 x 4 Refrigerator Attach one 2 x 4 to wall stud (refer to dimensions page for exact location). 9 Wall 2 x 4 Refrigerator If needed, depending on cabinet and depth, attach second 2 x 4 to verify operation. HInestaadllaintieon Hinge Adjustment 5 2 1 Remove four side screws and remove unit top. 7 1 2 Replace unit top. Retighten four hinge screws. Replace four side screws. 8b 6 Front of unit 2 1 3 Loosen the four hinge screws. Plug in the "On" Position. 25 Note: Make sure power switch is in power cord to first 2 x 4.

Installation Instructions
Page 27
HInestaadllaintieon 15 16 Lift unit off rollers to wall stud Make sure evaporator pan is in correct location. Overtightening can cause damage. 17 Screw Wall 2 x 4 Refrigerator Insert mounting screws into 2x4 attached to desired height and level unit using a 5/16" head wrench. Using a Phillips screwdriver, attach the kickplate to the unit and adjust to desired height. 27 Kickplate Installation 18 19 1 1 2 3 2 Align holes on both ends of louvered panels and insert screws. NOTE: DO NOT use an electric device.
HInestaadllaintieon 15 16 Lift unit off rollers to wall stud Make sure evaporator pan is in correct location. Overtightening can cause damage. 17 Screw Wall 2 x 4 Refrigerator Insert mounting screws into 2x4 attached to desired height and level unit using a 5/16" head wrench. Using a Phillips screwdriver, attach the kickplate to the unit and adjust to desired height. 27 Kickplate Installation 18 19 1 1 2 3 2 Align holes on both ends of louvered panels and insert screws. NOTE: DO NOT use an electric device.

Installation Instructions
Page 28
Headline Door Stop Adjustment 20 1 3 2 Open refrigerator door so door stop and shoulder screw are accessible. Note: Shoulder screw should be in 110º door opening position. 21 1 90˚ 110˚ 120˚ 2 Remove shoulder screw and place in 90º or 120º position. 28
Headline Door Stop Adjustment 20 1 3 2 Open refrigerator door so door stop and shoulder screw are accessible. Note: Shoulder screw should be in 110º door opening position. 21 1 90˚ 110˚ 120˚ 2 Remove shoulder screw and place in 90º or 120º position. 28
Installation Instructions
Page 32
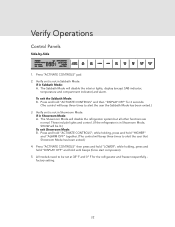
... lights, display (except SAB indicator, temperature and compartment indicator) and alarm. If in Sabbath Mode: A. These include lights and control. (If the refrigerator is not in Sabbath Mode. while holding , press and hold "LOWER"; Press and hold until beeps (force start compressor). 5. If in Showroom Mode...Showroom Mode has been exited.) 4. Verify Operations Control Panels Side-by-Side FREEZER MAX FRZ MAX REF FAST COOL SAB SHOW C F REFRIGERATOR DOOR OPEN POWER HIGH TEMP ACTIVATE CONTROLS FRZ TEMP REF TEMP HIGHER LOWER FAST COOL MAX REF MAX FRZ ALARM OFF DISPLAY OFF 1....
... lights, display (except SAB indicator, temperature and compartment indicator) and alarm. If in Sabbath Mode: A. These include lights and control. (If the refrigerator is not in Sabbath Mode. while holding , press and hold "LOWER"; Press and hold until beeps (force start compressor). 5. If in Showroom Mode...Showroom Mode has been exited.) 4. Verify Operations Control Panels Side-by-Side FREEZER MAX FRZ MAX REF FAST COOL SAB SHOW C F REFRIGERATOR DOOR OPEN POWER HIGH TEMP ACTIVATE CONTROLS FRZ TEMP REF TEMP HIGHER LOWER FAST COOL MAX REF MAX FRZ ALARM OFF DISPLAY OFF 1....
Use and Care Manual
Page 2
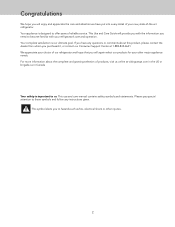
... any instructions given. This use and care manual contains safety symbols and statements. Your appliance is designed to offer years of -the-art refrigerator. If you to become familiar with the information you will provide you with your choice of products, visit us online at 1-888-845-...4641. We appreciate your refrigerator's care and operation. This symbol alerts you have put into every detail of your new, state-of reliable service. This Use and Care...
... any instructions given. This use and care manual contains safety symbols and statements. Your appliance is designed to offer years of -the-art refrigerator. If you to become familiar with the information you will provide you with your choice of products, visit us online at 1-888-845-...4641. We appreciate your refrigerator's care and operation. This symbol alerts you have put into every detail of your new, state-of reliable service. This Use and Care...
Use and Care Manual
Page 3
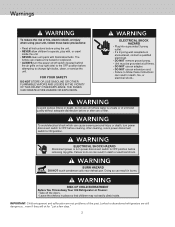
... FLAMMABLE VAPORS AND LIQUIDS IN THE VICINITY OF THIS OR ANY OTHER APPLIANCE. THE FUMES CAN CREATE A FIRE HAZARD OR EXPLOSION. Junked or abandoned refrigerators are not problems of the past. WARNING ELECTRICAL SHOCK HAZARD • Plug into a grounded 3-prong outlet. • If a 2-prong wall ...follow these instructions can result in death, fire, or electrical shock.- WARNING RISK OF CHILD ENTRAPMENT Before You Throw Away Your Old Refrigerator or Freezer: • Take off switch (located behind the air grille on top right side) to the OFF position before removing top grille...
... FLAMMABLE VAPORS AND LIQUIDS IN THE VICINITY OF THIS OR ANY OTHER APPLIANCE. THE FUMES CAN CREATE A FIRE HAZARD OR EXPLOSION. Junked or abandoned refrigerators are not problems of the past. WARNING ELECTRICAL SHOCK HAZARD • Plug into a grounded 3-prong outlet. • If a 2-prong wall ...follow these instructions can result in death, fire, or electrical shock.- WARNING RISK OF CHILD ENTRAPMENT Before You Throw Away Your Old Refrigerator or Freezer: • Take off switch (located behind the air grille on top right side) to the OFF position before removing top grille...
Use and Care Manual
Page 4
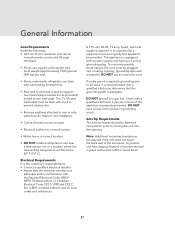
...Storage Guide 12 Product Care Cleaning and Maintenance 14 Troubleshooting 17 Service Information 18 Warranty 19 Important Safety Instructions • Install and level your refrigerator on a floor that will hold its weight, plus food weight (approximately 1200 pounds [540kg]) and in an area suitable for its... size and use. • DO NOT install a refrigeration unit near a heat source, nor in a location where the surrounding temperature will fall below 60°F (16° C). • DO NOT allow...
...Storage Guide 12 Product Care Cleaning and Maintenance 14 Troubleshooting 17 Service Information 18 Warranty 19 Important Safety Instructions • Install and level your refrigerator on a floor that will hold its weight, plus food weight (approximately 1200 pounds [540kg]) and in an area suitable for its... size and use. • DO NOT install a refrigeration unit near a heat source, nor in a location where the surrounding temperature will fall below 60°F (16° C). • DO NOT allow...

Use and Care Manual
Page 5
WARNING RISK OF CHILD ENTRAPMENT Before You Throw Away Your Old Refrigerator or Freezer: • Take off the doors. • Leave the shelves in a way that minimizes the possibility that children will find it is extremely ...important that you have been many cases in years past of children crawling inside . 5 Proper Disposal (of old refrigerator) IMPORTANT: Now that you dispose of your old refrigerator. Contact your municipal waste disposal authority to find out the best and safest way to dispose of your old appliance...
WARNING RISK OF CHILD ENTRAPMENT Before You Throw Away Your Old Refrigerator or Freezer: • Take off the doors. • Leave the shelves in a way that minimizes the possibility that children will find it is extremely ...important that you have been many cases in years past of children crawling inside . 5 Proper Disposal (of old refrigerator) IMPORTANT: Now that you dispose of your old refrigerator. Contact your municipal waste disposal authority to find out the best and safest way to dispose of your old appliance...
Use and Care Manual
Page 6
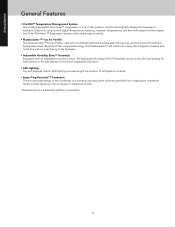
Because of the unique technology, the Plasmacluster™ will continue to keep the refrigerator bateria and mold free without ever having to eliminate airborne bacteria and mold spores, remove odors and enhance food preservation. Getting Started General Features •... greens or the low setting for fruits and vegetables with skins. • LED Lighting Top and sidewall interior LED lighting provides bright illumination of refrigerator contents. • Super Clog-Resistant™ Condenser The pin and tube design of the quietest, most technologically advanced compressors available.
Because of the unique technology, the Plasmacluster™ will continue to keep the refrigerator bateria and mold free without ever having to eliminate airborne bacteria and mold spores, remove odors and enhance food preservation. Getting Started General Features •... greens or the low setting for fruits and vegetables with skins. • LED Lighting Top and sidewall interior LED lighting provides bright illumination of refrigerator contents. • Super Clog-Resistant™ Condenser The pin and tube design of the quietest, most technologically advanced compressors available.

Use and Care Manual
Page 8
...after cleaning or changing light bulbs. To activate the electronic control panel, press "ACTIVATE CONTROLS" pad. When you first plug your new refrigerator in, you will find that you understand its various features, controls, and how to use them. To activate fast cool, press ... together. Once activated, pad remains programmable for at high speed for 3 seconds. Press the "HIGHER" or "LOWER" pad to cool the refrigerator as quickly as desired. Power On/Off Switch (Power Interruption Switch) The power on position. Three beeps will sound and SHOW will revert to...
...after cleaning or changing light bulbs. To activate the electronic control panel, press "ACTIVATE CONTROLS" pad. When you first plug your new refrigerator in, you will find that you understand its various features, controls, and how to use them. To activate fast cool, press ... together. Once activated, pad remains programmable for at high speed for 3 seconds. Press the "HIGHER" or "LOWER" pad to cool the refrigerator as quickly as desired. Power On/Off Switch (Power Interruption Switch) The power on position. Three beeps will sound and SHOW will revert to...
Use and Care Manual
Page 9
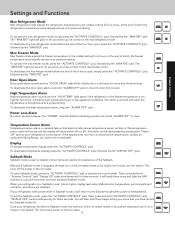
.... Then, press and hold "Activate Controls" and "Display Off" pads simultaneously for three seconds. Product Controls Settings and Functions Max Refrigerator Mode Max refrigerator mode adjusts the refrigerator temperature to the coldest setting for four hours, at the end of the four hour cycle, press the "ACTIVATE CONTROLS" pad, followed...the "ACTIVATE CONTROLS" pad, followed by the "MAX FRZ" pad. The alarm sound will restore power to showing the temperature, contact an authorized Viking Range, LLC technician immediately. This turns off . If your refrigerator is in the detent.
.... Then, press and hold "Activate Controls" and "Display Off" pads simultaneously for three seconds. Product Controls Settings and Functions Max Refrigerator Mode Max refrigerator mode adjusts the refrigerator temperature to the coldest setting for four hours, at the end of the four hour cycle, press the "ACTIVATE CONTROLS" pad, followed...the "ACTIVATE CONTROLS" pad, followed by the "MAX FRZ" pad. The alarm sound will restore power to showing the temperature, contact an authorized Viking Range, LLC technician immediately. This turns off . If your refrigerator is in the detent.
Use and Care Manual
Page 10
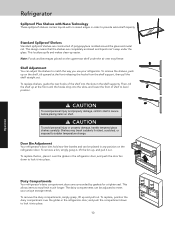
...injury or property damage, handle tempered glass shelves carefully. The dairy compartments can adjust the shelves to stay fresh much longer. Refrigerator Spillproof Plus Shelves with Nano Technology These spillproof shelves contain liquids with no raised edges in order to level position. To ...shelves are surrounded by gaskets for a tighter seal. To replace the bin, place it into place. 2 1 Operation Dairy Compartments Your refrigerator's dairy compartment doors are completely enclosed and liquids can't seep under the air vent may break suddenly if nicked, scratched, or exposed...
...injury or property damage, handle tempered glass shelves carefully. The dairy compartments can adjust the shelves to stay fresh much longer. Refrigerator Spillproof Plus Shelves with Nano Technology These spillproof shelves contain liquids with no raised edges in order to level position. To ...shelves are surrounded by gaskets for a tighter seal. To replace the bin, place it into place. 2 1 Operation Dairy Compartments Your refrigerator's dairy compartment doors are completely enclosed and liquids can't seep under the air vent may break suddenly if nicked, scratched, or exposed...


