Professional Stainless Steel Handle Kit - 28 inch - Installation Instructions
Page 2
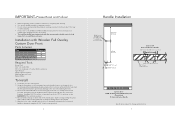
... these instructions completely and carefully. • Use caution during assembly to the DFRB5 or DFFB5 Installation Instructions for more information on installing the refrigerator/freezer door panel. • The installer should retain for local inspector's use and future reference. Align the holes in the hole locations. Using the 5/16"(.8 cm) drill bit, drill completely through -holes 3/4" (1.8 cm) Full Overlay Panel Custom Door DFRB All Refrigerator/DFFB All Freezer (Front View) Professional Series Handle Specifications...
... these instructions completely and carefully. • Use caution during assembly to the DFRB5 or DFFB5 Installation Instructions for more information on installing the refrigerator/freezer door panel. • The installer should retain for local inspector's use and future reference. Align the holes in the hole locations. Using the 5/16"(.8 cm) drill bit, drill completely through -holes 3/4" (1.8 cm) Full Overlay Panel Custom Door DFRB All Refrigerator/DFFB All Freezer (Front View) Professional Series Handle Specifications...
Installation Instructions
Page 3
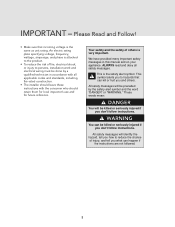
... injury, and tell you don't follow instructions. IMPORTANT - This is attached to persons, installation work and electrical wiring must be preceded by a qualified technician in this manual and on your appliance. ALWAYS read and obey all applicable codes and standards, including fire-rated construction. • The installer should leave these instructions with the consumer who should retain...
... injury, and tell you don't follow instructions. IMPORTANT - This is attached to persons, installation work and electrical wiring must be preceded by a qualified technician in this manual and on your appliance. ALWAYS read and obey all applicable codes and standards, including fire-rated construction. • The installer should leave these instructions with the consumer who should retain...
Installation Instructions
Page 5
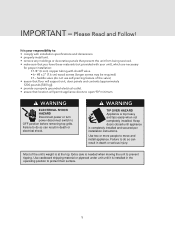
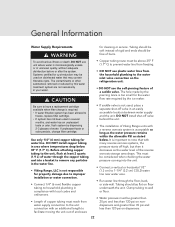
... Appliance is completely installed and secured per installation instructions. Use two or more people to : • comply with installation specifications and dimensions. • properly install unit. • remove any moldings or decorative panels that prevent the unit from being serviced. • make sure that location will support unit, door panels and contents (approximately 1200 pounds [540 kg]). • provide a properly grounded electrical outlet. •...
... Appliance is completely installed and secured per installation instructions. Use two or more people to : • comply with installation specifications and dimensions. • properly install unit. • remove any moldings or decorative panels that prevent the unit from being serviced. • make sure that location will support unit, door panels and contents (approximately 1200 pounds [540 kg]). • provide a properly grounded electrical outlet. •...
Installation Instructions
Page 21
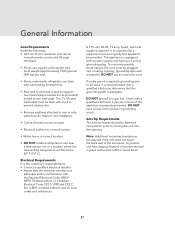
... correct location. • Water line is in correct location. • DO NOT install a refrigeration unit near a heat source, nor in a location where the surrounding temperature will fall below 60º F (16º C). Anti-Tip Requirements The anti-tip boards should be plugged into a mating 3-prong, grounding-type wall receptacle. A 115 volt, 60-Hz, 15 amp, fused, electrical supply is properly grounded. 48" Custom Panels HGeandelrianleInformation...
... correct location. • Water line is in correct location. • DO NOT install a refrigeration unit near a heat source, nor in a location where the surrounding temperature will fall below 60º F (16º C). Anti-Tip Requirements The anti-tip boards should be plugged into a mating 3-prong, grounding-type wall receptacle. A 115 volt, 60-Hz, 15 amp, fused, electrical supply is properly grounded. 48" Custom Panels HGeandelrianleInformation...
Installation Instructions
Page 22
... PSI as the water level of enclosure for cleaning or service. Before attaching copper tubing to freeze, replace filter cartridge. • If system has not been used in an easily accessible location between water supply and the unit. Clamp tubing to wall or floor. • Water pressure must be used , place a separate shut-off valve behind the unit. • The installation of a saddle valve. Systems certifi...
... PSI as the water level of enclosure for cleaning or service. Before attaching copper tubing to freeze, replace filter cartridge. • If system has not been used in an easily accessible location between water supply and the unit. Clamp tubing to wall or floor. • Water pressure must be used , place a separate shut-off valve behind the unit. • The installation of a saddle valve. Systems certifi...
Installation Instructions
Page 25
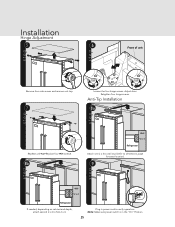
Replace four side screws. 8b 6 Front of unit 2 1 3 Loosen the four hinge screws. Plug in the "On" Position. 25 Adjust door. Note: Make sure power switch is in power cord to first 2 x 4. HInestaadllaintieon Hinge Adjustment 5 2 1 Remove four side screws and remove unit top. 7 1 2 Replace unit top. Anti-Tip Installation 8a Wall 2 x 4 Refrigerator Attach one 2 x 4 to wall stud (refer to dimensions page for exact location). 9 Wall 2 x 4 Refrigerator If needed, depending on cabinet and depth, attach second 2 x 4 to verify operation. Retighten four hinge screws.
Replace four side screws. 8b 6 Front of unit 2 1 3 Loosen the four hinge screws. Plug in the "On" Position. 25 Adjust door. Note: Make sure power switch is in power cord to first 2 x 4. HInestaadllaintieon Hinge Adjustment 5 2 1 Remove four side screws and remove unit top. 7 1 2 Replace unit top. Anti-Tip Installation 8a Wall 2 x 4 Refrigerator Attach one 2 x 4 to wall stud (refer to dimensions page for exact location). 9 Wall 2 x 4 Refrigerator If needed, depending on cabinet and depth, attach second 2 x 4 to verify operation. Retighten four hinge screws.
Installation Instructions
Page 29
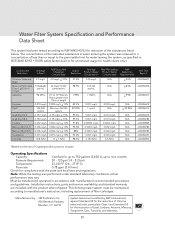
... reduced to 750 gallons (2,838 L); Installation instructions, parts and service availability, and standard warranty are included with the state and local laws and regulations. Water Filter System Specification and Performance Data Sheet This system has been tested according to NSF/ANSI 42/53 for the ...(1.4 - 8.2 bar) Temperature: 33-100º F (0.6 - 37.8º C) Flow rate: 0.78 gpm (2.9 l/min.) Check for compliance with the product when shipped. Manufactured by: 3M Purification Inc. 400 Research Parkway Meriden, CT 06770 System tested and certified ...
... reduced to 750 gallons (2,838 L); Installation instructions, parts and service availability, and standard warranty are included with the state and local laws and regulations. Water Filter System Specification and Performance Data Sheet This system has been tested according to NSF/ANSI 42/53 for the ...(1.4 - 8.2 bar) Temperature: 33-100º F (0.6 - 37.8º C) Flow rate: 0.78 gpm (2.9 l/min.) Check for compliance with the product when shipped. Manufactured by: 3M Purification Inc. 400 Research Parkway Meriden, CT 06770 System tested and certified ...
Installation Instructions
Page 31
... cabinet size. -Verify electrical supply and water supply (if applicable). -Install anti-tip device(s) and verify unit is secure. -Position unit in cutout, level at desired height and secure unit. -Plug-in unit and verify operation. -Connect water supply (if applicable). • Verify icemaker fill tube is properly inserted. • Verify icemaker bail arm is down. • Verify dispenser operation (if applicable). -Align/square door(s). -Verify drain pan is properly installed...
... cabinet size. -Verify electrical supply and water supply (if applicable). -Install anti-tip device(s) and verify unit is secure. -Position unit in cutout, level at desired height and secure unit. -Plug-in unit and verify operation. -Connect water supply (if applicable). • Verify icemaker fill tube is properly inserted. • Verify icemaker bail arm is down. • Verify dispenser operation (if applicable). -Align/square door(s). -Verify drain pan is properly installed...
Use and Care Manual
Page 3
... disinfection before attempting to change light bulbs, clean, or service the unit. After cleaning, return power disconnect switch to ON position. Doing so can create a fire hazard or explosion. • ALWAYS turn power disconnect switch to OFF position before cleaning. WARNING ELECTRICAL SHOCK HAZARD Disconnect power or turn the power on/off the doors. • Leave the shelves in death, fire, or electrical shock.- The fumes can...
... disinfection before attempting to change light bulbs, clean, or service the unit. After cleaning, return power disconnect switch to ON position. Doing so can create a fire hazard or explosion. • ALWAYS turn power disconnect switch to OFF position before cleaning. WARNING ELECTRICAL SHOCK HAZARD Disconnect power or turn the power on/off the doors. • Leave the shelves in death, fire, or electrical shock.- The fumes can...
Use and Care Manual
Page 4
... old refrigerator 5 Features 6 Product Controls Settings and Functions 8 Operation Refrigerator 10 Automatic Ice Maker 12 Food Storage Guide 12 Product Care Cleaning and Maintenance 14 Troubleshooting 17 Service Information 18 Warranty 19 Important Safety Instructions • Install and level your refrigerator on a floor that will hold its weight, plus food weight (approximately 1200 pounds [540kg]) and in an area suitable for its size and use. • DO NOT install a refrigeration...
... old refrigerator 5 Features 6 Product Controls Settings and Functions 8 Operation Refrigerator 10 Automatic Ice Maker 12 Food Storage Guide 12 Product Care Cleaning and Maintenance 14 Troubleshooting 17 Service Information 18 Warranty 19 Important Safety Instructions • Install and level your refrigerator on a floor that will hold its weight, plus food weight (approximately 1200 pounds [540kg]) and in an area suitable for its size and use. • DO NOT install a refrigeration...
Use and Care Manual
Page 6
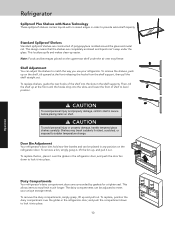
... refrigerator bateria and mold free without ever having to be replaced. • Adjustable Humidity Zone™ Drawer(s) Equipped with an adjustable humidity control, the Adjustable Humidity Zone™ Drawer(s) can be set on the high setting for leafy greens or the low setting for fruits and vegetables with digital temperature readouts, maintain temperatures and the multi-channel airflow system and Odor Eliminator™ Evaporator remove...
... refrigerator bateria and mold free without ever having to be replaced. • Adjustable Humidity Zone™ Drawer(s) Equipped with an adjustable humidity control, the Adjustable Humidity Zone™ Drawer(s) can be set on the high setting for leafy greens or the low setting for fruits and vegetables with digital temperature readouts, maintain temperatures and the multi-channel airflow system and Odor Eliminator™ Evaporator remove...

Use and Care Manual
Page 8
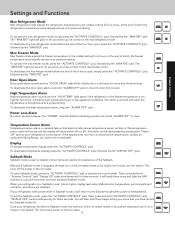
... five seconds. FREEZER MAX FRZ MAX REF FAST COOL SAB SHOW C F REFRIGERATOR DOOR OPEN POWER HIGH TEMP Showroom Mode Initiation Showroom mode allows electronic controls and interior lights to reach desired setting after cleaning or changing light bulbs. Note: Allow 24 hours for three to cool the refrigerator as quickly as desired. Fast Cool Fast Cool runs the compressor at least ten minutes. while holding the "ACTIVATE CONTROLS" pad for temperature to function independently...
... five seconds. FREEZER MAX FRZ MAX REF FAST COOL SAB SHOW C F REFRIGERATOR DOOR OPEN POWER HIGH TEMP Showroom Mode Initiation Showroom mode allows electronic controls and interior lights to reach desired setting after cleaning or changing light bulbs. Note: Allow 24 hours for three to cool the refrigerator as quickly as desired. Fast Cool Fast Cool runs the compressor at least ten minutes. while holding the "ACTIVATE CONTROLS" pad for temperature to function independently...
Use and Care Manual
Page 9
... open alarm sounds and the "DOOR OPEN" light blinks if either oPn or Shr. The alarm can be pushed downward until it clicks into the detent. Before the Sabbath mode is engaged, the bale arm of the ice maker needs to activate the control panel. Then, press and hold "ACTIVATE CONTROLS" and "DISPLAY OFF" pads simultaneously for three seconds. Product Controls Settings and Functions Max Refrigerator Mode Max refrigerator mode adjusts the refrigerator temperature...
... open alarm sounds and the "DOOR OPEN" light blinks if either oPn or Shr. The alarm can be pushed downward until it clicks into the detent. Before the Sabbath mode is engaged, the bale arm of the ice maker needs to activate the control panel. Then, press and hold "ACTIVATE CONTROLS" and "DISPLAY OFF" pads simultaneously for three seconds. Product Controls Settings and Functions Max Refrigerator Mode Max refrigerator mode adjusts the refrigerator temperature...
Use and Care Manual
Page 10
... compartments can adjust the shelves to provide extra shelf capacity. Shelf Adjustment You can be placed in order to match the way you use your unique storage needs. CAUTION To avoid personal injury and property damage, confirm shelf is secure before placing items on the refrigerator door. Door Bin Adjustment Your refrigerator's door bins hold two-liter bottles and can 't seep under the air vent...
... compartments can adjust the shelves to provide extra shelf capacity. Shelf Adjustment You can be placed in order to match the way you use your unique storage needs. CAUTION To avoid personal injury and property damage, confirm shelf is secure before placing items on the refrigerator door. Door Bin Adjustment Your refrigerator's door bins hold two-liter bottles and can 't seep under the air vent...
Use and Care Manual
Page 12
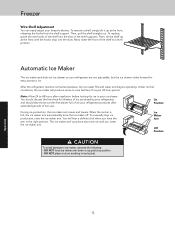
... ice maker arm. When the ice bin is full, the ice maker arm automatically turns the ice maker off. Ice Maker Arm Off Position CAUTION To avoid damage to a level position. To remove a shelf, simply tilt it up at the front until you have the arm in the shelf supports. Freezer Wire Shelf Adjustment You can easily adjust your refrigerator produces after installation before looking for easy access to nine batches of non-use...
... ice maker arm. When the ice bin is full, the ice maker arm automatically turns the ice maker off. Ice Maker Arm Off Position CAUTION To avoid damage to a level position. To remove a shelf, simply tilt it up at the front until you have the arm in the shelf supports. Freezer Wire Shelf Adjustment You can easily adjust your refrigerator produces after installation before looking for easy access to nine batches of non-use...
Use and Care Manual
Page 14
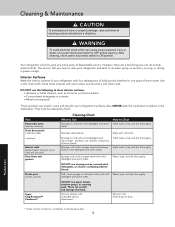
... to Use Sponge or cloth with mild detergent and warm water. Part Removable parts (shelves, drawers) Front door panels • stainless steel • painted Interior walls ((allow freezer to warm up so cloth will not stick) Door liners and gaskets Plastic parts (covers, panels) Super Clog-Resistant™ Condenser* Cleaning Chart What to help extend its life. Stainless steel cleaner Sponge or cloth with mild detergent and warm water How to clean your refrigerator with...
... to Use Sponge or cloth with mild detergent and warm water. Part Removable parts (shelves, drawers) Front door panels • stainless steel • painted Interior walls ((allow freezer to warm up so cloth will not stick) Door liners and gaskets Plastic parts (covers, panels) Super Clog-Resistant™ Condenser* Cleaning Chart What to help extend its life. Stainless steel cleaner Sponge or cloth with mild detergent and warm water How to clean your refrigerator with...

Use and Care Manual
Page 15
... Dry glass shelf thoroughly and replace shelf by lifting the front and releasing the hooks from the metal track. Remove any excess water from overflowing, check defrost pan periodically. Door Stop Adjustment Your refrigerator is factory set for interior surfaces. Product Care 1 1 3 2 Open refrigerator door so door stop position. To change . Then pull the shelf out. Door Gaskets Clean the door gaskets every three months using a 3/16" (0.5 cm) allen wrench. Failure to original position. To check defrost pan, remove two...
... Dry glass shelf thoroughly and replace shelf by lifting the front and releasing the hooks from the metal track. Remove any excess water from overflowing, check defrost pan periodically. Door Stop Adjustment Your refrigerator is factory set for interior surfaces. Product Care 1 1 3 2 Open refrigerator door so door stop position. To change . Then pull the shelf out. Door Gaskets Clean the door gaskets every three months using a 3/16" (0.5 cm) allen wrench. Failure to original position. To check defrost pan, remove two...
Use and Care Manual
Page 16
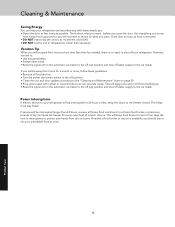
...: • Open the door as few times as food is removed. • DO NOT overcrowd the unit so air movement is available, you need to shut off water supply to protect your hands from home a short time (less than necessary. This helps food stay frozen. Cleaning & Maintenance Saving Energy You can help your refrigerator use or can circulate inside the freezer for every cubic foot...
...: • Open the door as few times as food is removed. • DO NOT overcrowd the unit so air movement is available, you need to shut off water supply to protect your hands from home a short time (less than necessary. This helps food stay frozen. Cleaning & Maintenance Saving Energy You can help your refrigerator use or can circulate inside the freezer for every cubic foot...

Use and Care Manual
Page 17
... familiar; Adjust temperature controls and wait 24 hours. • New plumbing connections can solve your old one. Product Care 17 Common Refrigerator Problems Problem Unit will not operate Unit makes unfamiliar sounds Water in the defrost pan Lights do not work Motor seems to run into a live circuit with water. Check water line for 24 hours. A filter may make a new supply. • Food is not wrapped properly • Freezer and ice bin need to be cleaned • Water may...
... familiar; Adjust temperature controls and wait 24 hours. • New plumbing connections can solve your old one. Product Care 17 Common Refrigerator Problems Problem Unit will not operate Unit makes unfamiliar sounds Water in the defrost pan Lights do not work Motor seems to run into a live circuit with water. Check water line for 24 hours. A filter may make a new supply. • Food is not wrapped properly • Freezer and ice bin need to be cleaned • Water may...
Use and Care Manual
Page 19
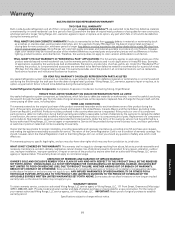
... ARISING OUT OF BREACH OF WARRANTY, BREACH OF CONTRACT OR OTHERWISE. Viking Range, LLC, warrantor, agrees to be covered by this "Residential Plus" warranty, the product, its free installation, except as listed below *†, are warranted to repair or replace, at overtime or premium rates shall not be free from defective materials or workmanship in kitchen lighting, product locations, and other costs, including labor...
... ARISING OUT OF BREACH OF WARRANTY, BREACH OF CONTRACT OR OTHERWISE. Viking Range, LLC, warrantor, agrees to be covered by this "Residential Plus" warranty, the product, its free installation, except as listed below *†, are warranted to repair or replace, at overtime or premium rates shall not be free from defective materials or workmanship in kitchen lighting, product locations, and other costs, including labor...


