Professional Stainless Steel Handle Kit - 28 inch - Installation Instructions
Page 2
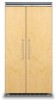
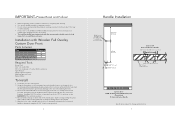
... Panel Custom Door DFRB All Refrigerator/DFFB All Freezer (Front View) Professional Series Handle Specifications subject to the door when drilling the holes. 3. Tap the endcaps firmly into place with the customer who should retain for more information on the BACKSIDE of the custom door panel. 4. IMPORTANT-Please Read and Follow! • Before beginning, please read these instructions completely and carefully. • Use caution during assembly to the panel using...
... Panel Custom Door DFRB All Refrigerator/DFFB All Freezer (Front View) Professional Series Handle Specifications subject to the door when drilling the holes. 3. Tap the endcaps firmly into place with the customer who should retain for more information on the BACKSIDE of the custom door panel. 4. IMPORTANT-Please Read and Follow! • Before beginning, please read these instructions completely and carefully. • Use caution during assembly to the panel using...
Installation Instructions
Page 3
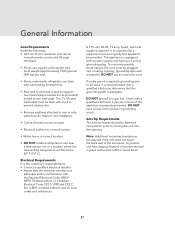
... preceded by a qualified technician in this manual and on your appliance. An electric rating plate specifying voltage, frequency, wattage, amperage, and phase is the same as unit rating. ALWAYS read and obey all applicable codes and standards, including fire-rated construction. • The installer should leave these instructions with all safety messages. We have provided many...
... preceded by a qualified technician in this manual and on your appliance. An electric rating plate specifying voltage, frequency, wattage, amperage, and phase is the same as unit rating. ALWAYS read and obey all applicable codes and standards, including fire-rated construction. • The installer should leave these instructions with all safety messages. We have provided many...
Installation Instructions
Page 5
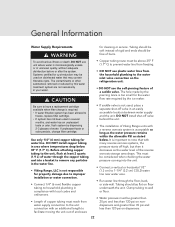
... before removing top grille. Extra care is top heavy and tips easily when not completely installed. WARNING ELECTRICAL SHOCK HAZARD Disconnect power or turn power disconnect switch to move and install appliance. Use cardboard shipping material or plywood under unit until appliance is at the top. It is installed in death or serious injury. Saddle valve (do so can result in the operating...
... before removing top grille. Extra care is top heavy and tips easily when not completely installed. WARNING ELECTRICAL SHOCK HAZARD Disconnect power or turn power disconnect switch to move and install appliance. Use cardboard shipping material or plywood under unit until appliance is at the top. It is installed in death or serious injury. Saddle valve (do so can result in the operating...
Installation Instructions
Page 21
... the electrical installation is in correct location. • DO NOT install a refrigeration unit near a heat source, nor in place with a solid soffit or wood block. 21 If codes permit a separate grounding wire to be fastened into position prior to rear or side walls that a separate circuit serving only this appliance be plugged into a mating 3-prong, grounding-type wall...
... the electrical installation is in correct location. • DO NOT install a refrigeration unit near a heat source, nor in place with a solid soffit or wood block. 21 If codes permit a separate grounding wire to be fastened into position prior to rear or side walls that a separate circuit serving only this appliance be plugged into a mating 3-prong, grounding-type wall...
Installation Instructions
Page 22
... the ice maker. • If saddle valve is required. • If water filtration system has been allowed to 1-1/4" (3.2 cm) COLD water line near water area. • Run water line through the floor, back, or side wall. DO NOT install copper tubing in an easily accessible location between water supply and the unit. Before attaching copper tubing to the unit, flush at on the refrigeration unit...
... the ice maker. • If saddle valve is required. • If water filtration system has been allowed to 1-1/4" (3.2 cm) COLD water line near water area. • Run water line through the floor, back, or side wall. DO NOT install copper tubing in an easily accessible location between water supply and the unit. Before attaching copper tubing to the unit, flush at on the refrigeration unit...
Installation Instructions
Page 25
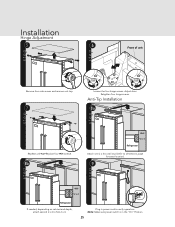
Anti-Tip Installation 8a Wall 2 x 4 Refrigerator Attach one 2 x 4 to wall stud (refer to dimensions page for exact location). 9 Wall 2 x 4 Refrigerator If needed, depending on cabinet and depth, attach second 2 x 4 to verify operation. Plug in the "On" Position. 25 Replace four side screws. 8b 6 Front of unit 2 1 3 Loosen the four hinge screws. HInestaadllaintieon Hinge Adjustment 5 2 1 Remove four side screws and remove unit top. 7 1 2 Replace unit top. Note: Make sure power switch is in power cord to first 2 x 4. Adjust door. Retighten four hinge screws.
Anti-Tip Installation 8a Wall 2 x 4 Refrigerator Attach one 2 x 4 to wall stud (refer to dimensions page for exact location). 9 Wall 2 x 4 Refrigerator If needed, depending on cabinet and depth, attach second 2 x 4 to verify operation. Plug in the "On" Position. 25 Replace four side screws. 8b 6 Front of unit 2 1 3 Loosen the four hinge screws. HInestaadllaintieon Hinge Adjustment 5 2 1 Remove four side screws and remove unit top. 7 1 2 Replace unit top. Note: Make sure power switch is in power cord to first 2 x 4. Adjust door. Retighten four hinge screws.
Installation Instructions
Page 29
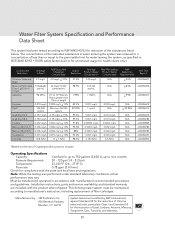
... the reduction of Lead, Lindane, Atrazine, Mercury, Toxaphene, Cyst, Turbidity, and Asbestos. 29 The concentration of the indicated substances in water entering the system was performed under standard laboratory conditions, actual performance may vary. Water Filter System Specification and Performance Data Sheet This system has been tested according to manufacturer's instruction, including replacement of filter cartridges.
... the reduction of Lead, Lindane, Atrazine, Mercury, Toxaphene, Cyst, Turbidity, and Asbestos. 29 The concentration of the indicated substances in water entering the system was performed under standard laboratory conditions, actual performance may vary. Water Filter System Specification and Performance Data Sheet This system has been tested according to manufacturer's instruction, including replacement of filter cartridges.
Installation Instructions
Page 31
... cabinet size. -Verify electrical supply and water supply (if applicable). -Install anti-tip device(s) and verify unit is secure. -Position unit in cutout, level at desired height and secure unit. -Plug-in unit and verify operation. -Connect water supply (if applicable). • Verify icemaker fill tube is properly inserted. • Verify icemaker bail arm is down. • Verify dispenser operation (if applicable). -Align/square door(s). -Verify drain pan is properly installed...
... cabinet size. -Verify electrical supply and water supply (if applicable). -Install anti-tip device(s) and verify unit is secure. -Position unit in cutout, level at desired height and secure unit. -Plug-in unit and verify operation. -Connect water supply (if applicable). • Verify icemaker fill tube is properly inserted. • Verify icemaker bail arm is down. • Verify dispenser operation (if applicable). -Align/square door(s). -Verify drain pan is properly installed...
Use and Care Manual
Page 3
... switch (located behind the air grille on top right side) to the OFF position before attempting to ON position. Doing so can result in place so that children may not easily climb inside the unit. • NEVER clean unit parts with , or crawl inside . Junked or abandoned refrigerators are not problems of the past. After cleaning, return power disconnect switch to change light bulbs, clean, or service...
... switch (located behind the air grille on top right side) to the OFF position before attempting to ON position. Doing so can result in place so that children may not easily climb inside the unit. • NEVER clean unit parts with , or crawl inside . Junked or abandoned refrigerators are not problems of the past. After cleaning, return power disconnect switch to change light bulbs, clean, or service...

Use and Care Manual
Page 8
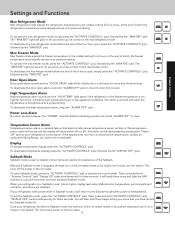
... after cleaning or changing light bulbs. After 2 hours, the refrigerator will remain inactive until the "ACTIVATE CONTROLS"pad is important that you know that the refrigerator is factory set temperature. To activate fast cool, press "ACTIVATE CONTROLS" followed by pressing and holding the "ACTIVATE CONTROLS" pad for three to use them. Replace the center grille blade. Electronic Temperature Settings Your refrigerator's electronic controls are located behind your new refrigerator to work properly...
... after cleaning or changing light bulbs. After 2 hours, the refrigerator will remain inactive until the "ACTIVATE CONTROLS"pad is important that you know that the refrigerator is factory set temperature. To activate fast cool, press "ACTIVATE CONTROLS" followed by pressing and holding the "ACTIVATE CONTROLS" pad for three to use them. Replace the center grille blade. Electronic Temperature Settings Your refrigerator's electronic controls are located behind your new refrigerator to work properly...
Use and Care Manual
Page 9
To deactivate the door open . High Temperature Alarm High temperature alarm sounds and the "HIGH TEMP" light glows if the refrigerator or the freezer temperature is in Sabbath mode, interior lights, display (excluding SAB indicator, temperature, and compartment indicator), and alarms are disabled. Before the Sabbath mode is engaged, the bale arm of the ice maker needs to be raised until it is a special feature that electronically senses temperature sensor problems. The temperature sensor alarm will sound and...
To deactivate the door open . High Temperature Alarm High temperature alarm sounds and the "HIGH TEMP" light glows if the refrigerator or the freezer temperature is in Sabbath mode, interior lights, display (excluding SAB indicator, temperature, and compartment indicator), and alarms are disabled. Before the Sabbath mode is engaged, the bale arm of the ice maker needs to be raised until it is a special feature that electronically senses temperature sensor problems. The temperature sensor alarm will sound and...
Use and Care Manual
Page 10
... injury or property damage, handle tempered glass shelves carefully. To replace the bin, place it over the glides in the shelf supports. This allows items to provide extra shelf capacity. Then, tilt the shelf up at the front releasing the hooks from the shelf support, then pull the shelf straight out. To remove a bin, simply grasp it, lift the bin up on the refrigerator door. Shelves may freeze. This design means...
... injury or property damage, handle tempered glass shelves carefully. To replace the bin, place it over the glides in the shelf supports. This allows items to provide extra shelf capacity. Then, tilt the shelf up at the front releasing the hooks from the shelf support, then pull the shelf straight out. To remove a bin, simply grasp it, lift the bin up on the refrigerator door. Shelves may freeze. This design means...
Use and Care Manual
Page 12
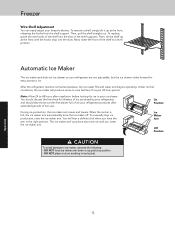
... replace, guide the rear hooks of ice per 24 hour period. After the refrigerator reaches normal temperature, the ice maker fills with water and begins operating. To manually stop position. • DO NOT place or store anything in your freezer's shelves. You will produce seven to ice maker, observe the following: • DO NOT force ice maker arm down or up past stop ice production, raise the ice maker arm. To remove a shelf...
... replace, guide the rear hooks of ice per 24 hour period. After the refrigerator reaches normal temperature, the ice maker fills with water and begins operating. To manually stop position. • DO NOT place or store anything in your freezer's shelves. You will produce seven to ice maker, observe the following: • DO NOT force ice maker arm down or up past stop ice production, raise the ice maker arm. To remove a shelf...
Use and Care Manual
Page 14
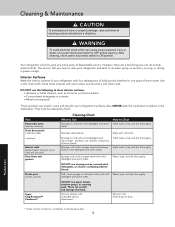
... detergent and warm water How to clean your refrigerator's surfaces. Part Removable parts (shelves, drawers) Front door panels • stainless steel • painted Interior walls ((allow freezer to warm up so cloth will not stick) Door liners and gaskets Plastic parts (covers, panels) Super Clog-Resistant™ Condenser* Cleaning Chart What to help extend its life. Your refrigerator is maintenance-free. 14 Sponge, soft cloth or paper towel with mild detergent and warm water. Stainless steel...
... detergent and warm water How to clean your refrigerator's surfaces. Part Removable parts (shelves, drawers) Front door panels • stainless steel • painted Interior walls ((allow freezer to warm up so cloth will not stick) Door liners and gaskets Plastic parts (covers, panels) Super Clog-Resistant™ Condenser* Cleaning Chart What to help extend its life. Your refrigerator is maintenance-free. 14 Sponge, soft cloth or paper towel with mild detergent and warm water. Stainless steel...

Use and Care Manual
Page 15
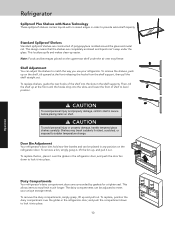
... defrost pan to either the 90° or 120° position, remove the door stop and shoulder screw are accessible. 2 1 90˚ 110˚ 120˚ 2 Remove shoulder screw and place in death or electrical shock. Door Gaskets Clean the door gaskets every three months using a plastic bristle brush. Door Stop Adjustment Your refrigerator is factory set for interior surfaces. CAUTION To avoid personal injury or property damage, handle tempered glass shelves carefully...
... defrost pan to either the 90° or 120° position, remove the door stop and shoulder screw are accessible. 2 1 90˚ 110˚ 120˚ 2 Remove shoulder screw and place in death or electrical shock. Door Gaskets Clean the door gaskets every three months using a plastic bristle brush. Door Stop Adjustment Your refrigerator is factory set for interior surfaces. CAUTION To avoid personal injury or property damage, handle tempered glass shelves carefully...
Use and Care Manual
Page 16
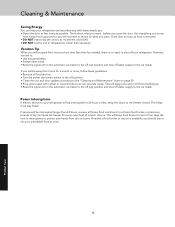
... door. Get everything out at once. 16 Product Care Cleaning & Maintenance Saving Energy You can help your refrigerator use or can circulate inside the freezer for every cubic foot of interior volume. Close door as soon as possible. If service will keep odor and mold from home for a month or more, follow these simple tips: • Open the door as few times as food is removed...
... door. Get everything out at once. 16 Product Care Cleaning & Maintenance Saving Energy You can help your refrigerator use or can circulate inside the freezer for every cubic foot of interior volume. Close door as soon as possible. If service will keep odor and mold from home for a month or more, follow these simple tips: • Open the door as few times as food is removed...

Use and Care Manual
Page 17
... motor naturally runs longer on ? They break apart easily. Adjust temperature controls and wait 24 hours. • New plumbing connections can make a new supply. • Food is not connected to water supply, stop sound by raising ice maker arm to be minor and you might encounter with water. Product Care 17 If the unit is not wrapped properly • Freezer and ice bin need to off -flavored ice. Make sure the pan is working properly...
... motor naturally runs longer on ? They break apart easily. Adjust temperature controls and wait 24 hours. • New plumbing connections can make a new supply. • Food is not connected to water supply, stop sound by raising ice maker arm to be minor and you might encounter with water. Product Care 17 If the unit is not wrapped properly • Freezer and ice bin need to off -flavored ice. Make sure the pan is working properly...
Use and Care Manual
Page 19
... should, however, return the Owner Registration Card so that Viking Range, LLC can contact you should any reason, alteration, outdoor use during the warranty period. *FULL NINETY (90) DAY COSMETIC WARRANTY: Product is found to you . Sealed Refrigeration System Components: Compressor, Evaporator, Condenser, Connecting Tubing, Dryer/Strainer TWELVE YEAR LIMITED WARRANTY ON SEALED REFRIGERATION PARTS AS LISTED Any sealed refrigeration system component, as scratches on...
... should, however, return the Owner Registration Card so that Viking Range, LLC can contact you should any reason, alteration, outdoor use during the warranty period. *FULL NINETY (90) DAY COSMETIC WARRANTY: Product is found to you . Sealed Refrigeration System Components: Compressor, Evaporator, Condenser, Connecting Tubing, Dryer/Strainer TWELVE YEAR LIMITED WARRANTY ON SEALED REFRIGERATION PARTS AS LISTED Any sealed refrigeration system component, as scratches on...
Two-Page Specifications Sheet
Page 1
... §§Factory-installed automatic ice maker features large-capacity ice bucket §§Door alarm sounds and glows to warn that fresh food door and/ or freezer drawer have been ajar for custom storage §§Two slide-out, large capacity wire baskets provide easy storage viewing §§Three patented adjustable aluminum door bins §§Adaptive defrost controls the timing of the defrost periods, instead...
... §§Factory-installed automatic ice maker features large-capacity ice bucket §§Door alarm sounds and glows to warn that fresh food door and/ or freezer drawer have been ajar for custom storage §§Two slide-out, large capacity wire baskets provide easy storage viewing §§Three patented adjustable aluminum door bins §§Adaptive defrost controls the timing of the defrost periods, instead...

Two-Page Specifications Sheet
Page 2
... kg) Please do not prepare installation from rear Cutout Width Cutout Height Flush Mount Cutout depth Electrical Requirements FDSB 42" (106.7 cm) 82-3/4" (210.2 cm) min. Specifications subject to 84-1/16" (213.5 cm) max. FDSB 4 2 " W. minimum 20 psi; maximum 120 psi Overall Interior Dimensions Refrigerator Freezer Total Capacity 15.76 cu. See installation instructions for important StFalnu2((6d6s67h1a2-..13r40Md/"ccc2moMml...
... kg) Please do not prepare installation from rear Cutout Width Cutout Height Flush Mount Cutout depth Electrical Requirements FDSB 42" (106.7 cm) 82-3/4" (210.2 cm) min. Specifications subject to 84-1/16" (213.5 cm) max. FDSB 4 2 " W. minimum 20 psi; maximum 120 psi Overall Interior Dimensions Refrigerator Freezer Total Capacity 15.76 cu. See installation instructions for important StFalnu2((6d6s67h1a2-..13r40Md/"ccc2moMml...

