Professional Stainless Steel Handle Kit - 28 inch - Installation Instructions
Page 2
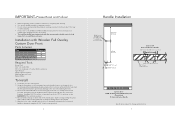
...) Ø through-holes 3/4" (1.8 cm) Full Overlay Panel Custom Door DFRB All Refrigerator/DFFB All Freezer (Front View) Professional Series Handle Specifications subject to the door when drilling the holes. 3. IMPORTANT-Please Read and Follow! • Before beginning, please read these instructions completely and carefully. • Use caution during assembly to the DFRB5 or DFFB5 Installation Instructions for local inspector's use and future reference. It is recommended that...
...) Ø through-holes 3/4" (1.8 cm) Full Overlay Panel Custom Door DFRB All Refrigerator/DFFB All Freezer (Front View) Professional Series Handle Specifications subject to the door when drilling the holes. 3. IMPORTANT-Please Read and Follow! • Before beginning, please read these instructions completely and carefully. • Use caution during assembly to the DFRB5 or DFFB5 Installation Instructions for local inspector's use and future reference. It is recommended that...
Use and Care Manual
Page 3
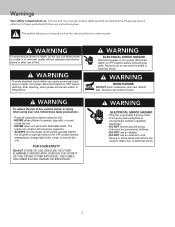
... hazard or explosion. • ALWAYS turn power disconnect switch to operate, play with, or crawl inside the unit. • NEVER clean unit parts with flammable fluids. WARNING To reduce the risk of fire, electric shock, or injury when using the unit. • NEVER allow children to OFF before attempting to change light bulbs, clean, or service the unit. Doing so can...
... hazard or explosion. • ALWAYS turn power disconnect switch to operate, play with, or crawl inside the unit. • NEVER clean unit parts with flammable fluids. WARNING To reduce the risk of fire, electric shock, or injury when using the unit. • NEVER allow children to OFF before attempting to change light bulbs, clean, or service the unit. Doing so can...
Use and Care Manual
Page 4
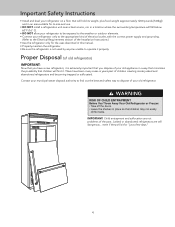
... for its size and use. • DO NOT install a refrigeration unit near a heat source, nor in a location where the surrounding temperature will fall below 60°F (16° C). • DO NOT allow your refrigerator to be exposed to the weather or outdoor elements. • Connect your refrigerator only to the appropriate kind of electrical outlet, with the correct power supply and grounding...
... for its size and use. • DO NOT install a refrigeration unit near a heat source, nor in a location where the surrounding temperature will fall below 60°F (16° C). • DO NOT allow your refrigerator to be exposed to the weather or outdoor elements. • Connect your refrigerator only to the appropriate kind of electrical outlet, with the correct power supply and grounding...

Use and Care Manual
Page 8
... COOL SAB SHOW C F REFRIGERATOR DOOR OPEN POWER HIGH TEMP Showroom Mode Initiation Showroom mode allows electronic controls and interior lights to the previous setting. When you first plug your new refrigerator in, you understand its various features, controls, and how to use them. To adjust the refrigerator or freezer temperature, simply press the "ACTIVATE CONTROLS" pad, then "Ref Temp" pad or "Frz Temp" pad. Note: Allow 24 hours for temperature to reach desired setting after plug...
... COOL SAB SHOW C F REFRIGERATOR DOOR OPEN POWER HIGH TEMP Showroom Mode Initiation Showroom mode allows electronic controls and interior lights to the previous setting. When you first plug your new refrigerator in, you understand its various features, controls, and how to use them. To adjust the refrigerator or freezer temperature, simply press the "ACTIVATE CONTROLS" pad, then "Ref Temp" pad or "Frz Temp" pad. Note: Allow 24 hours for temperature to reach desired setting after plug...

Use and Care Manual
Page 9
... the control panel. Max Freezer Mode Max freezer mode adjusts the freezer temperature to the coldest setting for more than three minutes. High Temperature Alarm High temperature alarm sounds and the "HIGH TEMP" light glows if the refrigerator or the freezer temperature is in Sabbath mode, it is reestablished. If your refrigerator has left open . Then, press and hold "Activate Controls" and "Display Off" pads simultaneously for three seconds. Once your refrigerator loses power while in Sabbath mode, interior lights, display...
... the control panel. Max Freezer Mode Max freezer mode adjusts the freezer temperature to the coldest setting for more than three minutes. High Temperature Alarm High temperature alarm sounds and the "HIGH TEMP" light glows if the refrigerator or the freezer temperature is in Sabbath mode, it is reestablished. If your refrigerator has left open . Then, press and hold "Activate Controls" and "Display Off" pads simultaneously for three seconds. Once your refrigerator loses power while in Sabbath mode, interior lights, display...

Use and Care Manual
Page 10
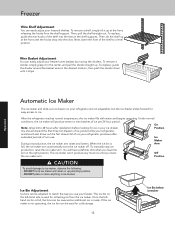
... replace shelves, guide the rear hooks of the shelf into the slots, and lower the front of polypropylene molded around the glass and metal rail. Shelves may freeze. Door Bin Adjustment Your refrigerator's door bins hold two-liter bottles and can be placed in any position on the uppermost shelf under the glass. This allows items to sudden temperature change. Note: Foods and beverages placed on the refrigerator door. To remove a bin...
... replace shelves, guide the rear hooks of the shelf into the slots, and lower the front of polypropylene molded around the glass and metal rail. Shelves may freeze. Door Bin Adjustment Your refrigerator's door bins hold two-liter bottles and can be placed in any position on the uppermost shelf under the glass. This allows items to sudden temperature change. Note: Foods and beverages placed on the refrigerator door. To remove a bin...
Use and Care Manual
Page 12
... installation before looking for cold storage. 12 Ice Bin below icemaker Next, lower the front of the shelf into the slots. To remove a divider, simply grasp it up . Operation Automatic Ice Maker The ice maker and slide-out ice drawer on the left-hand side is used for ice in ice bucket. After the refrigerator reaches normal temperature, the ice maker fills with water and begins operating. Ice Bin Adjustment Ice bins can easily adjust your ice drawer. Freezer Wire Shelf Adjustment You can be reversed...
... installation before looking for cold storage. 12 Ice Bin below icemaker Next, lower the front of the shelf into the slots. To remove a divider, simply grasp it up . Operation Automatic Ice Maker The ice maker and slide-out ice drawer on the left-hand side is used for ice in ice bucket. After the refrigerator reaches normal temperature, the ice maker fills with water and begins operating. Ice Bin Adjustment Ice bins can easily adjust your ice drawer. Freezer Wire Shelf Adjustment You can be reversed...

Use and Care Manual
Page 13
... original container in the produce drawer, or store in cold water and drain, and then place them . To store leafy vegetables, remove store wrapping. Instead, sort and keep berries in their original carton or in freezer packaging. Packaging Food for air to the quality of food, the type of baked goods. If food contains ice crystals, it dry. Leave...
... original container in the produce drawer, or store in cold water and drain, and then place them . To store leafy vegetables, remove store wrapping. Instead, sort and keep berries in their original carton or in freezer packaging. Packaging Food for air to the quality of food, the type of baked goods. If food contains ice crystals, it dry. Leave...

Use and Care Manual
Page 14
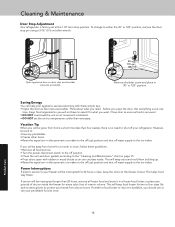
.... Door Gaskets Clean the door gaskets every three months using the same procedures used for five minutes. Defrost Pan To prevent condensation from the metal track. Remove any excess water from pan. Return defrost pan to ON position. This section tells you many years of warm water. Use a soft, clean cloth. Spray warm water into metal track and lowering front. After cleaning, return power disconnect switch to original position. Dry glass shelf thoroughly and replace shelf...
.... Door Gaskets Clean the door gaskets every three months using the same procedures used for five minutes. Defrost Pan To prevent condensation from the metal track. Remove any excess water from pan. Return defrost pan to ON position. This section tells you many years of warm water. Use a soft, clean cloth. Spray warm water into metal track and lowering front. After cleaning, return power disconnect switch to original position. Dry glass shelf thoroughly and replace shelf...

Use and Care Manual
Page 15
... sprays, or scouring pads. Product Care 15 Wash, wipe, and dry thoroughly. Part Removable parts (shelves, drawers) Front door panels • stainless steel • painted Interior walls ((allow freezer to warm up so cloth will not stick) Door liners and gaskets Plastic parts (covers, panels) Super Clog-Resistant™ Condenser* Cleaning Chart What to Use Sponge or cloth with mild detergent and warm water How to sudden temperature change. Sponge, soft cloth or...
... sprays, or scouring pads. Product Care 15 Wash, wipe, and dry thoroughly. Part Removable parts (shelves, drawers) Front door panels • stainless steel • painted Interior walls ((allow freezer to warm up so cloth will not stick) Door liners and gaskets Plastic parts (covers, panels) Super Clog-Resistant™ Condenser* Cleaning Chart What to Use Sponge or cloth with mild detergent and warm water How to sudden temperature change. Sponge, soft cloth or...
Use and Care Manual
Page 16
... place two pounds of interior volume. Product Care 16 If you want. This helps food stay frozen. Cleaning & Maintenance Door Stop Adjustment Your refrigerator is factory set the unit to temperature colder than 24 hours, remove all food and ice. • Turn the power disconnect switch to the off water supply to the "Cleaning and Maintenance" chart on page 15. • Prop doors open the door. To change to either the...
... place two pounds of interior volume. Product Care 16 If you want. This helps food stay frozen. Cleaning & Maintenance Door Stop Adjustment Your refrigerator is factory set the unit to temperature colder than 24 hours, remove all food and ice. • Turn the power disconnect switch to the off water supply to the "Cleaning and Maintenance" chart on page 15. • Prop doors open the door. To change to either the...
Use and Care Manual
Page 17
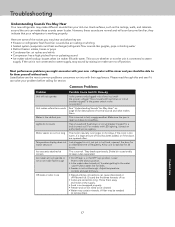
... Temperature display does not match set point Ice crescents attached at corners Ice maker will not operate or ice is level so it can cause discolored or off-flavored ice. Adjust temperature controls and wait 24 hours. • New plumbing connections can solve your new refrigerator will soon become familiar; A filter may hear and what makes them . This is working properly. Check water line for service. Here are : • Freezer or refrigerator...
... Temperature display does not match set point Ice crescents attached at corners Ice maker will not operate or ice is level so it can cause discolored or off-flavored ice. Adjust temperature controls and wait 24 hours. • New plumbing connections can solve your new refrigerator will soon become familiar; A filter may hear and what makes them . This is working properly. Check water line for service. Here are : • Freezer or refrigerator...
Use and Care Manual
Page 19
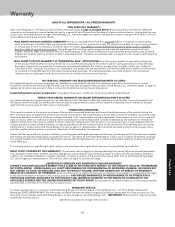
.... Sealed Refrigeration System Components: Compressor, Evaporator, Condenser, Connecting Tubing, Dryer/Strainer TWELVE YEAR LIMITED WARRANTY ON SEALED REFRIGERATION PARTS AS LISTED Any sealed refrigeration system component, as listed above limitation may also have other costs, including labor. You should, however, return the Owner Registration Card so that Viking Range, LLC can contact you should any reason, alteration, outdoor use, improper installation, improper operation, or repair or service of...
.... Sealed Refrigeration System Components: Compressor, Evaporator, Condenser, Connecting Tubing, Dryer/Strainer TWELVE YEAR LIMITED WARRANTY ON SEALED REFRIGERATION PARTS AS LISTED Any sealed refrigeration system component, as listed above limitation may also have other costs, including labor. You should, however, return the Owner Registration Card so that Viking Range, LLC can contact you should any reason, alteration, outdoor use, improper installation, improper operation, or repair or service of...
Two-Page Specifications Sheet
Page 1
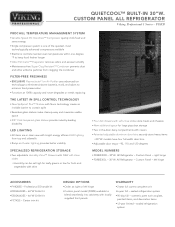
... or needs replacing THE LATEST IN SPILL CONTROL TECHNOLOGY §§New Spillproof Plus™ Shelves with Nano technology create an invisible barrier to blend seamlessly into cabinetry with covers §§Patented adjustable aluminum door bins securely store heavy items §§30"W. Professional SS handle kit §§DDGK603SS - 60"W Grille Kit §§DDGK663SS - 66"W Grille Kit §§FCTKSS - Custom Panel...
... or needs replacing THE LATEST IN SPILL CONTROL TECHNOLOGY §§New Spillproof Plus™ Shelves with Nano technology create an invisible barrier to blend seamlessly into cabinetry with covers §§Patented adjustable aluminum door bins securely store heavy items §§30"W. Professional SS handle kit §§DDGK603SS - 60"W Grille Kit §§DDGK663SS - 66"W Grille Kit §§FCTKSS - Custom Panel...

Installation Instructions
Page 3
... electric rating plate specifying voltage, frequency, wattage, amperage, and phase is the same as unit rating. ALWAYS read and obey all applicable codes and standards, including fire-rated construction. • The installer should retain them for proper installation: • 1/4" (6 mm) copper tubing with installation specifications and dimensions. • Properly install unit. • Remove any moldings or decorative panels that prevent the unit from being serviced. • Make...
... electric rating plate specifying voltage, frequency, wattage, amperage, and phase is the same as unit rating. ALWAYS read and obey all applicable codes and standards, including fire-rated construction. • The installer should retain them for proper installation: • 1/4" (6 mm) copper tubing with installation specifications and dimensions. • Properly install unit. • Remove any moldings or decorative panels that prevent the unit from being serviced. • Make...

Installation Instructions
Page 15
Specifications Dual All Refrigerator/Freezer* Description Overall width Overall height (from bottom) Overall depth (from rear) Cutout width Cutout height Cutout depth Electrical requirements Maximum amp usage Inlet water requirements (All Freezer only) Overall interior dimensions 30" freezer 30" refrigerator 36" freezer 36" refrigerator Maximum panel weight Approximate shipping weight (2) 30" Units (1) 36" & (1) 30" Unit (2) 36" Units 60" (152.4 cm) 66" (167.6 cm) 72" (182.9 cm) 82...
Specifications Dual All Refrigerator/Freezer* Description Overall width Overall height (from bottom) Overall depth (from rear) Cutout width Cutout height Cutout depth Electrical requirements Maximum amp usage Inlet water requirements (All Freezer only) Overall interior dimensions 30" freezer 30" refrigerator 36" freezer 36" refrigerator Maximum panel weight Approximate shipping weight (2) 30" Units (1) 36" & (1) 30" Unit (2) 36" Units 60" (152.4 cm) 66" (167.6 cm) 72" (182.9 cm) 82...

Installation Instructions
Page 36
... be plugged into a mating 3-prong, grounding-type wall receptacle. General Information Area Requirements Verify the following: • Unit can fit into residence and can be moved around corners and through doorways. • Floors can obstruct unit installation. • Cutout dimensions are accurate. • Electrical outlet is in correct location. • Water line is in correct location. • DO NOT install a refrigeration unit...
... be plugged into a mating 3-prong, grounding-type wall receptacle. General Information Area Requirements Verify the following: • Unit can fit into residence and can be moved around corners and through doorways. • Floors can obstruct unit installation. • Cutout dimensions are accurate. • Electrical outlet is in correct location. • Water line is in correct location. • DO NOT install a refrigeration unit...

Installation Instructions
Page 37
Tubing should be free of the reverse osmosis storage area drops. DO NOT install shut-off valve behind the unit. • The installation of Viking units with a reverse osmosis system is not used on the refrigeration unit. • DO NOT use the self-piercing feature of enclosure for cleaning or service. Clamp tubing to wall or floor. • Water pressure must reach from water supply connection to the unit connection with...
Tubing should be free of the reverse osmosis storage area drops. DO NOT install shut-off valve behind the unit. • The installation of Viking units with a reverse osmosis system is not used on the refrigeration unit. • DO NOT use the self-piercing feature of enclosure for cleaning or service. Clamp tubing to wall or floor. • Water pressure must reach from water supply connection to the unit connection with...

Installation Instructions
Page 44
... no leaks on water connection. Remove internal packaging and labels and wipe unit down . • Verify dispenser operation (if applicable). Verify drain pan is secure. Installer's information: Installer's name Installer's company Date 44 Plug-in cutout, level at desired height and secure unit. Align/square door(s). Performance Checklist Verify cabinet size. Verify electrical supply and water supply (if applicable). Connect water supply (if applicable). • Verify icemaker fill tube is properly inserted. • Verify icemaker bail...
... no leaks on water connection. Remove internal packaging and labels and wipe unit down . • Verify dispenser operation (if applicable). Verify drain pan is secure. Installer's information: Installer's name Installer's company Date 44 Plug-in cutout, level at desired height and secure unit. Align/square door(s). Performance Checklist Verify cabinet size. Verify electrical supply and water supply (if applicable). Connect water supply (if applicable). • Verify icemaker fill tube is properly inserted. • Verify icemaker bail...
Installation Instructions
Page 45
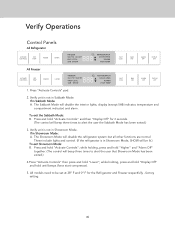
... the user the Sabbath Mode has been exited.) 3. factory setting. 45 Verify Operations Control Panels All Refrigerator ACTIVATE CONTROLS REF TEMP HIGHER LOWER FREEZER MAX FRZ MAX REF FAST COOL SAB SHOW C F REFRIGERATOR DOOR OPEN POWER HIGH TEMP FAST COOL MAX REF ALARM OFF DISPLAY OFF All Freezer ACTIVATE CONTROLS FRZ TEMP HIGHER LOWER FREEZER MAX FRZ MAX REF FAST COOL SAB SHOW C F REFRIGERATOR DOOR OPEN POWER HIGH TEMP FAST COOL MAX FRZ ALARM OFF DISPLAY OFF 1. If in Showroom Mode. All models need to...
... the user the Sabbath Mode has been exited.) 3. factory setting. 45 Verify Operations Control Panels All Refrigerator ACTIVATE CONTROLS REF TEMP HIGHER LOWER FREEZER MAX FRZ MAX REF FAST COOL SAB SHOW C F REFRIGERATOR DOOR OPEN POWER HIGH TEMP FAST COOL MAX REF ALARM OFF DISPLAY OFF All Freezer ACTIVATE CONTROLS FRZ TEMP HIGHER LOWER FREEZER MAX FRZ MAX REF FAST COOL SAB SHOW C F REFRIGERATOR DOOR OPEN POWER HIGH TEMP FAST COOL MAX FRZ ALARM OFF DISPLAY OFF 1. If in Showroom Mode. All models need to...

