
Convection Cookbook
Page 4
... They are sold as ovens. The Convection Microwave team bakes breads with convection heat are also microwave-safe. Stoneware and pottery utensils designed for microwaving alone, such as microwave-safe. Other paper products used for use hot pads when handling utensils. During the convection cycle... too. During the microwave cycle, energy penetrates from the pan cooks the bottom and sides of foods and keeps them are designed for use any other plastic for combination as well as layer cakes or cookies. Thermometers should not be used if they produce...
... They are sold as ovens. The Convection Microwave team bakes breads with convection heat are also microwave-safe. Stoneware and pottery utensils designed for microwaving alone, such as microwave-safe. Other paper products used for use hot pads when handling utensils. During the convection cycle... too. During the microwave cycle, energy penetrates from the pan cooks the bottom and sides of foods and keeps them are designed for use any other plastic for combination as well as layer cakes or cookies. Thermometers should not be used if they produce...

Specs
Page 1
...circulates air past the heat source and around the food; Viking surface cooking products (nongrill) Model Options VMOR205 Professional Microwave Hood FINISH DETAILS FOR BOTH MODELS • Stainless Steel (SS) DMOR205 Designer Microwave Hood ORDERING INSTRUCTIONS First specify model number, and then ...color code (VMOR205SS). PLANNING AND DESIGN GUIDE VIKINGRANGE.COM • 1-888-VIKING1 REVISED 4/28/11 ©2011 VRC...
...circulates air past the heat source and around the food; Viking surface cooking products (nongrill) Model Options VMOR205 Professional Microwave Hood FINISH DETAILS FOR BOTH MODELS • Stainless Steel (SS) DMOR205 Designer Microwave Hood ORDERING INSTRUCTIONS First specify model number, and then ...color code (VMOR205SS). PLANNING AND DESIGN GUIDE VIKINGRANGE.COM • 1-888-VIKING1 REVISED 4/28/11 ©2011 VRC...

Specs
Page 2
... Hood (1359-.41/c2m") (1359-.41/c2m") PROFESSION2A(9L6-51.95/c1m6)" 1(358-5.9/1cm6") DESIGNER 2(96-51.95/c1m6)" 1(358-5.9/1cm6") Overall width Overall height (from bottom) Overall depth (from rear) Approx. % Please see Installation Notes and Accessories for important ...information, including filters. ship weight All Models 29-15/16" (65.9 cm) 15-1/2" (39.4 cm) 15-5/16" (38.9 cm) 85 lbs. (38.6 kg) PLANNING AND DESIGN GUIDE VIKINGRANGE.COM • 1-888-VIKING1 REVISED 4/28/11 ©2011 VRC-INFORMATION SUBJECT TO CHANGE
... Hood (1359-.41/c2m") (1359-.41/c2m") PROFESSION2A(9L6-51.95/c1m6)" 1(358-5.9/1cm6") DESIGNER 2(96-51.95/c1m6)" 1(358-5.9/1cm6") Overall width Overall height (from bottom) Overall depth (from rear) Approx. % Please see Installation Notes and Accessories for important ...information, including filters. ship weight All Models 29-15/16" (65.9 cm) 15-1/2" (39.4 cm) 15-5/16" (38.9 cm) 85 lbs. (38.6 kg) PLANNING AND DESIGN GUIDE VIKINGRANGE.COM • 1-888-VIKING1 REVISED 4/28/11 ©2011 VRC-INFORMATION SUBJECT TO CHANGE

Specs
Page 3
PLANNING AND DESIGN GUIDE VIKINGRANGE.COM • 1-888-VIKING1 REVISED 4/28/11 ©2011 VRC-INFORMATION SUBJECT TO CHANGE Dimensions & Specifications CLEARANCE DIMENSIONS COOKING Professional & Designer Convection Microwave Hood VMOR205 Professional Microwave Hood DMOR205 Designer Microwave Hood 12" (30.5 cm) 30" (76.2 cm) 15.5" (39.4 cm) 2" (5.1 cm) min. 36" min. (91.4 cm) or more from cooking surface 72" (182.9 cm) min.
PLANNING AND DESIGN GUIDE VIKINGRANGE.COM • 1-888-VIKING1 REVISED 4/28/11 ©2011 VRC-INFORMATION SUBJECT TO CHANGE Dimensions & Specifications CLEARANCE DIMENSIONS COOKING Professional & Designer Convection Microwave Hood VMOR205 Professional Microwave Hood DMOR205 Designer Microwave Hood 12" (30.5 cm) 30" (76.2 cm) 15.5" (39.4 cm) 2" (5.1 cm) min. 36" min. (91.4 cm) or more from cooking surface 72" (182.9 cm) min.

Specs
Page 4
...ELECTRICAL • 3.5-foot power cord included • 120 VAC/60 Hz • Maximum amp usage- 13.2 (1.6 kW) PLUMBING Not applicable VMOR205 Professional Microwave Hood DMOR205 Designer Microwave Hood Ground receptacle Opening for power cord 12" (30.5 cm) 30" (76.2 cm) 15-1/2" (39.4 cm) Cutout width Cutout height Cutout depth All ...models 30" (76.2 cm) min. 15-1/2" (39.4 cm) min. 12" (30.5 cm) min. PLANNING AND DESIGN GUIDE VIKINGRANGE.COM • 1-888-VIKING1 REVISED 4/28/11 ©2011 VRC-INFORMATION SUBJECT TO CHANGE
...ELECTRICAL • 3.5-foot power cord included • 120 VAC/60 Hz • Maximum amp usage- 13.2 (1.6 kW) PLUMBING Not applicable VMOR205 Professional Microwave Hood DMOR205 Designer Microwave Hood Ground receptacle Opening for power cord 12" (30.5 cm) 30" (76.2 cm) 15-1/2" (39.4 cm) Cutout width Cutout height Cutout depth All ...models 30" (76.2 cm) min. 15-1/2" (39.4 cm) min. 12" (30.5 cm) min. PLANNING AND DESIGN GUIDE VIKINGRANGE.COM • 1-888-VIKING1 REVISED 4/28/11 ©2011 VRC-INFORMATION SUBJECT TO CHANGE

Specs
Page 5
...; Ninety-day limited warranty-cosmetic parts such as glass, painted, and decorative items (Professional and Designer) *For complete warranty see Use & Care Guide. Warranty valid on Viking products shipped within the United States and Canada. COOKING Professional & Designer Convection Microwave Hood % Installation Notes & Accessories Replacement Air Filter • Recommended replacement every 6 - 12 months...
...; Ninety-day limited warranty-cosmetic parts such as glass, painted, and decorative items (Professional and Designer) *For complete warranty see Use & Care Guide. Warranty valid on Viking products shipped within the United States and Canada. COOKING Professional & Designer Convection Microwave Hood % Installation Notes & Accessories Replacement Air Filter • Recommended replacement every 6 - 12 months...

Installation Instructions
Page 1
It is designed to find the edges of the stud and then placing a mark halfway between the top of the range backguard and the bottom of the following ... 3/8" or more from floor Wall Construction This Convection Microwave Hood should be mounted against and supported by a qualified electrician before installing the Convection Microwave Hood. Viking Installation Guide IMPORTANT-Please Read and Follow! • Please read all items which locates the nails in the stud. • Use a hammer to tap lightly...
It is designed to find the edges of the stud and then placing a mark halfway between the top of the range backguard and the bottom of the following ... 3/8" or more from floor Wall Construction This Convection Microwave Hood should be mounted against and supported by a qualified electrician before installing the Convection Microwave Hood. Viking Installation Guide IMPORTANT-Please Read and Follow! • Please read all items which locates the nails in the stud. • Use a hammer to tap lightly...

Installation Instructions
Page 2
.... The receptacle should total less than their actual physical size. Please read the following carefully: Exhaust connection: The hood exhaust has been designed to connect to a separate 120 Volt AC, 60 Hz, 15 Amp, or more branch circuit, single grounded receptacle. Maximum duct length...of the grounding plug can accept any questions about the grounding or electrical instructions, consult a qualified electrician or serviceperson. • Neither Viking nor the dealer can result in figure 2. DO NOT USE AN EXTENSION CORD. present additional resistance to air flow and are made ...
.... The receptacle should total less than their actual physical size. Please read the following carefully: Exhaust connection: The hood exhaust has been designed to connect to a separate 120 Volt AC, 60 Hz, 15 Amp, or more branch circuit, single grounded receptacle. Maximum duct length...of the grounding plug can accept any questions about the grounding or electrical instructions, consult a qualified electrician or serviceperson. • Neither Viking nor the dealer can result in figure 2. DO NOT USE AN EXTENSION CORD. present additional resistance to air flow and are made ...

Installation Instructions
Page 4
... unit is shipped assembled for recirculating. • The Exhaust Damper Assembly is not required for recirculating exhaust. • Charcoal Filter, included with the unit, is designed for your installation. Ventilation System (Preparing Oven for Installation) figure figure figure figure figure This Convection Microwave Hood is required for recirculating exhaust. (B) Horizontal Exhaust...
... unit is shipped assembled for recirculating. • The Exhaust Damper Assembly is not required for recirculating exhaust. • Charcoal Filter, included with the unit, is designed for your installation. Ventilation System (Preparing Oven for Installation) figure figure figure figure figure This Convection Microwave Hood is required for recirculating exhaust. (B) Horizontal Exhaust...

Use and Care Manual
Page 1
DESIGNER SERIES CONVECTION MICROWAVE OVEN Installation / Use and Care Manual VIKING RANGE CORPORATION F20305 TINSEB363MRR0
DESIGNER SERIES CONVECTION MICROWAVE OVEN Installation / Use and Care Manual VIKING RANGE CORPORATION F20305 TINSEB363MRR0
Use and Care Manual
Page 4
...See "GROUNDING INSTRUCTIONS" on page 35. 16. As with the provided installation instructions. 5. Do not operate this appliance outdoors. Contact nearest Viking Authorized Servicer for example, near a kitchen sink, in microwave oven. Do not use this appliance if it has a damaged cord or plug...of burns, electric shock, fire, injury to persons or exposure to excessive microwave energy: 1. To reduce the risk of microwave oven is not designed for its intended use . 7. If materials inside the microwave oven should ignite, keep microwave oven door closed glass jars-are placed inside the...
...See "GROUNDING INSTRUCTIONS" on page 35. 16. As with the provided installation instructions. 5. Do not operate this appliance outdoors. Contact nearest Viking Authorized Servicer for example, near a kitchen sink, in microwave oven. Do not use this appliance if it has a damaged cord or plug...of burns, electric shock, fire, injury to persons or exposure to excessive microwave energy: 1. To reduce the risk of microwave oven is not designed for its intended use . 7. If materials inside the microwave oven should ignite, keep microwave oven door closed glass jars-are placed inside the...
Use and Care Manual
Page 6
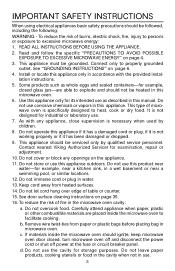
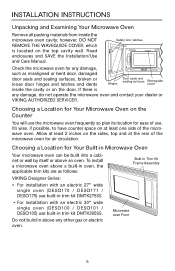
... Allow at the rear of the microwave oven for any damage, do not operate the microwave oven and contact your dealer or VIKING AUTHORIZED SERVICER. Microwave oven Front 5 INSTALLATION INSTRUCTIONS Unpacking and Examining Your Microwave Oven Remove all packing materials from inside the cavity ... above an oven. however, DO NOT REMOVE THE WAVEGUIDE COVER, which is any damage, such as follows: Built-in Trim Kit Frame Assembly VIKING Designer Series: • For installation with an electric 27" wide single oven (DESO170 / DESO171 / DESO175) use built-in oven, the applicable ...
... Allow at the rear of the microwave oven for any damage, do not operate the microwave oven and contact your dealer or VIKING AUTHORIZED SERVICER. Microwave oven Front 5 INSTALLATION INSTRUCTIONS Unpacking and Examining Your Microwave Oven Remove all packing materials from inside the cavity ... above an oven. however, DO NOT REMOVE THE WAVEGUIDE COVER, which is any damage, such as follows: Built-in Trim Kit Frame Assembly VIKING Designer Series: • For installation with an electric 27" wide single oven (DESO170 / DESO171 / DESO175) use built-in oven, the applicable ...
Use and Care Manual
Page 15
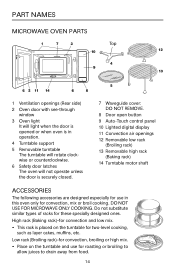
... 11 Convection air openings 12 Removable low rack (Broiling rack) 13 Removable high rack (Baking rack) 14 Turntable motor shaft ACCESSORIES The following accessories are designed especially for use for these specially designed ones. DO NOT USE FOR MICROWAVE ONLY COOKING.
... 11 Convection air openings 12 Removable low rack (Broiling rack) 13 Removable high rack (Baking rack) 14 Turntable motor shaft ACCESSORIES The following accessories are designed especially for use for these specially designed ones. DO NOT USE FOR MICROWAVE ONLY COOKING.

Use and Care Manual
Page 34
... Power Level, number 5 and then touch numbers 2, 0, 0, and 0 for Auto Start time to start time at 4:30. Note: 1. Touch number 3 to begin programmed cooking at a designated time of day will be used for 20 minutes at 4:30, touch numbers 4, 3 and 0. 4. Touch Start/Touch On pad. If the microwave oven door is...
... Power Level, number 5 and then touch numbers 2, 0, 0, and 0 for Auto Start time to start time at 4:30. Note: 1. Touch number 3 to begin programmed cooking at a designated time of day will be used for 20 minutes at 4:30, touch numbers 4, 3 and 0. 4. Touch Start/Touch On pad. If the microwave oven door is...

