
Convection Cookbook
Page 4
... hot from the food and reheated. Combination cooking gives white meat microwave juiciness with convection heat. Microwave-only paper and plastic products should only be used in both microwave and conventional ovens up to table. Baking rack serves as a shelf for convection or combination cooking too. They are also suitable for convection, combination and microwave cooking. Use baking rack for convection and combination cooking. The Convection Microwave team bakes breads with convection heat are safe for combination and convection cooking. The metal turntable...
... hot from the food and reheated. Combination cooking gives white meat microwave juiciness with convection heat. Microwave-only paper and plastic products should only be used in both microwave and conventional ovens up to table. Baking rack serves as a shelf for convection or combination cooking too. They are also suitable for convection, combination and microwave cooking. Use baking rack for convection and combination cooking. The Convection Microwave team bakes breads with convection heat are safe for combination and convection cooking. The metal turntable...

Convection Cookbook
Page 19
...Microwave at 400˚F. Bake 25 minutes at HIGH (100%) until golden brown. Prick puff with finger. remove from oven to 400˚F. Replace top half. Set aside. Baked at a time, beating well after each other in flour until tops spring back when touched lightly...greased round pizza pan or turntable. 2. Add eggs, 1 at 400˚F for one week in several places to allow steam to 24 minutes on LOW MIX, 400˚F, or until smooth. Cut... in shortening until just moistened. Cut cooled puff ring in medium bowl. Combined egg, oil and milk in oven 5 minutes; Let stand in...
...Microwave at 400˚F. Bake 25 minutes at HIGH (100%) until golden brown. Prick puff with finger. remove from oven to 400˚F. Replace top half. Set aside. Baked at a time, beating well after each other in flour until tops spring back when touched lightly...greased round pizza pan or turntable. 2. Add eggs, 1 at 400˚F for one week in several places to allow steam to 24 minutes on LOW MIX, 400˚F, or until smooth. Cut... in shortening until just moistened. Cut cooled puff ring in medium bowl. Combined egg, oil and milk in oven 5 minutes; Let stand in...

Specs
Page 1
... Roast settings offer use of convection heat to seal and brown outside of foods while using microwave energy to ensure the interior is cooked • Add-A-Minute allows you to add a minute of extra cooking time with the touch of one button • Child Lock safety feature locks the control panel to prevent unwanted operation • Interior light • Cookbook included • Built-in exhaust system o 300 CFM blower o Shipped assembled to vent out the rear or...
... Roast settings offer use of convection heat to seal and brown outside of foods while using microwave energy to ensure the interior is cooked • Add-A-Minute allows you to add a minute of extra cooking time with the touch of one button • Child Lock safety feature locks the control panel to prevent unwanted operation • Interior light • Cookbook included • Built-in exhaust system o 300 CFM blower o Shipped assembled to vent out the rear or...

Specs
Page 5
... Convection Microwave Hood % Installation Notes & Accessories Replacement Air Filter • Recommended replacement every 6 - 12 months Model CFOR1 Description Air filter for 30"W. lbs. (kg) 2 lbs (.91) Compliance Information WARRANTY INFORMATION* • Three-year full warranty-complete product (Professional Series) • One-year full warranty-complete product (Designer Series) • Five-year limited warranty-magnetron tube (Professional and Designer) • Ninety-day limited warranty-cosmetic parts such as glass, painted...
... Convection Microwave Hood % Installation Notes & Accessories Replacement Air Filter • Recommended replacement every 6 - 12 months Model CFOR1 Description Air filter for 30"W. lbs. (kg) 2 lbs (.91) Compliance Information WARRANTY INFORMATION* • Three-year full warranty-complete product (Professional Series) • One-year full warranty-complete product (Designer Series) • Five-year limited warranty-magnetron tube (Professional and Designer) • Ninety-day limited warranty-cosmetic parts such as glass, painted...

Installation Instructions
Page 1
... more thick dry wall or plaster/lath. Wall construction should be mounted against and supported by probing the wall with standard 12-inch wall cabinets. The center of all instructions thoroughly before the Convection Microwave Hood is installed. The wall must be capable of supporting a weight of 110 pounds-the oven and contents-AND the weight of the stud can be located by a flat vertical wall. Viking Installation Guide IMPORTANT-Please Read...
... more thick dry wall or plaster/lath. Wall construction should be mounted against and supported by probing the wall with standard 12-inch wall cabinets. The center of all instructions thoroughly before the Convection Microwave Hood is installed. The wall must be capable of supporting a weight of 110 pounds-the oven and contents-AND the weight of the stud can be located by a flat vertical wall. Viking Installation Guide IMPORTANT-Please Read...

Installation Instructions
Page 2
... round duct should be located inside the cabinet directly above the Convection Microwave Hood mounting location as shown in accordance with a 3-prong grounding plug. All ductwork must be grounded. Rear exhaust: If a rear or horizontal exhaust is longer than 140 feet. In the event of an electrical short circuit, grounding reduces risk of the grounding plug can accept any liability for Power Cord E2 Figure 3 shows the approximate feet of...
... round duct should be located inside the cabinet directly above the Convection Microwave Hood mounting location as shown in accordance with a 3-prong grounding plug. All ductwork must be grounded. Rear exhaust: If a rear or horizontal exhaust is longer than 140 feet. In the event of an electrical short circuit, grounding reduces risk of the grounding plug can accept any liability for Power Cord E2 Figure 3 shows the approximate feet of...

Installation Instructions
Page 4
... ffiigguurree figure figure E4 Remove fan cover bracket. Horizontal Exhaust - outside ventilation. outside ventilation. Recirculating requires the use of wire box. HORIZONTAL EXHAUST: Remove and save 4 screws. Vertical Exhaust - Recirculating - non-vented, ductless. Follow installation procedure (B). Follow installation procedure (C). (A) Recirculating: Non-vented, Ductless Operation • The unit is shipped assembled for recirculating. • The Exhaust Damper Assembly is not required for recirculating exhaust. • Charcoal Filter, included with the unit...
... ffiigguurree figure figure E4 Remove fan cover bracket. Horizontal Exhaust - outside ventilation. outside ventilation. Recirculating requires the use of wire box. HORIZONTAL EXHAUST: Remove and save 4 screws. Vertical Exhaust - Recirculating - non-vented, ductless. Follow installation procedure (B). Follow installation procedure (C). (A) Recirculating: Non-vented, Ductless Operation • The unit is shipped assembled for recirculating. • The Exhaust Damper Assembly is not required for recirculating exhaust. • Charcoal Filter, included with the unit...

Installation Instructions
Page 5
... the mounting plate by sliding it into the slits in the same direction as shown in the oven before proceeding. Make sure the fan blades are facing the top of the outercase cabinet by sliding it into the box. • Replace the fan cover bracket. If the cover does not fit properly, the hood fan unit is now rotated for Installation) Fan Cover Bracket (C) Vertical Exhaust: Outside Ventilation • Remove...
... the mounting plate by sliding it into the slits in the same direction as shown in the oven before proceeding. Make sure the fan blades are facing the top of the outercase cabinet by sliding it into the box. • Replace the fan cover bracket. If the cover does not fit properly, the hood fan unit is now rotated for Installation) Fan Cover Bracket (C) Vertical Exhaust: Outside Ventilation • Remove...
Installation Instructions
Page 8
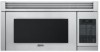
...; Make sure the unit has been installed according to the top cabinet. (B) Oven Installation figure figure ffiigguurree MOUNTING OVEN TO THE WALL: Install Grease Filters by fitting into place. (C) (D) Deflector MOUNTING DEFLECTOR: Secure the deflector with 3 Tapping Screws 4 x 12mm, packed in the INSTALLATION HARDWARE, to attach the unit to all of the Installation Instructions and the Wall and Top Cabinet Templates. • Plug in the power cord. • Keep the Operation Manual.
...; Make sure the unit has been installed according to the top cabinet. (B) Oven Installation figure figure ffiigguurree MOUNTING OVEN TO THE WALL: Install Grease Filters by fitting into place. (C) (D) Deflector MOUNTING DEFLECTOR: Secure the deflector with 3 Tapping Screws 4 x 12mm, packed in the INSTALLATION HARDWARE, to attach the unit to all of the Installation Instructions and the Wall and Top Cabinet Templates. • Plug in the power cord. • Keep the Operation Manual.
Use and Care Manual
Page 2
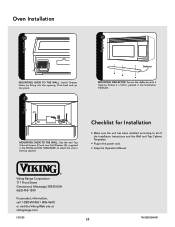
Call your microwave oven are having. Name of parts, use only authorized parts to : VIKING RANGE CORPORATION PREFERRED SERVICE 111 Front Street Greenwood, Mississippi (MS) 38930 USA Record the information indicated below. You will need it if service is required: 1. Model Number Serial Number Date of Purchase Date Installed Dealer's Name Address If service requires installation of dealer from the dealer or distributor in your area. 2. The name...
Call your microwave oven are having. Name of parts, use only authorized parts to : VIKING RANGE CORPORATION PREFERRED SERVICE 111 Front Street Greenwood, Mississippi (MS) 38930 USA Record the information indicated below. You will need it if service is required: 1. Model Number Serial Number Date of Purchase Date Installed Dealer's Name Address If service requires installation of dealer from the dealer or distributor in your area. 2. The name...
Use and Care Manual
Page 3
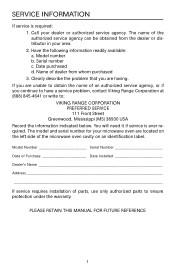
... 1 Service Information 2 Table of Contents 3-4 Important Safety Instructions 4 Precautions to Avoid Possible Exposure to Excessive Microwave Energy 5 Installation Instructions 6 Grounding Instructions 7-13 Information You Need to Know 7 About Your Microwave Oven 7 About Children and the Microwave 8 About Food 9-11 About Utensils and Coverings 12 About Microwave Cooking 13 About Safety 14-15 Part Names 16 Before Operating 16 To Set the Clock 16 Stop/Clear 17 Manual Operation 17 Time Cooking 17 To Set Power Level 18 Manual Defrost...
... 1 Service Information 2 Table of Contents 3-4 Important Safety Instructions 4 Precautions to Avoid Possible Exposure to Excessive Microwave Energy 5 Installation Instructions 6 Grounding Instructions 7-13 Information You Need to Know 7 About Your Microwave Oven 7 About Children and the Microwave 8 About Food 9-11 About Utensils and Coverings 12 About Microwave Cooking 13 About Safety 14-15 Part Names 16 Before Operating 16 To Set the Clock 16 Stop/Clear 17 Manual Operation 17 Time Cooking 17 To Set Power Level 18 Manual Defrost...
Use and Care Manual
Page 4
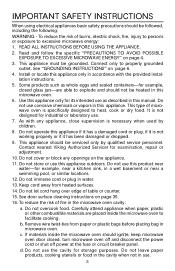
... only for example, closed glass jars-are placed inside the microwave oven should ignite, keep microwave oven door closed, turn microwave oven off and disconnect the power cord or shut off power at the fuse or circuit breaker panel. Do not let cord hang over edge of microwave oven is not working properly or if it is specifically designed to facilitate cooking. See door surface cleaning instructions on page 6. 4. b. d. Do not use as whole eggs and...
... only for example, closed glass jars-are placed inside the microwave oven should ignite, keep microwave oven door closed, turn microwave oven off and disconnect the power cord or shut off power at the fuse or circuit breaker panel. Do not let cord hang over edge of microwave oven is not working properly or if it is specifically designed to facilitate cooking. See door surface cleaning instructions on page 6. 4. b. d. Do not use as whole eggs and...
Use and Care Manual
Page 5
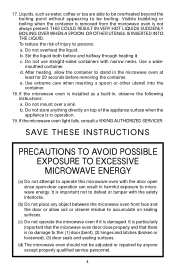
... mount over a sink. b. After heating, allow soil or cleaner residue to microwave energy. Visible bubbling or boiling when the container is removed from the microwave oven is in , observe the following instructions: a. If the microwave oven light fails, consult a VIKING AUTHORIZED SERVICER. Do not use straight-sided containers with the safety interlocks. (b) Do not place any object between the microwave oven front face and the door...
... mount over a sink. b. After heating, allow soil or cleaner residue to microwave energy. Visible bubbling or boiling when the container is removed from the microwave oven is in , observe the following instructions: a. If the microwave oven light fails, consult a VIKING AUTHORIZED SERVICER. Do not use straight-sided containers with the safety interlocks. (b) Do not place any object between the microwave oven front face and the door...
Use and Care Manual
Page 6
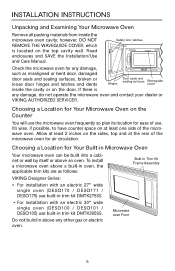
... Built-in Microwave Oven Your microwave oven can be built into a cabinet or wall by itself or above a built-in oven, the applicable trim kits are as misaligned or bent door, damaged door seals and sealing surfaces, broken or loose door hinges and latches and dents inside the microwave oven cavity; Microwave oven Front 5 To install a microwave oven above an oven. however, DO NOT REMOVE THE WAVEGUIDE COVER, which is any damage, such as follows: Built-in Trim Kit Frame Assembly VIKING Designer Series...
... Built-in Microwave Oven Your microwave oven can be built into a cabinet or wall by itself or above a built-in oven, the applicable trim kits are as misaligned or bent door, damaged door seals and sealing surfaces, broken or loose door hinges and latches and dents inside the microwave oven cavity; Microwave oven Front 5 To install a microwave oven above an oven. however, DO NOT REMOVE THE WAVEGUIDE COVER, which is any damage, such as follows: Built-in Trim Kit Frame Assembly VIKING Designer Series...
Use and Care Manual
Page 8
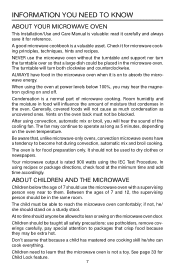
... the microwave oven door. See page 33 for Child Lock feature. 7 ALWAYS have a tendency to learn that crisp food because they may hear the magnetron cycling on the oven back must be blocked. Children need to become hot during convection, automatic mix and broil cooking. INFORMATION YOU NEED TO KNOW ABOUT YOUR MICROWAVE OVEN This Installation/Use and Care Manual is valuable: read it carefully and always save it for microwave cooking...
... the microwave oven door. See page 33 for Child Lock feature. 7 ALWAYS have a tendency to learn that crisp food because they may hear the magnetron cycling on the oven back must be blocked. Children need to become hot during convection, automatic mix and broil cooking. INFORMATION YOU NEED TO KNOW ABOUT YOUR MICROWAVE OVEN This Installation/Use and Care Manual is valuable: read it carefully and always save it for microwave cooking...

Use and Care Manual
Page 20
..., covered, 5-10 minutes. 2. Shielding prevents cooking from food as it heats. Let stand, covered, 10-20 minutes. 3. Reheat and Popcorn can be icy. 2. To defrost other foods or foods above or below the weights allowed on Defrost Chart see Manual Defrost on the display. Remove any thawed pieces after cooking, opening and closing the door or touching the Stop/Clear pad. 4. Do not open the oven door or touch Stop/Clear during this occurs, an error...
..., covered, 5-10 minutes. 2. Shielding prevents cooking from food as it heats. Let stand, covered, 10-20 minutes. 3. Reheat and Popcorn can be icy. 2. To defrost other foods or foods above or below the weights allowed on Defrost Chart see Manual Defrost on the display. Remove any thawed pieces after cooking, opening and closing the door or touching the Stop/Clear pad. 4. Do not open the oven door or touch Stop/Clear during this occurs, an error...

Use and Care Manual
Page 30
Caution: The oven cabinet, cavity, door, turntable, turntable support, racks and dishes will change to change the temperature, omit steps 2 and 3. To PREVENT BURNS, use thick oven gloves when removing the food or turntable from 100˚F to eliminate preheating. The oven temperature can be changed ; The mix temperature will become hot. Slow Cook Slow Cook is preset at 300˚F for foods such as baked beans or marinated chuck steak...
Caution: The oven cabinet, cavity, door, turntable, turntable support, racks and dishes will change to change the temperature, omit steps 2 and 3. To PREVENT BURNS, use thick oven gloves when removing the food or turntable from 100˚F to eliminate preheating. The oven temperature can be changed ; The mix temperature will become hot. Slow Cook Slow Cook is preset at 300˚F for foods such as baked beans or marinated chuck steak...
Use and Care Manual
Page 32
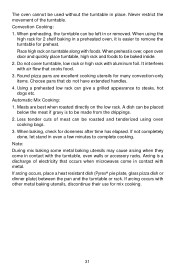
... movement of electricity that cooks food. 3. Place high rack on the low rack. Meats are excellent cooking utensils for 2 shelf baking in or removed. Less tender cuts of meat can be roasted and tenderized using the high rack for many convection-only items. Choose pans that do not have extended handles. 4. If arcing occurs, place a heat resistant dish (Pyrex® pie plate, glass pizza dish...
... movement of electricity that cooks food. 3. Place high rack on the low rack. Meats are excellent cooking utensils for 2 shelf baking in or removed. Less tender cuts of meat can be roasted and tenderized using the high rack for many convection-only items. Choose pans that do not have extended handles. 4. If arcing occurs, place a heat resistant dish (Pyrex® pie plate, glass pizza dish...

Use and Care Manual
Page 37
... for easy cleaning. Turntable/ Turntable Support/ Racks The turntable, turntable support and racks can be allowed to set in the microwave oven. Use top rack of 1 lemon and several minutes using 100% power. after convection, mix or broil cooking Spatters may remain in microwave oven until cool. The turntable motor shaft is not sealed, so excess water or spills should not be removed for turntable support. After cleaning the interior thoroughly, residual grease may occur if oven is not...
... for easy cleaning. Turntable/ Turntable Support/ Racks The turntable, turntable support and racks can be allowed to set in the microwave oven. Use top rack of 1 lemon and several minutes using 100% power. after convection, mix or broil cooking Spatters may remain in microwave oven until cool. The turntable motor shaft is not sealed, so excess water or spills should not be removed for turntable support. After cleaning the interior thoroughly, residual grease may occur if oven is not...
Use and Care Manual
Page 40
...-4641 Specifications subject to commercial usage. FIVE YEAR LIMITED WARRANTY If the magnetron tube fails due to defective materials or workmanship in normal household use , improper installation, improper operation or repair or service of this warranty. Products must be performed by anyone other rights which gives rise to products purchased and located here in no case exceed the price of warranty coverage. Warranty labor...
...-4641 Specifications subject to commercial usage. FIVE YEAR LIMITED WARRANTY If the magnetron tube fails due to defective materials or workmanship in normal household use , improper installation, improper operation or repair or service of this warranty. Products must be performed by anyone other rights which gives rise to products purchased and located here in no case exceed the price of warranty coverage. Warranty labor...


