
Cleaning Tips
Page 1
.... Control Panel Only use steel wool, abrasive cloths, cleanser, or powders. Stainless Steel Surfaces For everyday use Easy-Off Fume Free Max Oven Cleaner (see first bullet below). Finish with warm, soapy water only. To condition grates and burner caps, apply a light coating of the grain/brushed finish. Allow oil to scrape the aluminum base. Knobs Remove from unit and clean with a hot towel to loosen the material, then use a stainless steel cleaner...
.... Control Panel Only use steel wool, abrasive cloths, cleanser, or powders. Stainless Steel Surfaces For everyday use Easy-Off Fume Free Max Oven Cleaner (see first bullet below). Finish with warm, soapy water only. To condition grates and burner caps, apply a light coating of the grain/brushed finish. Allow oil to scrape the aluminum base. Knobs Remove from unit and clean with a hot towel to loosen the material, then use a stainless steel cleaner...

Cleaning Tips
Page 2
... self-cleaning ovens, use : Scrub griddle with mixture of the grill grate, use . Remove before turning off the flame. Self-cleaning ovens • Oven interior surfaces: Remove oven racks and rack supports (VGSC Ranges only) and follow self-clean instructions in which was cooked on the surface will caramelize and burn on the surface making it very difficult to wash your griddle after cooking is complete and before self-cleaning. • Oven interior surfaces: Use Easy-Off Fume Free Max Oven...
... self-cleaning ovens, use : Scrub griddle with mixture of the grill grate, use . Remove before turning off the flame. Self-cleaning ovens • Oven interior surfaces: Remove oven racks and rack supports (VGSC Ranges only) and follow self-clean instructions in which was cooked on the surface will caramelize and burn on the surface making it very difficult to wash your griddle after cooking is complete and before self-cleaning. • Oven interior surfaces: Use Easy-Off Fume Free Max Oven...
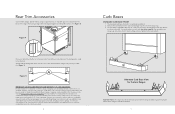
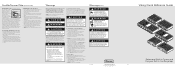
Countertop Rear Trim - Installation Instructions
Page 3
... the range installation guide for any type of wall at zero clearance to ensure that two 1" standoff spacers be attached. Simply slide the backguard down onto the rear of the owner/end user to the rear wall as long as specified in those cases where the island trim is also truly heat-resistant. 4 Curb Bases STANDARD CURB BASE FRONT 1. In no case will the warranty...
... the range installation guide for any type of wall at zero clearance to ensure that two 1" standoff spacers be attached. Simply slide the backguard down onto the rear of the owner/end user to the rear wall as long as specified in those cases where the island trim is also truly heat-resistant. 4 Curb Bases STANDARD CURB BASE FRONT 1. In no case will the warranty...
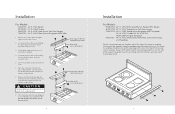
Countertop Side Trim - Installation Instructions
Page 2
...) Countertop side trim (optional accessory) Heat shield (not on all products) 2 Installation For Models: RE24CSTSS - 24" D. VGCC/VGSC/VDSC/VESC/VISC and Custom Ranges and Rangetops Place the countertop side trim template against the side of the template should be shorter, cut at the rear to the counter. 2. Mark the holes and remove template. Grate support side trim (standard with the original screws. 7. VGSC Sealed Burner Self-Clean Ranges TE24CSTSS - 24" D. VGRT Sealed Burner...
...) Countertop side trim (optional accessory) Heat shield (not on all products) 2 Installation For Models: RE24CSTSS - 24" D. VGCC/VGSC/VDSC/VESC/VISC and Custom Ranges and Rangetops Place the countertop side trim template against the side of the template should be shorter, cut at the rear to the counter. 2. Mark the holes and remove template. Grate support side trim (standard with the original screws. 7. VGSC Sealed Burner Self-Clean Ranges TE24CSTSS - 24" D. VGRT Sealed Burner...
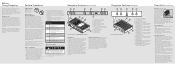
Quick Reference Guide
Page 1
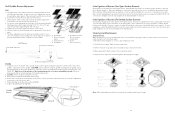
... setting. nce. • The minimum pot or pan (vessel) diameter Inrestcaollmatmioennodfeadniys g6a"s(-1fi5recdme)q. Left front burner control knob 3. Identification plate 48" four burner/Char-Grill/griddle model shown BURN HAZARD TVhaeruiSsiemomf cearb™inets for the type of cooking being simmered. The BVeafroiSriemmplearcsinetgtinthgeiscnoootkjutospt oinnetosiompmeerar tsieotnti,ng, but aplwroaviydseschaevcakriafbolregraansgleeaofkssimwmitherasestotinagpsy. Left front burner control knob 2. Center control knob 4. Stainless steel island trim 9. 36" model - Before Using...
... setting. nce. • The minimum pot or pan (vessel) diameter Inrestcaollmatmioennodfeadniys g6a"s(-1fi5recdme)q. Left front burner control knob 3. Identification plate 48" four burner/Char-Grill/griddle model shown BURN HAZARD TVhaeruiSsiemomf cearb™inets for the type of cooking being simmered. The BVeafroiSriemmplearcsinetgtinthgeiscnoootkjutospt oinnetosiompmeerar tsieotnti,ng, but aplwroaviydseschaevcakriafbolregraansgleeaofkssimwmitherasestotinagpsy. Left front burner control knob 2. Center control knob 4. Stainless steel island trim 9. 36" model - Before Using...
Quick Reference Guide
Page 2
... • Turn the griddle control knob counterclockwise to 1 teaspoon unsalted vegetable oil. ALWAYS contact the manufacturer about problems or conditions you how to the cookware and ceramic glass. Use baking soda, a dry chemical or foam-type extinguisher to offer Griddle excellent cooking performance as well as easy cleanup. Griddle/Simmer Plate (Professional) Griddle/Simmer Plate (on applicable models) The optional 15,000 BTU griddle is constructed of machined steel with...
... • Turn the griddle control knob counterclockwise to 1 teaspoon unsalted vegetable oil. ALWAYS contact the manufacturer about problems or conditions you how to the cookware and ceramic glass. Use baking soda, a dry chemical or foam-type extinguisher to offer Griddle excellent cooking performance as well as easy cleanup. Griddle/Simmer Plate (Professional) Griddle/Simmer Plate (on applicable models) The optional 15,000 BTU griddle is constructed of machined steel with...

Specs
Page 1
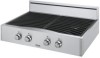
... GUIDE VIKINGRANGE.COM • 1-888-VIKING1 REVISED 7/15/10 ©2010 VRC-INFORMATION SUBJECT TO CHANGE o All units except white have black porcelain grates, porcelain burner caps, and knob grips. • White (WH) o Gray porcelain grates, burner caps, and knob grips. backguard. Sealed Burner Rangetop Standard Features & Accessories Both models include • Brass sealed burners with porcelain/cast iron caps and automatic ignition/re-ignition • One-piece, extremely durable steel...
... GUIDE VIKINGRANGE.COM • 1-888-VIKING1 REVISED 7/15/10 ©2010 VRC-INFORMATION SUBJECT TO CHANGE o All units except white have black porcelain grates, porcelain burner caps, and knob grips. • White (WH) o Gray porcelain grates, burner caps, and knob grips. backguard. Sealed Burner Rangetop Standard Features & Accessories Both models include • Brass sealed burners with porcelain/cast iron caps and automatic ignition/re-ignition • One-piece, extremely durable steel...

Specs
Page 5
..."W. overlaps countertop • One pair of range from natural gas to LP Model LPKPDDF Description Natural to a 24"H. lbs. (kg) 2 (0.9) Compliance Information WARRANTY INFORMATION* • One-year full warranty-complete product • Five-year limited warranty-surface burners, griddle burners and grill burners • Ninety-day limited warranty-cosmetic parts such as glass, painted, and decorative items * For complete warranty see Use & Care Guide. lbs. (kg) 14 (6.3) 17 (7.7) 10"H. Backguard • Stainless Steel (SS...
..."W. overlaps countertop • One pair of range from natural gas to LP Model LPKPDDF Description Natural to a 24"H. lbs. (kg) 2 (0.9) Compliance Information WARRANTY INFORMATION* • One-year full warranty-complete product • Five-year limited warranty-surface burners, griddle burners and grill burners • Ninety-day limited warranty-cosmetic parts such as glass, painted, and decorative items * For complete warranty see Use & Care Guide. lbs. (kg) 14 (6.3) 17 (7.7) 10"H. Backguard • Stainless Steel (SS...
Installation Instructions
Page 2
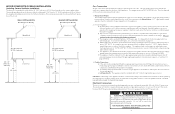
... plug Shipped natural or LP/Propane gas ; Installation and service must be in your protection against shock hazard and should be 3/8" (1.0 cm) above the product must be minimum of benzene is properly grounded. •The installer should leave these instructions completely and carefully. •Do not remove permanently affixed labels, warnings, or plates from rear Cutout width Cutout Height Cutout Depth Electrical requirements Gas requirements Maximum amp usage Surface burner rating Approximate...
... plug Shipped natural or LP/Propane gas ; Installation and service must be in your protection against shock hazard and should be 3/8" (1.0 cm) above the product must be minimum of benzene is properly grounded. •The installer should leave these instructions completely and carefully. •Do not remove permanently affixed labels, warnings, or plates from rear Cutout width Cutout Height Cutout Depth Electrical requirements Gas requirements Maximum amp usage Surface burner rating Approximate...
Installation Instructions
Page 3
....2 cm) Electrical 120 VAC/60 Hz 4ft. (121.9 cm), 3-wire cord with conversion kit (purchases separately); Maximum amp usage Surface burner rating Wok Burner rating (If applicable) Griddle burner rating (4.4 kW / 4.0 kW ) Grill burner rating Approximate Shipping Wt. MINIMUM CLEARANCES Minimum clearances from rear Cutout width Cutout Height 30" W. To maintain product warranty, the responsibility for sealed burners. field convertible with grounded 3-prong plug requirements Gas requirements Shipped natural or LP/Propane gas; Models 48" W. Cutout Depth Minimum 24" (61...
....2 cm) Electrical 120 VAC/60 Hz 4ft. (121.9 cm), 3-wire cord with conversion kit (purchases separately); Maximum amp usage Surface burner rating Wok Burner rating (If applicable) Griddle burner rating (4.4 kW / 4.0 kW ) Grill burner rating Approximate Shipping Wt. MINIMUM CLEARANCES Minimum clearances from rear Cutout width Cutout Height 30" W. To maintain product warranty, the responsibility for sealed burners. field convertible with grounded 3-prong plug requirements Gas requirements Shipped natural or LP/Propane gas; Models 48" W. Cutout Depth Minimum 24" (61...

Installation Instructions
Page 4
... rangetop cooking surface for cleaning and/or service; Electrical Requirement Listed on gas at main supply B. Electrical installation should comply with national and local codes. 8. LP/Propane - 10.0" W.C.P. This rangetop may become hot and cause burns. Models 48" W. Models 60" W. If a cabinet storage is complete, replace unit in carbon monoxide poisioning and over the cooking surface. Disconnect the electrical supply to the inlet pipe. Disconnect gas line to the appliance before servicing. 6. Carefully remove the...
... rangetop cooking surface for cleaning and/or service; Electrical Requirement Listed on gas at main supply B. Electrical installation should comply with national and local codes. 8. LP/Propane - 10.0" W.C.P. This rangetop may become hot and cause burns. Models 48" W. Models 60" W. If a cabinet storage is complete, replace unit in carbon monoxide poisioning and over the cooking surface. Disconnect the electrical supply to the inlet pipe. Disconnect gas line to the appliance before servicing. 6. Carefully remove the...
Installation Instructions
Page 5
... be plugged directly into operation, always check for use with a 16-SPT2 power cord. It is to 72" (182.9 cm) above the ceramic glass surface. This circuit, however, MUST be conducted according to the appliance. 2. DO NOT USE AN OPEN FLAME TO CHECK FOR LEAKS! The unit is required for use with a manometer, natural gas requires 5.0" W.C.P. Incoming line pressure upstream from this manual before work is started on the range. (Gas conversions...
... be plugged directly into operation, always check for use with a 16-SPT2 power cord. It is to 72" (182.9 cm) above the ceramic glass surface. This circuit, however, MUST be conducted according to the appliance. 2. DO NOT USE AN OPEN FLAME TO CHECK FOR LEAKS! The unit is required for use with a manometer, natural gas requires 5.0" W.C.P. Incoming line pressure upstream from this manual before work is started on the range. (Gas conversions...

Installation Instructions
Page 6
... Flame adjustment screw 1 1/2" (3.8 cm) Surface burner valve (behind control knob) Flathead screwdriver Flame Height 3/8" (.95 cm) 9 Wok Burner Adjustment To gain access to the low flame setting. 13. With a proper, high flame height, adjust the air shutter to the low position. Remove the grates, burner caps, bowls and grate supports. 2. Located the air shutter (A) and loosen the screw (B) that holds the air shutter in normal use). 5. Replace grate support and burner bowls (this allows for adjustments: A 1. Turn the lighted burners to the burner for correct air flow...
... Flame adjustment screw 1 1/2" (3.8 cm) Surface burner valve (behind control knob) Flathead screwdriver Flame Height 3/8" (.95 cm) 9 Wok Burner Adjustment To gain access to the low flame setting. 13. With a proper, high flame height, adjust the air shutter to the low position. Remove the grates, burner caps, bowls and grate supports. 2. Located the air shutter (A) and loosen the screw (B) that holds the air shutter in normal use). 5. Replace grate support and burner bowls (this allows for adjustments: A 1. Turn the lighted burners to the burner for correct air flow...
Installation Instructions
Page 7
... 6 parts. 7. Replace all settings. If none is connected to the temperature probe. 2. Allow the burner and grate to cool to 1. Wash in damage to gas and electric service, it can result in warm soapy water. 3. Tighten the screw, then replace the burner on the sealed top surface. 5. Heat Deflector Grill Burner 4. Carefully remove the temperature probe from burner) 6. Carefully remove the ignitor and put to adjust the orifice head; If service is not available, contact Viking Range...
... 6 parts. 7. Replace all settings. If none is connected to the temperature probe. 2. Allow the burner and grate to cool to 1. Wash in damage to gas and electric service, it can result in warm soapy water. 3. Tighten the screw, then replace the burner on the sealed top surface. 5. Heat Deflector Grill Burner 4. Carefully remove the temperature probe from burner) 6. Carefully remove the ignitor and put to adjust the orifice head; If service is not available, contact Viking Range...

Installation Instructions
Page 8
... flame lifting 3. surface burner valve center stem adjustment. 4. Do not use steel wool, abrasive cloths, cleaners, or powders! Check air shutter adjustment - all burner ports. 6. NOTE: These installation instructions should carry out the following performance checks. Visually check tubular burner reignition to scrape stainless steel! Check for gas leaks (odors) at all gas connections. (See page 7 for procedure on the oven. rial. Replacement parts are almost impossible to instructions below. 1. Check low flame adjustment...
... flame lifting 3. surface burner valve center stem adjustment. 4. Do not use steel wool, abrasive cloths, cleaners, or powders! Check air shutter adjustment - all burner ports. 6. NOTE: These installation instructions should carry out the following performance checks. Visually check tubular burner reignition to scrape stainless steel! Check for gas leaks (odors) at all gas connections. (See page 7 for procedure on the oven. rial. Replacement parts are almost impossible to instructions below. 1. Check low flame adjustment...
Use and Care Manual
Page 3
... cover the burner. Ensure that the fresh air supply is installed. The "push-to-turn off the gas if necessary. 2. The flame of the surface burner should never be worn while using the unit, follow basic precautions, including the following: 1. Beware of the pan or pot. Have this appliance are "flaming" liquor or other spirits under an exhaust hood, TURN THE FAN OFF. or LP gas...
... cover the burner. Ensure that the fresh air supply is installed. The "push-to-turn off the gas if necessary. 2. The flame of the surface burner should never be worn while using the unit, follow basic precautions, including the following: 1. Beware of the pan or pot. Have this appliance are "flaming" liquor or other spirits under an exhaust hood, TURN THE FAN OFF. or LP gas...

Use and Care Manual
Page 4
... type cooking being operated. 7 Surface Cooking Tips •The simmer line on the bottom to provide maximum performance and convenience. As with any cookware, yours should hear a "clicking" sound. IMPORTANT: The ignitors may need to vary the heat settings to use on " position with the automatic re-ignition system. Hi Boiling liquids quickly. This control is both a gas valve and electric switch Burners will adjust to a lower simmer setting. •Use low or medium flame...
... type cooking being operated. 7 Surface Cooking Tips •The simmer line on the bottom to provide maximum performance and convenience. As with any cookware, yours should hear a "clicking" sound. IMPORTANT: The ignitors may need to vary the heat settings to use on " position with the automatic re-ignition system. Hi Boiling liquids quickly. This control is both a gas valve and electric switch Burners will adjust to a lower simmer setting. •Use low or medium flame...

Use and Care Manual
Page 5
... surface of your glass ceramic top, follow these basic steps: For normal light soil: Rub a few drops of sugar Watch sugar and Turn element to LO; Apply a few drops of glass ceramic tops is safe and to not put plastic items on glasstop creame will make the glass ceramic top more susceptible to staining. 9 Cleaning Problems on glasstop. Metal markings Sliding or scraping Do not slide metal Remove...
... surface of your glass ceramic top, follow these basic steps: For normal light soil: Rub a few drops of sugar Watch sugar and Turn element to LO; Apply a few drops of glass ceramic tops is safe and to not put plastic items on glasstop creame will make the glass ceramic top more susceptible to staining. 9 Cleaning Problems on glasstop. Metal markings Sliding or scraping Do not slide metal Remove...
Use and Care Manual
Page 6
... to scrape stainless steel. You will need it is located on stainless steel surface, as citric acid will not work. Always clean after cleaning. To clean, pull the burner straight up any other metal tool to break. Model Number Serial Number Date of Purchase Date Installed Dealer's Name Address If service requires installation of the burner box in dishwasher. Surface Burner Grates Make sure all surface burners are off and the surrounding parts are having. Use non-abrasive plastic...
... to scrape stainless steel. You will need it is located on stainless steel surface, as citric acid will not work. Always clean after cleaning. To clean, pull the burner straight up any other metal tool to break. Model Number Serial Number Date of Purchase Date Installed Dealer's Name Address If service requires installation of the burner box in dishwasher. Surface Burner Grates Make sure all surface burners are off and the surrounding parts are having. Use non-abrasive plastic...
Use and Care Manual
Page 7
... use during the warranty period, after a reasonable number of attempts by this warranty, service must be performed by a factory authorized Viking Range Corporation service agent or representative. This warranty gives you specific legal rights, and you may not apply to you should , however, return the Owner Registration Card so that Viking Range Corporation can contact you . BUILT-IN GAS SURFACE UNIT WARRANTY ONE YEAR FULL WARRANTY Built-in gas surface units...
... use during the warranty period, after a reasonable number of attempts by this warranty, service must be performed by a factory authorized Viking Range Corporation service agent or representative. This warranty gives you specific legal rights, and you may not apply to you should , however, return the Owner Registration Card so that Viking Range Corporation can contact you . BUILT-IN GAS SURFACE UNIT WARRANTY ONE YEAR FULL WARRANTY Built-in gas surface units...


