Professional Stainless Steel Handle Kit - 23 inch - Installation Instructions
Page 1
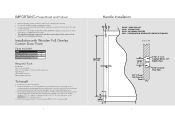
Viking Installation Guide Viking Range Corporation 111 Front Street Greenwood, Mississippi 38930 USA (662) 455-1200 For product information, call 1-888-VIKING1 (845-4641) or visit the Viking Web site at vikingrange.com F20098C EN (042508J) Professional Series Handle Kit For Use with DFUD/DFWD/DFUR/DFUW/DFRI/DFRD/DFIM Models
Viking Installation Guide Viking Range Corporation 111 Front Street Greenwood, Mississippi 38930 USA (662) 455-1200 For product information, call 1-888-VIKING1 (845-4641) or visit the Viking Web site at vikingrange.com F20098C EN (042508J) Professional Series Handle Kit For Use with DFUD/DFWD/DFUR/DFUW/DFRI/DFRD/DFIM Models
Professional Stainless Steel Handle Kit - 23 inch - Installation Instructions
Page 2
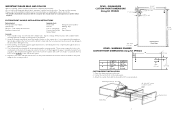
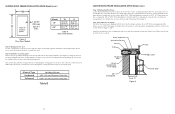
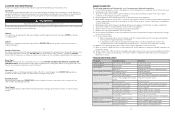
... the holes in order for the door to the door when drilling the holes. 3. DISHWASHER CUSTOM FRONT DIMENSIONS (Using Kit #PHK23) 1" (2.5 cm) 23 1/2" (59.7 cm) 1 3/8" (3.5 cm) 7/8" 2.2 cm) 29 3/4" (75.6 cm) 3/4" Thick (1.9 cm) DFWD - Open the drawer and remove the pan. 2. CUSTOM FRONT HANDLE INSTALLATION INSTRUCTIONS Parts included: Required Tools: Professional Series Handle Electric Drill Phillips Head Screwdriver (2) End Caps Pilot...
... the holes in order for the door to the door when drilling the holes. 3. DISHWASHER CUSTOM FRONT DIMENSIONS (Using Kit #PHK23) 1" (2.5 cm) 23 1/2" (59.7 cm) 1 3/8" (3.5 cm) 7/8" 2.2 cm) 29 3/4" (75.6 cm) 3/4" Thick (1.9 cm) DFWD - Open the drawer and remove the pan. 2. CUSTOM FRONT HANDLE INSTALLATION INSTRUCTIONS Parts included: Required Tools: Professional Series Handle Electric Drill Phillips Head Screwdriver (2) End Caps Pilot...
Professional Stainless Steel Handle Kit - 23 inch - Installation Instructions
Page 3
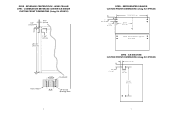
COMBNATION BEVERAGE CENTER/ICE MAKER CUSTOM FRONT DIMENSIONS (Using Kit #PHK30) 5/8" (1.6 cm) 9/16" (1.4 cm) A A 1 3/8" (3.5 cm) 29 1/16" (73.8 cm) TYP 1 3/8" (3.5 cm) Countersink Front of Panel 1/4" (0.6 cm) O through holes 4 DFRD - WINE CELLAR/ DFRI - REFRIGERATED DRAWER CUSTOM FRONT DIMENSIONS (Using Kit #PHK23) 1" (2.5 cm) 1 3/8" (3.5 cm) 21 3/4" (55.2 cm) 10 7/8" (27.6 cm) CL NOTE: Hole locations are Typical as above panel DFIM - DFUR - ICE MACHINE CUSTOM FRONT DIMENSIONS (Using Kit #PHK23) 9/16...
COMBNATION BEVERAGE CENTER/ICE MAKER CUSTOM FRONT DIMENSIONS (Using Kit #PHK30) 5/8" (1.6 cm) 9/16" (1.4 cm) A A 1 3/8" (3.5 cm) 29 1/16" (73.8 cm) TYP 1 3/8" (3.5 cm) Countersink Front of Panel 1/4" (0.6 cm) O through holes 4 DFRD - WINE CELLAR/ DFRI - REFRIGERATED DRAWER CUSTOM FRONT DIMENSIONS (Using Kit #PHK23) 1" (2.5 cm) 1 3/8" (3.5 cm) 21 3/4" (55.2 cm) 10 7/8" (27.6 cm) CL NOTE: Hole locations are Typical as above panel DFIM - DFUR - ICE MACHINE CUSTOM FRONT DIMENSIONS (Using Kit #PHK23) 9/16...
Designer Stainless Steel Handle Kit - 29 inch - Installation Instructions
Page 2
... plates from the product. BEVERAGE CENTER DFRI - Locate the wooden custom panel. 2. The Designer handle will be mounted using (4) #10 x 3/4" screws provided. 2 Handle Installation CL DFUW - Attach the Designer handle to the DFUR, DFUW, DFRI, DFIM, DFWD101 Installation Instructions for local inspector's use and future reference. ICE MACHINE DFUR - Using the 3/16"(0.5 cm) drill bit, drill completely through the door in the...
... plates from the product. BEVERAGE CENTER DFRI - Locate the wooden custom panel. 2. The Designer handle will be mounted using (4) #10 x 3/4" screws provided. 2 Handle Installation CL DFUW - Attach the Designer handle to the DFUR, DFUW, DFRI, DFIM, DFWD101 Installation Instructions for local inspector's use and future reference. ICE MACHINE DFUR - Using the 3/16"(0.5 cm) drill bit, drill completely through the door in the...

Installation Instructions
Page 2
... necessary. 2. Provisions for electricity should be sure your wine cellar has been thoroughly inspected and found to any problems resulting from the outside and inside the unit. • Never clean unit parts with temperature above 55°F (13°C) and below . IMPORTANT: Now that you dispose of water or moisture. • Viking Range Corporation will be moved for freestanding models. 3. VUWC144T) and...
... necessary. 2. Provisions for electricity should be sure your wine cellar has been thoroughly inspected and found to any problems resulting from the outside and inside the unit. • Never clean unit parts with temperature above 55°F (13°C) and below . IMPORTANT: Now that you dispose of water or moisture. • Viking Range Corporation will be moved for freestanding models. 3. VUWC144T) and...

Installation Instructions
Page 5
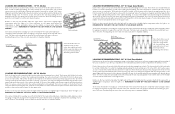
... hinge pin Remove to remove the door Hinge adaptor screws Loosen these to adjust door, on the refrigerator model cut the overlay panel to the sides and top of 9/32" (7mm) between the door and cabinet flange as shown. Remove the door gasket by loosening the 2 screws which secure the hinge adapter brackets to the door and adjusting the door side to 5/8" (16 mm) minimum. Dual Zone...
... hinge pin Remove to remove the door Hinge adaptor screws Loosen these to adjust door, on the refrigerator model cut the overlay panel to the sides and top of 9/32" (7mm) between the door and cabinet flange as shown. Remove the door gasket by loosening the 2 screws which secure the hinge adapter brackets to the door and adjusting the door side to 5/8" (16 mm) minimum. Dual Zone...
Installation Instructions
Page 6
...supplied with the retaining nut using a 15mm socket. Use the longer extension for a 3/4" thick overlay panel and the shorter one for attaching the overlay panel to the door. Install this assembly into the overlay panel and secure with the lock. Be careful not to drill the pilot holes through the overlay panel centered...extension, cam stop washer, spring washer, and set screw to door Set the overlay panel on the overlay panel, this time, drill the screw pilot holes for a 5/8" thick panel. Step 6: Drill holes in overlay panel Remove the hinge adapter bushings from the door. Pilot Hole...
...supplied with the retaining nut using a 15mm socket. Use the longer extension for a 3/4" thick overlay panel and the shorter one for attaching the overlay panel to the door. Install this assembly into the overlay panel and secure with the lock. Be careful not to drill the pilot holes through the overlay panel centered...extension, cam stop washer, spring washer, and set screw to door Set the overlay panel on the overlay panel, this time, drill the screw pilot holes for a 5/8" thick panel. Step 6: Drill holes in overlay panel Remove the hinge adapter bushings from the door. Pilot Hole...
Installation Instructions
Page 8
... the back section of the wine cellar. Make sure they are almost impossible to remove. Plug the unit into the light enclosure channel. Dual Zone Models DANGER ELECTRICAL SHOCK HAZARD Failure to to disconnect the power cord when changing the light tube, could result in fire or electrical shock. Use only approved replacement light tubes from your dealer or manufacturer. This product uses two light tubes to illuminate the...
... the back section of the wine cellar. Make sure they are almost impossible to remove. Plug the unit into the light enclosure channel. Dual Zone Models DANGER ELECTRICAL SHOCK HAZARD Failure to to disconnect the power cord when changing the light tube, could result in fire or electrical shock. Use only approved replacement light tubes from your dealer or manufacturer. This product uses two light tubes to illuminate the...
Installation Instructions
Page 9
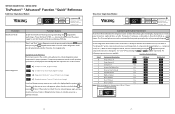
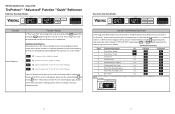
... System POWER FAILURE - COLDER 55 13 SA38 4 ˚C SA 4 LED displays steady green when alarms enabled. Reset Function Turn Unit On & Off Function Access WARMER Pressing and holding the ON OFF keySEfTor 5-seconds w˚F̊/Cill turLInGHTthe unit "ON" or "OFF". COLDER COLDER keypad. SINGLE ZONE The temperature of the compartments stored wine and/or 55 13 38 contents. Flashing Amber HIGH/LOW TEMP - COLDER Adjust Temperature Set...
... System POWER FAILURE - COLDER 55 13 SA38 4 ˚C SA 4 LED displays steady green when alarms enabled. Reset Function Turn Unit On & Off Function Access WARMER Pressing and holding the ON OFF keySEfTor 5-seconds w˚F̊/Cill turLInGHTthe unit "ON" or "OFF". COLDER COLDER keypad. SINGLE ZONE The temperature of the compartments stored wine and/or 55 13 38 contents. Flashing Amber HIGH/LOW TEMP - COLDER Adjust Temperature Set...
Installation Instructions
Page 10
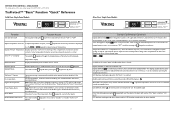
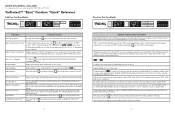
... display an amber "POWER FAILURE" whenever power is normal. Lights will still function, but will be displayed. 55˚ SETTING THE CONTROLS - The display, audible alarms, message center and lights will time-out in 15 minutes after each compartment's stored wine and/or contents. TruProtect™ "Basic" Function "Quick" Reference Solid Door Dual Zone Models: 64 ˚F 42 ˚F ON Hi/Low Temp Upper Hi/Low Temp Lower Function Turn Unit...
... display an amber "POWER FAILURE" whenever power is normal. Lights will still function, but will be displayed. 55˚ SETTING THE CONTROLS - The display, audible alarms, message center and lights will time-out in 15 minutes after each compartment's stored wine and/or contents. TruProtect™ "Basic" Function "Quick" Reference Solid Door Dual Zone Models: 64 ˚F 42 ˚F ON Hi/Low Temp Upper Hi/Low Temp Lower Function Turn Unit...
Installation Instructions
Page 11
... storage in the rear half of the rack. Avoid pulling out more efficient energy usage and functionality of the racks where labels are completely visible and place wines for everyday use on . Store red wines on the upper racks where the temperature is on the front half of the unit, it is lower. Bottles on the top rack directly under the light and on the rack directly...
... storage in the rear half of the rack. Avoid pulling out more efficient energy usage and functionality of the racks where labels are completely visible and place wines for everyday use on . Store red wines on the upper racks where the temperature is on the front half of the unit, it is lower. Bottles on the top rack directly under the light and on the rack directly...
Installation Instructions
Page 12
... storage compartment will disappear Move unit to cooler location Reset to slightly warmer temperature Reset control to expel heat. 4. Use the warmest temperature control set - When serving temperatures are not required, return the compartment(s) set Faulty thermometer Solution Clean inside of unit Power cord not plugged into power source Reset house fuse Reduce number and/or duration of openings Raise temperature of unit via control panel Clean condenser Reduce number of door openings Reduce number of door openings Move unit...
... storage compartment will disappear Move unit to cooler location Reset to slightly warmer temperature Reset control to expel heat. 4. Use the warmest temperature control set - When serving temperatures are not required, return the compartment(s) set Faulty thermometer Solution Clean inside of unit Power cord not plugged into power source Reset house fuse Reduce number and/or duration of openings Raise temperature of unit via control panel Clean condenser Reduce number of door openings Reduce number of door openings Move unit...
Installation Instructions
Page 13
... 4 specifications, the display will automatically exit after 15-minutes of Door C Sense. If the prod˚F̊u/Cct isLIGaHtT fault, the error code will disable the refrigerator system and fans while allowing the internal lights, display and user interface panel to unit. SINGLE ZONE TruProtect™ "Advanced" Function "Quick" Reference Solid Door Single Zone Models: 55 ON OFF ˚F PRESS AND HOLD WARMER SET COLDER F/C TruProtect System POWER FAILURE - LIGHT COLDER...
... 4 specifications, the display will automatically exit after 15-minutes of Door C Sense. If the prod˚F̊u/Cct isLIGaHtT fault, the error code will disable the refrigerator system and fans while allowing the internal lights, display and user interface panel to unit. SINGLE ZONE TruProtect™ "Advanced" Function "Quick" Reference Solid Door Single Zone Models: 55 ON OFF ˚F PRESS AND HOLD WARMER SET COLDER F/C TruProtect System POWER FAILURE - LIGHT COLDER...
Installation Instructions
Page 14
... the code by pressing ON theOFF SET and WARMER COLDER ˚F̊ /C COLDLIEGRHT keypads respectively. Display Error Code Reference: The microprocessor in five (5) seconds. pressing ON OFF 4 timSETes. compressor WARMER on/off, etc...). DUAL ZONE TruProtect™ "Advanced" Function "Quick" Reference Solid Door Dual Zone Models: 64 ˚F 42 ˚F ON Hi/Low Temp Upper Hi/Low Temp Lower Glass Door Dual Zone Models: 64 ˚F Place new control here when I get it...
... the code by pressing ON theOFF SET and WARMER COLDER ˚F̊ /C COLDLIEGRHT keypads respectively. Display Error Code Reference: The microprocessor in five (5) seconds. pressing ON OFF 4 timSETes. compressor WARMER on/off, etc...). DUAL ZONE TruProtect™ "Advanced" Function "Quick" Reference Solid Door Dual Zone Models: 64 ˚F 42 ˚F ON Hi/Low Temp Upper Hi/Low Temp Lower Glass Door Dual Zone Models: 64 ˚F Place new control here when I get it...
Installation Instructions
Page 15
... Viking Range Corporation service agent or representative. The model and serial number for Indoor Use) TWO YEAR FULL WARRANTY Built-In/Freestanding Undercounter Wine Cellars and all of their components and accessories, except as listed above limitation or exclusion may not apply to you continue to be free from the date of charge for any kind, with the owner paying all commercial locations such as listed below . UNDERCOUNTER...
... Viking Range Corporation service agent or representative. The model and serial number for Indoor Use) TWO YEAR FULL WARRANTY Built-In/Freestanding Undercounter Wine Cellars and all of their components and accessories, except as listed above limitation or exclusion may not apply to you continue to be free from the date of charge for any kind, with the owner paying all commercial locations such as listed below . UNDERCOUNTER...
Installation Instructions
Page 16
... Outdoor Use) ONE YEAR FULL WARRANTY Built-In/Freestanding Undercounter Wine Cellars and all commercial locations such as restaurants, food service locations and institutional food service locations. The normal operating range for the unit is entitled to damage resulting from whom the product was purchased or Viking Range Corporation. Service will be performed by a factory authorized Viking Range Corporation service agent or representative. Warranty shall not apply to either a refund or replacement of its free installation.
... Outdoor Use) ONE YEAR FULL WARRANTY Built-In/Freestanding Undercounter Wine Cellars and all commercial locations such as restaurants, food service locations and institutional food service locations. The normal operating range for the unit is entitled to damage resulting from whom the product was purchased or Viking Range Corporation. Service will be performed by a factory authorized Viking Range Corporation service agent or representative. Warranty shall not apply to either a refund or replacement of its free installation.
Specs
Page 1
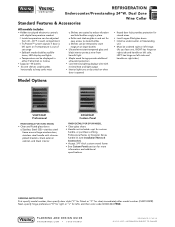
... set range o Sabbath mode disables audible tones, LED display and lights o Temperature can be ordered right or left hinge. (As you face unit, RIGHT has hinge on right side and handle on by switch or when door is opened • Keyed door lock provides protection for more information and additional specifications. Dual Zone Wine Cellar Standard Features & Accessories All models include: • Hidden touchpad electronic controls with digital temperature...
... set range o Sabbath mode disables audible tones, LED display and lights o Temperature can be ordered right or left hinge. (As you face unit, RIGHT has hinge on right side and handle on by switch or when door is opened • Keyed door lock provides protection for more information and additional specifications. Dual Zone Wine Cellar Standard Features & Accessories All models include: • Hidden touchpad electronic controls with digital temperature...
Specs
Page 2
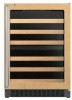
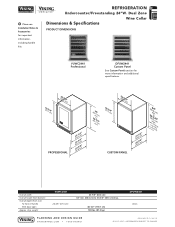
Dual Zone Wine Cellar Dimensions & Specifications PRODUCT DIMENSIONS VUWC2441 Professional DFUW2441 Custom Panel See Custom Panels section for important information, including handle kits. INFORMATION SUBJECT TO CHANGE ship. REFRIGERATION Undercounter/Freestanding 24"W. weight VUWC2441 26-3/8" (67.0 cm) 23-7/8" (60.6 cm) 34" min. (86.4 cm) to 34-3/4" (88.3 cm) max. 46-1/2" (118.1 cm) 180 lbs. (81.0 kg) DFUW2441 Varies PLANNING AND DESIGN GUIDE VIKINGRANGE.COM • 1-888...
Dual Zone Wine Cellar Dimensions & Specifications PRODUCT DIMENSIONS VUWC2441 Professional DFUW2441 Custom Panel See Custom Panels section for important information, including handle kits. INFORMATION SUBJECT TO CHANGE ship. REFRIGERATION Undercounter/Freestanding 24"W. weight VUWC2441 26-3/8" (67.0 cm) 23-7/8" (60.6 cm) 34" min. (86.4 cm) to 34-3/4" (88.3 cm) max. 46-1/2" (118.1 cm) 180 lbs. (81.0 kg) DFUW2441 Varies PLANNING AND DESIGN GUIDE VIKINGRANGE.COM • 1-888...
Specs
Page 4
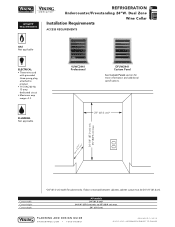
... 24-1/4" (61.6 cm). UTILITY REQUIREMENTS REFRIGERATION Undercounter/Freestanding 24"W. Dual Zone Wine Cellar Installation Requirements ACCESS REQUIREMENTS GAS Not applicable ELECTRICAL • Three-wire cord with grounded three-prong plug attached to 35" (88.9 cm) max. 24" (61.0 cm) PLANNING AND DESIGN GUIDE VIKINGRANGE.COM • 1-888-VIKING1 RELEASED 7/30/10 © 2 0 1 0 V R C - INFORMATION SUBJECT TO CHANGE to product • 115 VAC/60 Hz...
... 24-1/4" (61.6 cm). UTILITY REQUIREMENTS REFRIGERATION Undercounter/Freestanding 24"W. Dual Zone Wine Cellar Installation Requirements ACCESS REQUIREMENTS GAS Not applicable ELECTRICAL • Three-wire cord with grounded three-prong plug attached to 35" (88.9 cm) max. 24" (61.0 cm) PLANNING AND DESIGN GUIDE VIKINGRANGE.COM • 1-888-VIKING1 RELEASED 7/30/10 © 2 0 1 0 V R C - INFORMATION SUBJECT TO CHANGE to product • 115 VAC/60 Hz...
Specs
Page 5
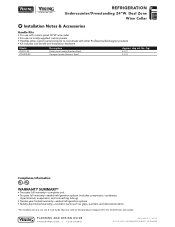
PLANNING AND DESIGN GUIDE VIKINGRANGE.COM • 1-888-VIKING1 RELEASED 7/30/10 © 2 0 1 0 V R C - Dual Zone Wine Cellar % Installation Notes & Accessories Handle Kits • For use on Viking products shipped within the United States and Canada. INFORMATION SUBJECT TO CHANGE wine cellar • For use with other Professional & Designer products • Kit includes one handle and installation hardware Model PHK30 - ship wt. SS DDHK29-SS Description Professional handle (Stainless Steel) Designer handle...
PLANNING AND DESIGN GUIDE VIKINGRANGE.COM • 1-888-VIKING1 RELEASED 7/30/10 © 2 0 1 0 V R C - Dual Zone Wine Cellar % Installation Notes & Accessories Handle Kits • For use on Viking products shipped within the United States and Canada. INFORMATION SUBJECT TO CHANGE wine cellar • For use with other Professional & Designer products • Kit includes one handle and installation hardware Model PHK30 - ship wt. SS DDHK29-SS Description Professional handle (Stainless Steel) Designer handle...

