Side Panel Kit Instructions
Page 1
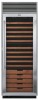
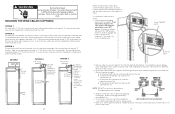
... with the unit. Side Panel Support Installation. If necessary, use and for proper securing methods. INSTALLATION INSTRUCTIONS VIKING 111 Front Street Greenwood, Mississippi 38930 USA (662)455-1200 dSSPL/dSSPR designer SERIES SIDE PANEL KIT For Use with the top panel kit. 2. Some edges may void the warranty. •Please refer to installation instructions included with Built-In Refrigerator/Freezers and Full Height Wine Cellars IMPORTANT - If a top panel kit was purchased, refer to...
... with the unit. Side Panel Support Installation. If necessary, use and for proper securing methods. INSTALLATION INSTRUCTIONS VIKING 111 Front Street Greenwood, Mississippi 38930 USA (662)455-1200 dSSPL/dSSPR designer SERIES SIDE PANEL KIT For Use with the top panel kit. 2. Some edges may void the warranty. •Please refer to installation instructions included with Built-In Refrigerator/Freezers and Full Height Wine Cellars IMPORTANT - If a top panel kit was purchased, refer to...
Custom Side Panel Hardware Kit - Installation Instructions
Page 1
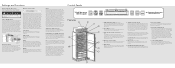
... on the back, attach the Z-Brackets to be used . This may void the warranty. •Please observe all local and national codes and ordinances. •The installer should retain for local inspector's use and for each side panel used in conjunction with the refrigerator/wine cellar installation instructions supplied with Designer Series Built-In Refrigerators/Wine Cellars Retain for Future Reference VIKING RANGE CORPORATION 111 FRONT STREET GREENWOOD, MISSISSIPPI (MS...
... on the back, attach the Z-Brackets to be used . This may void the warranty. •Please observe all local and national codes and ordinances. •The installer should retain for local inspector's use and for each side panel used in conjunction with the refrigerator/wine cellar installation instructions supplied with Designer Series Built-In Refrigerators/Wine Cellars Retain for Future Reference VIKING RANGE CORPORATION 111 FRONT STREET GREENWOOD, MISSISSIPPI (MS...
Specs
Page 1
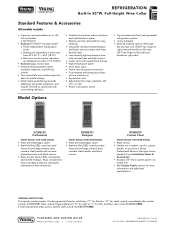
... half-size bottles • Two convertible wine shelves adjust to allow for bottle display • Solid maple wood facings provide additional ultraviolet protection, and may be finished to 150 full-size bottles o 84"H./24"D. • Exclusive TriTemp™ storage system o Three independent temperature zones o Settings are fully removable for left), and then color code (VCWB300FRSS). INFORMATION SUBJECT TO CHANGE Full-Height Wine Cellar Standard Features & Accessories All models...
... half-size bottles • Two convertible wine shelves adjust to allow for bottle display • Solid maple wood facings provide additional ultraviolet protection, and may be finished to 150 full-size bottles o 84"H./24"D. • Exclusive TriTemp™ storage system o Three independent temperature zones o Settings are fully removable for left), and then color code (VCWB300FRSS). INFORMATION SUBJECT TO CHANGE Full-Height Wine Cellar Standard Features & Accessories All models...
Specs
Page 7
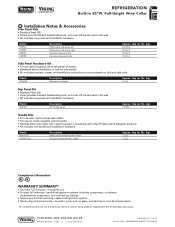
... use on locally supplied custom panels • Handles allow wine cellar with custom panels to coordinate with Designer built-in refrigerator/freezers • Hardware allows installation of custom side panels • Kit includes brackets, screws, and installation instructions to mount panels on Viking products shipped within the United States and Canada. lbs. (kg) 7 (3.2) 7 (3.2) Compliance Information WARRANTY SUMMARY* • Two-year full warranty-complete unit • Six-year full warranty-sealed refrigeration system (includes compressor...
... use on locally supplied custom panels • Handles allow wine cellar with custom panels to coordinate with Designer built-in refrigerator/freezers • Hardware allows installation of custom side panels • Kit includes brackets, screws, and installation instructions to mount panels on Viking products shipped within the United States and Canada. lbs. (kg) 7 (3.2) 7 (3.2) Compliance Information WARRANTY SUMMARY* • Two-year full warranty-complete unit • Six-year full warranty-sealed refrigeration system (includes compressor...
Installation Instructions
Page 2
... messages in accordance with installation specifications and dimensions -properly install wine cellar -remove any moldings or decorative panels that prevent the wine cellar from being serviced -assure that floor will support wine cellar, door panels and contents (approximately 1200 lbs. [540 kg]). -provide a properly grounded electrical outlet -assure that location will permit appliance doors to open 90° minimum All safety messages will NOT warranty any problems resulting from Rear...
... messages in accordance with installation specifications and dimensions -properly install wine cellar -remove any moldings or decorative panels that prevent the wine cellar from being serviced -assure that floor will support wine cellar, door panels and contents (approximately 1200 lbs. [540 kg]). -provide a properly grounded electrical outlet -assure that location will permit appliance doors to open 90° minimum All safety messages will NOT warranty any problems resulting from Rear...

Installation Instructions
Page 3
...; storage system 2. Low intensity lighting 7. Black interior 8. Extendable shelves (13) 5. High temperature alarm (behind grille) 10. Door alarm (behind grille) 9. Connection to home security system (behind grille) 11. FULL HEIGHT WINE CELLAR CABINET OPENING DIMENSIONS 84 1/16 (213.5) cm max. Keyed door lock - (on front of door) 8 9 10 2 3 4 5 6 7 1 12 SITE PREPARATIONS AND CONSIDERATIONS PROFESSIONAL MODEL 30" W. Electronic control center 3. anti-tip board and...
...; storage system 2. Low intensity lighting 7. Black interior 8. Extendable shelves (13) 5. High temperature alarm (behind grille) 10. Door alarm (behind grille) 9. Connection to home security system (behind grille) 11. FULL HEIGHT WINE CELLAR CABINET OPENING DIMENSIONS 84 1/16 (213.5) cm max. Keyed door lock - (on front of door) 8 9 10 2 3 4 5 6 7 1 12 SITE PREPARATIONS AND CONSIDERATIONS PROFESSIONAL MODEL 30" W. Electronic control center 3. anti-tip board and...

Installation Instructions
Page 4
...'s responsibility to move and install wine cellar. Additional boards may be provided. DO NOT use an adapter. Check with a solid soffit or wood block. 7 It is in conformance with a power supply cord having a 3prong grounding plug. Use two or more people to : •contact a qualified electrical installer. •assure that the electrical installation is adequate. If codes permit a separate grounding wire to rear or side...
...'s responsibility to move and install wine cellar. Additional boards may be provided. DO NOT use an adapter. Check with a solid soffit or wood block. 7 It is in conformance with a power supply cord having a 3prong grounding plug. Use two or more people to : •contact a qualified electrical installer. •assure that the electrical installation is adequate. If codes permit a separate grounding wire to rear or side...
Installation Instructions
Page 11
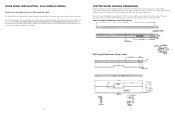
... per the panel dimension instructions. (See panel dimensions for proper attachment locations of the handles.) Use the enclosed adhesive backed mylar pieces to cut wood facing out of the panel. NOTE: A scrap sample should be removed. FULL OVERLAY MODEL Panels must be stained, painted, or removed and replaced with alternative wood facings. Short Facing Dimensions (Top Two Zones) SCALE 1.000 Tall Facing Dimensions (Lower zone) 20...
... per the panel dimension instructions. (See panel dimensions for proper attachment locations of the handles.) Use the enclosed adhesive backed mylar pieces to cut wood facing out of the panel. NOTE: A scrap sample should be removed. FULL OVERLAY MODEL Panels must be stained, painted, or removed and replaced with alternative wood facings. Short Facing Dimensions (Top Two Zones) SCALE 1.000 Tall Facing Dimensions (Lower zone) 20...
Installation Instructions
Page 12
... wine cellar (see Figure 1). Red, white, and black wiring* Back side of the unit that leveling legs are up before the unit is completely installed and secured per side) 2) Remove the grille louver assembly to access the black safety grille. 3) Turn power off. 4) Remove the four screws that attach the top grille assembly to move and install wine cellar. Failure to support...
... wine cellar (see Figure 1). Red, white, and black wiring* Back side of the unit that leveling legs are up before the unit is completely installed and secured per side) 2) Remove the grille louver assembly to access the black safety grille. 3) Turn power off. 4) Remove the four screws that attach the top grille assembly to move and install wine cellar. Failure to support...
Installation Instructions
Page 13
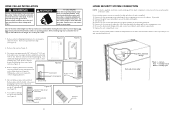
... the wine cellar, raise unit until firmly in place, confirm the finished dimensions, electrical location, minimum door and shelf clearances, and door panel instructions. (See pages 3, 4, 5 & 6). 1. OPTION 2 If a solid soffit is not available or soffit is shut-off the rollers, adjust to the "ON" position, showroom mode is engaged and power is more than 1" (2.5 cm) above wine cellar. Position wine cellar in front of cabinets by plugging power cord...
... the wine cellar, raise unit until firmly in place, confirm the finished dimensions, electrical location, minimum door and shelf clearances, and door panel instructions. (See pages 3, 4, 5 & 6). 1. OPTION 2 If a solid soffit is not available or soffit is shut-off the rollers, adjust to the "ON" position, showroom mode is engaged and power is more than 1" (2.5 cm) above wine cellar. Position wine cellar in front of cabinets by plugging power cord...
Quick Reference Guide
Page 1
... lighted bar on the control center will turn the power off switch is shipped with no longer flash. To again view the set to display degrees Fahrenheit. Refer to the "Wine Storage" section for your wine displayed without compromising wine integrity. Display The display key will toggle between the upper, middle, and lower zones. Press this button if you wish to adjust by 5 degrees for 5 seconds. The wine cellar's door must be set the temperature...
... lighted bar on the control center will turn the power off switch is shipped with no longer flash. To again view the set to display degrees Fahrenheit. Refer to the "Wine Storage" section for your wine displayed without compromising wine integrity. Display The display key will toggle between the upper, middle, and lower zones. Press this button if you wish to adjust by 5 degrees for 5 seconds. The wine cellar's door must be set the temperature...

Quick Reference Guide
Page 2
... to adjust, repair, service, or replace any part of your safety, DO NOT store or use the display shelf, first remove any other appliance. Shelf Support F20723 EN VIKING RANGE CORPORATION 111 Front Street • Greenwood, Mississippi 38930 USA • (662) 455-1200 (012010) Viking Quick Reference Guide Built-In Full Height Wine Cellars Failure to operate, play with, or crawl inside the wine cellar cannot be removed. Keep doors closed...
... to adjust, repair, service, or replace any part of your safety, DO NOT store or use the display shelf, first remove any other appliance. Shelf Support F20723 EN VIKING RANGE CORPORATION 111 Front Street • Greenwood, Mississippi 38930 USA • (662) 455-1200 (012010) Viking Quick Reference Guide Built-In Full Height Wine Cellars Failure to operate, play with, or crawl inside the wine cellar cannot be removed. Keep doors closed...

Use and Care Manual
Page 2
... these instructions can create a fire hazard or explosion. •Always turn the power on/off switch (located behind the air grille on top right side) to the OFF position before using your other injuries. 2 WARNING To reduce the risk of Your Wine Cellar 6 Before Using Your Wine Cellar 8 Electronic Control Center 9 Wine Storage System 11 Wine Storage Guidelines 17 Cleaning and Maintenance 19 Troubleshooting 20 Service Information 21 Warranty 22...
... these instructions can create a fire hazard or explosion. •Always turn the power on/off switch (located behind the air grille on top right side) to the OFF position before using your other injuries. 2 WARNING To reduce the risk of Your Wine Cellar 6 Before Using Your Wine Cellar 8 Electronic Control Center 9 Wine Storage System 11 Wine Storage Guidelines 17 Cleaning and Maintenance 19 Troubleshooting 20 Service Information 21 Warranty 22...

Use and Care Manual
Page 3
... or abandoned refrigerated products are not problems of the Installation Instructions). •Properly maintain the wine cellar. •Be sure the wine cellar is not used by anyone unable to the electrical requirements section of the past. Safety/Installation Tips •Install and level the wine cellar on a ...size and use. •Do not install the wine cellar near an oven, radiator, or other heat source. •Keep the wine cellar out of the weather. •Connect the wine cellar only to the proper type of outlet, with the correct electrical supply and grounding. (Refer to operate...
... or abandoned refrigerated products are not problems of the Installation Instructions). •Properly maintain the wine cellar. •Be sure the wine cellar is not used by anyone unable to the electrical requirements section of the past. Safety/Installation Tips •Install and level the wine cellar on a ...size and use. •Do not install the wine cellar near an oven, radiator, or other heat source. •Keep the wine cellar out of the weather. •Connect the wine cellar only to the proper type of outlet, with the correct electrical supply and grounding. (Refer to operate...

Use and Care Manual
Page 5
... grille. The unit is shipped with the power on the control center. The lighted bar on /off switch to the "Off" position. The door lock provides added protection for wine storage guidelines and suggested serving temperatures. 9 Your wine cellar is factory set temperature will flash on /off switch to the "On" position. To use the showroom mode, remove center grille assembly and turn the power back on, press...
... grille. The unit is shipped with the power on the control center. The lighted bar on /off switch to the "Off" position. The door lock provides added protection for wine storage guidelines and suggested serving temperatures. 9 Your wine cellar is factory set temperature will flash on /off switch to the "On" position. To use the showroom mode, remove center grille assembly and turn the power back on, press...

Use and Care Manual
Page 6
... bottle. Fan outputs will not be heard and the wine cellar's display will be affected by one degree increments. At the end of 10 seconds, the display will signal if the temperature in any zone fluctuates 5 degrees from the control will each accommodate 10 bottles of the door switch. Wine Storage System CAUTION To store magnum or oversized bottles, the shelf directly above must be removed. Lower Temp...
... bottle. Fan outputs will not be heard and the wine cellar's display will be affected by one degree increments. At the end of 10 seconds, the display will signal if the temperature in any zone fluctuates 5 degrees from the control will each accommodate 10 bottles of the door switch. Wine Storage System CAUTION To store magnum or oversized bottles, the shelf directly above must be removed. Lower Temp...

Use and Care Manual
Page 7
... in the wine cellar on how to wine cellar fronts. 12 13 Lift the shelf up, rotate the shelf support up with glide, lower into place with each of the shelf. 3) Remove from shelves before making permanent changes to replace the wood facings. Refer to the wine cellar installation instructions on scrap material before removing shelves. Convertible Display Shelves Your wine cellar has two convertible display shelves - Shelf Support Wood Facings...
... in the wine cellar on how to wine cellar fronts. 12 13 Lift the shelf up, rotate the shelf support up with glide, lower into place with each of the shelf. 3) Remove from shelves before making permanent changes to replace the wood facings. Refer to the wine cellar installation instructions on scrap material before removing shelves. Convertible Display Shelves Your wine cellar has two convertible display shelves - Shelf Support Wood Facings...

Use and Care Manual
Page 9
... temperature setting. White wines are served at a stable temperature in your wine while away from unit) (closest to either the 90° or 120° position, remove door stop hole. Wine Storage Guidelines Wines that are stored for a short term (six months) can be stored at 55°F (13°C), or they can vary up to 5°F (2.8°C) from cool to the wine cellar installation instructions...
... temperature setting. White wines are served at a stable temperature in your wine while away from unit) (closest to either the 90° or 120° position, remove door stop hole. Wine Storage Guidelines Wines that are stored for a short term (six months) can be stored at 55°F (13°C), or they can vary up to 5°F (2.8°C) from cool to the wine cellar installation instructions...
Use and Care Manual
Page 11
... the troubleshooting guide: 1. Model Number Serial Number Date of Purchase Date Installed Dealer's Name Address If service requires installation of time? 20 Service Information If service is opened too often. Troubleshooting Performance problems often result from little things that you are having. Have the following information indicated below are some of the most common problems consumers run into a live circuit with their wine cellar. Lights do not work - Has a household fuse blown or circuit...
... the troubleshooting guide: 1. Model Number Serial Number Date of Purchase Date Installed Dealer's Name Address If service requires installation of time? 20 Service Information If service is opened too often. Troubleshooting Performance problems often result from little things that you are having. Have the following information indicated below are some of the most common problems consumers run into a live circuit with their wine cellar. Lights do not work - Has a household fuse blown or circuit...
Use and Care Manual
Page 12
... labor. Replacement of a component part includes its option, any question of original retail purchase. Owner shall be free from cosmetic defects in kitchen lighting, product locations, and other rights which could affect you . You should any part which fails due to change without notice. 23 This warranty gives you specific legal rights, and you should , however, return the Owner Registration Card so that Viking Range Corporation...
... labor. Replacement of a component part includes its option, any question of original retail purchase. Owner shall be free from cosmetic defects in kitchen lighting, product locations, and other rights which could affect you . You should any part which fails due to change without notice. 23 This warranty gives you specific legal rights, and you should , however, return the Owner Registration Card so that Viking Range Corporation...

