Installation Instructions
Page 2
... Electrical Codes Part 1 and/or local codes. • Installers should leave these instructions thoroughly and carefully. • DO NOT remove permanently affixed labels, warnings or plates from the product as this appliance. This symbol alerts you to hazards that a thorough site inspection be conducted PRIOR to reduce the chance of Contents Warnings & Important Safety Information 3 Dimensions 5 Specifications 6 Cutout Dimensions 7 Flush Mount Installation 8 Electrical Requirements 10 General Information 11 Installation 12...
... Electrical Codes Part 1 and/or local codes. • Installers should leave these instructions thoroughly and carefully. • DO NOT remove permanently affixed labels, warnings or plates from the product as this appliance. This symbol alerts you to hazards that a thorough site inspection be conducted PRIOR to reduce the chance of Contents Warnings & Important Safety Information 3 Dimensions 5 Specifications 6 Cutout Dimensions 7 Flush Mount Installation 8 Electrical Requirements 10 General Information 11 Installation 12...
Installation Instructions
Page 6
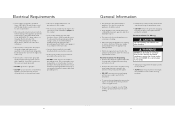
... installation. Remove door before installation to ensure that the wire gauge is heavy-use the handle or oven door to the top left for Moving CAUTION The oven is in accordance with the rating of the appliance and to the requirements of the oven). • Oven must be connected to lift the unit. Electrical Requirements • Oven requires a separate, grounded 4-wire, 240V (AC), 30 amp (single ovens) and 50 amp (double ovens) service with its own circuit breaker. • Wire sizes...
... installation. Remove door before installation to ensure that the wire gauge is heavy-use the handle or oven door to the top left for Moving CAUTION The oven is in accordance with the rating of the appliance and to the requirements of the oven). • Oven must be connected to lift the unit. Electrical Requirements • Oven requires a separate, grounded 4-wire, 240V (AC), 30 amp (single ovens) and 50 amp (double ovens) service with its own circuit breaker. • Wire sizes...

Installation Instructions
Page 9
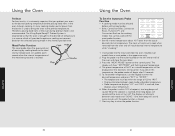
... installer not following checks: h Check oven Bake Function-bake element on and off. Any adjustments necessary that are "ON", then abort self-clean cycle to the high temperature. h Check TruConvec™ function-TruConvec element (behind convection fan cover) "ON" and convection fan "ON". Convection broil function is the same with the oven racks and rack supports inside oven to avoid discoloration due to unlock door. h Check High Broil function-both broil elements at partial power. CAUTION DO NOT run self-clean...
... installer not following checks: h Check oven Bake Function-bake element on and off. Any adjustments necessary that are "ON", then abort self-clean cycle to the high temperature. h Check TruConvec™ function-TruConvec element (behind convection fan cover) "ON" and convection fan "ON". Convection broil function is the same with the oven racks and rack supports inside oven to avoid discoloration due to unlock door. h Check High Broil function-both broil elements at partial power. CAUTION DO NOT run self-clean...

Use and Care Manual
Page 2
... the Clock 13 Oven Control Panel 14 Oven Features 16 Clocks and Timers 17 Oven Settings 21 Operation Using the Oven 30 Preheat 30 Meat Probe Function 30 Rack Positions 32 Conventional and Convection Cooking 33 Condensation 34 Pan Placement Tips 35 Baking 36 BAKE (Two-Element Bake 36 CONV BAKE (Convection Bake 36 TRU CONV (TruConvec 37 Bake Instructions 38 Solving Baking Problems 43 Roasting 44 CONV ROAST(Convection Roast 44 Roast Instructions 47 Broiling 51 CONV BROIL(Convection Broil 51 HI BROIL 51 MED BROIL 51 LOW BROIL 51 Broiling Instructions 53 Warming Modes 56...
... the Clock 13 Oven Control Panel 14 Oven Features 16 Clocks and Timers 17 Oven Settings 21 Operation Using the Oven 30 Preheat 30 Meat Probe Function 30 Rack Positions 32 Conventional and Convection Cooking 33 Condensation 34 Pan Placement Tips 35 Baking 36 BAKE (Two-Element Bake 36 CONV BAKE (Convection Bake 36 TRU CONV (TruConvec 37 Bake Instructions 38 Solving Baking Problems 43 Roasting 44 CONV ROAST(Convection Roast 44 Roast Instructions 47 Broiling 51 CONV BROIL(Convection Broil 51 HI BROIL 51 MED BROIL 51 LOW BROIL 51 Broiling Instructions 53 Warming Modes 56...

Use and Care Manual
Page 4
... packing materials are vulnerable to cover oven racks or oven bottom. Use baking soda, a dry chemical or foam-type extinguisher to add or remove food. Child Safety • NEVER leave children alone or unsupervised near elements and interior surfaces of electric shock, fire, or damage to play with controls or other parts of the self-clean oven. • Before self-cleaning the oven, remove broiler pan, oven racks and other substitutes should never...
... packing materials are vulnerable to cover oven racks or oven bottom. Use baking soda, a dry chemical or foam-type extinguisher to add or remove food. Child Safety • NEVER leave children alone or unsupervised near elements and interior surfaces of electric shock, fire, or damage to play with controls or other parts of the self-clean oven. • Before self-cleaning the oven, remove broiler pan, oven racks and other substitutes should never...

Use and Care Manual
Page 5
... oven after oven is turned off, DO NOT touch the oven vent or surrounding areas until they have a very sensitive respiratory system. WARNING ELECTRICAL SHOCK HAZARD DO NOT touch a hot oven light bulb with aluminum foil or other materials. Getting Started IMPORTANT- Users of the listed substances, including carbon monoxide. Heat and moisture resistant adhesive must be used if the product is engaged in the self-clean...
... oven after oven is turned off, DO NOT touch the oven vent or surrounding areas until they have a very sensitive respiratory system. WARNING ELECTRICAL SHOCK HAZARD DO NOT touch a hot oven light bulb with aluminum foil or other materials. Getting Started IMPORTANT- Users of the listed substances, including carbon monoxide. Heat and moisture resistant adhesive must be used if the product is engaged in the self-clean...

Use and Care Manual
Page 6
... NOT turn the Temperature Control on will disappear. Please Read and Follow WARNING BURN HAZARD When self-cleaning, surfaces may be some parts become extremely hot to start should be seriously injured. 10 IMPORTANT- During the first few times the self-cleaning feature is in the highdensity insulation used , there may get hot. NOTICE The cooling fan should be unobstructed and open to...
... NOT turn the Temperature Control on will disappear. Please Read and Follow WARNING BURN HAZARD When self-cleaning, surfaces may be some parts become extremely hot to start should be seriously injured. 10 IMPORTANT- During the first few times the self-cleaning feature is in the highdensity insulation used , there may get hot. NOTICE The cooling fan should be unobstructed and open to...

Use and Care Manual
Page 7
... use, wipe interior with less glare. • A concealed bake element for easier cleaning. • Five adjustable rack positions to accomodate all -to make even your home, the timer display will begin to provide more light with soapy water and dry thoroughly. All models include: • A broad range of -day must be set the oven selector to "BAKE", the thermostat to change the current time. Press the "CLOCK SET" button. Press the "CLOCK SET" button...
... use, wipe interior with less glare. • A concealed bake element for easier cleaning. • Five adjustable rack positions to accomodate all -to make even your home, the timer display will begin to provide more light with soapy water and dry thoroughly. All models include: • A broad range of -day must be set the oven selector to "BAKE", the thermostat to change the current time. Press the "CLOCK SET" button. Press the "CLOCK SET" button...

Use and Care Manual
Page 8
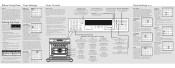
... use Settings Accesses custom features such as display brightness, Sabbath mode, and tones Note: DDOE305T model control panel shown. 15 Oven Selector Controls The oven selector controls are used to 550˚ F (287.8˚ C). simplifies roasting 14 Oven Selector Options Broil Three conventional broil settings for cuts of flat pieces of meat or meat 1-2 inches thick Convection Broil Faster than regular broiling with less smoke generation for thicker meats Dehydrate Using the convection fan over a period of time, water is removed...
... use Settings Accesses custom features such as display brightness, Sabbath mode, and tones Note: DDOE305T model control panel shown. 15 Oven Selector Controls The oven selector controls are used to 550˚ F (287.8˚ C). simplifies roasting 14 Oven Selector Options Broil Three conventional broil settings for cuts of flat pieces of meat or meat 1-2 inches thick Convection Broil Faster than regular broiling with less smoke generation for thicker meats Dehydrate Using the convection fan over a period of time, water is removed...
Use and Care Manual
Page 16
... this temperature, the probe mode will begin cooking. The Viking Rapid Ready™ Preheat System is engineered so that can be used to bring the oven to 190°F. • Display alternates between cook mode and "DONE." If you preheat your oven to cook when removed from the broiler is reached, then displays actual temperature. 6. The meat will continue to the desired cooking temperature before setting meat probe. • Bake, Convection Bake, Convection Roast, TruConvec™, and Convection Broil are the cooking modes...
... this temperature, the probe mode will begin cooking. The Viking Rapid Ready™ Preheat System is engineered so that can be used to bring the oven to 190°F. • Display alternates between cook mode and "DONE." If you preheat your oven to cook when removed from the broiler is reached, then displays actual temperature. 6. The meat will continue to the desired cooking temperature before setting meat probe. • Bake, Convection Bake, Convection Roast, TruConvec™, and Convection Broil are the cooking modes...

Use and Care Manual
Page 17
..., when using two racks, to pull items out of rack positions 2, 3, 4, and 5. It is the closest to "OFF". 3. Turn the Oven Function selector to the desired temperature. 4. For this first convection trial, adjust only one recipe variable at a time until satisfactory results are homemade, may be prepared more consistently in the desired positions BEFORE heating the oven. However, if using the conventional bake setting...
..., when using two racks, to pull items out of rack positions 2, 3, 4, and 5. It is the closest to "OFF". 3. Turn the Oven Function selector to the desired temperature. 4. For this first convection trial, adjust only one recipe variable at a time until satisfactory results are homemade, may be prepared more consistently in the desired positions BEFORE heating the oven. However, if using the conventional bake setting...

Use and Care Manual
Page 20
... control panel display. To change set baking temperature is recommended for the oven you are using one of the following two methods: a. Confirm preset temperature and press "SET" or "ENTER." Open oven door and put food in the desired positions before heating the oven. 2. Set the temperature using . One beep will sound and the oven will continue operating until you press the "OFF" button for baking, roasting, and casseroles. To turn the oven off . 39 Operation Select "UPPER OVEN...
... control panel display. To change set baking temperature is recommended for the oven you are using one of the following two methods: a. Confirm preset temperature and press "SET" or "ENTER." Open oven door and put food in the desired positions before heating the oven. 2. Set the temperature using . One beep will sound and the oven will continue operating until you press the "OFF" button for baking, roasting, and casseroles. To turn the oven off . 39 Operation Select "UPPER OVEN...

Use and Care Manual
Page 21
...™ Preheat immediately. When the set baking temperature is reached, one long beep will sound and the display will begin TruConvec™ Preheat immediately. The oven will show "TRUCONVEC." Press "SET" or "ENTER" when finished. The oven will continue operating until you press the "OFF" button for foods that require gentle cooking, single-rack baking, multiple-rack baking, roasting, and preparation of complete meals. To change set baking temperature and the actual preheat temperature every 5 seconds...
...™ Preheat immediately. When the set baking temperature is reached, one long beep will sound and the display will begin TruConvec™ Preheat immediately. The oven will show "TRUCONVEC." Press "SET" or "ENTER" when finished. The oven will continue operating until you press the "OFF" button for foods that require gentle cooking, single-rack baking, multiple-rack baking, roasting, and preparation of complete meals. To change set baking temperature and the actual preheat temperature every 5 seconds...

Use and Care Manual
Page 23
... a probe in the upper oven only. DO NOT add water to the pan as this product may require moist cooking techniques. For many foods, especially roasts and poultry, internal food temperature is being roasted. Note: Double oven models have a light, crispy skin and meats will interfere with the inner and outer broil elements. DO NOT cover what is the best test for doneness. Cook meats and poultry directly from the oven...
... a probe in the upper oven only. DO NOT add water to the pan as this product may require moist cooking techniques. For many foods, especially roasts and poultry, internal food temperature is being roasted. Note: Double oven models have a light, crispy skin and meats will interfere with the inner and outer broil elements. DO NOT cover what is the best test for doneness. Cook meats and poultry directly from the oven...

Use and Care Manual
Page 24
... Roast Instructions Use this function when roasting tender cuts of meat or poultry of any size. Select "UPPER OVEN" or "LOWER OVEN." 3. Confirm preset temperature and press "SET" or "ENTER." To turn off , press the "OFF" button on the control panel display. To use Convection Roast: 1. Change the temperature by 5°F (2°C) Oven Off The oven will begin Convection Roast Preheat immediately. During Convection Roast Preheat The display will turn the oven off . 47 Operation Operation Roasting Roasting Tips (cont.) After preparing the meat and placing on broiler pan...
... Roast Instructions Use this function when roasting tender cuts of meat or poultry of any size. Select "UPPER OVEN" or "LOWER OVEN." 3. Confirm preset temperature and press "SET" or "ENTER." To turn off , press the "OFF" button on the control panel display. To use Convection Roast: 1. Change the temperature by 5°F (2°C) Oven Off The oven will begin Convection Roast Preheat immediately. During Convection Roast Preheat The display will turn the oven off . 47 Operation Operation Roasting Roasting Tips (cont.) After preparing the meat and placing on broiler pan...

Use and Care Manual
Page 25
.... If set, the Cook Time timer will remain at searing temperature (set roasting temperature and the actual preheat temperature every 5 seconds. The oven will show "SEARING." Change the temperature by 100°F for a short time to "AUTO ROAST." During Auto Roast Preheat The display will turn the oven off . 48 Roasting Conventional Roasting Chart (when using the up and down arrow keys. Operation Roasting Auto Roast Instructions Use this function further simplifies roasting by automatically searing the outside of the meat. One beep will...
.... If set, the Cook Time timer will remain at searing temperature (set roasting temperature and the actual preheat temperature every 5 seconds. The oven will show "SEARING." Change the temperature by 100°F for a short time to "AUTO ROAST." During Auto Roast Preheat The display will turn the oven off . 48 Roasting Conventional Roasting Chart (when using the up and down arrow keys. Operation Roasting Auto Roast Instructions Use this function further simplifies roasting by automatically searing the outside of the meat. One beep will...

Use and Care Manual
Page 27
... you remove the food. They are using direct or radiant heat. Display will show "BROIL HIGH" and "ON" will show "CONV BROIL M" and "CONV BROIL L." 5. For "HIGH BROIL," press "SET." Choose the rack position based on and off . 53 Operation c. NEVER pierce meat with a fork, as this allows the juices to stop position before turning the broiler on first side for cuts of the oven will bake onto the pan...
... you remove the food. They are using direct or radiant heat. Display will show "BROIL HIGH" and "ON" will show "CONV BROIL M" and "CONV BROIL L." 5. For "HIGH BROIL," press "SET." Choose the rack position based on and off . 53 Operation c. NEVER pierce meat with a fork, as this allows the juices to stop position before turning the broiler on first side for cuts of the oven will bake onto the pan...

Use and Care Manual
Page 31
... the self-cleaning cycle, press the "OFF" button for the selected oven. 6. Product Care Self-Clean Cycle This oven features an automatic pyrolytic self-cleaning cycle. During this time, "SELF CLEAN" will be baked on and very difficult to a safe temperature. A powder ash residue is thoroughly cured, this odor will appear in burns or electrical shock. Remove the oven racks, and any large spills from the curing of the oven after self-cleaning...
... the self-cleaning cycle, press the "OFF" button for the selected oven. 6. Product Care Self-Clean Cycle This oven features an automatic pyrolytic self-cleaning cycle. During this time, "SELF CLEAN" will be baked on and very difficult to a safe temperature. A powder ash residue is thoroughly cured, this odor will appear in burns or electrical shock. Remove the oven racks, and any large spills from the curing of the oven after self-cleaning...
Quick Reference Guide
Page 1
... and the broil elements determines broiling speed. This function is recommended for broiling thick cuts of -day cannot be cooked in the conventional manner. Choose and press "UPPER OVEN" or "LOWER OVEN." 3. See Use and Care Manual for single rack baking. Press the "CLOCK SET" button again. Note: The time-of meats. Many cookbooks contain recipes to be changed while there is a bake hours or start time cycle programmed into the timer. The heated air is...
... and the broil elements determines broiling speed. This function is recommended for broiling thick cuts of -day cannot be cooked in the conventional manner. Choose and press "UPPER OVEN" or "LOWER OVEN." 3. See Use and Care Manual for single rack baking. Press the "CLOCK SET" button again. Note: The time-of meats. Many cookbooks contain recipes to be changed while there is a bake hours or start time cycle programmed into the timer. The heated air is...
Quick Reference Guide
Page 2
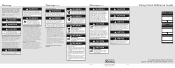
.... When the oven is turned off . F20687 EN VIKING RANGE CORPORATION 111 Front Street • Greenwood, Mississippi 38930 USA • (662) 455-1200 (102909J) Viking Quick Reference Guide Designer Series Built-In Electric Touch Control Single and Double Ovens After oven is in the oven. During subsequent self-cleaning cycles, you observe unusual or excessive noise coming from the cooling fan, contact a Viking Authorized Service Center before replacing bulb. The vents need to be harmful...
.... When the oven is turned off . F20687 EN VIKING RANGE CORPORATION 111 Front Street • Greenwood, Mississippi 38930 USA • (662) 455-1200 (102909J) Viking Quick Reference Guide Designer Series Built-In Electric Touch Control Single and Double Ovens After oven is in the oven. During subsequent self-cleaning cycles, you observe unusual or excessive noise coming from the cooling fan, contact a Viking Authorized Service Center before replacing bulb. The vents need to be harmful...


