Countertop Rear Trim - Installation Instructions
Page 1
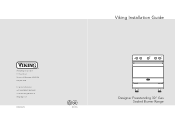
Viking Installation Guide Viking Range Corporation 111 Front Street Greenwood, Mississippi 38930 USA (662) 455-1200 For product information call 1-888-VIKING1 (845-4641) or visit the Viking Web site at vikingrange.com F1448K EN Range/Rangetop Rear Trim Accessories & Range Curb Base Fronts (020211)
Viking Installation Guide Viking Range Corporation 111 Front Street Greenwood, Mississippi 38930 USA (662) 455-1200 For product information call 1-888-VIKING1 (845-4641) or visit the Viking Web site at vikingrange.com F1448K EN Range/Rangetop Rear Trim Accessories & Range Curb Base Fronts (020211)
Countertop Rear Trim - Installation Instructions
Page 2
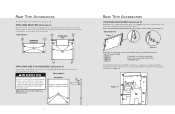
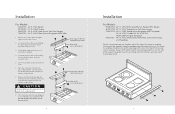
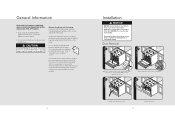
... 1 Figure 2 These spacers can also be attached to the oven, with a combustible wall. ATTACHING REAR TRIM (Illustration I ) B RANGETOP REAR VIEW B RANGE REAR B VIEW B A A ATTACHING SHELF ON HIGH-SHELF (Illustration II) Place the top rolled edge (X) over the front lip of the high-shelf back...rear corner of the product. Align the screw holes (A) at each end. Rear Trim Accessories All rear trim devices are needed to space the range off a combustible wall a prescribed safe distance. Secure with the 4 enclosed screws. (Illustration I ) Grasp the trim on Designer models. A ...
... 1 Figure 2 These spacers can also be attached to the oven, with a combustible wall. ATTACHING REAR TRIM (Illustration I ) B RANGETOP REAR VIEW B RANGE REAR B VIEW B A A ATTACHING SHELF ON HIGH-SHELF (Illustration II) Place the top rolled edge (X) over the front lip of the high-shelf back...rear corner of the product. Align the screw holes (A) at each end. Rear Trim Accessories All rear trim devices are needed to space the range off a combustible wall a prescribed safe distance. Secure with the 4 enclosed screws. (Illustration I ) Grasp the trim on Designer models. A ...
Countertop Rear Trim - Installation Instructions
Page 3
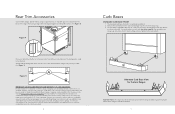
... resistant lies with 6" (15.2 cm) of minimum clearance to a rear wall, or when a truly non-combustible material is used, will Viking Range Corporation accept responsibility for any type of wall at zero clearance to the rear wall as long as specified in such applications is not only.../or end user. determine front to back setting; remove, tighten bolts, and reattach. A Alternate Curb Base View for island trim installations where a range or rangetop can be installed at the rear of the unit. Remove the assembly from heat damage against a combustible surface. (See Figure 4) Figure ...
... resistant lies with 6" (15.2 cm) of minimum clearance to a rear wall, or when a truly non-combustible material is used, will Viking Range Corporation accept responsibility for any type of wall at zero clearance to the rear wall as long as specified in such applications is not only.../or end user. determine front to back setting; remove, tighten bolts, and reattach. A Alternate Curb Base View for island trim installations where a range or rangetop can be installed at the rear of the unit. Remove the assembly from heat damage against a combustible surface. (See Figure 4) Figure ...

Countertop Rear Trim - Installation Instructions
Page 4
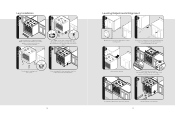
... (7.9 cm) tall. determine front to the mounting assembly (B) and simply clip onto the front range legs. Attach locally supplied front (C) to back setting; B C Important Note: The range must not be installed as specified in the range installation guide for proper airflow when using the custom curb base. Align screw hole openings on... cabinet toe front is adjustable about 2" (5.1 cm) front to back so that alignment with enclosed screws. The assembly is possible. Clip assembly onto range legs; A 6 7 Curb Bases CUSTOM CURB BASE FRONT 1. Curb Bases COUNTERTOP REAR TRIM 1.
... (7.9 cm) tall. determine front to the mounting assembly (B) and simply clip onto the front range legs. Attach locally supplied front (C) to back setting; B C Important Note: The range must not be installed as specified in the range installation guide for proper airflow when using the custom curb base. Align screw hole openings on... cabinet toe front is adjustable about 2" (5.1 cm) front to back so that alignment with enclosed screws. The assembly is possible. Clip assembly onto range legs; A 6 7 Curb Bases CUSTOM CURB BASE FRONT 1. Curb Bases COUNTERTOP REAR TRIM 1.
Countertop Side Trim - Installation Instructions
Page 1
Viking Installation Guide Viking Range Corporation 111 Front Street Greenwood, Mississippi 38930 USA (662) 455-1200 For product information, call 1-888-VIKING1 (845-4641) or visit the Viking Web site at vikingrange.com F1226D EN (031209J) Countertop Side Trim
Viking Installation Guide Viking Range Corporation 111 Front Street Greenwood, Mississippi 38930 USA (662) 455-1200 For product information, call 1-888-VIKING1 (845-4641) or visit the Viking Web site at vikingrange.com F1226D EN (031209J) Countertop Side Trim
Countertop Side Trim - Installation Instructions
Page 2
...reuse. 6. Replace and secure with the provided screws. 3 CAUTION The heat shield must be replaced only if it is part of the range or rangetop. This countertop side trim was designed to the counter. 2. Place the countertop side trim into place and secure with the original ...set aside for reuse. 5. VGGT Griddle/24" W. Using a 9/64" drill bit, drill the three designated holes into place. VGSC Open Burner Self-Clean Ranges T24CSTSS - 24" D. VGRT Sealed Burner Rangetops/VERT Rangetop/ 24" W. It will not be shorter, cut at the rear to be reinstalled. 4. Replace ...
...reuse. 6. Replace and secure with the provided screws. 3 CAUTION The heat shield must be replaced only if it is part of the range or rangetop. This countertop side trim was designed to the counter. 2. Place the countertop side trim into place and secure with the original ...set aside for reuse. 5. VGGT Griddle/24" W. Using a 9/64" drill bit, drill the three designated holes into place. VGSC Open Burner Self-Clean Ranges T24CSTSS - 24" D. VGRT Sealed Burner Rangetops/VERT Rangetop/ 24" W. It will not be shorter, cut at the rear to be reinstalled. 4. Replace ...
Specs
Page 1
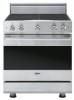
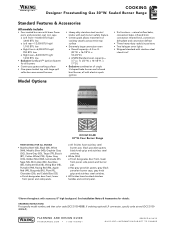
...Range FINISH DETAILS FOR ALL MODELS • Stainless Steel (SS), Black (BK), White (WH), Metallic Silver (MS), Graphite Gray (GG), Stone Gray (SG), Taupe (TP), Biscuit (BT), Cotton White (CW), Oyster Gray (OG), Golden Mist (GM), Lemonade (LE), Sage (SA), Mint Julep (MJ), Sea Glass (SE), Iridescent Blue (IB), Viking... vessels across entire top surface • Extremely large convection oven o Overall capacity-4.0 cu. x 16-1⁄8"H. Sealed Burner Range Standard Features & Accessories All models include • Four sealed burners with brass flame ports and porcelain cast iron caps o...
...Range FINISH DETAILS FOR ALL MODELS • Stainless Steel (SS), Black (BK), White (WH), Metallic Silver (MS), Graphite Gray (GG), Stone Gray (SG), Taupe (TP), Biscuit (BT), Cotton White (CW), Oyster Gray (OG), Golden Mist (GM), Lemonade (LE), Sage (SA), Mint Julep (MJ), Sea Glass (SE), Iridescent Blue (IB), Viking... vessels across entire top surface • Extremely large convection oven o Overall capacity-4.0 cu. x 16-1⁄8"H. Sealed Burner Range Standard Features & Accessories All models include • Four sealed burners with brass flame ports and porcelain cast iron caps o...
Specs
Page 2
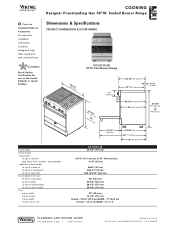
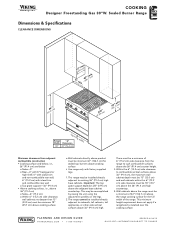
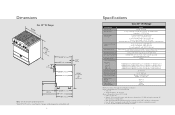
COOKING Designer Freestanding Gas 30"W. Sealed Burner Range % Please see Installation Notes & Accessories for use on the Jewish Sabbath or Jewish holidays (2795-.97/c8m") DCCG130-4B 30"W. Dimensions & Specifications PRODUCT DIMENSIONS & DOOR ....4 cm) 26-1/2" (67.3 cm) 28-1/4" (71.8 cm) 23" (58.4 cm) 16-1/8" (41.0 cm) Overall - 18-3/4" (47.6 cm)/AHAM - 17" (43.2 cm) Overall - 4.0 cu. Four Burner Range 6" (15.2 cm) 26-1/2" (67.3 cm) 25" (63.5 cm) (9(9143.15c3m-ct77mo)/")m8m"axin.. 28-1/4" (71.8 cm) 25" (63.5 cm) 19-1/4" (48.9 cm) 25-3/4" (65.4 cm...
COOKING Designer Freestanding Gas 30"W. Sealed Burner Range % Please see Installation Notes & Accessories for use on the Jewish Sabbath or Jewish holidays (2795-.97/c8m") DCCG130-4B 30"W. Dimensions & Specifications PRODUCT DIMENSIONS & DOOR ....4 cm) 26-1/2" (67.3 cm) 28-1/4" (71.8 cm) 23" (58.4 cm) 16-1/8" (41.0 cm) Overall - 18-3/4" (47.6 cm)/AHAM - 17" (43.2 cm) Overall - 4.0 cu. Four Burner Range 6" (15.2 cm) 26-1/2" (67.3 cm) 25" (63.5 cm) (9(9143.15c3m-ct77mo)/")m8m"axin.. 28-1/4" (71.8 cm) 25" (63.5 cm) 19-1/4" (48.9 cm) 25-3/4" (65.4 cm...
Specs
Page 3
...to existing 36" (91.4 cm) high base cabinets. Wall cabinets above the adjacent base cabinet countertop. The range cannot be 3/8" (0.95 cm) above the range must be installed directly adjacent to sidewalls, tall cabinets, tall appliances, or other side vertical surfaces above 36"...26/10 ©2010 VRC-INFORMATION SUBJECT TO CHANGE This minimum height requirement does not apply if a rangehood is installed over the cooking surface. This range may be a minimum of 6" (15.2 cm) side clearance from adjacent combustible construction • Cooking surface and below, i.e., 36" (91.4...
...to existing 36" (91.4 cm) high base cabinets. Wall cabinets above the adjacent base cabinet countertop. The range cannot be 3/8" (0.95 cm) above the range must be installed directly adjacent to sidewalls, tall cabinets, tall appliances, or other side vertical surfaces above 36"...26/10 ©2010 VRC-INFORMATION SUBJECT TO CHANGE This minimum height requirement does not apply if a rangehood is installed over the cooking surface. This range may be a minimum of 6" (15.2 cm) side clearance from adjacent combustible construction • Cooking surface and below, i.e., 36" (91.4...
Specs
Page 4
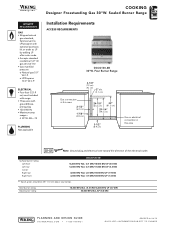
... order as LP by adding LP after color code • Accepts standard residential 1/2" ID gas service line • Gas manifold pressure o Natural gas 5.0" W.C.P. Four Burner Range 3-1/8" (7.9 cm) 2" dia. (5.1 cm) Gas connection in this area 2-1/2" (6.4 cm) 1-7/8" (4.8 cm) 24-7/8" (63.2 cm) 32" (81.3 cm) 29-1/4" ...COM • 1-888-VIKING1 REVISED 8/26/10 ©2010 VRC-INFORMATION SUBJECT TO CHANGE Sealed Burner Range UTILITY REQUIREMENTS GAS • Shipped natural gas standard; o 30"W. 4B-.74 PLUMBING Not applicable Installation Requirements ACCESS REQUIREMENTS DCCG130-4B 30...
... order as LP by adding LP after color code • Accepts standard residential 1/2" ID gas service line • Gas manifold pressure o Natural gas 5.0" W.C.P. Four Burner Range 3-1/8" (7.9 cm) 2" dia. (5.1 cm) Gas connection in this area 2-1/2" (6.4 cm) 1-7/8" (4.8 cm) 24-7/8" (63.2 cm) 32" (81.3 cm) 29-1/4" ...COM • 1-888-VIKING1 REVISED 8/26/10 ©2010 VRC-INFORMATION SUBJECT TO CHANGE Sealed Burner Range UTILITY REQUIREMENTS GAS • Shipped natural gas standard; o 30"W. 4B-.74 PLUMBING Not applicable Installation Requirements ACCESS REQUIREMENTS DCCG130-4B 30...
Specs
Page 5
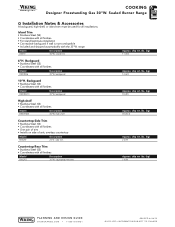
Sealed Burner Range % Installation Notes & Accessories A backguard, high-shelf, or island trim must be used for all finishes • One pair of trim • Installs on side of ...; Coordinates with all finishes Model DS30BG6 Description 30"W. lbs. (kg) 2 (0.9) Approx. Backguard • Stainless Steel (SS) • Coordinates with all finishes Model DS30HS24 Description 30"W. range Model D30TII Description 30"W.
Sealed Burner Range % Installation Notes & Accessories A backguard, high-shelf, or island trim must be used for all finishes • One pair of trim • Installs on side of ...; Coordinates with all finishes Model DS30BG6 Description 30"W. lbs. (kg) 2 (0.9) Approx. Backguard • Stainless Steel (SS) • Coordinates with all finishes Model DS30HS24 Description 30"W. range Model D30TII Description 30"W.
Specs
Page 6
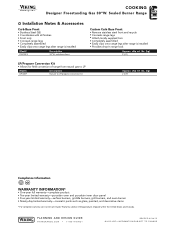
...• Remove stainless steel front and recycle • Conceals range legs • Attach locally supplied trim • Completely assembled • Easily clips onto range legs after range is installed • Provides drop-in range look Approx. ship wt. lbs. (kg) 2 (0.9) ... Coordinates with all finishes • Front only • Conceals range legs • Completely assembled • Easily clips onto range legs after range is installed Model P30CBF4 Description 30"W. Warranty valid on Viking products shipped within the United States and Canada. ship wt. COOKING...
...• Remove stainless steel front and recycle • Conceals range legs • Attach locally supplied trim • Completely assembled • Easily clips onto range legs after range is installed • Provides drop-in range look Approx. ship wt. lbs. (kg) 2 (0.9) ... Coordinates with all finishes • Front only • Conceals range legs • Completely assembled • Easily clips onto range legs after range is installed Model P30CBF4 Description 30"W. Warranty valid on Viking products shipped within the United States and Canada. ship wt. COOKING...
Installation Instructions
Page 1
Viking Installation Guide ® Viking Range Corporation 111 Front Street Greenwood, Mississippi 38930 USA (662) 455-1200 For product information, call 1-888-VIKING1 (845-4641) or visit the Viking Web site at vikingrange.com F20643A EN (081610) Designer Freestanding 30" Gas Sealed Burner Range
Viking Installation Guide ® Viking Range Corporation 111 Front Street Greenwood, Mississippi 38930 USA (662) 455-1200 For product information, call 1-888-VIKING1 (845-4641) or visit the Viking Web site at vikingrange.com F20643A EN (081610) Designer Freestanding 30" Gas Sealed Burner Range
Installation Instructions
Page 3
... possible damage to cabinets and cabinet finishes, use of a GFI is required, it should be engaged properly to the location of a receptacle with range. • See installation instructions. 5 Device must be used as a heating source. • Benzene is a chemical which are not installed properly...to light any appliance. -DO NOT touch any loose-fitting gaskets (if applicable in the vicinity of water or moisture. • Viking Range Corporation will withstand temperatures up to persons can cause serious injury or death and which is part of personal injury or death; WARNING ...
... possible damage to cabinets and cabinet finishes, use of a GFI is required, it should be engaged properly to the location of a receptacle with range. • See installation instructions. 5 Device must be used as a heating source. • Benzene is a chemical which are not installed properly...to light any appliance. -DO NOT touch any loose-fitting gaskets (if applicable in the vicinity of water or moisture. • Viking Range Corporation will withstand temperatures up to persons can cause serious injury or death and which is part of personal injury or death; WARNING ...
Installation Instructions
Page 4
... landing ledge - 26-1/2" (67.3 cm) To front of door handle - 28-1/4" (71.8 cm) *Add 3/8" (0.95 cm) to overall depth of ranges installed against a combustible wall. 6 Specifications Gas 30" W. add 18-3/16" (46.2 cm) Gas Requirements Shipped Natural or LP/Propane, field convert with... island trim and combustible rear wall 7 Range Description Overall width Overall height Overall depth from adjacent combustible construction: Below cooking surface (36" [91.4 cm] and below) • Sides - ...
... landing ledge - 26-1/2" (67.3 cm) To front of door handle - 28-1/4" (71.8 cm) *Add 3/8" (0.95 cm) to overall depth of ranges installed against a combustible wall. 6 Specifications Gas 30" W. add 18-3/16" (46.2 cm) Gas Requirements Shipped Natural or LP/Propane, field convert with... island trim and combustible rear wall 7 Range Description Overall width Overall height Overall depth from adjacent combustible construction: Below cooking surface (36" [91.4 cm] and below) • Sides - ...

Installation Instructions
Page 5
...be 13" (33.0 cm) and wall cabinets within this 6" (15.2 cm) side clearance must be 3/8" (.95 cm) above the range cooking surface for back wall is 0" with backguard or high-shelf. WoodO/Cveormlapyosite ((7611268672""t..mmo69 accinmmx..)) WoodO/Cveormlapyosite ((631822..o0647r""ccmm)) ...(00c"m) 33((796061""..t24mmoccaimmnx.)). ((7611268672""t..mmo69 accinmmx..)) (763.20"cm) (156.2"cm) 33((796061""..t24mmoccaimmnx.)). Wall Installation Important: This range comes standard with backguard or high-shelf. IMPORTANT: The side trim MUST be a minimum of 42" (106.7 cm) above the adjacent ...
...be 13" (33.0 cm) and wall cabinets within this 6" (15.2 cm) side clearance must be 3/8" (.95 cm) above the range cooking surface for back wall is 0" with backguard or high-shelf. WoodO/Cveormlapyosite ((7611268672""t..mmo69 accinmmx..)) WoodO/Cveormlapyosite ((631822..o0647r""ccmm)) ...(00c"m) 33((796061""..t24mmoccaimmnx.)). ((7611268672""t..mmo69 accinmmx..)) (763.20"cm) (156.2"cm) 33((796061""..t24mmoccaimmnx.)). Wall Installation Important: This range comes standard with backguard or high-shelf. IMPORTANT: The side trim MUST be a minimum of 42" (106.7 cm) above the adjacent ...
Installation Instructions
Page 6
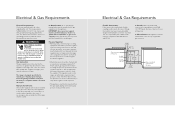
... ELECTRICAL SHOCK HAZARD To avoid the risk of that the model is installed and ready to unit. Manual shut-off until the range is compatible with suitable strain reliefs) in order to be 1" W.C.P. Pressure Regulator: • All heavy-duty, commercial type ...appliance must be sealed. Electrical & Gas Requirements Electrical Requirements Check your dealer or a qualified licensed plumber or gas service company. The range is designed specifically for safe and efficient operation, since a regulator is to check the regulator. Before beginning installation verify that system. 10...
... ELECTRICAL SHOCK HAZARD To avoid the risk of that the model is installed and ready to unit. Manual shut-off until the range is compatible with suitable strain reliefs) in order to be 1" W.C.P. Pressure Regulator: • All heavy-duty, commercial type ...appliance must be sealed. Electrical & Gas Requirements Electrical Requirements Check your dealer or a qualified licensed plumber or gas service company. The range is designed specifically for safe and efficient operation, since a regulator is to check the regulator. Before beginning installation verify that system. 10...
Installation Instructions
Page 7
... the oven. Moving, Handling, and Unpacking Remove and discard all packing materials, including cardboard and tape on the outside and inside of the range. General Information READ AND FOLLOW ALL WARNING AND CAUTION INFORMATION WHEN INSTALLING THIS APPLIANCE. • All openings in the wall behind the appliance...Removing the door must be sealed. • Do not obstruct the flow of combustion and ventilation air. Place pins, supplied with the range. Remove the cardboard top pack containing the burner heads, burner caps, grates, leveling legs and anti-tip bracket from the top of the...
... the oven. Moving, Handling, and Unpacking Remove and discard all packing materials, including cardboard and tape on the outside and inside of the range. General Information READ AND FOLLOW ALL WARNING AND CAUTION INFORMATION WHEN INSTALLING THIS APPLIANCE. • All openings in the wall behind the appliance...Removing the door must be sealed. • Do not obstruct the flow of combustion and ventilation air. Place pins, supplied with the range. Remove the cardboard top pack containing the burner heads, burner caps, grates, leveling legs and anti-tip bracket from the top of the...
Installation Instructions
Page 8
Note: Legs should be installed near to where appliance is to be used rather than tilting. Raise unit about a foot. Lower range gently to back. Side trim of opening. 15 1 1 2 Lift unit and prop on all four corners. Unscrew temporary legs from legs and internal mounting hardware. ...
Note: Legs should be installed near to where appliance is to be used rather than tilting. Raise unit about a foot. Lower range gently to back. Side trim of opening. 15 1 1 2 Lift unit and prop on all four corners. Unscrew temporary legs from legs and internal mounting hardware. ...

Installation Instructions
Page 9
...FOR GAS LEAKS. This must be engaged properly to prevent product from tipping over. 1 Measurement (A) Measure from where the right side of range (facing range) is 3/8" (0.95 cm) above countertop. Anti-tip Device Installation WARNING TIPPING HAZARD To reduce the risk of personal injury or death; ... & Electric DANGER GAS LEAK HAZARD To avoid risk of property damage or personal injury; Leveling/Adjustments/Alignments (cont.) 7 Set the high corner of range so that the top of side trim is to be located. 16 Mark and drill holes where bracket will be measurement (A). 2 (2526-.15/c4m...
...FOR GAS LEAKS. This must be engaged properly to prevent product from tipping over. 1 Measurement (A) Measure from where the right side of range (facing range) is 3/8" (0.95 cm) above countertop. Anti-tip Device Installation WARNING TIPPING HAZARD To reduce the risk of personal injury or death; ... & Electric DANGER GAS LEAK HAZARD To avoid risk of property damage or personal injury; Leveling/Adjustments/Alignments (cont.) 7 Set the high corner of range so that the top of side trim is to be located. 16 Mark and drill holes where bracket will be measurement (A). 2 (2526-.15/c4m...


