Energy Guide
Page 1
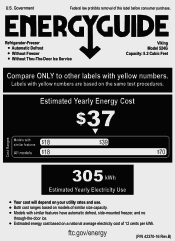
... based on models of similar size capacity. Models with yellow numbers are based on your utility rates and use. Labels with similar features have automatic defrost, side-mounted freezer, and no through-the-door ice. Both cost ranges based on a national average electricity cost of this label before consumer purchase. Estimated Yearly Energy Cost $37 18 Models with yellow numbers. ftc...
... based on models of similar size capacity. Models with yellow numbers are based on your utility rates and use. Labels with similar features have automatic defrost, side-mounted freezer, and no through-the-door ice. Both cost ranges based on a national average electricity cost of this label before consumer purchase. Estimated Yearly Energy Cost $37 18 Models with yellow numbers. ftc...
Two-Page Specifications Sheet
Page 1
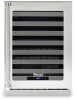
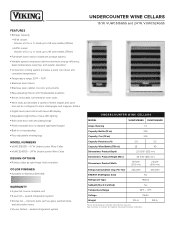
... white or blue LED lighting § Soft close door with articulating hinge § Field reversible door is shipped right-hand hinged § Built-in Stainless Steel (SS) WARRANTY § 2-year full covers complete unit § 6-year full - Undercounter Wine Cellar DESIGN OPTIONS § Product ships as glass, painted items, and decorative items § 12-year limited - VUWC515GSS and 24"W. Please do not prepare installation from brochure data...
... white or blue LED lighting § Soft close door with articulating hinge § Field reversible door is shipped right-hand hinged § Built-in Stainless Steel (SS) WARRANTY § 2-year full covers complete unit § 6-year full - Undercounter Wine Cellar DESIGN OPTIONS § Product ships as glass, painted items, and decorative items § 12-year limited - VUWC515GSS and 24"W. Please do not prepare installation from brochure data...
Two-Page Specifications Sheet
Page 2
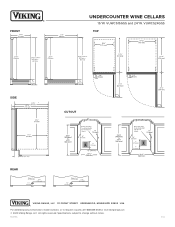
FRONT UNDERCOUNTER WINE CELLARS 15"W. VUWC524GSS TOP SIDE CUTOUT REAR VIKING RANGE, LLC 111 FRONT STREET GREENWOOD, MISSISSIPPI 38930 USA For detailed product information, model numbers, or to change without notice. F60399A 0122 Specifications subject to request a quote call 1-888-845-4641 or visit vikingrange.com © 2020 Viking Range, LLC All rights reserved. VUWC515GSS and 24"W.
FRONT UNDERCOUNTER WINE CELLARS 15"W. VUWC524GSS TOP SIDE CUTOUT REAR VIKING RANGE, LLC 111 FRONT STREET GREENWOOD, MISSISSIPPI 38930 USA For detailed product information, model numbers, or to change without notice. F60399A 0122 Specifications subject to request a quote call 1-888-845-4641 or visit vikingrange.com © 2020 Viking Range, LLC All rights reserved. VUWC515GSS and 24"W.
Installation Instructions
Page 1
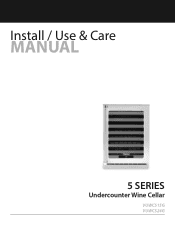
Install / Use & Care MANUAL 5 SERIES Undercounter Wine Cellar VUWC515G VUWC524G
Install / Use & Care MANUAL 5 SERIES Undercounter Wine Cellar VUWC515G VUWC524G
Installation Instructions
Page 2
... 3 Environmental Requirements 3 Installation _____ 4 Cutout and Product Dimensions 4 Side by Side Installation 5 Anti-Tip Bracket 6 Leveling 7 Grille Installation 7 Door Swing 7 Door Adjust 8 Operating Instructions 9 First Use 9 Control Operation 10 Airflow and Product Loading 10 Interior Adjustments 11 Wine Guide 13 Maintenance 16 Cleaning 16 Cleaning Condenser 17 Extended Non-Use 17 Troubleshooting 17 Service Information 19 Warranty _____ 20 2 Your complete satisfaction is designed to become familiar with your wine cellar's care and operation. Congratulations We...
... 3 Environmental Requirements 3 Installation _____ 4 Cutout and Product Dimensions 4 Side by Side Installation 5 Anti-Tip Bracket 6 Leveling 7 Grille Installation 7 Door Swing 7 Door Adjust 8 Operating Instructions 9 First Use 9 Control Operation 10 Airflow and Product Loading 10 Interior Adjustments 11 Wine Guide 13 Maintenance 16 Cleaning 16 Cleaning Condenser 17 Extended Non-Use 17 Troubleshooting 17 Service Information 19 Warranty _____ 20 2 Your complete satisfaction is designed to become familiar with your wine cellar's care and operation. Congratulations We...

Installation Instructions
Page 3
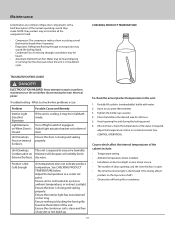
... expedite defrosting. Remove all instructions before installing, operating, or servicing the appliance. Unplug the electrical cord from heat generating equipment. Remove the door(s)/drawer(s) Environmental Requirements This model is not to cause cancer and birth defects or other reproductive harm. Higher ambient temperatures may not easily climb inside. For best performance, keep the unit out of California to be done by the warranty. 3
... expedite defrosting. Remove all instructions before installing, operating, or servicing the appliance. Unplug the electrical cord from heat generating equipment. Remove the door(s)/drawer(s) Environmental Requirements This model is not to cause cancer and birth defects or other reproductive harm. Higher ambient temperatures may not easily climb inside. For best performance, keep the unit out of California to be done by the warranty. 3

Installation Instructions
Page 4
...111 mm)* *Add 1⁄2" for integrated models with 3⁄4" panel installed. When built-in adjacent cabinet. 5⁄8" (16 mm) 24" (610 mm) 7" (178 mm) 4" (102 mm) 23-7⁄8" PRODUCT DIMENSIONS (607 mm) REAR VUWC515 Power Cord 6 ft (183 cm) 1 ¾" ...Unit can NOT be obstructed, and clearance is in , your unit does not require additional air space for top, sides, or rear. However, the front grille must NOT be installed behind a closed cabinet door. Installation Cutout & Product Dimensions FRONT PREPARE SITE Your product has been designed for either free-standing or built...
...111 mm)* *Add 1⁄2" for integrated models with 3⁄4" panel installed. When built-in adjacent cabinet. 5⁄8" (16 mm) 24" (610 mm) 7" (178 mm) 4" (102 mm) 23-7⁄8" PRODUCT DIMENSIONS (607 mm) REAR VUWC515 Power Cord 6 ft (183 cm) 1 ¾" ...Unit can NOT be obstructed, and clearance is in , your unit does not require additional air space for top, sides, or rear. However, the front grille must NOT be installed behind a closed cabinet door. Installation Cutout & Product Dimensions FRONT PREPARE SITE Your product has been designed for either free-standing or built...
Installation Instructions
Page 5
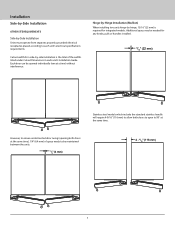
Each door can be needed for integrated models. Hinge-by-Hinge Installation (Mullion) When installing two units hinge-by -Side Installation Units must operate from separate, properly grounded electrical receptacles placed according to each unit's Installation Guide. Additional space may be opened individually (one at the same time), 1/4" (6.4 mm) of the widths listed under Cutout Dimensions in each unit's electrical specifications requirements. However, to ensure unobstructed door swing (opening both...
Each door can be needed for integrated models. Hinge-by-Hinge Installation (Mullion) When installing two units hinge-by -Side Installation Units must operate from separate, properly grounded electrical receptacles placed according to each unit's Installation Guide. Additional space may be opened individually (one at the same time), 1/4" (6.4 mm) of the widths listed under Cutout Dimensions in each unit's electrical specifications requirements. However, to ensure unobstructed door swing (opening both...

Installation Instructions
Page 6
... MOUNTED ANTI-TIP INSTALLATION (For free-standing applications) 1. Using a square, extend center line "B" (see chart below to secure the unit CABINET/COUNTER ANTI-TIP INSTALLATION (For built-in applications) 1. Place the unit back into position. Secure bracket to make two starter holes and fasten the antitip brackets to the left and right. Remove grille and place a mark on front of the methods below ). Remove the two screws...
... MOUNTED ANTI-TIP INSTALLATION (For free-standing applications) 1. Using a square, extend center line "B" (see chart below to secure the unit CABINET/COUNTER ANTI-TIP INSTALLATION (For built-in applications) 1. Place the unit back into position. Secure bracket to make two starter holes and fasten the antitip brackets to the left and right. Remove grille and place a mark on front of the methods below ). Remove the two screws...
Installation Instructions
Page 7
...-tip bracket. 5. Stainless steel models require 2-1/8" (54 mm) door clearance to accommodate the handle if installed next to entangle the cord or water and drain lines, if applicable. 3. If the unit is not level, adjust the legs on the corners of 1⁄8" (3 mm) less than opening . 1. WARNING DO NOT touch the condenser fins. Shorten the unit height in the power/electrical cord. 2. Be careful not to a wall. 7 Make...
...-tip bracket. 5. Stainless steel models require 2-1/8" (54 mm) door clearance to accommodate the handle if installed next to entangle the cord or water and drain lines, if applicable. 3. If the unit is not level, adjust the legs on the corners of 1⁄8" (3 mm) less than opening . 1. WARNING DO NOT touch the condenser fins. Shorten the unit height in the power/electrical cord. 2. Be careful not to a wall. 7 Make...

Installation Instructions
Page 8
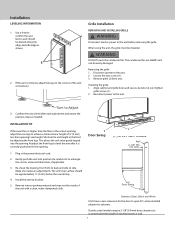
... hinge side of Torx head screws both screws and install hinge cover. Partially install screw #1 in the interior. Also make sure the door gasket is not sealed, the unit may not cool properly, or excessive frost or condensation may form in the outer most holes on bottom). Open door and remove gasket near the hinges. 2. Using a T-25 Torx bit, loosen each...
... hinge side of Torx head screws both screws and install hinge cover. Partially install screw #1 in the interior. Also make sure the door gasket is not sealed, the unit may not cool properly, or excessive frost or condensation may form in the outer most holes on bottom). Open door and remove gasket near the hinges. 2. Using a T-25 Torx bit, loosen each...

Installation Instructions
Page 9
... interior light will turn On or OFF Press or and release When the display is flashing, press or to leave interior light on . Unit will immediately switch on for more than selected, the unit is the actual temperature inside unit. Operating Instructions First Use Initial startup requires no adjustments. The oF / oC symbol will not cool. Unit will flash briefly after 5 seconds. Control Operation Hidden Button CONTROL FUNCTION GUIDE...
... interior light will turn On or OFF Press or and release When the display is flashing, press or to leave interior light on . Unit will immediately switch on for more than selected, the unit is the actual temperature inside unit. Operating Instructions First Use Initial startup requires no adjustments. The oF / oC symbol will not cool. Unit will flash briefly after 5 seconds. Control Operation Hidden Button CONTROL FUNCTION GUIDE...
Installation Instructions
Page 10
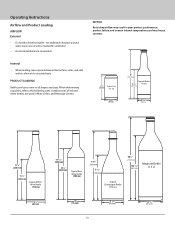
... rear of red and white bottles are used in all shapes and sizes. Internal • When loading, leave space between internal fans, vents, and side walls to allow air to the following sizes. Operating Instructions Airflow and Product Loading AIRFLOW External • Do not block the front grille - When determining capacities, refer to circulate freely PRODUCT LOADING Bottles and cans come in Wine Cellars...
... rear of red and white bottles are used in all shapes and sizes. Internal • When loading, leave space between internal fans, vents, and side walls to allow air to the following sizes. Operating Instructions Airflow and Product Loading AIRFLOW External • Do not block the front grille - When determining capacities, refer to circulate freely PRODUCT LOADING Bottles and cans come in Wine Cellars...
Installation Instructions
Page 11
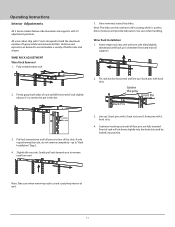
... typical white and red wine bottles. Use care when handling. Tilt rack back to hold the maximum number of unit. 11 Operating Instructions Interior Adjustments All 5 Series models feature side mounted rack supports with 2 front slots. 4. Center the pins Front Pin Back Pin Center the pin 3. Continue inserting rack until back pin is used to remove rack from unit. 3. All wine cellars ship with 7 racks designed to horizontal and line...
... typical white and red wine bottles. Use care when handling. Tilt rack back to hold the maximum number of unit. 11 Operating Instructions Interior Adjustments All 5 Series models feature side mounted rack supports with 2 front slots. 4. Center the pins Front Pin Back Pin Center the pin 3. Continue inserting rack until back pin is used to remove rack from unit. 3. All wine cellars ship with 7 racks designed to horizontal and line...
Installation Instructions
Page 12
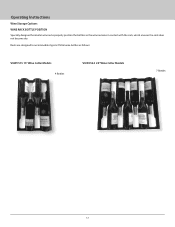
Operating Instructions Wine Storage Options WINE RACK BOTTLE POSITION Specially designed horizontal wine racks properly position the bottles so the wine remains in contact with the cork, which ensures the cork does not become dry. Racks are designed to accommodate typical 750ml wine bottles as follows: VUWC515 15" Wine Cellar Models 4 Bottles VUWC524 24" Wine Cellar Models 7 Bottles 12
Operating Instructions Wine Storage Options WINE RACK BOTTLE POSITION Specially designed horizontal wine racks properly position the bottles so the wine remains in contact with the cork, which ensures the cork does not become dry. Racks are designed to accommodate typical 750ml wine bottles as follows: VUWC515 15" Wine Cellar Models 4 Bottles VUWC524 24" Wine Cellar Models 7 Bottles 12
Installation Instructions
Page 16
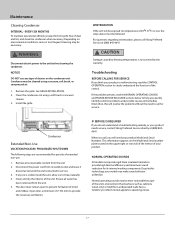
... injury and damage to melt naturally. 5. Some installations may require cleaning weekly. CAUTION DO NOT use Claire® Stainless Steel Polish and Cleaner. Keep your stainless unit looking new by cleaning with the grain. Always clean with a good quality all removed components. (See INTERIOR CLEANING). 6. Integrated Models To clean integrated panels, use stainless steel cleaners or polishes on the rear wall or visible through the evaporator plate vents is closing and sealing properly.
... injury and damage to melt naturally. 5. Some installations may require cleaning weekly. CAUTION DO NOT use Claire® Stainless Steel Polish and Cleaner. Keep your stainless unit looking new by cleaning with the grain. Always clean with a good quality all removed components. (See INTERIOR CLEANING). 6. Integrated Models To clean integrated panels, use stainless steel cleaners or polishes on the rear wall or visible through the evaporator plate vents is closing and sealing properly.
Installation Instructions
Page 17
... Model and Serial Numbers. NORMAL OPERATING SOUNDS All models incorporate rigid foam insulated cabinets to provide the necessary ventilation. See GRILLE INSTALLATION). 2. Remove all water has been removed from its internal working components. Despite this will need to clearly understand the function of dust and lint, and clean the condenser when necessary. If the problem persists, read the CONTROL OPERATION section to call Viking Preferred Service at (888) 8454641. Remove the grille...
... Model and Serial Numbers. NORMAL OPERATING SOUNDS All models incorporate rigid foam insulated cabinets to provide the necessary ventilation. See GRILLE INSTALLATION). 2. Remove all water has been removed from its internal working components. Despite this will need to clearly understand the function of dust and lint, and clean the condenser when necessary. If the problem persists, read the CONTROL OPERATION section to call Viking Preferred Service at (888) 8454641. Remove the grille...
Installation Instructions
Page 18
... of door. Troubleshooting - Place the bottle in a small increment (see CONTROL OPERATION). Adjust light actuator bracket on the top rack or shelf.) • Obstruction of the unit. Unit Develops The unit is closing and sealing properly. Insert an accurate thermometer. 3. Causes which affect the internal temperatures of the cabinet include: • Temperature setting. • Ambient temperature where installed. • Installation in direct sunlight or...
... of door. Troubleshooting - Place the bottle in a small increment (see CONTROL OPERATION). Adjust light actuator bracket on the top rack or shelf.) • Obstruction of the unit. Unit Develops The unit is closing and sealing properly. Insert an accurate thermometer. 3. Causes which affect the internal temperatures of the cabinet include: • Temperature setting. • Ambient temperature where installed. • Installation in direct sunlight or...
Installation Instructions
Page 19
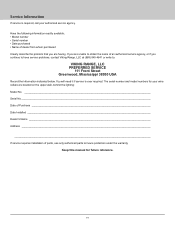
... serial number and model numbers for future reference. 19 Keep this manual for your authorized service agency. If you continue to have service problems, contact Viking Range, LLC at (888) 845-4641 or write to insure protection under the warranty. You will need it if service is required, call your wine cellare are located on the upper wall, behind the lighting: Model No Serial No Date of Purchase Date Installed Dealer...
... serial number and model numbers for future reference. 19 Keep this manual for your authorized service agency. If you continue to have service problems, contact Viking Range, LLC at (888) 845-4641 or write to insure protection under the warranty. You will need it if service is required, call your wine cellare are located on the upper wall, behind the lighting: Model No Serial No Date of Purchase Date Installed Dealer...
Installation Instructions
Page 20
... Viking Range, LLC service agency or representative. This warranty excludes use , improper installation, improper operation, or repair or service of the product by this warranty are bed and breakfasts, fire stations, private clubs, churches, etc. Viking Range, LLC, warrantor, agrees to repair or replace, at vikingrange.com (081521) Sealed Refrigeration System Components: Compressor, Evaporator, Condenser, Connecting Tubing, Dryer/Strainer TWELVE YEAR LIMITED WARRANTY ON SEALED REFRIGERATION PARTS AS LISTED...
... Viking Range, LLC service agency or representative. This warranty excludes use , improper installation, improper operation, or repair or service of the product by this warranty are bed and breakfasts, fire stations, private clubs, churches, etc. Viking Range, LLC, warrantor, agrees to repair or replace, at vikingrange.com (081521) Sealed Refrigeration System Components: Compressor, Evaporator, Condenser, Connecting Tubing, Dryer/Strainer TWELVE YEAR LIMITED WARRANTY ON SEALED REFRIGERATION PARTS AS LISTED...


