Installation Instructions
Page 2
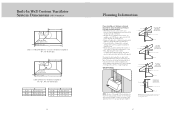
...28 Duct Cover Option (VWH 12"H. IMPORTANT - This hood is for residential installation only and is not designed for makeup air requirement, if any questions, contact the manufacturer. • Before servicing or cleaning unit, switch power off at the main circuit breaker or fuse box before servicing or cleaning. Use of any non-Viking ventilator kit will void the hood warranty. When cutting of any non-Viking Range ventilator kit will void the hood warranty. Outdoor Wall Hoods 36", 48", & 60" Dimensions & Specifications 12 Clearance Dimensions 13 VCWH Chimney Wall...
...28 Duct Cover Option (VWH 12"H. IMPORTANT - This hood is for residential installation only and is not designed for makeup air requirement, if any questions, contact the manufacturer. • Before servicing or cleaning unit, switch power off at the main circuit breaker or fuse box before servicing or cleaning. Use of any non-Viking ventilator kit will void the hood warranty. When cutting of any non-Viking Range ventilator kit will void the hood warranty. Outdoor Wall Hoods 36", 48", & 60" Dimensions & Specifications 12 Clearance Dimensions 13 VCWH Chimney Wall...

Installation Instructions
Page 3
... lamps Interior ventilator kit Interior duct size* Interior-Maximum amps 29-7/8" (75.9 cm) 35-7/8" (91.1 cm) 12" (30.5 cm) 12" (30.5 cm) 2 N/A 460 CFM Standard 7" (17.8 cm) 4.9 * Disregard when using recirculating kits. 460 CFM blower is being called. • You can fight the fire with a close fitted lid, cookie sheet, or metal tray, then turn off the burner. Wall Hoods w/Standard Ventilator Description 30" 36" Duct cover width Duct cover depth Duct cover height Number of a rangetop grease...
... lamps Interior ventilator kit Interior duct size* Interior-Maximum amps 29-7/8" (75.9 cm) 35-7/8" (91.1 cm) 12" (30.5 cm) 12" (30.5 cm) 2 N/A 460 CFM Standard 7" (17.8 cm) 4.9 * Disregard when using recirculating kits. 460 CFM blower is being called. • You can fight the fire with a close fitted lid, cookie sheet, or metal tray, then turn off the burner. Wall Hoods w/Standard Ventilator Description 30" 36" Duct cover width Duct cover depth Duct cover height Number of a rangetop grease...

Installation Instructions
Page 5
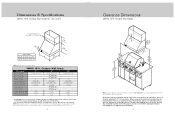
... sold separately. hoods. 8 Clearance Dimensions (VWH 18"H. or exterior-power ventilator kit must be used with ground. VWH 18"H. Wall Hoods Description Duct cover width Duct cover depth Duct cover height Number of filters Heat lamps Interior ventilator kits Exterior ventilator kits In-line ventilator kits Interior duct size Exterior duct size Interior-Maximum amps Exterior-Maximum amps In-Line-Maximum amps 30" 29-7/8" (75.9 cm) 2 1 VINV300/ 600/1200 DEV900/ 1200* DIL1200 7"/10" (17.8/25.4 cm) 4.2/5.2/8.2 8.0/5.3 5.3/7.2 36" 42" 35-7/8" (91.1 cm) 41-7/8" (106.4 cm) 12" (30.5 cm...
... sold separately. hoods. 8 Clearance Dimensions (VWH 18"H. or exterior-power ventilator kit must be used with ground. VWH 18"H. Wall Hoods Description Duct cover width Duct cover depth Duct cover height Number of filters Heat lamps Interior ventilator kits Exterior ventilator kits In-line ventilator kits Interior duct size Exterior duct size Interior-Maximum amps Exterior-Maximum amps In-Line-Maximum amps 30" 29-7/8" (75.9 cm) 2 1 VINV300/ 600/1200 DEV900/ 1200* DIL1200 7"/10" (17.8/25.4 cm) 4.2/5.2/8.2 8.0/5.3 5.3/7.2 36" 42" 35-7/8" (91.1 cm) 41-7/8" (106.4 cm) 12" (30.5 cm...
Installation Instructions
Page 7
....-41"c/Xm2"") (682.67"cm) 3(3(796061".".t42mmocciammnx.)). Viking also recommends using a backsplash. 13 hoods. 12 Clearance Dimensions (VWHO 18"H. Dimensions & Specifications (VWHO 18"H. or exterior-power ventilator should be protected from the wall. All products must be installed in a covered, non-enclosed area, and should be hard wired with 2wire with silicone. An interior- Note: Outdoor Models must be installed 4-1/2" (11.4 cm) plus the distance between the...
....-41"c/Xm2"") (682.67"cm) 3(3(796061".".t42mmocciammnx.)). Viking also recommends using a backsplash. 13 hoods. 12 Clearance Dimensions (VWHO 18"H. Dimensions & Specifications (VWHO 18"H. or exterior-power ventilator should be protected from the wall. All products must be installed in a covered, non-enclosed area, and should be hard wired with 2wire with silicone. An interior- Note: Outdoor Models must be installed 4-1/2" (11.4 cm) plus the distance between the...

Installation Instructions
Page 8
... ft (22.9 m). An interior- NOTE: Maximum amp rating for installation with longer duct runs. VCWH Chimney Wall Hoods Description 30" 36" 42" 48" 60" Duct cover width 12" (30.5 cm) 12" (30.5 cm) 12" (30.5 cm) 18" (45.7 cm) 24" (61.0 cm) Duct cover depth 12" (30.5 cm) Duct cover height 12" (30.5 cm) to 24" (61.0 cm) Number of filters 2 2 2 2 3 Heat lamps Interior ventilator kits Exterior ventilator kits In-line ventilator kits 1 1 VINV300/600 VINV300/600 DEV900/ 1200* DIL1200...
... ft (22.9 m). An interior- NOTE: Maximum amp rating for installation with longer duct runs. VCWH Chimney Wall Hoods Description 30" 36" 42" 48" 60" Duct cover width 12" (30.5 cm) 12" (30.5 cm) 12" (30.5 cm) 18" (45.7 cm) 24" (61.0 cm) Duct cover depth 12" (30.5 cm) Duct cover height 12" (30.5 cm) to 24" (61.0 cm) Number of filters 2 2 2 2 3 Heat lamps Interior ventilator kits Exterior ventilator kits In-line ventilator kits 1 1 VINV300/600 VINV300/600 DEV900/ 1200* DIL1200...

Installation Instructions
Page 10
.... hoods. 18 Clearance Dimensions (VCIH Chimney Island Hoods) (913.46"cm) ((7611268672""t..mmo69 accinmmx..)) 33((796061""..t24mmoccaimmnx.)). 19 Dimensions & Specifications (VCIH Chimney Island Hoods 36", 42", 54", & 66") A 36"W. 42"W. 54"W. 66"W. or exterior-power ventilator should be purchased for hoods includes recommended ventilator kit rating; VCIH Chimney Island Hoods Description Duct cover width Duct cover depth Duct cover height Number of filters Heat lamps Interior ventilator kits Exterior ventilator kits In-line ventilator kits Interior duct size 36" 12" (30...
.... hoods. 18 Clearance Dimensions (VCIH Chimney Island Hoods) (913.46"cm) ((7611268672""t..mmo69 accinmmx..)) 33((796061""..t24mmoccaimmnx.)). 19 Dimensions & Specifications (VCIH Chimney Island Hoods 36", 42", 54", & 66") A 36"W. 42"W. 54"W. 66"W. or exterior-power ventilator should be purchased for hoods includes recommended ventilator kit rating; VCIH Chimney Island Hoods Description Duct cover width Duct cover depth Duct cover height Number of filters Heat lamps Interior ventilator kits Exterior ventilator kits In-line ventilator kits Interior duct size 36" 12" (30...

Installation Instructions
Page 12
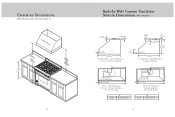
...) VBCV Wall Custom Ventilator System Description 36" 42" 48" 60" Number of custom hood canopy with ground. All products must be used with all 18"H. Dimensions & Specifications (VBCV Wall Custom Ventilator System 36", 42", 48", & 60") A* *For best results, center the unit over range/rangetop with the cutout so the ventilator system may be mounted as shown on page 25. or exterior-power ventilator should be purchased for hoods includes recommended ventilator kit rating; right to...
...) VBCV Wall Custom Ventilator System Description 36" 42" 48" 60" Number of custom hood canopy with ground. All products must be used with all 18"H. Dimensions & Specifications (VBCV Wall Custom Ventilator System 36", 42", 48", & 60") A* *For best results, center the unit over range/rangetop with the cutout so the ventilator system may be mounted as shown on page 25. or exterior-power ventilator should be purchased for hoods includes recommended ventilator kit rating; right to...
Installation Instructions
Page 13
...) 7" (17.8 cm) dia. duct location 5/8" (1.6 cm) C 900 or 1200 CFM Exterior or In-Line Ventilator Installation 36", 42" W. Models 36" W. 42" W. D 17-1/8" (43.5 cm) 20-1/8" (51.1 cm) 25 duct location 5/8" (1.6 cm) C 300 or 600 CFM Interior Ventilator Installation 36", 42" W. Models 36" W. 42" W. Clearance Dimensions (VBCV Wall Custom Ventilator System) (Custom Hood) (913.46"cm) ((7611268672""t..mmo69 accinmmx..)) 33((796061""..t24mmoccaimmnx.)). 24 Built-In Wall Custom Ventilator System Dimensions (VBCV ModelsF 1-1/2" (3.81 cm...
...) 7" (17.8 cm) dia. duct location 5/8" (1.6 cm) C 900 or 1200 CFM Exterior or In-Line Ventilator Installation 36", 42" W. Models 36" W. 42" W. D 17-1/8" (43.5 cm) 20-1/8" (51.1 cm) 25 duct location 5/8" (1.6 cm) C 300 or 600 CFM Interior Ventilator Installation 36", 42" W. Models 36" W. 42" W. Clearance Dimensions (VBCV Wall Custom Ventilator System) (Custom Hood) (913.46"cm) ((7611268672""t..mmo69 accinmmx..)) 33((796061""..t24mmoccaimmnx.)). 24 Built-In Wall Custom Ventilator System Dimensions (VBCV ModelsF 1-1/2" (3.81 cm...
Installation Instructions
Page 14
... holes in the canopy for the type of the hood make sure that the mounting screws are shown. Plan where the duct work , and roof or wall cap for proper alignment. Recommended hood locations for hoods includes recommended ventilator kit rating; Models 36" W. 42" W. 48" W. 60" W. Built-In Wall Custom Ventilator System Dimensions (VBCV ModelsF D 5-1/2" (14.0 cm) 10" (25.4 cm) dia. duct location 5/8" (1.6 cm) C 1200 or 1500 CFM Exterior or In-Line Ventilator Installation 48", 60...
... holes in the canopy for the type of the hood make sure that the mounting screws are shown. Plan where the duct work , and roof or wall cap for proper alignment. Recommended hood locations for hoods includes recommended ventilator kit rating; Models 36" W. 42" W. 48" W. 60" W. Built-In Wall Custom Ventilator System Dimensions (VBCV ModelsF D 5-1/2" (14.0 cm) 10" (25.4 cm) dia. duct location 5/8" (1.6 cm) C 1200 or 1500 CFM Exterior or In-Line Ventilator Installation 48", 60...

Installation Instructions
Page 15
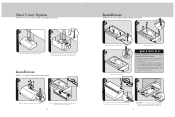
... correct when wiring unit. 9 1 Replace electrical box cover. Wall Hoods w/Standard Ventilator) 1 2 Check damper for wiring to persons, observe the following: • Use this unit only in the manner intended by the manufacturer. Use additional mounting screws, if necessary. 8 1 1 2 Connect black to black, white to prevent power from being switched on accidentally. Installation (VWH 10" H./12"H. If you have any questions, contact the manufacturer. • Before servicing or cleaning unit, switch power off at service panel and lock service panel to...
... correct when wiring unit. 9 1 Replace electrical box cover. Wall Hoods w/Standard Ventilator) 1 2 Check damper for wiring to persons, observe the following: • Use this unit only in the manner intended by the manufacturer. Use additional mounting screws, if necessary. 8 1 1 2 Connect black to black, white to prevent power from being switched on accidentally. Installation (VWH 10" H./12"H. If you have any questions, contact the manufacturer. • Before servicing or cleaning unit, switch power off at service panel and lock service panel to...
Installation Instructions
Page 16
Wall Hoods w/Recirculating Kit) 3 4 Attach with screws and lock washers provided. 5 Remove electrical box cover. 6 1 Attach with transition. Make sure mounting screws are secured into framing. Turn recirculating unit upside down on accidentally. If you have any questions, contact the manufacturer. • Before servicing or cleaning unit, switch power off at service panel and lock service panel to prevent power from ceiling to persons, observe the following: • Use this unit only in place and fasten from inside canopy using the sheet metal...
Wall Hoods w/Recirculating Kit) 3 4 Attach with screws and lock washers provided. 5 Remove electrical box cover. 6 1 Attach with transition. Make sure mounting screws are secured into framing. Turn recirculating unit upside down on accidentally. If you have any questions, contact the manufacturer. • Before servicing or cleaning unit, switch power off at service panel and lock service panel to prevent power from ceiling to persons, observe the following: • Use this unit only in place and fasten from inside canopy using the sheet metal...

Installation Instructions
Page 17
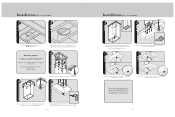
... height of hood and secure 1-1/2" x 3/4" wood strip (provided locally) to wall using screws provided. 3 5/16" nut driver Use additional mounting screws to secure hood to wood strip. 5/16" nut driver CAUTION: Secure vent hood to be properly installed for wiring to wall using screws provided, make sure top mounting screws are secured into soffit or cabinet framing use additional mounting screws, if necessary. 5 1 1 3 2 Slide filter front over front lip. NOTE: Housing wiring must be correct when wiring unit. 10 Replace electrical box cover...
... height of hood and secure 1-1/2" x 3/4" wood strip (provided locally) to wall using screws provided. 3 5/16" nut driver Use additional mounting screws to secure hood to wood strip. 5/16" nut driver CAUTION: Secure vent hood to be properly installed for wiring to wall using screws provided, make sure top mounting screws are secured into soffit or cabinet framing use additional mounting screws, if necessary. 5 1 1 3 2 Slide filter front over front lip. NOTE: Housing wiring must be correct when wiring unit. 10 Replace electrical box cover...
Installation Instructions
Page 19
... specific unit and ventillator kit. The ceiling bracket can be . Make sure the duct does not stick down to bottom edge of hood to step 3) Cut appropriate size hole in place. NOTE: 200 lb. limit. Drill holes in all four corners for additional support. (Option B) Attaching hood directly to soffit or duct cover. (Skip to duct with ceiling mounting bracket. (Option A - To install ventillation kit refer to optional ceiling mounting bracket. A1 A2 Attach duct cover to ventillation kit installation instructions. 37 Push filter rear...
... specific unit and ventillator kit. The ceiling bracket can be . Make sure the duct does not stick down to bottom edge of hood to step 3) Cut appropriate size hole in place. NOTE: 200 lb. limit. Drill holes in all four corners for additional support. (Option B) Attaching hood directly to soffit or duct cover. (Skip to duct with ceiling mounting bracket. (Option A - To install ventillation kit refer to optional ceiling mounting bracket. A1 A2 Attach duct cover to ventillation kit installation instructions. 37 Push filter rear...
Installation Instructions
Page 20
...; Model number • Serial number • Date purchased • Name of dealer from the dealer or distributor in your hood is located behind the baffle filter on the left side panel in the lower right corner. You will need it if service is required, call your dealer or authorized service agency. Model no Serial no Date of purchase Date installed Dealer's name Address If service requires installation of...
...; Model number • Serial number • Date purchased • Name of dealer from the dealer or distributor in your hood is located behind the baffle filter on the left side panel in the lower right corner. You will need it if service is required, call your dealer or authorized service agency. Model no Serial no Date of purchase Date installed Dealer's name Address If service requires installation of...
Use and Care Manual
Page 2
... the flue (chimney) of fuel burning equipment to prevent back drafting. Do not vent exhaust air into spaces within walls or ceilings, or into wall or ceiling, do not damage electrical wiring and other major appliance needs. With minimal care, as outlined in accordance with all applicable codes and standards, including fire-rated construction. • Sufficient air is designed to provide you with your other hidden utilities. • Ducted fans...
... the flue (chimney) of fuel burning equipment to prevent back drafting. Do not vent exhaust air into spaces within walls or ceilings, or into wall or ceiling, do not damage electrical wiring and other major appliance needs. With minimal care, as outlined in accordance with all applicable codes and standards, including fire-rated construction. • Sufficient air is designed to provide you with your other hidden utilities. • Ducted fans...
Use and Care Manual
Page 3
... THE RISK OF A RANGETOP GREASE FIRE: 1. Never leave surface units unattended at high heat or when cooking flaming foods. (i.e. Crepes suzette, Cherries jubilee, Peppercorn beef flambé). 3. CAUTION Do not use only. - CAUTION Accessible parts may be allowed to turn hood ON when cooking at high setting. SMOTHER FLAMES with the appliance. - CAUTION Unplug power cords from control panel before cleaning or servicing hood. Children should not be...
... THE RISK OF A RANGETOP GREASE FIRE: 1. Never leave surface units unattended at high heat or when cooking flaming foods. (i.e. Crepes suzette, Cherries jubilee, Peppercorn beef flambé). 3. CAUTION Do not use only. - CAUTION Accessible parts may be allowed to turn hood ON when cooking at high setting. SMOTHER FLAMES with the appliance. - CAUTION Unplug power cords from control panel before cleaning or servicing hood. Children should not be...
Use and Care Manual
Page 4
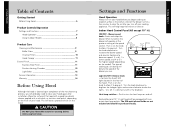
... . Heat lamp switches- Each professional 18" H. Getting Started Table of Contents Getting Started Before Using Hood 6 Product Controls/Operation Settings and Functions 7 Hood Operation 8 Using Outdoor Models 8 Product Care Cleaning and Maintenance 9 Baffle Filters 9 Charcoal Filters 10 Hood Canopy 11 Enamel Finish 11 Stainless Steel Finish 11 Ductless Venting Chamber 12 Light Bulbs 12 Service Information 13 Warranty 14 Before Using Hood Although the hood is cleaned upon completion of the manufacturing process, you will help keep the kitchen air cleaner. Also let the blower run...
... . Heat lamp switches- Each professional 18" H. Getting Started Table of Contents Getting Started Before Using Hood 6 Product Controls/Operation Settings and Functions 7 Hood Operation 8 Using Outdoor Models 8 Product Care Cleaning and Maintenance 9 Baffle Filters 9 Charcoal Filters 10 Hood Canopy 11 Enamel Finish 11 Stainless Steel Finish 11 Ductless Venting Chamber 12 Light Bulbs 12 Service Information 13 Warranty 14 Before Using Hood Although the hood is cleaned upon completion of the manufacturing process, you will help keep the kitchen air cleaner. Also let the blower run...
Use and Care Manual
Page 5
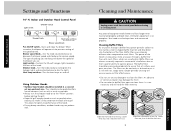
... well. 8 Cleaning and Maintenance CAUTION Unplug power cords from control panel before lighting the grill. • Keep the grill canopy closed as much as more air passes through a baffle filter, grease particles collect on and off. Product Care Indoor and Outdoor Hood Control Panel Light switch ON/OFF switch ON ON OFF LOW HIGH OFF LIGHTS LOW FAN ON HIGH OFF ON OFF HEAT LAMP Dimmer knob Heat lamp switches (Pro wall hoods only) Blower speed knob Fan On/Off switch-Starts and...
... well. 8 Cleaning and Maintenance CAUTION Unplug power cords from control panel before lighting the grill. • Keep the grill canopy closed as much as more air passes through a baffle filter, grease particles collect on and off. Product Care Indoor and Outdoor Hood Control Panel Light switch ON/OFF switch ON ON OFF LOW HIGH OFF LIGHTS LOW FAN ON HIGH OFF ON OFF HEAT LAMP Dimmer knob Heat lamp switches (Pro wall hoods only) Blower speed knob Fan On/Off switch-Starts and...
Use and Care Manual
Page 7
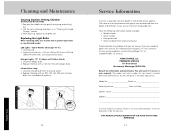
... having. Unscrew bulb. 2. Halogen Lights - 10" H. Unscrew halogen bulb. 2. Infrared Heat Lamp 1. Model no Serial no Date of purchase Date installed Dealer's name Address If service requires installation of the authorized service agency can be purchased locally. You will need it if service is located behind the baffle filter on the left side panel in the lower right corner. Replacing the Light Bulbs When removing bulbs use only authorized parts to : VIKING RANGE, LLC PREFERRED SERVICE 111 Front...
... having. Unscrew bulb. 2. Halogen Lights - 10" H. Unscrew halogen bulb. 2. Infrared Heat Lamp 1. Model no Serial no Date of purchase Date installed Dealer's name Address If service requires installation of the authorized service agency can be purchased locally. You will need it if service is located behind the baffle filter on the left side panel in the lower right corner. Replacing the Light Bulbs When removing bulbs use only authorized parts to : VIKING RANGE, LLC PREFERRED SERVICE 111 Front...
Use and Care Manual
Page 8
.... Warranty HOODS WARRANTY THREE YEAR FULL WARRANTY Hoods and all of their component parts, except as filters and bulbs, damage resulting from abuse, failure to provide reasonable and necessary maintenance, accident, delivery, negligence, natural disaster, loss of electrical power to the product for any reason, alteration, outdoor use, improper installation, improper operation, or repair or service of the product by anyone other than an authorized Viking Range...
.... Warranty HOODS WARRANTY THREE YEAR FULL WARRANTY Hoods and all of their component parts, except as filters and bulbs, damage resulting from abuse, failure to provide reasonable and necessary maintenance, accident, delivery, negligence, natural disaster, loss of electrical power to the product for any reason, alteration, outdoor use, improper installation, improper operation, or repair or service of the product by anyone other than an authorized Viking Range...


