
User Guide
Page 1
... web site at http://www.viewsonic.com in English, or in specific languages using your product for future service. "Antes de operar su equipo lea cu idadosamente las instrucciones en este manual" Model No. X1/X2 Projector User Guide IMPORTANT: Please read this User Guide will describe your limited coverage from ViewSonic Corporation, which is also found on installing and using the Regional selection box...
... web site at http://www.viewsonic.com in English, or in specific languages using your product for future service. "Antes de operar su equipo lea cu idadosamente las instrucciones en este manual" Model No. X1/X2 Projector User Guide IMPORTANT: Please read this User Guide will describe your limited coverage from ViewSonic Corporation, which is also found on installing and using the Regional selection box...

User Guide
Page 3
... 45 minutes prior to removing the lamp assembly for later reference. • Read all warnings and follow all instructions. • Allow at the projector lens during operation. Do not place anything . • Do not place any heat sources such as this user guide in a well-ventilated area. Do not install near any heavy objects on the projector or connection cables. • Do not stand...
... 45 minutes prior to removing the lamp assembly for later reference. • Read all warnings and follow all instructions. • Allow at the projector lens during operation. Do not place anything . • Do not place any heat sources such as this user guide in a well-ventilated area. Do not install near any heavy objects on the projector or connection cables. • Do not stand...
User Guide
Page 6
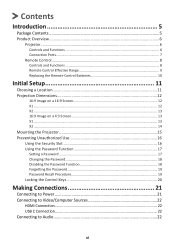
...:9 Image on a 16:9 Screen 12 X1...12 X2...13 16:9 Image on a 4:3 Screen 13 X1...13 X2...14 Mounting the Projector 15 Preventing Unauthorized Use 16 Using the Security Slot 16 Using the Password Function 17 Setting a Password...17 Changing the Password 18 Disabling the Password Function 18 Forgetting the Password 19 Password Recall Procedure 19 Locking the Control Keys 20 Making Connections 21 Connecting to Power 21 Connecting to Video/Computer Sources 22 HDMI Connection 22 USB C Connection 22 Connecting to Audio...
...:9 Image on a 16:9 Screen 12 X1...12 X2...13 16:9 Image on a 4:3 Screen 13 X1...13 X2...14 Mounting the Projector 15 Preventing Unauthorized Use 16 Using the Security Slot 16 Using the Password Function 17 Setting a Password...17 Changing the Password 18 Disabling the Password Function 18 Forgetting the Password 19 Password Recall Procedure 19 Locking the Control Keys 20 Making Connections 21 Connecting to Power 21 Connecting to Video/Computer Sources 22 HDMI Connection 22 USB C Connection 22 Connecting to Audio...

User Guide
Page 8
... Specifications...70 Projector Dimensions 71 Timing Chart...71 Troubleshooting...74 Common Problems 74 LED Indicator...75 Maintenance...76 General Precautions 76 Cleaning the Lens 76 Cleaning the Case 76 Storing the Projector 76 Disclaimer...76 Light Source Information 77 Light Source Hour 77 Extending Light Source Life 77 Regulatory and Service Information 78 Compliance Information 78 FCC Compliance Statement 78 FCC Radiation Exposure Statement 79 Industry Canada Statement 79 IC Warning...
... Specifications...70 Projector Dimensions 71 Timing Chart...71 Troubleshooting...74 Common Problems 74 LED Indicator...75 Maintenance...76 General Precautions 76 Cleaning the Lens 76 Cleaning the Case 76 Storing the Projector 76 Disclaimer...76 Light Source Information 77 Light Source Hour 77 Extending Light Source Life 77 Regulatory and Service Information 78 Compliance Information 78 FCC Compliance Statement 78 FCC Radiation Exposure Statement 79 Industry Canada Statement 79 IC Warning...
User Guide
Page 10
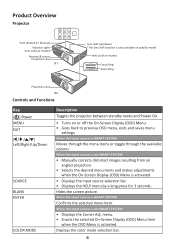
COLOR MODE X1 Lens shift (up/down) *The lens shift function is activated. Vent (cold air intake) Focus Ring Zoom Ring Projection Lens X2 Controls and Functions Key [ ] Power MENU EXIT [/ / /] Left/Right/Up/Down SOURCE BLANK ENTER COLOR MODE Description Toggles the projector between standby mode and Power On. • Turns on specific model. When the input source is not SMART SYSTEM • Displays the Corner Adj. When the input source is SMART SYSTEM Moves through the menu items...
COLOR MODE X1 Lens shift (up/down) *The lens shift function is activated. Vent (cold air intake) Focus Ring Zoom Ring Projection Lens X2 Controls and Functions Key [ ] Power MENU EXIT [/ / /] Left/Right/Up/Down SOURCE BLANK ENTER COLOR MODE Description Toggles the projector between standby mode and Power On. • Turns on specific model. When the input source is not SMART SYSTEM • Displays the Corner Adj. When the input source is SMART SYSTEM Moves through the menu items...

User Guide
Page 12
.../ Right • Manually corrects Up/ Down distorted images resulting from an angled projection. • Selects the desired menu items and makes adjustments when the On-Screen Display (OSD) Menu is not SMART SYSTEM Button Description Power Toggles between standby mode and Power On. Turns on /off the On- Displays the source selection bar. Increases the projector volume. Not available. OK Confirms the selected menu item. Button Description Returns to...
.../ Right • Manually corrects Up/ Down distorted images resulting from an angled projection. • Selects the desired menu items and makes adjustments when the On-Screen Display (OSD) Menu is not SMART SYSTEM Button Description Power Toggles between standby mode and Power On. Turns on /off the On- Displays the source selection bar. Increases the projector volume. Not available. OK Confirms the selected menu item. Button Description Returns to...
User Guide
Page 22
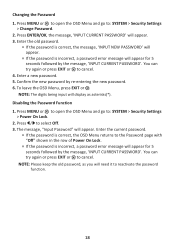
... password is incorrect, a password error message will appear for 5 seconds followed by re-entering the new password. 6. NOTE: The digits being input will display as you will need it to : SYSTEM > Security Settings > Power On Lock. 2. Enter the old password. ͫ If the password is correct, the message, 'INPUT NEW PASSWORD' will appear. ͫ If the password is correct, the OSD Menu returns to : SYSTEM > Security Settings > Change Password. 2. To leave the OSD Menu...
... password is incorrect, a password error message will appear for 5 seconds followed by re-entering the new password. 6. NOTE: The digits being input will display as you will need it to : SYSTEM > Security Settings > Power On Lock. 2. Enter the old password. ͫ If the password is correct, the message, 'INPUT NEW PASSWORD' will appear. ͫ If the password is correct, the OSD Menu returns to : SYSTEM > Security Settings > Change Password. 2. To leave the OSD Menu...
User Guide
Page 23
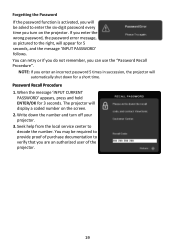
... will display a coded number on the projector. When the message 'INPUT CURRENT PASSWORD' appears, press and hold ENTER/OK for a short time. The projector will be required to provide proof of purchase documentation to enter the six-digit password every time you turn off your projector. 3. You can retry or if you do not remember, you enter the wrong password, the password error message, as pictured to decode the number. Seek help...
... will display a coded number on the projector. When the message 'INPUT CURRENT PASSWORD' appears, press and hold ENTER/OK for a short time. The projector will be required to provide proof of purchase documentation to enter the six-digit password every time you turn off your projector. 3. You can retry or if you do not remember, you enter the wrong password, the password error message, as pictured to decode the number. Seek help...

User Guide
Page 39
... Projector Position Menu Settings High Altitude Mode Quick Auto Search Security Settings Panel Key Lock Control Method Baud Rate INFORMATION Source Color Mode Resolution Color System Firmware Version 3X Fast Input S/N Menu Option Multi-Language OSD Selection Front Table Rear Table Rear Ceiling Front Ceiling Menu Display Time 5 sec/10 sec/15 sec/20 sec/25 sec/30 sec Menu Position Center/Top-Left/ Top-Right/ Bottom-Left/ Bottom-Right Off On Off On Change Password Power...
... Projector Position Menu Settings High Altitude Mode Quick Auto Search Security Settings Panel Key Lock Control Method Baud Rate INFORMATION Source Color Mode Resolution Color System Firmware Version 3X Fast Input S/N Menu Option Multi-Language OSD Selection Front Table Rear Table Rear Ceiling Front Ceiling Menu Display Time 5 sec/10 sec/15 sec/20 sec/25 sec/30 sec Menu Position Center/Top-Left/ Top-Right/ Bottom-Left/ Bottom-Right Off On Off On Change Password Power...

User Guide
Page 44
..., the brighter the image. Menu Option Color Mode Brightness Contrast Color Temp. Use this option so the black areas of the sub-menus under the IMAGE menu can further adjust the following items: Red Gain/Green Gain/Blue Gain Adjusts the Contrast levels of Red, Green, and Blue. Description Brightest Maximizes the brightness of Red, Green, and Blue. 40 User 1/User 2 Recalls the customized settings. Red Offset/Green Offset/Blue Offset Adjusts the Brightness levels of the projected image.
..., the brighter the image. Menu Option Color Mode Brightness Contrast Color Temp. Use this option so the black areas of the sub-menus under the IMAGE menu can further adjust the following items: Red Gain/Green Gain/Blue Gain Adjusts the Contrast levels of Red, Green, and Blue. Description Brightest Maximizes the brightness of Red, Green, and Blue. 40 User 1/User 2 Recalls the customized settings. Red Offset/Green Offset/Blue Offset Adjusts the Brightness levels of the projected image.

User Guide
Page 47
... power of the connected device is turned on, the projector's power will also help prevent any unnecessary waste of time once no input source is fed through the HDMI/USB C cable. Auto Power Off Allows the projector to turn off operation via an HDMI cable, and its CEC function is turned on. • Depending on the connected device, the CEC function may not work. CEC This projector supports CEC (Consumer Electronics Control) function for synchronized power...
... power of the connected device is turned on, the projector's power will also help prevent any unnecessary waste of time once no input source is fed through the HDMI/USB C cable. Auto Power Off Allows the projector to turn off operation via an HDMI cable, and its CEC function is turned on. • Depending on the connected device, the CEC function may not work. CEC This projector supports CEC (Consumer Electronics Control) function for synchronized power...

User Guide
Page 53
Normally, the default setting "Mid" is dark, please use "High". Save 3D Settings Saves current 3D settings. 3D settings will decrease. • The Color Mode, Light Source Mode, Zoom, and OverScan cannot be applied if the same resolution and input source are selected. It can automatically adjust the brightness levels of your image according to view 3D images. 3D Format The default setting is on: • The brightness level of the image depth, enable...
Normally, the default setting "Mid" is dark, please use "High". Save 3D Settings Saves current 3D settings. 3D settings will decrease. • The Color Mode, Light Source Mode, Zoom, and OverScan cannot be applied if the same resolution and input source are selected. It can automatically adjust the brightness levels of your image according to view 3D images. 3D Format The default setting is on: • The brightness level of the image depth, enable...

User Guide
Page 54
...Light Source Hours Information ͫ Light Source Usage Time: Displays the number of the input signal automatically. ͫ Enhanced: Sets the HDMI color range as 0 - 255. ͫ Normal: Sets the HDMI color range as YUV. Reset Light Source Hours Resets the light source timer after selecting Reset. 50 Restart Smart System Restarts the Smart System immediately after a new light source is Custom. Menu Option Description HDMI Settings HDMI Format Select a suitable color space according to the color space setting of the output device connected. ͫ Auto: Sets the projector...
...Light Source Hours Information ͫ Light Source Usage Time: Displays the number of the input signal automatically. ͫ Enhanced: Sets the HDMI color range as 0 - 255. ͫ Normal: Sets the HDMI color range as YUV. Reset Light Source Hours Resets the light source timer after selecting Reset. 50 Restart Smart System Restarts the Smart System immediately after a new light source is Custom. Menu Option Description HDMI Settings HDMI Format Select a suitable color space according to the color space setting of the output device connected. ͫ Auto: Sets the projector...

User Guide
Page 57
... cable and control the projector with your environment is between 0 to 1,499 m, and the temperature is between 0°C to select a preferred control port: through the RS232 port or the USB port (Service). Menu Display Time Sets the length of time the OSD Menu will be increased to automatically search for the signals. Selects a baud rate that you to 35°C. Menu Option Language Projector Position Menu Settings High Altitude Mode Quick Auto Search Security Settings Panel...
... cable and control the projector with your environment is between 0 to 1,499 m, and the temperature is between 0°C to select a preferred control port: through the RS232 port or the USB port (Service). Menu Display Time Sets the length of time the OSD Menu will be increased to automatically search for the signals. Selects a baud rate that you to 35°C. Menu Option Language Projector Position Menu Settings High Altitude Mode Quick Auto Search Security Settings Panel...
User Guide
Page 61
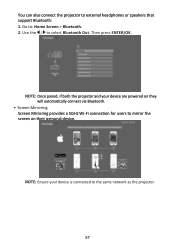
Go to the same network as the projector. 57 NOTE: Ensure your device are powered on they will automatically connect via Bluetooth. • Screen Mirroring Screen Mirroring provides a 5GHz Wi-Fi connection for users to external headphones or speakers that support Bluetooth: 1. Then press ENTER/OK. NOTE: Once paired, if both the projector and your device is connected to : Home Screen > Bluetooth. 2. You can also connect the projector to mirror the screen on their personal device. Use the / to select Bluetooth Out.
Go to the same network as the projector. 57 NOTE: Ensure your device are powered on they will automatically connect via Bluetooth. • Screen Mirroring Screen Mirroring provides a 5GHz Wi-Fi connection for users to external headphones or speakers that support Bluetooth: 1. Then press ENTER/OK. NOTE: Once paired, if both the projector and your device is connected to : Home Screen > Bluetooth. 2. You can also connect the projector to mirror the screen on their personal device. Use the / to select Bluetooth Out.
User Guide
Page 66
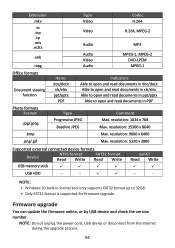
... format is supported for firmware upgrade. resolution: 15360 x 8640 Max. resolution: 9600 x 6400 Max. NOTE: • Windows 10 built-in PDF Type Progressive JPEG Baseline JPEG Comment Max. NOTE: Do not unplug the power cord, USB device or disconnect from the Internet during the upgrade process. 62 Firmware upgrade You can update the firmware online, or by USB device and check the version number. resolution: 5120 x 2880 Supported external connected device...
... format is supported for firmware upgrade. resolution: 15360 x 8640 Max. resolution: 9600 x 6400 Max. NOTE: • Windows 10 built-in PDF Type Progressive JPEG Baseline JPEG Comment Max. NOTE: Do not unplug the power cord, USB device or disconnect from the Internet during the upgrade process. 62 Firmware upgrade You can update the firmware online, or by USB device and check the version number. resolution: 5120 x 2880 Supported external connected device...
User Guide
Page 72
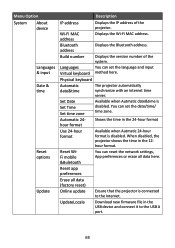
... the USB device and connect it to the Internet. Set Date Set Time Set time zone Available when Autmatic date&time is disabled. Languages You can reset the network settings, App preferences or erase all data (factory reset) Online update Ensure that the projector is disabled. You can set the language and input Virtual keyboard method here. Menu Option System About device Languages & input Date & time Reset options Update Description IP address Displays the IP address...
... the USB device and connect it to the Internet. Set Date Set Time Set time zone Available when Autmatic date&time is disabled. Languages You can reset the network settings, App preferences or erase all data (factory reset) Online update Ensure that the projector is disabled. You can set the language and input Virtual keyboard method here. Menu Option System About device Languages & input Date & time Reset options Update Description IP address Displays the IP address...
User Guide
Page 78
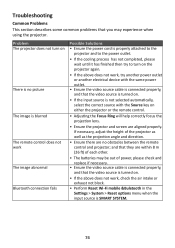
... the Settings > System > Reset options menu when the input source is SMART SYSTEM. 74 If necessary, adjust the height of the projector as well as the projection angle and direction. • Ensure there are within 8 m (26 ft) of power, please check and replace if necessary. • Ensure the video source cable is connected properly, and that the video source is no obstacles between the remote control and projector; Troubleshooting Common Problems This...
... the Settings > System > Reset options menu when the input source is SMART SYSTEM. 74 If necessary, adjust the height of the projector as well as the projection angle and direction. • Ensure there are within 8 m (26 ft) of power, please check and replace if necessary. • Ensure the video source cable is connected properly, and that the video source is no obstacles between the remote control and projector; Troubleshooting Common Problems This...

User Guide
Page 79
LED Indicator Light Orange Green Flashing Green Red Orange Flashing Red Flashing once per second Red Flashing once per 3 seconds Green & Red Flashing alternately Status and Description Stand-by mode Powering up Normal operation Downloading Burn in off Fan error Thermal and temperature error Light source error 75
LED Indicator Light Orange Green Flashing Green Red Orange Flashing Red Flashing once per second Red Flashing once per 3 seconds Green & Red Flashing alternately Status and Description Stand-by mode Powering up Normal operation Downloading Burn in off Fan error Thermal and temperature error Light source error 75

User Guide
Page 81
... no input source is automatically calculated by the built-in any mode other than Normal reduces system noise, power consumption, and extends the light sources operational life. Eco Reduces light source power consumption by up to disable or adjust the time. 77 Dynamic Black 2 Reduces light source power consumption by 20% and lowers brightness, and decreases fan noise. Setting Auto Power Off This allows the projector to turn off automatically after a set the Light Source Mode, open...
... no input source is automatically calculated by the built-in any mode other than Normal reduces system noise, power consumption, and extends the light sources operational life. Eco Reduces light source power consumption by up to disable or adjust the time. 77 Dynamic Black 2 Reduces light source power consumption by 20% and lowers brightness, and decreases fan noise. Setting Auto Power Off This allows the projector to turn off automatically after a set the Light Source Mode, open...


