User Manual
Page 2
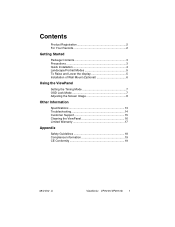
Contents Product Registration 2 For Your Records 2 Getting Started Package Contents 3 Precautions 3 Quick Installation 4 Landscape/Portrait Modes 5 To Raise and Lower the display 5 Installation of Wall Mount (Optional 6 Using the ViewPanel Setting the Timing Mode 7 OSD Lock Mode 7 Adjusting the Screen Image 8 Other Information Specifications 13 Troubleshooting 14 Customer Support 15 Cleaning the ViewPanel 16 Limited Warranty 17 Appendix Safety Guidelines 18 Compliance Information 19 CE Conformity 19 08/01/02 A ViewSonic VP201m/VP201mb 1
Contents Product Registration 2 For Your Records 2 Getting Started Package Contents 3 Precautions 3 Quick Installation 4 Landscape/Portrait Modes 5 To Raise and Lower the display 5 Installation of Wall Mount (Optional 6 Using the ViewPanel Setting the Timing Mode 7 OSD Lock Mode 7 Adjusting the Screen Image 8 Other Information Specifications 13 Troubleshooting 14 Customer Support 15 Cleaning the ViewPanel 16 Limited Warranty 17 Appendix Safety Guidelines 18 Compliance Information 19 CE Conformity 19 08/01/02 A ViewSonic VP201m/VP201mb 1
User Manual
Page 4
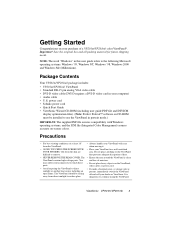
... ICM file (Integrated Color Management) assures accurate on CD-ROM must be facing away from the ViewPanel. • AVOID TOUCHING THE SCREEN WITH YOUR FINGERS. ViewSonic VP201m/VP201mb 3 Important! Package Contents Your VP201m/VP201mb package includes: • VP201m/VP201mb ViewPanel • Standard DB-15 pin analog VGA video cable • DVI-D video cable (DVI-D requires a DVI...
... ICM file (Integrated Color Management) assures accurate on CD-ROM must be facing away from the ViewPanel. • AVOID TOUCHING THE SCREEN WITH YOUR FINGERS. ViewSonic VP201m/VP201mb 3 Important! Package Contents Your VP201m/VP201mb package includes: • VP201m/VP201mb ViewPanel • Standard DB-15 pin analog VGA video cable • DVI-D video cable (DVI-D requires a DVI...
User Manual
Page 5
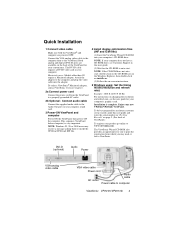
... your computer. Connect audio cable Connect the supplied audio cable to ViewSonic. To order a ViewSonic® Macintosh adapter, contact ViewSonic Customer Support. 2a Connect power cord Connect the power cord from the ViewPanel to computer ViewSonic VP201m/VP201mb 4 To be best prepared for any future customer service needs: print this user guide. (2) Wait for your computer...
... your computer. Connect audio cable Connect the supplied audio cable to ViewSonic. To order a ViewSonic® Macintosh adapter, contact ViewSonic Customer Support. 2a Connect power cord Connect the power cord from the ViewPanel to computer ViewSonic VP201m/VP201mb 4 To be best prepared for any future customer service needs: print this user guide. (2) Wait for your computer...
User Manual
Page 6
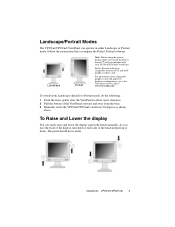
... to Portrait mode, do the following: 1 From the front, gently raise the ViewPanel to the ViewSonic website, http:// www.viewsonic.com To switch from the base. 3 Manually rotate the VP201m/VP201mb clockwise 90 degrees as shown above. Follow the instructions that accompany the Perfect Portrait ...software. To Raise and Lower the display You can operate in either Landscape or Portrait mode. ViewSonic VP201m/VP201mb 5 For information about compatible graphics cards and approved hardware configurations, go to allow more clearance. 2 Pull the bottom of...
... to Portrait mode, do the following: 1 From the front, gently raise the ViewPanel to the ViewSonic website, http:// www.viewsonic.com To switch from the base. 3 Manually rotate the VP201m/VP201mb clockwise 90 degrees as shown above. Follow the instructions that accompany the Perfect Portrait ...software. To Raise and Lower the display You can operate in either Landscape or Portrait mode. ViewSonic VP201m/VP201mb 5 For information about compatible graphics cards and approved hardware configurations, go to allow more clearance. 2 Pull the bottom of...
User Manual
Page 7
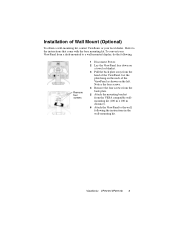
...wallmounting kit (100 m x 100 m distance). 6 Attach the ViewPanel to the wall, following : Remove four screws 1 Disconnect Power. 2 Lay the ViewPanel face down on the left. Let the plate hang on the neck of the ViewPanel as shown on a towel or blanket. 3 Pull the back plate...Wall Mount (Optional) To obtain a wall-mounting kit, contact ViewSonic or your ViewPanel from a desk-mounted to a wall-mounted display, do the following the instructions in the wall-mounting kit. Installation of the ViewPanel. ViewSonic VP201m/VP201mb 6 Refer to the instructions that come with the base mounting...
...wallmounting kit (100 m x 100 m distance). 6 Attach the ViewPanel to the wall, following : Remove four screws 1 Disconnect Power. 2 Lay the ViewPanel face down on the left. Let the plate hang on the neck of the ViewPanel as shown on a towel or blanket. 3 Pull the back plate...Wall Mount (Optional) To obtain a wall-mounting kit, contact ViewSonic or your ViewPanel from a desk-mounted to a wall-mounted display, do the following the instructions in the wall-mounting kit. Installation of the ViewPanel. ViewSonic VP201m/VP201mb 6 Refer to the instructions that come with the base mounting...
User Manual
Page 8
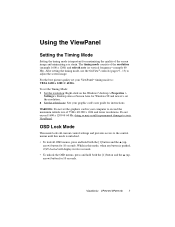
...not exceed 1600 x 1200 @ 60 Hz; OSD Lock Mode This mode locks all OSD menus, press and hold both the [1] button and the L (up- ViewSonic VP201m/VP201mb 7 While in this mode is unlocked. • To lock all current control settings and prevents access to : VESA 1600 x 1200 @ 60 Hz. For ... x 1200) and refresh rate (or vertical frequency--example 60 Hz). WARNING: Do not set the resolution. 2 Set the refresh rate: See your ViewPanel® timing mode to the control menus until this mode, when any button is pushed, OSD Locked will display for five seconds. • To unlock...
...not exceed 1600 x 1200 @ 60 Hz; OSD Lock Mode This mode locks all OSD menus, press and hold both the [1] button and the L (up- ViewSonic VP201m/VP201mb 7 While in this mode is unlocked. • To lock all current control settings and prevents access to : VESA 1600 x 1200 @ 60 Hz. For ... x 1200) and refresh rate (or vertical frequency--example 60 Hz). WARNING: Do not set the resolution. 2 Set the refresh rate: See your ViewPanel® timing mode to the control menus until this mode, when any button is pushed, OSD Locked will display for five seconds. • To unlock...
User Manual
Page 10
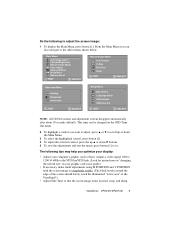
... screens disappear automatically after about 10 seconds (default). The following to adjust the screen image: 1 To display the Main Menu, press button [1]. ViewSonic VP201m/VP201mb 9 Do the following tips may help you optimize your display: • Adjust your graphic card's user guide.) • If necessary, make...around the edge of the screen should barely touch the illuminated "active area" of the ViewPanel®.) • Adjust Fine Tune so that it outputs a video signal 1600 x 1200 @ 60Hz to the VP201m/VP201mb. (Look for instructions on the OSD Time Out menu. 2 To highlight a control...
... screens disappear automatically after about 10 seconds (default). The following to adjust the screen image: 1 To display the Main Menu, press button [1]. ViewSonic VP201m/VP201mb 9 Do the following tips may help you optimize your display: • Adjust your graphic card's user guide.) • If necessary, make...around the edge of the screen should barely touch the illuminated "active area" of the ViewPanel®.) • Adjust Fine Tune so that it outputs a video signal 1600 x 1200 @ 60Hz to the VP201m/VP201mb. (Look for instructions on the OSD Time Out menu. 2 To highlight a control...
User Manual
Page 11
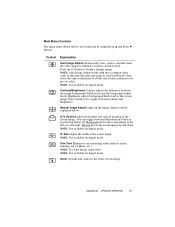
.... NOTE: Not available for digital mode. Size adjusts the width of the screen image. If this function does not work on your ViewPanel®, then lower the video refresh rate to 60 Hz and set the resolution to obtain a sharper image. Press button [2] to ...Main Menu Controls The menu items shown below . Manual Image Adjust brings up L and down . NOTE: Not available for digital mode. ViewSonic VP201m/VP201mb 10 Contrast/Brightness Contrast adjusts the difference between Contrast and Brightness. H./V. You can toggle between Horizontal and Vertical by using the up the ...
.... NOTE: Not available for digital mode. Size adjusts the width of the screen image. If this function does not work on your ViewPanel®, then lower the video refresh rate to 60 Hz and set the resolution to obtain a sharper image. Press button [2] to ...Main Menu Controls The menu items shown below . Manual Image Adjust brings up L and down . NOTE: Not available for digital mode. ViewSonic VP201m/VP201mb 10 Contrast/Brightness Contrast adjusts the difference between Contrast and Brightness. H./V. You can toggle between Horizontal and Vertical by using the up the ...
User Manual
Page 14
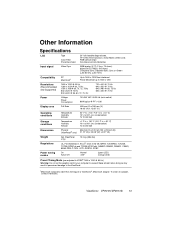
...; C to + 60° C) 10% to 90% (no condensation) To 40,000 feet Dimensions Physical 536 mm (H) x 510 mm (W) x 238 mm (D) (ViewPanel® only) 21.10" (H) x 20.08" (W) x 9.37" (D) Weight Net (ViewPanel only) 13.0 kg (28.6 lbs) Regulations UL, FCC-B, ENERGY STAR®, CSA, IC-B, CE, MPRII, TUV/ERGO, TUV/GS, TCO99 (VP201m...
...; C to + 60° C) 10% to 90% (no condensation) To 40,000 feet Dimensions Physical 536 mm (H) x 510 mm (W) x 238 mm (D) (ViewPanel® only) 21.10" (H) x 20.08" (W) x 9.37" (D) Weight Net (ViewPanel only) 13.0 kg (28.6 lbs) Regulations UL, FCC-B, ENERGY STAR®, CSA, IC-B, CE, MPRII, TUV/ERGO, TUV/GS, TCO99 (VP201m...
User Manual
Page 15
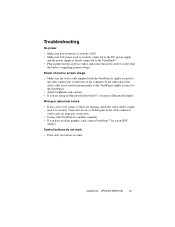
ViewSonic VP201m/VP201mb 14 If the other end of the computer. Control buttons do not work • Press only one button at a time. Power on but no screen image • Make sure the video cable supplied with the ViewPanel is tightly secured to the video output port on the back of the ... cord is securely connected to the DC power supply and the power supply is firmly connected to the ViewPanel®. • Plug another computer. • If you have an older graphics card, contact ViewSonic ® for a non-DDC adapter. Wrong or abnormal colors • If any colors (red, green, or ...
ViewSonic VP201m/VP201mb 14 If the other end of the computer. Control buttons do not work • Press only one button at a time. Power on but no screen image • Make sure the video cable supplied with the ViewPanel is tightly secured to the video output port on the back of the ... cord is securely connected to the DC power supply and the power supply is firmly connected to the ViewPanel®. • Plug another computer. • If you have an older graphics card, contact ViewSonic ® for a non-DDC adapter. Wrong or abnormal colors • If any colors (red, green, or ...

User Manual
Page 17
...any ammonia or alcohol-based cleaners. Disclaimer ViewSonic® does not recommend the use of a non-ammonia, non-alcohol based, mild non-abrasive detergent onto a clean, soft, lint-free cloth, then wipe the surface. Cleaning the ViewPanel • MAKE SURE THE VIEWPANEL® IS TURNED OFF. • NEVER... the screen with a clean, soft, lint-free cloth. Some chemical cleaners have been reported to damage the screen and/or case of the ViewPanel.ViewSonic will not be liable for damage resulting from use of non-ammonia, non-alcohol based glass cleaner onto a clean, soft, lint-free cloth,...
...any ammonia or alcohol-based cleaners. Disclaimer ViewSonic® does not recommend the use of a non-ammonia, non-alcohol based, mild non-abrasive detergent onto a clean, soft, lint-free cloth, then wipe the surface. Cleaning the ViewPanel • MAKE SURE THE VIEWPANEL® IS TURNED OFF. • NEVER... the screen with a clean, soft, lint-free cloth. Some chemical cleaners have been reported to damage the screen and/or case of the ViewPanel.ViewSonic will not be liable for damage resulting from use of non-ammonia, non-alcohol based glass cleaner onto a clean, soft, lint-free cloth,...
User Manual
Page 18
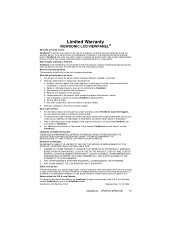
...ANY OTHERPARTY. Some states do not allow limitations on which does not relate to a product defect. 3. ViewSonic LCD Warranty (V2.0) Release Date: 10-15-1999 ViewSonic VP201m/VP201mb 17 If a product proves to be defective in material or workmanship during the warranty period. Take or ... may not apply to you may include remanufactured or refurbished parts or components. Who the warranty protects: This warranty is effective: ViewSonic LCD ViewPanels are warranted for three (3) years for all parts including the light source and three (3) years for the first consumer purchaser....
...ANY OTHERPARTY. Some states do not allow limitations on which does not relate to a product defect. 3. ViewSonic LCD Warranty (V2.0) Release Date: 10-15-1999 ViewSonic VP201m/VP201mb 17 If a product proves to be defective in material or workmanship during the warranty period. Take or ... may not apply to you may include remanufactured or refurbished parts or components. Who the warranty protects: This warranty is effective: ViewSonic LCD ViewPanels are warranted for three (3) years for all parts including the light source and three (3) years for the first consumer purchaser....