User Guide
Page 5
...not attempt to rain or moisture. 6. The wide blade and the third prong are provided for replacement of time. 14. Protect the power cord from being tread upon or pinched, particularly at the plug, and the point where if emerges from tipping over. 13. Follow all...this equipment near water. Service is required when the unit has been damaged in any way, such as radiators, heat registers, stoves, or other . ViewSonic VA2226w 2 Do not use attachments/accessories specified by the manufacturer, or sold with the manufacturer's instructions. 8. Install the equipment in a safe place. 3....
...not attempt to rain or moisture. 6. The wide blade and the third prong are provided for replacement of time. 14. Protect the power cord from being tread upon or pinched, particularly at the plug, and the point where if emerges from tipping over. 13. Follow all...this equipment near water. Service is required when the unit has been damaged in any way, such as radiators, heat registers, stoves, or other . ViewSonic VA2226w 2 Do not use attachments/accessories specified by the manufacturer, or sold with the manufacturer's instructions. 8. Install the equipment in a safe place. 3....
User Guide
Page 8
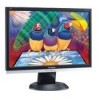
...systems, and the ICM file (Image Color Matching) ensures accurate on-screen colors. Orient the LCD display away from the LCD display. • Avoid touching the screen. ViewSonic VA2226w 5 NOTE: The word "Windows" in a well ventilated area. The INF file ensures ...8226; Ensure the area around the LCD display is clean and free of a ViewSonic® LCD display. Getting Started Congratulations on your dealer or ViewSonic. Package Contents Your LCD display package includes: • LCD display • Power cord • D-Sub cable • ViewSonic Wizard CD-ROM • Quick ...
...systems, and the ICM file (Image Color Matching) ensures accurate on-screen colors. Orient the LCD display away from the LCD display. • Avoid touching the screen. ViewSonic VA2226w 5 NOTE: The word "Windows" in a well ventilated area. The INF file ensures ...8226; Ensure the area around the LCD display is clean and free of a ViewSonic® LCD display. Getting Started Congratulations on your dealer or ViewSonic. Package Contents Your LCD display package includes: • LCD display • Power cord • D-Sub cable • ViewSonic Wizard CD-ROM • Quick ...
User Guide
Page 9
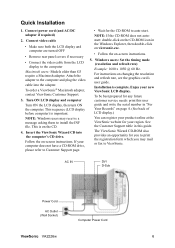
...AC IN DVI D-Sub Power Cord AC Outlet (Wall Socket) Computer Power Cord ViewSonic VA2226w 6 Turn ON LCD display and computer Turn ON the LCD display, then turn ON the computer. To be best prepared for your product online at the ViewSonic website for any future ...(resolution and refresh rate) Example: 1680 x 1050 @ 60 Hz. To order a ViewSonic® Macintosh adapter, contact ViewSonic Customer Support. 3. If your new ViewSonic LCD display. Installation is complete. Connect power cord (and AC/DC adapter if required) 2. Connect video cable • Make sure both...
...AC IN DVI D-Sub Power Cord AC Outlet (Wall Socket) Computer Power Cord ViewSonic VA2226w 6 Turn ON LCD display and computer Turn ON the LCD display, then turn ON the computer. To be best prepared for your product online at the ViewSonic website for any future ...(resolution and refresh rate) Example: 1680 x 1050 @ 60 Hz. To order a ViewSonic® Macintosh adapter, contact ViewSonic Customer Support. 3. If your new ViewSonic LCD display. Installation is complete. Connect power cord (and AC/DC adapter if required) 2. Connect video cable • Make sure both...
User Guide
Page 10
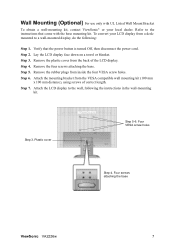
...with the base mounting kit. Refer to the instructions that the power button is turned Off, then disconnect the power cord. Step 4. Step 6. Attach the mounting bracket from a ... Step 7. Step 2. Four VESA screw holes Step 4. Four screws attaching the base ViewSonic VA2226w 7 Remove the rubber plugs from the back of correct length. Verify that come with ...ViewSonic® or your LCD display from the VESA compatible wall mounting kit (100 mm x 100 mm distance), using screws of the LCD display. Lay the LCD display face down on a towel or blanket. Attach the LCD...
...with the base mounting kit. Refer to the instructions that the power button is turned Off, then disconnect the power cord. Step 4. Step 6. Attach the mounting bracket from a ... Step 7. Step 2. Four VESA screw holes Step 4. Four screws attaching the base ViewSonic VA2226w 7 Remove the rubber plugs from the back of correct length. Verify that come with ...ViewSonic® or your LCD display from the VESA compatible wall mounting kit (100 mm x 100 mm distance), using screws of the LCD display. Lay the LCD display face down on a towel or blanket. Attach the LCD...
User Guide
Page 18
... you are using an Macintosh older than G3, you have an older graphics card, contact ViewSonic® for a non-DDC adapter. Troubleshooting No power • Make sure power button (or switch) is ON. • Make sure A/C power cord is securely connected to the LCD display. • Plug another computer. • If you need a Macintosh adapter. ViewSonic VA2226w 15
... you are using an Macintosh older than G3, you have an older graphics card, contact ViewSonic® for a non-DDC adapter. Troubleshooting No power • Make sure power button (or switch) is ON. • Make sure A/C power cord is securely connected to the LCD display. • Plug another computer. • If you need a Macintosh adapter. ViewSonic VA2226w 15


