
User Guide
Page 4
After rebooting, change your monitor again. When using ear-/headphones, adjust the volume to a power outlet, DO NOT remove the grounding prong. Service ... CAN CAUSE HEARING DAMAGE/HEARING LOSS. • When connecting to appropriate levels, or hearing damage may result. • NOTICE: THE MONITOR MAY OVERHEAT AND SHUTDOWN! Ensure that the power outlet is located near the equipment so that it emerges from the AC outlet if the.... • Disconnect the power plug from the equipment. If the device shuts down automatically, please turn on your monitor's resolution and refresh rate.
After rebooting, change your monitor again. When using ear-/headphones, adjust the volume to a power outlet, DO NOT remove the grounding prong. Service ... CAN CAUSE HEARING DAMAGE/HEARING LOSS. • When connecting to appropriate levels, or hearing damage may result. • NOTICE: THE MONITOR MAY OVERHEAT AND SHUTDOWN! Ensure that the power outlet is located near the equipment so that it emerges from the AC outlet if the.... • Disconnect the power plug from the equipment. If the device shuts down automatically, please turn on your monitor's resolution and refresh rate.
User Guide
Page 5
... 13 HDMI Connection 13 DVI Connection...14 VGA Connection...15 USB Connection...16 Touch Function Control 17 Touch Accuracy...18 Audio Connection 19 Using the Monitor 20 Adjusting the Viewing Angle 20 Tilt Angle Adjustment 20 Turning the Device On/Off 21 Using the Control Panel Keys 21 On-Screen Display...
... 13 HDMI Connection 13 DVI Connection...14 VGA Connection...15 USB Connection...16 Touch Function Control 17 Touch Accuracy...18 Audio Connection 19 Using the Monitor 20 Adjusting the Viewing Angle 20 Tilt Angle Adjustment 20 Turning the Device On/Off 21 Using the Control Panel Keys 21 On-Screen Display...
User Guide
Page 9
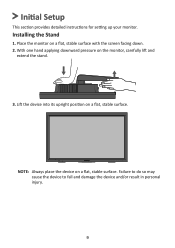
With one hand applying downward pressure on a flat, stable surface with the screen facing down. 2. Initial Setup This section provides detailed instructions for setting up your monitor. Place the monitor on the monitor, carefully lift and extend the stand. 3. Failure to do so may cause the device to fall and damage the device and/or result in personal injury. 9 Lift the device into its upright position on a flat, stable surface. NOTE: Always place the device on a flat, stable surface. Installing the Stand 1.
With one hand applying downward pressure on a flat, stable surface with the screen facing down. 2. Initial Setup This section provides detailed instructions for setting up your monitor. Place the monitor on the monitor, carefully lift and extend the stand. 3. Failure to do so may cause the device to fall and damage the device and/or result in personal injury. 9 Lift the device into its upright position on a flat, stable surface. NOTE: Always place the device on a flat, stable surface. Installing the Stand 1.
User Guide
Page 10
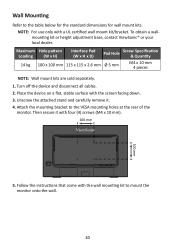
Unscrew the attached stand and carefully remove it with the wall mounting kit to mount the monitor onto the wall. 10 Attach the mounting bracket to the table below for the standard dimensions for wall mount kits. Follow the instructions that... come with four (4) screws (M4 x 10 mm). 100 mm 100 mm HDMI 5. To obtain a wallmounting kit or height adjustment base, contact ViewSonic® or your local dealer. Then secure it . 4. Maximum Hole pattern Loading (W x H) Interface Pad (W x H x D) Pad Hole Screw Specification & Quantity 14 kg 100 x 100 ...
Unscrew the attached stand and carefully remove it with the wall mounting kit to mount the monitor onto the wall. 10 Attach the mounting bracket to the table below for the standard dimensions for wall mount kits. Follow the instructions that... come with four (4) screws (M4 x 10 mm). 100 mm 100 mm HDMI 5. To obtain a wallmounting kit or height adjustment base, contact ViewSonic® or your local dealer. Then secure it . 4. Maximum Hole pattern Loading (W x H) Interface Pad (W x H x D) Pad Hole Screw Specification & Quantity 14 kg 100 x 100 ...
User Guide
Page 11
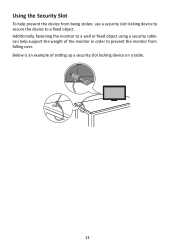
Below is an example of the monitor in order to prevent the monitor from being stolen, use a security slot locking device to secure the device to a wall or fixed object using a security cable can help prevent the device from falling over. Additionally, fastening the monitor to a fixed object. Using the Security Slot To help support the weight of setting up a security slot locking device on a table. 11
Below is an example of the monitor in order to prevent the monitor from being stolen, use a security slot locking device to secure the device to a wall or fixed object using a security cable can help prevent the device from falling over. Additionally, fastening the monitor to a fixed object. Using the Security Slot To help support the weight of setting up a security slot locking device on a table. 11

User Guide
Page 12
Making Connections This section guides you on how to the AC IN jack at the rear of the device. 2. Connect the power cord to connect the monitor with other equipment. Connect the power cord plug to Power 1. Connecting to a power outlet. 1 2 12
Making Connections This section guides you on how to the AC IN jack at the rear of the device. 2. Connect the power cord to connect the monitor with other equipment. Connect the power cord plug to Power 1. Connecting to a power outlet. 1 2 12

User Guide
Page 13
HDMI HDMI 13 NOTE: The monitor is equipped with one end of an HDMI cable to the HDMI port of your computer. Then connect the other end of the cable to the HDMI port of your monitor. Connecting External Devices HDMI Connection Connect one HDMI 1.4 port.
HDMI HDMI 13 NOTE: The monitor is equipped with one end of an HDMI cable to the HDMI port of your computer. Then connect the other end of the cable to the HDMI port of your monitor. Connecting External Devices HDMI Connection Connect one HDMI 1.4 port.

User Guide
Page 16
storage device). ͫ NOTE: To activate the USB Type A port, ensure your computer is also connected to the monitor's USB Type B port. • One (1) USB Type B port: Connect the USB Type B male cable (square with 2 cut corners) to this port, and then ...connect the other end of the cable to a USB port of your Type A peripheral device(s). (i.e. NOTE: The monitor supports two (2) types of the monitor. When making the connection(s), observe the following guidelines: • Two (2) USB Type A ports: Connection for your computer. 16 Then connect the other...
storage device). ͫ NOTE: To activate the USB Type A port, ensure your computer is also connected to the monitor's USB Type B port. • One (1) USB Type B port: Connect the USB Type B male cable (square with 2 cut corners) to this port, and then ...connect the other end of the cable to a USB port of your Type A peripheral device(s). (i.e. NOTE: The monitor supports two (2) types of the monitor. When making the connection(s), observe the following guidelines: • Two (2) USB Type A ports: Connection for your computer. 16 Then connect the other...

User Guide
Page 19
NOTE: The monitor is also equipped with dual speakers. 19 Audio Connection Plug an audio cable into your computer (Audio In) or ear-/headphones (Audio Out). Plug the other end into the Audio In/Audio Out port of the monitor.
NOTE: The monitor is also equipped with dual speakers. 19 Audio Connection Plug an audio cable into your computer (Audio In) or ear-/headphones (Audio Out). Plug the other end into the Audio In/Audio Out port of the monitor.

User Guide
Page 20
Using the Monitor Adjusting the Viewing Angle Tilt Angle Adjustment Tilt the monitor stand forwards or backwards to the desired viewing angle (20˚ to 40˚). 20
Using the Monitor Adjusting the Viewing Angle Tilt Angle Adjustment Tilt the monitor stand forwards or backwards to the desired viewing angle (20˚ to 40˚). 20

User Guide
Page 21
If the monitor is connected to the power outlet. NOTE: The monitor will still consume some power as long as the power cord is not being used for a long period of time, please disconnect the power plug from the power outlet. Using the Control Panel Keys Use the control panel keys to turn the monitor off, press the Power key again. To turn on the monitor. 3. Plug the power cord into a power outlet. 2. Press the Power key to activate Hot Keys, navigate the On-Screen Display (OSD) Menu, and change the settings. 12 ▲ 21 ▲ Turning the Device On/Off 1.
If the monitor is connected to the power outlet. NOTE: The monitor will still consume some power as long as the power cord is not being used for a long period of time, please disconnect the power plug from the power outlet. Using the Control Panel Keys Use the control panel keys to turn the monitor off, press the Power key again. To turn on the monitor. 3. Plug the power cord into a power outlet. 2. Press the Power key to activate Hot Keys, navigate the On-Screen Display (OSD) Menu, and change the settings. 12 ▲ 21 ▲ Turning the Device On/Off 1.

User Guide
Page 33
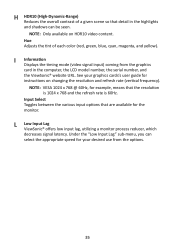
... inputs if you have more comfortable viewing experience. Auto Detect If the current input source has no signal, the monitor will automatically switch to your monitor. Blue Light Filter Adjusts the filter that blocks high-energy blue light for a more than one source. Brightness Adjusts... Preset Timing Mode listed in alphabetical order. All terms are listed in the Specifications of this manual. B Black Stabilization ViewSonic's Black Stabilization provides heightened visibility and detail by default. Glossary This section describes the standard glossary of the screen image. 33
... inputs if you have more comfortable viewing experience. Auto Detect If the current input source has no signal, the monitor will automatically switch to your monitor. Blue Light Filter Adjusts the filter that blocks high-energy blue light for a more than one source. Brightness Adjusts... Preset Timing Mode listed in alphabetical order. All terms are listed in the Specifications of this manual. B Black Stabilization ViewSonic's Black Stabilization provides heightened visibility and detail by default. Glossary This section describes the standard glossary of the screen image. 33

User Guide
Page 34
...puts an end to 5000K. Color Temperature Allows users to select specific color temperature settings to 9300K. Recommended for the best blend of the monitor's grayscale levels. 34 User Custom user settings. G Game Mode Integrating a gaming-oriented OSD design including pre-calibrated FPS, RTS, and MOBA... modes to help adjust the color settings to 7500K. Cool Set the color temperature to fit the user's needs. Color Format The monitor can manually change the color range options to use . You can detect the input signal color range automatically. Color Space Allows users...
...puts an end to 5000K. Color Temperature Allows users to select specific color temperature settings to 9300K. Recommended for the best blend of the monitor's grayscale levels. 34 User Custom user settings. G Game Mode Integrating a gaming-oriented OSD design including pre-calibrated FPS, RTS, and MOBA... modes to help adjust the color settings to 7500K. Cool Set the color temperature to fit the user's needs. Color Format The monitor can manually change the color range options to use . You can detect the input signal color range automatically. Color Space Allows users...
User Guide
Page 35
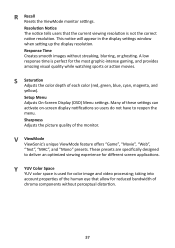
See your desired use from the graphics card in the highlights and shadows can select the appropriate speed for the monitor. H HDR10 (High-Dynamic-Range) Reduces the overall contrast of each color (red, green, blue, cyan, magenta, and yellow). NOTE: VESA 1024 x... given scene so that detail in the computer, the LCD model number, the serial number, and the ViewSonic® website URL. L Low Input Lag ViewSonic® offers low input lag, utilizing a monitor process reducer, which decreases signal latency. NOTE: Only available on changing the resolution and refresh rate (vertical...
See your desired use from the graphics card in the highlights and shadows can select the appropriate speed for the monitor. H HDR10 (High-Dynamic-Range) Reduces the overall contrast of each color (red, green, blue, cyan, magenta, and yellow). NOTE: VESA 1024 x... given scene so that detail in the computer, the LCD model number, the serial number, and the ViewSonic® website URL. L Low Input Lag ViewSonic® offers low input lag, utilizing a monitor process reducer, which decreases signal latency. NOTE: Only available on changing the resolution and refresh rate (vertical...

User Guide
Page 36
M Manual Image Adjust Displays the "Manual Image Adjust" menu. Environmental Protection Agency (EPA). A setting on your monitor zooms in on your monitor's screen. The user can manually set of image quality adjustments. Memory Recall is the setting in the "Specifications" of the film. Environmental Protection Agency and ...
M Manual Image Adjust Displays the "Manual Image Adjust" menu. Environmental Protection Agency (EPA). A setting on your monitor zooms in on your monitor's screen. The user can manually set of image quality adjustments. Memory Recall is the setting in the "Specifications" of the film. Environmental Protection Agency and ...
User Guide
Page 37
... quality of each color (red, green, blue, cyan, magenta, and yellow). Response Time Creates smooth images without perceptual distortion. 37 V ViewMode ViewSonic's unique ViewMode feature offers "Game", "Movie", "Web", "Text", "MAC", and "Mono" presets. This notice will appear in the display settings... quality while watching sports or action movies. S Saturation Adjusts the color depth of the monitor. These presets are specifically designed to reopen the menu. R Recall Resets the ViewMode monitor settings. Y YUV Color Space YUV color space is perfect for color image and video ...
... quality of each color (red, green, blue, cyan, magenta, and yellow). Response Time Creates smooth images without perceptual distortion. 37 V ViewMode ViewSonic's unique ViewMode feature offers "Game", "Movie", "Web", "Text", "MAC", and "Mono" presets. This notice will appear in the display settings... quality while watching sports or action movies. S Saturation Adjusts the color depth of the monitor. These presets are specifically designed to reopen the menu. R Recall Resets the ViewMode monitor settings. Y YUV Color Space YUV color space is perfect for color image and video ...
User Guide
Page 38
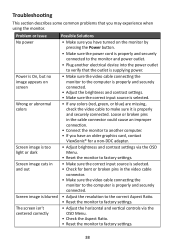
...'t centered correctly • Adjust the horizontal and vertical controls via the OSD Menu. • Reset the monitor to verify that you have an older graphics card, contact ViewSonic® for bent or broken pins in the cable connector could cause an improper connection. • Connect the... monitor to another electrical device into the power outlet to factory settings. Screen image is properly and ...
...'t centered correctly • Adjust the horizontal and vertical controls via the OSD Menu. • Reset the monitor to verify that you have an older graphics card, contact ViewSonic® for bent or broken pins in the cable connector could cause an improper connection. • Connect the... monitor to another electrical device into the power outlet to factory settings. Screen image is properly and ...

User Guide
Page 39
..., ensure the mini stereo jack is connected. • Make sure the volume is properly and securely connected. The OSD Menu does not appear on the monitor, and that there is connected, but no obstructions near or on the screen/the OSD controls are no image appears on the... monitor. • Reset the monitor to 0. • Check the Audio Input setting. Some menus aren't • Adjust the ViewMode or the input source. selectable in the cable connector could cause ...
..., ensure the mini stereo jack is connected. • Make sure the volume is properly and securely connected. The OSD Menu does not appear on the monitor, and that there is connected, but no obstructions near or on the screen/the OSD controls are no image appears on the... monitor. • Reset the monitor to 0. • Check the Audio Input setting. Some menus aren't • Adjust the ViewMode or the input source. selectable in the cable connector could cause ...

User Guide
Page 40
... screen or case. then wipe the screen. Some chemical cleaners have been reported to damage the screen and/or case of the monitor. • ViewSonic® will not be liable for damage resulting from the power outlet. • Never spray or pour any ammonia or alcohol-based..., soft, lint-free cloth; Cleaning the Screen • Wipe the screen with care, as a darker-colored monitor, if scuffed, may show marks more clearly than a lighter-colored monitor. Disclaimer • ViewSonic® does not recommend the use of non-ammonia, non- This removes dust and other particles. • ...
... screen or case. then wipe the screen. Some chemical cleaners have been reported to damage the screen and/or case of the monitor. • ViewSonic® will not be liable for damage resulting from the power outlet. • Never spray or pour any ammonia or alcohol-based..., soft, lint-free cloth; Cleaning the Screen • Wipe the screen with care, as a darker-colored monitor, if scuffed, may show marks more clearly than a lighter-colored monitor. Disclaimer • ViewSonic® does not recommend the use of non-ammonia, non- This removes dust and other particles. • ...
vTouch Software User Guide
Page 2
Contents Introduction 3 What is vTouch Support 3 Monitor Support...3 Initial Setup 4 Where to get vTouch Support 4 Installing vTouch on Big Sur 5 For Intel Systems...5 For Silicon (M1 chip) Systems 6 Installing UPDD in Big Sur 7 Intel systems...7 Silicon systems...7 Connection Methods 8 Using the Applications 9 UPDD Commander 9 Setup Touch Behaviors for All Applications 9 Adjusting the Settings 11 UPDD Console...13 Console...13 Reset Settings...15 Using the UPDD Application 16 Appendix 18 Troubleshooting...18 2
Contents Introduction 3 What is vTouch Support 3 Monitor Support...3 Initial Setup 4 Where to get vTouch Support 4 Installing vTouch on Big Sur 5 For Intel Systems...5 For Silicon (M1 chip) Systems 6 Installing UPDD in Big Sur 7 Intel systems...7 Silicon systems...7 Connection Methods 8 Using the Applications 9 UPDD Commander 9 Setup Touch Behaviors for All Applications 9 Adjusting the Settings 11 UPDD Console...13 Console...13 Reset Settings...15 Using the UPDD Application 16 Appendix 18 Troubleshooting...18 2


