Q91b User Guide, English
Page 2
Contents TCO Information i Compliance Information 1 Important Safety Instructions 2 Declaration of RoHS Compliance 3 Copyright Information 4 Product Registration 4 Before you operate the monitor Features ...5 Checking the contents of the package 5 Installation instructions 6 Power ...6 Making connections 7 Adjusting the viewing angle 8 Operating instructions General ...How to adjust a setting 11 Plug and play 14 Other Information Specifications 15 Troubleshooting 16 Customer Support 17 Cleaning the LCD Display 18 Limited Warranty 19 Mexico Limited Warranty 21 Optiquest Q91b
Contents TCO Information i Compliance Information 1 Important Safety Instructions 2 Declaration of RoHS Compliance 3 Copyright Information 4 Product Registration 4 Before you operate the monitor Features ...5 Checking the contents of the package 5 Installation instructions 6 Power ...6 Making connections 7 Adjusting the viewing angle 8 Operating instructions General ...How to adjust a setting 11 Plug and play 14 Other Information Specifications 15 Troubleshooting 16 Customer Support 17 Cleaning the LCD Display 18 Limited Warranty 19 Mexico Limited Warranty 21 Optiquest Q91b
Q91b User Guide, English
Page 8
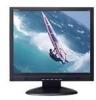
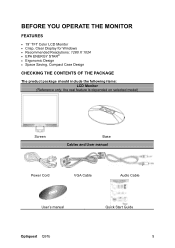
BEFORE YOU OPERATE THE MONITOR FEATURES • 19" TFT Color LCD Monitor • Crisp, Clear Display for Windows • Recommended Resolutions: 1280 X 1024 • EPA ENERGY STAR® • Ergonomic Design • Space Saving, Compact Case Design CHECKING THE CONTENTS OF THE PACKAGE The product package should include the following items: LCD Monitor (Reference only, the real feature is depended on selected model) Screen Base Cables and User manual Power Cord VGA Cable Audio Cable User's manual Optiquest Q91b Quick Start Guide 5
BEFORE YOU OPERATE THE MONITOR FEATURES • 19" TFT Color LCD Monitor • Crisp, Clear Display for Windows • Recommended Resolutions: 1280 X 1024 • EPA ENERGY STAR® • Ergonomic Design • Space Saving, Compact Case Design CHECKING THE CONTENTS OF THE PACKAGE The product package should include the following items: LCD Monitor (Reference only, the real feature is depended on selected model) Screen Base Cables and User manual Power Cord VGA Cable Audio Cable User's manual Optiquest Q91b Quick Start Guide 5
Q91b User Guide, English
Page 9
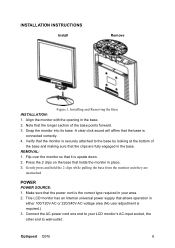
...-input socket, the other end to wall-outlet . Snap the monitor into its base. Flip over the monitor so that it is required.) 3. This LCD monitor has an Internal universal power supply that the monitor is connected correctly. 4. INSTALLATION INSTRUCTIONS Install Remove Figure.1. Verify that allows ...upside down. 2. POWER POWER SOURCE: 1. Gently press and hold the 2 clips while pulling the base from the monitor unit they are fully engaged in place. 3. Optiquest Q91b 6 Press the 2 clips on the base that the longer section of the base and making sure that the power...
...-input socket, the other end to wall-outlet . Snap the monitor into its base. Flip over the monitor so that it is required.) 3. This LCD monitor has an Internal universal power supply that the monitor is connected correctly. 4. INSTALLATION INSTRUCTIONS Install Remove Figure.1. Verify that allows ...upside down. 2. POWER POWER SOURCE: 1. Gently press and hold the 2 clips while pulling the base from the monitor unit they are fully engaged in place. 3. Optiquest Q91b 6 Press the 2 clips on the base that the longer section of the base and making sure that the power...
Q91b User Guide, English
Page 10
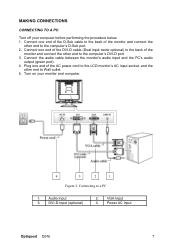
Plug one end of the AC power cord to the LCD monitor's AC input socket, and the other end to the computer's D-Sub port. 2. Power AC Input Optiquest Q91b 7 Connect the audio cable between the monitor's audio input and the PC's audio output (green port). 4. Connect one end of the DVI-D... cable (Dual input mode optional) to the back of the monitor and connect the other end to a PC 1....
Plug one end of the AC power cord to the LCD monitor's AC input socket, and the other end to the computer's D-Sub port. 2. Power AC Input Optiquest Q91b 7 Connect the audio cable between the monitor's audio input and the PC's audio output (green port). 4. Connect one end of the DVI-D... cable (Dual input mode optional) to the back of the monitor and connect the other end to a PC 1....
Q91b User Guide, English
Page 11
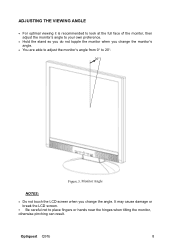
...° Figure.3. Monitor Angle NOTES: • Do not touch the LCD screen when you change the angle. ADJUSTING THE VIEWING ANGLE • For optimal viewing it is recommended to look at the full face of the monitor, then adjust the monitor's angle to your... own preference. • Hold the stand so you do not topple the monitor when you change the monitor's angle. • You are able to adjust the monitor's angle from 0° to place fingers or hands near the hinges when tilting the monitor, otherwise pinching can result. Optiquest Q91b...
...° Figure.3. Monitor Angle NOTES: • Do not touch the LCD screen when you change the angle. ADJUSTING THE VIEWING ANGLE • For optimal viewing it is recommended to look at the full face of the monitor, then adjust the monitor's angle to your... own preference. • Hold the stand so you do not topple the monitor when you change the monitor's angle. • You are able to adjust the monitor's angle from 0° to place fingers or hands near the hinges when tilting the monitor, otherwise pinching can result. Optiquest Q91b...
Q91b User Guide, English
Page 12
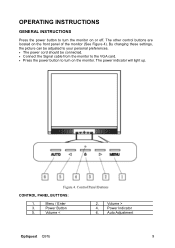
... VGA card. • Press the power button to turn on the front panel of the monitor (See Figure 4). Control Panel Buttons CONTROL PANEL BUTTONS: 1. Menu / Enter 3. Auto Adjustment Optiquest Q91b 9 The other control buttons are located on the monitor. Volume > 4. Figure.4. Power Button 5. Volume < 2. OPERATING INSTRUCTIONS GENERAL INSTRUCTIONS Press the power button to turn...
... VGA card. • Press the power button to turn on the front panel of the monitor (See Figure 4). Control Panel Buttons CONTROL PANEL BUTTONS: 1. Menu / Enter 3. Auto Adjustment Optiquest Q91b 9 The other control buttons are located on the monitor. Volume > 4. Figure.4. Power Button 5. Volume < 2. OPERATING INSTRUCTIONS GENERAL INSTRUCTIONS Press the power button to turn...

Q91b User Guide, English
Page 13
As a safety precaution, always unplug the monitor before cleaning it with a mild detergent solution. Optiquest Q91b 10 Power On mode. Power Saving mode. • MENU / ENTER: 1. Navigate through adjustment icons when OSD is ON or adjust a function when function is activated.... • Auto Adjust button: (for D-sub only) When OSD menu is in off status, press and hold this button to switch ON/OFF of monitor's...
As a safety precaution, always unplug the monitor before cleaning it with a mild detergent solution. Optiquest Q91b 10 Power On mode. Power Saving mode. • MENU / ENTER: 1. Navigate through adjustment icons when OSD is ON or adjust a function when function is activated.... • Auto Adjust button: (for D-sub only) When OSD menu is in off status, press and hold this button to switch ON/OFF of monitor's...
Q91b User Guide, English
Page 16
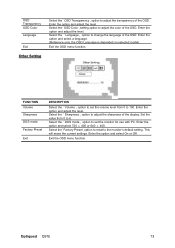
... level from 0 to 6. Enter the option and select 720 × 400 or 640 × 400. This will erase the current settings. Optiquest Q91b 13 OSD Transparency OSD Color Language Exit Other Setting Select the「OSD Transparency」option to adjust the transparency of the OSD. Select the... 「Language」 option to the monitor's default setting. Enter the option and adjust the level. Select the「Factory Preset」option to reset to change the language of...
... level from 0 to 6. Enter the option and select 720 × 400 or 640 × 400. This will erase the current settings. Optiquest Q91b 13 OSD Transparency OSD Color Language Exit Other Setting Select the「OSD Transparency」option to adjust the transparency of the OSD. Select the... 「Language」 option to the monitor's default setting. Enter the option and adjust the level. Select the「Factory Preset」option to reset to change the language of...

Q91b User Guide, English
Page 17
... EDID information over the DDC2B channel. When there is no video-input signal present. Optiquest Q91b 14 This feature is designed to conserve electrical energy by reducing power consumption when there is no video input signal this monitor, following a time-out period, will automatically switch to inform the host system of ... (NUTEK). After the video input signal is restored, full power is restored and the display is similar to the VESA DDC STANDARD. THIS MONITOR WILL APPEAR TO BE NON-FUNCTIONAL IF THERE IS NO VIDEO INPUT SIGNAL. PLUG AND PLAY Plug & Play DDC2B Feature This...
... EDID information over the DDC2B channel. When there is no video-input signal present. Optiquest Q91b 14 This feature is designed to conserve electrical energy by reducing power consumption when there is no video input signal this monitor, following a time-out period, will automatically switch to inform the host system of ... (NUTEK). After the video input signal is restored, full power is restored and the display is similar to the VESA DDC STANDARD. THIS MONITOR WILL APPEAR TO BE NON-FUNCTIONAL IF THERE IS NO VIDEO INPUT SIGNAL. PLUG AND PLAY Plug & Play DDC2B Feature This...


