
PJD5352 Datasheet
Page 1
...; TECHNOLOGY Small projector. ViewSonic's powerful PJD5352 sets the stage for a new generation of location. Multiple preset presentation modes, an increased 40 degree digital vertical keystone correction and optical zoom ensure the best possible image regardless of versatile projectors equipped with short throw distances. With its short throw lens, the PJD5352 saves space by allowing...
...; TECHNOLOGY Small projector. ViewSonic's powerful PJD5352 sets the stage for a new generation of location. Multiple preset presentation modes, an increased 40 degree digital vertical keystone correction and optical zoom ensure the best possible image regardless of versatile projectors equipped with short throw distances. With its short throw lens, the PJD5352 saves space by allowing...

PJD5352 Datasheet
Page 2
PJD5352 PORTABLE SHORT THROW PROJECTOR WITH BRILLIANTCOLOR™ TECHNOLOGY Optional Accessories > Replacement Lamp RLC-055 > Universal Ceiling Mount Kit WMK-005 > Wireless G Presentation Gateway ...1.8 72 2.0 80 2.4 96 2.5 100 3.0 120 3.8 150 4.6 180 4.6 180 5.5 216 DISPLAY Type 0.55" Digital Micromirror Device (DLP™) Resolution XGA 1024x768 (native) / SXGA 1280x1024 (compressed) Lens 1.2× optical zoom / Manual optical focus Keystone Vertical digital keystone correction: +/- 40 degrees Size 32"-195" / 0.8m-5m Throw Distance 0.5m-3.5m / 1.8ft-11.5ft...
PJD5352 PORTABLE SHORT THROW PROJECTOR WITH BRILLIANTCOLOR™ TECHNOLOGY Optional Accessories > Replacement Lamp RLC-055 > Universal Ceiling Mount Kit WMK-005 > Wireless G Presentation Gateway ...1.8 72 2.0 80 2.4 96 2.5 100 3.0 120 3.8 150 4.6 180 4.6 180 5.5 216 DISPLAY Type 0.55" Digital Micromirror Device (DLP™) Resolution XGA 1024x768 (native) / SXGA 1280x1024 (compressed) Lens 1.2× optical zoom / Manual optical focus Keystone Vertical digital keystone correction: +/- 40 degrees Size 32"-195" / 0.8m-5m Throw Distance 0.5m-3.5m / 1.8ft-11.5ft...
PJD5152, PJD5352 User Guide (English)
Page 6
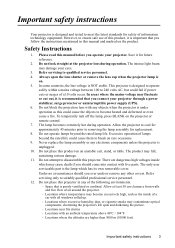
...picture. - Do not attempt to disassemble this product, it is important that is poorly ventilated or confined. Allow at the projector lens during operation. Locations with all windows rolled up. - Please read this product on rare occasions. 9. Do not block the projection... place this manual before you connect your projector through a power stabilizer, surge protector or uninterruptible power supply (UPS). 6. Always open the lens shutter or remove the lens cap when the projector lamp is on the product. In areas where the mains voltage may cause death if you ever undo or...
...picture. - Do not attempt to disassemble this product, it is important that is poorly ventilated or confined. Allow at the projector lens during operation. Locations with all windows rolled up. - Please read this product on rare occasions. 9. Do not block the projection... place this manual before you connect your projector through a power stabilizer, surge protector or uninterruptible power supply (UPS). 6. Always open the lens shutter or remove the lens cap when the projector lamp is on the product. In areas where the mains voltage may cause death if you ever undo or...

PJD5152, PJD5352 User Guide (English)
Page 8
..., and is normal and expected behavior. This is directly proportional to reduce the power consumption • Component HDTV compatibility (YPbPr) • High quality manual zoom lens • The apparent brightness of use. Introduction Projector features The projector integrates high-performance optical engine projection and a user-friendly design to deliver high reliability...
..., and is normal and expected behavior. This is directly proportional to reduce the power consumption • Component HDTV compatibility (YPbPr) • High quality manual zoom lens • The apparent brightness of use. Introduction Projector features The projector integrates high-performance optical engine projection and a user-friendly design to deliver high reliability...
PJD5152, PJD5352 User Guide (English)
Page 10
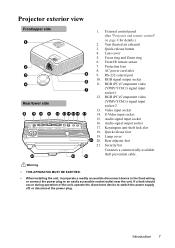
... or disconnect the power plug. RGB (PC)/Component video (YPbPr/YCbCr) signal input socket-2 12 13 14 15 16 17 13. Projection lens 8. Audio signal input socket 16. Quick-release foot 19. RGB (PC)/Component video 7 (YPbPr/YCbCr) signal input socket-1 12. Vent... (heated air exhaust) 3. Quick-release button 4. Lens cover 5. S-Video input socket 15. External control panel (See "Projector and remote control" on page 8 for details.) 2. RGB signal output socket ...
... or disconnect the power plug. RGB (PC)/Component video (YPbPr/YCbCr) signal input socket-2 12 13 14 15 16 17 13. Projection lens 8. Audio signal input socket 16. Quick-release foot 19. RGB (PC)/Component video 7 (YPbPr/YCbCr) signal input socket-1 12. Vent... (heated air exhaust) 3. Quick-release button 4. Lens cover 5. S-Video input socket 15. External control panel (See "Projector and remote control" on page 8 for details.) 2. RGB signal output socket ...
PJD5152, PJD5352 User Guide (English)
Page 15
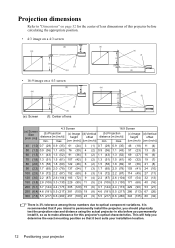
... the actual projector in situ before calculating the appropriate position. • 4:3 image on a 4:3 screen (b) (a) (d) (c) (f) (e) (a) (c) (d) (e) (f) (b) • 16:9 image on page 52 for the center of lens dimensions of lens (a) (e) (f) (c) (d) (b) (a) Screen Size [inch (m)] 4:3 Screen (b) Projection (c) Image (d) Vertical distance [m (inch)] height offset min. Projection dimensions Refer to "Dimensions" on a 4:3 screen (b) (a) (d) (e): Screen (c) (f) (e) (f): Center of this projector...
... the actual projector in situ before calculating the appropriate position. • 4:3 image on a 4:3 screen (b) (a) (d) (c) (f) (e) (a) (c) (d) (e) (f) (b) • 16:9 image on page 52 for the center of lens dimensions of lens (a) (e) (f) (c) (d) (b) (a) Screen Size [inch (m)] 4:3 Screen (b) Projection (c) Image (d) Vertical distance [m (inch)] height offset min. Projection dimensions Refer to "Dimensions" on a 4:3 screen (b) (a) (d) (e): Screen (c) (f) (e) (f): Center of this projector...
PJD5152, PJD5352 User Guide (English)
Page 22
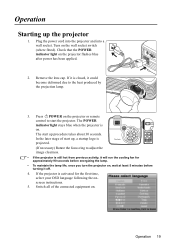
... due to start up the projector 1. Operation 19 Turn on the projector or remote control to the heat produced by the projection lamp. 3. Remove the lens cap. Press II POWER on the wall socket switch (where fitted). If the projector is on , wait at least 5 minutes before energizing the lamp. •...
... due to start up the projector 1. Operation 19 Turn on the projector or remote control to the heat produced by the projection lamp. 3. Remove the lens cap. Press II POWER on the wall socket switch (where fitted). If the projector is on , wait at least 5 minutes before energizing the lamp. •...

PJD5152, PJD5352 User Guide (English)
Page 28
... built-in Intelligent Auto Adjustment function will be displayed in the upper left corner of the screen for details. • Do not look into the lens while the lamp is on page 26 for 3 seconds. • The screen will re-adjust the values of the projector. Screw the rear adjuster foot...
... built-in Intelligent Auto Adjustment function will be displayed in the upper left corner of the screen for details. • Do not look into the lens while the lamp is on page 26 for 3 seconds. • The screen will re-adjust the values of the projector. Screw the rear adjuster foot...

PJD5152, PJD5352 User Guide (English)
Page 36
... menu to let the projector return the image automatically after a period of the screen while the image is hidden. CAUTION Do not block the projection lens from being changed accidentally (by pressing / on the blank screen. Locking control keys With the control keys on the projector locked, you press II POWER...
... menu to let the projector return the image automatically after a period of the screen while the image is hidden. CAUTION Do not block the projection lens from being changed accidentally (by pressing / on the blank screen. Locking control keys With the control keys on the projector locked, you press II POWER...
PJD5152, PJD5352 User Guide (English)
Page 46
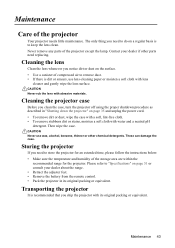
...an extended time, please follow the instructions below: • Make sure the temperature and humidity of compressed air to keep the lens clean. Please refer to store the projector for the projector. Never remove any parts of the projector Your projector needs little maintenance.... Maintenance 43 Then wipe the case. CAUTION Never use lens-cleaning paper or moisten a soft cloth with its original packing or equivalent. Contact your dealer about the range. • Retract the ...
...an extended time, please follow the instructions below: • Make sure the temperature and humidity of compressed air to keep the lens clean. Please refer to store the projector for the projector. Never remove any parts of the projector Your projector needs little maintenance.... Maintenance 43 Then wipe the case. CAUTION Never use lens-cleaning paper or moisten a soft cloth with its original packing or equivalent. Contact your dealer about the range. • Retract the ...
PJD5152, PJD5352 User Guide (English)
Page 53
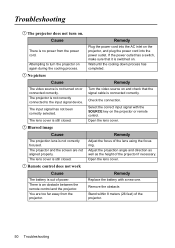
... to the input signal device. No picture Cause The video source is not turned on again during the cooling process. The lens cover is still closed . The lens cover is still closed . Remote control does not work Cause The battery is an obstacle between the remote control and the ...remote control. Wait until the cooling down process has completed. The projector and the screen are too far away from the power cord. Open the lens cover. Remedy Replace the battery with the SOURCE key on . Remedy Turn the video source on . Select the correct input signal with a new...
... to the input signal device. No picture Cause The video source is not turned on again during the cooling process. The lens cover is still closed . The lens cover is still closed . Remote control does not work Cause The battery is an obstacle between the remote control and the ...remote control. Wait until the cooling down process has completed. The projector and the screen are too far away from the power cord. Open the lens cover. Remedy Replace the battery with the SOURCE key on . Remedy Turn the video source on . Select the correct input signal with a new...
PJD5152, PJD5352 User Guide (English)
Page 54
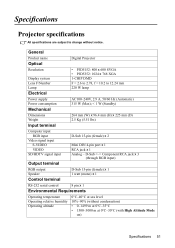
... input D-Sub 15-pin (female) x 2 Mini DIN 4-pin port x 1 RCA jack x 1 Analog - General Product name Digital Projector Optical Resolution Display system Lens F/Number Lamp • PJD5152: 800 x 600 SVGA • PJD5352: 1024 x 768 XGA 1-CHIP DMD F = 2.6 to 2.78, f = 10.2 to change without condensation) • 0-1499 m at 0°C-35°C • 1500-3000...
... input D-Sub 15-pin (female) x 2 Mini DIN 4-pin port x 1 RCA jack x 1 Analog - General Product name Digital Projector Optical Resolution Display system Lens F/Number Lamp • PJD5152: 800 x 600 SVGA • PJD5352: 1024 x 768 XGA 1-CHIP DMD F = 2.6 to 2.78, f = 10.2 to change without condensation) • 0-1499 m at 0°C-35°C • 1500-3000...

