

vController User Guide English
Page 3
Hardware settings 1 1.1 RS232C connections 1 1.2 Software installation 1 2. Command Mode 26 4. About 28 6. Contents 1. Other Information 29 Customer Support 29 i Setting / Getting buttons 8 2.2.2 Monitor Setting 9 2.2.3 Projector Setting 17 2.3 Schedule 25 3. User interface 2 2.1 Start Up...2 2.1.1 Select Device 2 2.1.2 RS232 settings 3 2.1.3 Network settings 4 2.1.4 Start 5 2.2. Language 27 5. Setting...8 2.2.1.
Hardware settings 1 1.1 RS232C connections 1 1.2 Software installation 1 2. Command Mode 26 4. About 28 6. Contents 1. Other Information 29 Customer Support 29 i Setting / Getting buttons 8 2.2.2 Monitor Setting 9 2.2.3 Projector Setting 17 2.3 Schedule 25 3. User interface 2 2.1 Start Up...2 2.1.1 Select Device 2 2.1.2 RS232 settings 3 2.1.3 Network settings 4 2.1.4 Start 5 2.2. Language 27 5. Setting...8 2.2.1.

vController User Guide English
Page 5
There are to be switched on the top of monitor/projector commands. or 2 Schedule: Used to control projector. Setting: Allows the setting or getting of UI: Start Up: monitor or projector selection provides RS232 or LAN communication connection, monitor identity code, switching the machine on and off . 2.1 Start Up 2.1.1 Select Device Press to control the monitor or to determine when the monitors or projector are three main pages on /off , and the input signal settings. 2. User interface vController 2.0 integrated RS232 and LAN command for monitor and projector.
There are to be switched on the top of monitor/projector commands. or 2 Schedule: Used to control projector. Setting: Allows the setting or getting of UI: Start Up: monitor or projector selection provides RS232 or LAN communication connection, monitor identity code, switching the machine on and off . 2.1 Start Up 2.1.1 Select Device Press to control the monitor or to determine when the monitors or projector are three main pages on /off , and the input signal settings. 2. User interface vController 2.0 integrated RS232 and LAN command for monitor and projector.

vController User Guide English
Page 10
Enter the IP address of the monitor or projector in the IP address field. • Press button to add IP address into group. • Press button to remove IP address from group. • Press button to move up the focus IP address. • Press button to move down the focus IP address. • Press button to enable all IP address. • Press button to disable all IP address. • Press button to set the IP group. IP Group Press button to close IP group windows. 7
Enter the IP address of the monitor or projector in the IP address field. • Press button to add IP address into group. • Press button to remove IP address from group. • Press button to move up the focus IP address. • Press button to move down the focus IP address. • Press button to enable all IP address. • Press button to disable all IP address. • Press button to set the IP group. IP Group Press button to close IP group windows. 7

vController User Guide English
Page 20
2.2.3 Projector Setting • Setup Pro 9 Series no selected Item OSD Language Reset all settings to the default factory settings Commands supported Write Devices supported Supported NonPro 9 Series model Write All devices Write Supported NonPro 9 Series model 17 Return all Reset color Pro 9 Series selected Functional descriptions Select the language for the OSD interface.
2.2.3 Projector Setting • Setup Pro 9 Series no selected Item OSD Language Reset all settings to the default factory settings Commands supported Write Devices supported Supported NonPro 9 Series model Write All devices Write Supported NonPro 9 Series model 17 Return all Reset color Pro 9 Series selected Functional descriptions Select the language for the OSD interface.

vController User Guide English
Page 28
2.3 Schedule Pre-set schedules can select Group A to H or No group. • Name: Type a schedule name. • Protocol: Press for RS232 or for LAN. • Device: Press for ... vController software must be switched on /off. Be reminded that in order for Projector. • COM: Set the RS232 COM port. • ID: Select display ID. • On: Set the time to switch on the monitor (hours , minutes) • Off: Set the time to switch off the monitor (hours , minutes) • A week: Press to...
2.3 Schedule Pre-set schedules can select Group A to H or No group. • Name: Type a schedule name. • Protocol: Press for RS232 or for LAN. • Device: Press for ... vController software must be switched on /off. Be reminded that in order for Projector. • COM: Set the RS232 COM port. • ID: Select display ID. • On: Set the time to switch on the monitor (hours , minutes) • Off: Set the time to switch off the monitor (hours , minutes) • A week: Press to...
User Guide English
Page 6
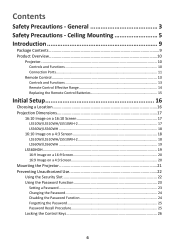
......18 16:10 Image on a 4:3 Screen 18 LS510W/LS510WH/LS510WH-2 18 LS560W/LS560WH...19 LS560HDH...19 16:9 Image on a 16:9 Screen 20 16:9 Image on a 4:3 Screen 20 Mounting the Projector 21 Preventing Unauthorized Use 22 Using the Security Slot 22 Using the Password Function 23 Setting a Password...23 Changing the Password 24 Disabling the...
......18 16:10 Image on a 4:3 Screen 18 LS510W/LS510WH/LS510WH-2 18 LS560W/LS560WH...19 LS560HDH...19 16:9 Image on a 16:9 Screen 20 16:9 Image on a 4:3 Screen 20 Mounting the Projector 21 Preventing Unauthorized Use 22 Using the Security Slot 22 Using the Password Function 23 Setting a Password...23 Changing the Password 24 Disabling the...

User Guide English
Page 7
...28 Connecting to Audio 28 Operation 30 Turning the Projector On/Off 30 Starting Up the Projector 30 First Time Activation...30 Shutting Down the Projector 31 Selecting an Input Source 32 Adjusting the Projected Image 33 Adjusting the Projector's Height and Projection Angle 33 Auto-Adjusting the... the Image Size and Clarity 33 Correcting Keystone 34 Adjusting 4 corners 35 Hiding the Image 35 Controlling the Projector through a LAN Environment 36 Configuring the LAN Control Settings 36 Menu Functions 38 General On-Screen Display (OSD) Menu Operation 38 On-Screen Display (OSD) Menu ...
...28 Connecting to Audio 28 Operation 30 Turning the Projector On/Off 30 Starting Up the Projector 30 First Time Activation...30 Shutting Down the Projector 31 Selecting an Input Source 32 Adjusting the Projected Image 33 Adjusting the Projector's Height and Projection Angle 33 Auto-Adjusting the... the Image Size and Clarity 33 Correcting Keystone 34 Adjusting 4 corners 35 Hiding the Image 35 Controlling the Projector through a LAN Environment 36 Configuring the LAN Control Settings 36 Menu Functions 38 General On-Screen Display (OSD) Menu Operation 38 On-Screen Display (OSD) Menu ...
User Guide English
Page 10
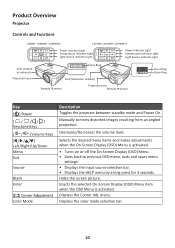
... menu, exits and saves menu settings. • Displays the input source selection bar. • Displays the HELP menu by a long press for 3 seconds. menu. Product Overview Projector Controls and Functions LS560W / LS560WH / LS560HDH LS510W / LS510WH / LS510WH-2 Power Indicator Light ENTER Temperature ... / ] Volume Keys [/ / /] Left/Right/Up/Down Menu Exit Source Blank Enter [ ] Corner Adjustment Color Mode Description Toggles the projector between standby mode and Power On. Decreases/Decreases the volume level. Displays the Corner Adj. Displays the color mode selection bar. 10 Selects ...
... menu, exits and saves menu settings. • Displays the input source selection bar. • Displays the HELP menu by a long press for 3 seconds. menu. Product Overview Projector Controls and Functions LS560W / LS560WH / LS560HDH LS510W / LS510WH / LS510WH-2 Power Indicator Light ENTER Temperature ... / ] Volume Keys [/ / /] Left/Right/Up/Down Menu Exit Source Blank Enter [ ] Corner Adjustment Color Mode Description Toggles the projector between standby mode and Power On. Decreases/Decreases the volume level. Displays the Corner Adj. Displays the color mode selection bar. 10 Selects ...
User Guide English
Page 16
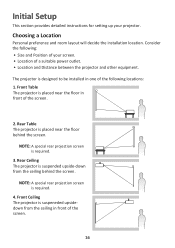
... other equipment. NOTE: A special rear projection screen is required. 4. Rear Ceiling The projector is designed to be installed in front of the following : • Size and Position of your projector. Initial Setup This section provides detailed instructions for setting up your screen. • Location of the screen. 2. Choosing a Location Personal preference and room...
... other equipment. NOTE: A special rear projection screen is required. 4. Rear Ceiling The projector is designed to be installed in front of the following : • Size and Position of your projector. Initial Setup This section provides detailed instructions for setting up your screen. • Location of the screen. 2. Choosing a Location Personal preference and room...

User Guide English
Page 22
Below is an example of setting up a security slot locking device: NOTE: The security slot can also be used as a safety anchor if the projector is mounted to prevent theft, access, or accidental setting changes. Preventing Unauthorized Use The projector has several built-in security features to the ceiling. 22 Using the Security Slot To help prevent the projector from being stolen, use a security slot locking device to secure the projector to a fixed object.
Below is an example of setting up a security slot locking device: NOTE: The security slot can also be used as a safety anchor if the projector is mounted to prevent theft, access, or accidental setting changes. Preventing Unauthorized Use The projector has several built-in security features to the ceiling. 22 Using the Security Slot To help prevent the projector from being stolen, use a security slot locking device to secure the projector to a fixed object.

User Guide English
Page 23
... On by re-entering the new password. Once the password is started. 23 The password can be entered every time the projector is set through the On-Screen Display (OSD) Menu. Setting a Password 1. As pictured to enter a six digit password. 4. Press the arrow keys to the right, the four arrow keys... Using the Password Function To help prevent unauthorized access or use, the projector offers a password security option. NOTE: Make note of your password, and keep it in a safe place. Press Exit to : SYSTEM > Security Settings and press Enter. 2. Press Menu to open the OSD Menu and ...
... On by re-entering the new password. Once the password is started. 23 The password can be entered every time the projector is set through the On-Screen Display (OSD) Menu. Setting a Password 1. As pictured to enter a six digit password. 4. Press the arrow keys to the right, the four arrow keys... Using the Password Function To help prevent unauthorized access or use, the projector offers a password security option. NOTE: Make note of your password, and keep it in a safe place. Press Exit to : SYSTEM > Security Settings and press Enter. 2. Press Menu to open the OSD Menu and ...

User Guide English
Page 26
Locking the Control Keys With the control keys on the projector for example). Press Menu to open the OSD Menu and go to confirm. 4. NOTE: You can prevent your settings from being changed accidentally (by children, for 3 seconds. Select Yes and press Enter to : SYSTEM > Panel Key Lock. 2. To release panel key lock, press and hold on the projector locked, you can also use the remote control to select On. 3. NOTE: When the Panel Key Lock is On, no control keys on the projector will operate except Power. 1. Press / to enter the SYSTEM > Panel Key Lock menu and select Off. 26
Locking the Control Keys With the control keys on the projector for example). Press Menu to open the OSD Menu and go to confirm. 4. NOTE: You can prevent your settings from being changed accidentally (by children, for 3 seconds. Select Yes and press Enter to : SYSTEM > Panel Key Lock. 2. To release panel key lock, press and hold on the projector locked, you can also use the remote control to select On. 3. NOTE: When the Panel Key Lock is On, no control keys on the projector will operate except Power. 1. Press / to enter the SYSTEM > Panel Key Lock menu and select Off. 26
User Guide English
Page 28
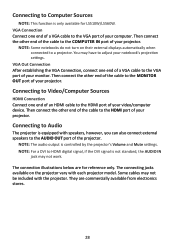
... only. Then connect the other end of the cable to the COMPUTER IN port of your notebook's projection settings. Then connect the other end of the cable to the HDMI port of your projector. They are for LS510W/LS560W. The connection illustrations below are commercially available from electronics stores. 28 Then connect...
... only. Then connect the other end of the cable to the COMPUTER IN port of your notebook's projection settings. Then connect the other end of the cable to the HDMI port of your projector. They are for LS510W/LS560W. The connection illustrations below are commercially available from electronics stores. 28 Then connect...

User Guide English
Page 35
...Menu or Exit to go to hide the screen image. The Corner Adj. NOTE: • Adjusting keystone will reset the settings on the corner that happens, reset the settings on the projector or remote control to a previous step. When that you chose. Press any key on all sides. 1. A long .../ / / to select an adjustment method that is unevenly rectangular on Enter will reset the Corner Adj. As indicated on the projector or remote control to the DISPLAY > Corner Adj. settings. • After the Corner Adj. Use / / / to select the corner you can do one of an image that...
...Menu or Exit to go to hide the screen image. The Corner Adj. NOTE: • Adjusting keystone will reset the settings on the corner that happens, reset the settings on the projector or remote control to a previous step. When that you chose. Press any key on all sides. 1. A long .../ / / to select an adjustment method that is unevenly rectangular on Enter will reset the Corner Adj. As indicated on the projector or remote control to the DISPLAY > Corner Adj. settings. • After the Corner Adj. Use / / / to select the corner you can do one of an image that...
User Guide English
Page 36
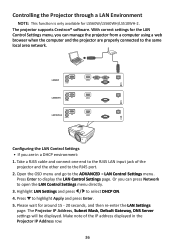
... when the computer and the projector are in the Projector IP Address row. 36 Make note of the projector and the other end to display the LAN Control Settings page. With correct settings for LS560W/LS560WH/LS510WH-2. Open the OSD menu and go to the ADVANCED > LAN Control Settings menu. Controlling the Projector through a LAN Environment NOTE: This...
... when the computer and the projector are in the Projector IP Address row. 36 Make note of the projector and the other end to display the LAN Control Settings page. With correct settings for LS560W/LS560WH/LS510WH-2. Open the OSD menu and go to the ADVANCED > LAN Control Settings menu. Controlling the Projector through a LAN Environment NOTE: This...

User Guide English
Page 37
...above again. • If you wish to connect to the projector in its standby mode, set Standby LAN Control to save the settings, press Enter. Repeat steps 1-2 above again. • If you need to connect to the projector in its standby mode, be sure you do not want ...to modify and press Enter. 5. Highlight LAN Settings and press / to select the item you are not properly connected, the Projector IP Address, Subnet Mask, Default Gateway, DNS Server settings will display 0.0.0.0. To save the settings, press Exit. 7. Contact your network administrator. • If the...
...above again. • If you wish to connect to the projector in its standby mode, set Standby LAN Control to save the settings, press Enter. Repeat steps 1-2 above again. • If you need to connect to the projector in its standby mode, be sure you do not want ...to modify and press Enter. 5. Highlight LAN Settings and press / to select the item you are not properly connected, the Projector IP Address, Subnet Mask, Default Gateway, DNS Server settings will display 0.0.0.0. To save the settings, press Exit. 7. Contact your network administrator. • If the...

User Guide English
Page 38
... menu. Press / to the actual OSD of the following OSD settings may have another sub-menu. Then press Enter or use / to select the menu option. NOTE: Some sub-menu options may not be accessed by pressing Menu on the projector or remote control. 1. To enter the respective sub-menu, press... reference only and may differ from the actual design. Some of your projector. It can be available. Menu Functions This section will introduce the On-Screen Display (OSD) Menu and its sub-menu, or press / to adjust/select the setting. Press / to access the sub-menu list. 2. Use / or / to...
... menu. Press / to the actual OSD of the following OSD settings may have another sub-menu. Then press Enter or use / to select the menu option. NOTE: Some sub-menu options may not be accessed by pressing Menu on the projector or remote control. 1. To enter the respective sub-menu, press... reference only and may differ from the actual design. Some of your projector. It can be available. Menu Functions This section will introduce the On-Screen Display (OSD) Menu and its sub-menu, or press / to adjust/select the setting. Press / to access the sub-menu list. 2. Use / or / to...

User Guide English
Page 43
...-Bottom Side-by-Side 3D Sync Invert Disable/Invert Save 3D Settings Yes/No HDMI Settings HDMI Format Auto/RGB/YUV HDMI Range Auto/Enhanced/ Normal LAN Control Settings LAN Settings DHCP ON/Static IP Projector IP Address Subnet Mask Default Gateway DNS Server Standby LAN Control ...Off/On Apply Light Source Settings Light Source Mode Normal/Eco/ Dynamic Black 1/ Dynamic Black 2 Reset ...
...-Bottom Side-by-Side 3D Sync Invert Disable/Invert Save 3D Settings Yes/No HDMI Settings HDMI Format Auto/RGB/YUV HDMI Range Auto/Enhanced/ Normal LAN Control Settings LAN Settings DHCP ON/Static IP Projector IP Address Subnet Mask Default Gateway DNS Server Standby LAN Control ...Off/On Apply Light Source Settings Light Source Mode Normal/Eco/ Dynamic Black 1/ Dynamic Black 2 Reset ...

User Guide English
Page 44
Main Menu SYSTEM Sub-menu Language Menu Option Multi-Language OSD Selection Projector Position Front Table Rear Table Rear Ceiling Front Ceiling Menu Settings Menu Display Time 5 sec/10 sec/15 sec/20 sec/25 sec/30 sec Menu Position Center/Top-Left/ Top-Right/ Bottom-Left/ Bottom-Right High Altitude Mode Off On Quick Auto Search Off On Security Settings Change Password Power On Lock Off/On Panel Key Lock Off On Remote Control Code 1/2/3/4/5/6/7/8 Control Method RS-232 USB Baud Rate 2400/4800/9600/14400/19200/ 38400/57600/115200 44
Main Menu SYSTEM Sub-menu Language Menu Option Multi-Language OSD Selection Projector Position Front Table Rear Table Rear Ceiling Front Ceiling Menu Settings Menu Display Time 5 sec/10 sec/15 sec/20 sec/25 sec/30 sec Menu Position Center/Top-Left/ Top-Right/ Bottom-Left/ Bottom-Right High Altitude Mode Off On Quick Auto Search Off On Security Settings Change Password Power On Lock Off/On Panel Key Lock Off On Remote Control Code 1/2/3/4/5/6/7/8 Control Method RS-232 USB Baud Rate 2400/4800/9600/14400/19200/ 38400/57600/115200 44

User Guide English
Page 50
...Gain/Blue Gain Adjusts the Contrast levels of the image appear just as using the projector in the dark area are several preset color temperature settings (9300K, 7500K, 6500K) available. The available settings may vary according to match PC and notebook coloring. Description Brightest Maximizes the brightness.... After User 1/User 2 is required, such as black and details in well lit rooms. Presentation Designed for photo viewing. To set the peak white level after you can be adjusted, according to your selected input source. Menu Option Color Mode Brightness Contrast Color Temp...
...Gain/Blue Gain Adjusts the Contrast levels of the image appear just as using the projector in the dark area are several preset color temperature settings (9300K, 7500K, 6500K) available. The available settings may vary according to match PC and notebook coloring. Description Brightest Maximizes the brightness.... After User 1/User 2 is required, such as black and details in well lit rooms. Presentation Designed for photo viewing. To set the peak white level after you can be adjusted, according to your selected input source. Menu Option Color Mode Brightness Contrast Color Temp...


