
Flyer
Page 1
... Plug And Play - Specifiactions: Model: Internal Interface: External Interface: Dimension: Material: Memory Cards Supported: UGT-CR905 9-Pin USB Header Multi-Memory Card Reader USB 2.0 Port 102 x 97 x 26 mm Plastic & Steel Compact Flash Type I/II, Micro SD, SD, SDHC, SDXC, MMC, Microdrive, Memory Stick, Memory Stick PRO, Memory Stick Duo, Memory Stick PRO Duo* System Requirement Microsoft Windows XP/Vista/7 (32/64 Bit) Mac OS X 10.4+ Package Contents Vantec Multi-Memory Internal Card, Reader w/USB 2.0, 3.5" To 5.25" Mounting Bracket, Installation Guide, Installation Screws Send us an...
... Plug And Play - Specifiactions: Model: Internal Interface: External Interface: Dimension: Material: Memory Cards Supported: UGT-CR905 9-Pin USB Header Multi-Memory Card Reader USB 2.0 Port 102 x 97 x 26 mm Plastic & Steel Compact Flash Type I/II, Micro SD, SD, SDHC, SDXC, MMC, Microdrive, Memory Stick, Memory Stick PRO, Memory Stick Duo, Memory Stick PRO Duo* System Requirement Microsoft Windows XP/Vista/7 (32/64 Bit) Mac OS X 10.4+ Package Contents Vantec Multi-Memory Internal Card, Reader w/USB 2.0, 3.5" To 5.25" Mounting Bracket, Installation Guide, Installation Screws Send us an...
User Guide
Page 2
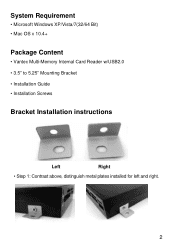
System Requirement • Microsoft Windows XP/Vista/7(32/64 Bit) • Mac OS x 10.4+ Package Content • Vantec Multi-Memory Internal Card Reader w/USB2.0 • 3.5" to 5.25" Mounting Bracket • Installation Guide • Installation Screws Bracket Installation instructions Left Right • Step 1: Contrast above, distinguish metal plates installed for left and right. 2
System Requirement • Microsoft Windows XP/Vista/7(32/64 Bit) • Mac OS x 10.4+ Package Content • Vantec Multi-Memory Internal Card Reader w/USB2.0 • 3.5" to 5.25" Mounting Bracket • Installation Guide • Installation Screws Bracket Installation instructions Left Right • Step 1: Contrast above, distinguish metal plates installed for left and right. 2

User Guide
Page 3
both left and right (refer to card reader; Step 4: Finish Installation of product If in unit as well as your computer and all connected devices. 3 Improper installation damages the plug-in doubt about how to install the device correctly, please contact an EXPERT or a specialist workshop and let them do the installation! •Step 2: Install the screws to above photo) Step 3: Put the card reader inside the bracket, tighten the screws.
both left and right (refer to card reader; Step 4: Finish Installation of product If in unit as well as your computer and all connected devices. 3 Improper installation damages the plug-in doubt about how to install the device correctly, please contact an EXPERT or a specialist workshop and let them do the installation! •Step 2: Install the screws to above photo) Step 3: Put the card reader inside the bracket, tighten the screws.
User Guide
Page 4
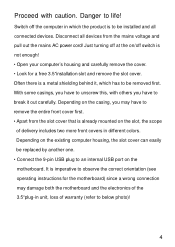
... on the casing, you have to break it , which the product is to be installed and all devices from the slot cover that is a metal shielding behind it out carefully. Just turning ... mains AC power cord! Switch off switch is imperative to observe the correct orientation (see operating instructions for a free 3.5"installation slot and remove the slot cover. Danger to life! It is not enough! • Open... two more front covers in which has to be replaced by another one. • Connect the 9-pin USB plug to an internal USB port on the slot, the scope of warranty (refer to below...
... on the casing, you have to break it , which the product is to be installed and all devices from the slot cover that is a metal shielding behind it out carefully. Just turning ... mains AC power cord! Switch off switch is imperative to observe the correct orientation (see operating instructions for a free 3.5"installation slot and remove the slot cover. Danger to life! It is not enough! • Open... two more front covers in which has to be replaced by another one. • Connect the 9-pin USB plug to an internal USB port on the slot, the scope of warranty (refer to below...
User Guide
Page 5
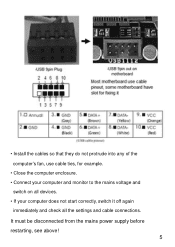
• Install the cables so that they do not protrude into any of the computer's fan, use cable ties, for example. • Close the computer enclosure. • Connect your computer and monitor to the mains voltage and switch on all devices. • If your computer does not start correctly, switch it off again immediately and check all the settings and cable connections. It must be disconnected from the mains power supply before restarting, see above! 5
• Install the cables so that they do not protrude into any of the computer's fan, use cable ties, for example. • Close the computer enclosure. • Connect your computer and monitor to the mains voltage and switch on all devices. • If your computer does not start correctly, switch it off again immediately and check all the settings and cable connections. It must be disconnected from the mains power supply before restarting, see above! 5
User Guide
Page 6
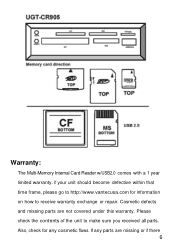
Cosmetic defects and missing parts are missing or if there 6 Please check the contents of the unit to receive warranty exchange or repair. Also, check for information on how to make sure you received all parts. If any cosmetic flaws. If your unit should become defective within that time frame, please go to http://www.vantecusa.com for any parts are not covered under this warranty. Warranty: The Multi-Memory Internal Card Reader w/USB2.0 comes with a 1 year limited warranty.
Cosmetic defects and missing parts are missing or if there 6 Please check the contents of the unit to receive warranty exchange or repair. Also, check for information on how to make sure you received all parts. If any cosmetic flaws. If your unit should become defective within that time frame, please go to http://www.vantecusa.com for any parts are not covered under this warranty. Warranty: The Multi-Memory Internal Card Reader w/USB2.0 comes with a 1 year limited warranty.

User Guide
Page 7
are cosmetic defects, please contact the retailer from which you purchased the unit immediately and ask for a replacement. Contact: Vantec Thermal Technology www.vantecusa.com 7
are cosmetic defects, please contact the retailer from which you purchased the unit immediately and ask for a replacement. Contact: Vantec Thermal Technology www.vantecusa.com 7