
User Guide
Page 8
5.Installation: Dual 3.5" RAID Enclosure w/Fan USB 3.0 & eSATA Interface 5.1.Hardware Installation: Installing the hard drive: (1) Release the four screws then pull out the rear panel and tray of the NexStar MX. ( figure 5.1-A ) (2) Place the first HDD onto the drive caddy then insert the HDD into the SATA connector. ( figure 5.1-B ) ( figure 5.1-A ) (3) Place the second HDD onto the drive caddy then insert the HDD into the SATA connector. ( figure 5.1-C ) ( figure 5.1-B ) ( figure 5.1-C ) Installation 6
5.Installation: Dual 3.5" RAID Enclosure w/Fan USB 3.0 & eSATA Interface 5.1.Hardware Installation: Installing the hard drive: (1) Release the four screws then pull out the rear panel and tray of the NexStar MX. ( figure 5.1-A ) (2) Place the first HDD onto the drive caddy then insert the HDD into the SATA connector. ( figure 5.1-B ) ( figure 5.1-A ) (3) Place the second HDD onto the drive caddy then insert the HDD into the SATA connector. ( figure 5.1-C ) ( figure 5.1-B ) ( figure 5.1-C ) Installation 6
User Guide
Page 16
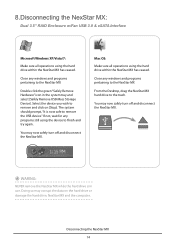
... windows and programs pertaining to the NexStar MX Double click the green "Safely Remove Hardware" icon in use. You may now safely turn off and disconnect the NexStar MX. Mac OS: Make sure all operations using the hard drive within the NexStar MX has ceased. The system should prompt... or damage the hard drive, NexStar MX and the computer. WARING: NEVER remove the NexStar MX while the hard drive is now safe to remove the USB device." Disconnecting the NexStar MX 14 You may corrupt the data on [Stop]. 8.Disconnecting the NexStar MX: Dual 3.5" RAID Enclosure w/Fan USB 3.0 & ...
... windows and programs pertaining to the NexStar MX Double click the green "Safely Remove Hardware" icon in use. You may now safely turn off and disconnect the NexStar MX. Mac OS: Make sure all operations using the hard drive within the NexStar MX has ceased. The system should prompt... or damage the hard drive, NexStar MX and the computer. WARING: NEVER remove the NexStar MX while the hard drive is now safe to remove the USB device." Disconnecting the NexStar MX 14 You may corrupt the data on [Stop]. 8.Disconnecting the NexStar MX: Dual 3.5" RAID Enclosure w/Fan USB 3.0 & ...
Datasheet
Page 2
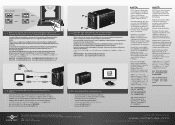
... ROckselztaste bei eingeschaltetem Gerrit 5 -7 Sekunden lang gedrOcIct. Your NexStar MX is powered on. Ihr NexStar MX ist nun einsatzbereit. Mode Configuration: 1 N1 2 1 ON 1 2 'Jr.. INDIVIDUAL ON 1 2 JBOD 'Jr. ON 1 RAID 0 RAID 1 Refer to align and secure with the provided screws. Consulte...housing. Faites attention a l'alignement et vissez le tout avec les vis fournies. OntitheLkaltkilt# go 10. NexStar MX OftflrZ.k5" iErx 9 NexStar MX 3E47, 1cAlfiElElj7 NexStar MX EMTailEfliT. *NOTE: NOTE: New hard drives needs to 7 seconds while the unit is now ready...
... ROckselztaste bei eingeschaltetem Gerrit 5 -7 Sekunden lang gedrOcIct. Your NexStar MX is powered on. Ihr NexStar MX ist nun einsatzbereit. Mode Configuration: 1 N1 2 1 ON 1 2 'Jr.. INDIVIDUAL ON 1 2 JBOD 'Jr. ON 1 RAID 0 RAID 1 Refer to align and secure with the provided screws. Consulte...housing. Faites attention a l'alignement et vissez le tout avec les vis fournies. OntitheLkaltkilt# go 10. NexStar MX OftflrZ.k5" iErx 9 NexStar MX 3E47, 1cAlfiElElj7 NexStar MX EMTailEfliT. *NOTE: NOTE: New hard drives needs to 7 seconds while the unit is now ready...