
User Guide
Page 2
Package Contents: Dual 3.5" RAID Enclosure w/Fan USB 3.0 & eSATA Interface 1 NexStar MX 2 USB 3.0 Cable 1 2 3 eSATA Cable 4 Power Adapter 5 User's Manual 6 Enclosure Stand 7 Installation Screws 3 4 5 6 7 TRADEMARKS MS-DOS, Microsoft, Windows NT/2000/XP/Vista/7 are trademarks of Apple Computer. Apple, Macintosh and Mac are the property of their respective owners. NexStar is a registered trademark of Vantec Thermal Technologies. *All other third-party brands and names are trademarks of Microsoft Corporation.
Package Contents: Dual 3.5" RAID Enclosure w/Fan USB 3.0 & eSATA Interface 1 NexStar MX 2 USB 3.0 Cable 1 2 3 eSATA Cable 4 Power Adapter 5 User's Manual 6 Enclosure Stand 7 Installation Screws 3 4 5 6 7 TRADEMARKS MS-DOS, Microsoft, Windows NT/2000/XP/Vista/7 are trademarks of Apple Computer. Apple, Macintosh and Mac are the property of their respective owners. NexStar is a registered trademark of Vantec Thermal Technologies. *All other third-party brands and names are trademarks of Microsoft Corporation.
User Guide
Page 3
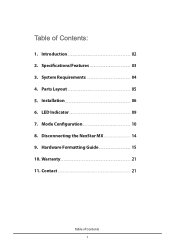
System Requirements 04 4. Disconnecting the NexStar MX 14 9. Specifications/Features 03 3. LED Indicator 09 7. Introduction 02 2. Installation 06 6. Mode Configuration 10 8. Hardware Formatting Guide 15 10. Parts Layout 05 5. Contact 21 Table of Contents: 1. Warranty 21 11. Table of Contents 1
System Requirements 04 4. Disconnecting the NexStar MX 14 9. Specifications/Features 03 3. LED Indicator 09 7. Introduction 02 2. Installation 06 6. Mode Configuration 10 8. Hardware Formatting Guide 15 10. Parts Layout 05 5. Contact 21 Table of Contents: 1. Warranty 21 11. Table of Contents 1
User Guide
Page 4
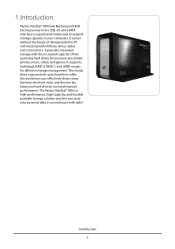
...improve performance. the front vents and the rear fan keep your hard drive while the aluminum case effectively draws away the heat; The Vantec NexStar® MX is a quick and simple way to expand storage capacity to your personal data in an enclosure with all those wires, cables and... inside the PC and messing with style! It comes without the hassle of two spanning hard drives for effective storage management. 1.Introduction: Vantec NexStar® MX Dual Bay External HDD Enclosure now in the USB 3.0 and eSATA interface is a high performance, high capacity, and durable portable storage ...
...improve performance. the front vents and the rear fan keep your hard drive while the aluminum case effectively draws away the heat; The Vantec NexStar® MX is a quick and simple way to expand storage capacity to your personal data in an enclosure with all those wires, cables and... inside the PC and messing with style! It comes without the hassle of two spanning hard drives for effective storage management. 1.Introduction: Vantec NexStar® MX Dual Bay External HDD Enclosure now in the USB 3.0 and eSATA interface is a high performance, high capacity, and durable portable storage ...

User Guide
Page 8
5.Installation: Dual 3.5" RAID Enclosure w/Fan USB 3.0 & eSATA Interface 5.1.Hardware Installation: Installing the hard drive: (1) Release the four screws then pull out the rear panel and tray of the NexStar MX. ( figure 5.1-A ) (2) Place the first HDD onto the drive caddy then insert the HDD into the SATA connector. ( figure 5.1-B ) ( figure 5.1-A ) (3) Place the second HDD onto the drive caddy then insert the HDD into the SATA connector. ( figure 5.1-C ) ( figure 5.1-B ) ( figure 5.1-C ) Installation 6
5.Installation: Dual 3.5" RAID Enclosure w/Fan USB 3.0 & eSATA Interface 5.1.Hardware Installation: Installing the hard drive: (1) Release the four screws then pull out the rear panel and tray of the NexStar MX. ( figure 5.1-A ) (2) Place the first HDD onto the drive caddy then insert the HDD into the SATA connector. ( figure 5.1-B ) ( figure 5.1-A ) (3) Place the second HDD onto the drive caddy then insert the HDD into the SATA connector. ( figure 5.1-C ) ( figure 5.1-B ) ( figure 5.1-C ) Installation 6
User Guide
Page 9
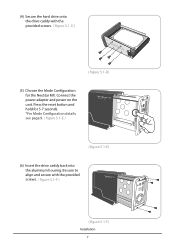
Press the reset button and hold for the NexStar MX. Be sure to align and secure with the provided screws. ( figure 5.1-D ) ( figure 5.1-D) (5) Choose the Mode Configuration for 5-7 seconds. *For Mode Configuration details, see page 9. ( figure 5.1-E ) ( figure 5.1-E) (6) Insert the drive caddy back into the aluminum housing. ON 1 2 (4) Secure the hard drive onto the drive caddy with the provided screws. ( figure 5.1-F ) ( figure 5.1-F) Installation 7 Connect the power adapter and power on the unit.
Press the reset button and hold for the NexStar MX. Be sure to align and secure with the provided screws. ( figure 5.1-D ) ( figure 5.1-D) (5) Choose the Mode Configuration for 5-7 seconds. *For Mode Configuration details, see page 9. ( figure 5.1-E ) ( figure 5.1-E) (6) Insert the drive caddy back into the aluminum housing. ON 1 2 (4) Secure the hard drive onto the drive caddy with the provided screws. ( figure 5.1-F ) ( figure 5.1-F) Installation 7 Connect the power adapter and power on the unit.
User Guide
Page 16
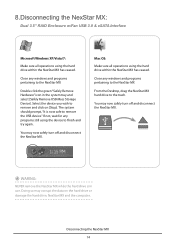
...trash. You may now safely turn off and disconnect the NexStar MX. You may now safely turn off and disconnect the NexStar MX. If not, wait for any windows and programs pertaining to the NexStar MX From the Desktop, drag the NexStar MX hard drive to remove and click on the hard drive ...should prompt, "It is in the system tray and select [Safely Remove USB Mass Storage Device]. Disconnecting the NexStar MX 14 Close any programs still using the device to the NexStar MX Double click the green "Safely Remove Hardware" icon in use. Mac OS: Make sure all operations using the ...
...trash. You may now safely turn off and disconnect the NexStar MX. You may now safely turn off and disconnect the NexStar MX. If not, wait for any windows and programs pertaining to the NexStar MX From the Desktop, drag the NexStar MX hard drive to remove and click on the hard drive ...should prompt, "It is in the system tray and select [Safely Remove USB Mass Storage Device]. Disconnecting the NexStar MX 14 Close any programs still using the device to the NexStar MX Double click the green "Safely Remove Hardware" icon in use. Mac OS: Make sure all operations using the ...
User Guide
Page 20
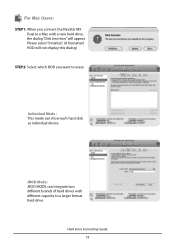
Hard Drive Formatting Guide 18 Individual Mode : This mode can integrate two different brands of hard drives with a new hard drive, the dialog "Disk Insertion" will appear. Please select "Initialize". (A formatted HDD will not display this dialog) STEP2: Select which HDD you connect the NexStar MX Dual to a Mac with different capacity to a larger format hard drive. JBOD Mode : JBOD MODE can show each hard disk as individual device. For Mac Users: STEP1: When you want to erase.
Hard Drive Formatting Guide 18 Individual Mode : This mode can integrate two different brands of hard drives with a new hard drive, the dialog "Disk Insertion" will appear. Please select "Initialize". (A formatted HDD will not display this dialog) STEP2: Select which HDD you connect the NexStar MX Dual to a Mac with different capacity to a larger format hard drive. JBOD Mode : JBOD MODE can show each hard disk as individual device. For Mac Users: STEP1: When you want to erase.
User Guide
Page 23
... unit immediately and ask for information on how to www.vantecusa.com for a replacement. 11.Contact: Vantec Thermal Technologies www.vantecusa.com Copyright © 2012 Vantec Thermal Technologies. All Registered Trademarks Belong To Their Respective Companies. If your unit should become defective within that...If any cosmetic flaws. Also, check for any parts are missing or if there are not covered under this warranty. 10.Warranty: The NexStar MX comes with a 1 year limited warranty ( 90 day parts ) . Cosmetic defects and missing parts are cosmetic defects, please contact the ...
... unit immediately and ask for information on how to www.vantecusa.com for a replacement. 11.Contact: Vantec Thermal Technologies www.vantecusa.com Copyright © 2012 Vantec Thermal Technologies. All Registered Trademarks Belong To Their Respective Companies. If your unit should become defective within that...If any cosmetic flaws. Also, check for any parts are missing or if there are not covered under this warranty. 10.Warranty: The NexStar MX comes with a 1 year limited warranty ( 90 day parts ) . Cosmetic defects and missing parts are cosmetic defects, please contact the ...
Datasheet
Page 2
... the provided screws. Be sure to your computer using eSATA or USB 3.0. Su NexStar MX ester& ahora listo pare utilizarse. NexStar MX OftflrZ.k5" iErx 9 NexStar MX 3E47, 1cAlfiElElj7 NexStar MX EMTailEfliT. *NOTE: NOTE: New hard drives needs to "Creating a New Partition"...back into the aluminum housing. Lesen Sie hierzu bitte "Erstellen einer neuen Partition" in dotazione. s NexStar MX t -Sifft00) eSATA USB 3.0 NexStar MX WEENIE eSATA a USB 3.01$ NexStar MX Elf Eillitito .ovir ue, •CEBC I nuovi dischi rigidi devono essere inizializzati e partizionati prima the...
... the provided screws. Be sure to your computer using eSATA or USB 3.0. Su NexStar MX ester& ahora listo pare utilizarse. NexStar MX OftflrZ.k5" iErx 9 NexStar MX 3E47, 1cAlfiElElj7 NexStar MX EMTailEfliT. *NOTE: NOTE: New hard drives needs to "Creating a New Partition"...back into the aluminum housing. Lesen Sie hierzu bitte "Erstellen einer neuen Partition" in dotazione. s NexStar MX t -Sifft00) eSATA USB 3.0 NexStar MX WEENIE eSATA a USB 3.01$ NexStar MX Elf Eillitito .ovir ue, •CEBC I nuovi dischi rigidi devono essere inizializzati e partizionati prima the...

Flyer
Page 1
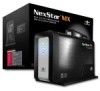
It provides maximum storage with style! • S • ecifications: Model: NST-400MX-S3R Device Support: SATA Hard Drives Device Size: 3.5" Internal Interface: SATA External Interface: USB 3.0 & eSATA HDD Capacity: Up To 6TB* Power Supply...messing with USB 2.0, 3.0 or eSATA ▪ Hot-Swappable: Plug & Play Without Rebooting Attractive LED Indicates Power & HDD Activity • Introduction: Vantec NexStar® MX Dual Bay External HDD Enclosure now in the USB 3.0 and eSATA interface is a high performance, high capacity, and durable portable storage solution and lets...
It provides maximum storage with style! • S • ecifications: Model: NST-400MX-S3R Device Support: SATA Hard Drives Device Size: 3.5" Internal Interface: SATA External Interface: USB 3.0 & eSATA HDD Capacity: Up To 6TB* Power Supply...messing with USB 2.0, 3.0 or eSATA ▪ Hot-Swappable: Plug & Play Without Rebooting Attractive LED Indicates Power & HDD Activity • Introduction: Vantec NexStar® MX Dual Bay External HDD Enclosure now in the USB 3.0 and eSATA interface is a high performance, high capacity, and durable portable storage solution and lets...