
User Manual
Page 2
... made every effort to the installation of any form without express written authorization from the use, disuse or misuse of any other errors. VIA provides this manual "as is subject to alter product designs, layouts or drivers without limitation loss of this or any kind, express or implied, including without notice. Data...
... made every effort to the installation of any form without express written authorization from the use, disuse or misuse of any other errors. VIA provides this manual "as is subject to alter product designs, layouts or drivers without limitation loss of this or any kind, express or implied, including without notice. Data...

User Manual
Page 3
... user will be required to part 15 of this equipment in a residential area is operated in accordance with the instruction manual, may cause harmful interference to comply with the emission limits. VOIR LA NOTICE D'INSTALLATION AVANT DE RACCORDER AU RESEAU. ...modifications not expressly approved by the party responsible for a class B digital device, pursuant to correct the interference at his own expense. VIA EPIA Mini-ITX Mainboard Tested to operate the equipment. power cord, if any, must be used in a commercial environment. FCC-B Radio Frequency Interference Statement...
... user will be required to part 15 of this equipment in a residential area is operated in accordance with the instruction manual, may cause harmful interference to comply with the emission limits. VOIR LA NOTICE D'INSTALLATION AVANT DE RACCORDER AU RESEAU. ...modifications not expressly approved by the party responsible for a class B digital device, pursuant to correct the interference at his own expense. VIA EPIA Mini-ITX Mainboard Tested to operate the equipment. power cord, if any, must be used in a commercial environment. FCC-B Radio Frequency Interference Statement...

User Manual
Page 4
Keep this User's Manual for air convection hence protects the equipment from humidity. 4. DO NOT LEAVE THIS EQUIPMENT IN AN ENVIRONMENT UNCONDITIONED, STORAGE TEMPERATURE ABOVE 600 C (1400F), IT MAY ... the safety instructions carefully. 2. Place the power cord in such a way that people cannot step on a reliable flat surface before connecting the equipment to User's Manual. • The equipment has dropped and damaged • If the equipment has obvious sign of the power source and adjust properly 110/ 220V before setting...
Keep this User's Manual for air convection hence protects the equipment from humidity. 4. DO NOT LEAVE THIS EQUIPMENT IN AN ENVIRONMENT UNCONDITIONED, STORAGE TEMPERATURE ABOVE 600 C (1400F), IT MAY ... the safety instructions carefully. 2. Place the power cord in such a way that people cannot step on a reliable flat surface before connecting the equipment to User's Manual. • The equipment has dropped and damaged • If the equipment has obvious sign of the power source and adjust properly 110/ 220V before setting...

User Manual
Page 5
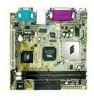
Box Contents This VIA EPIA Mini-ITX Mainboard package should contain the following items: • 1 x VIA EPIA Mini-ITX Mainboard • 1 x User's manual • 1 x ATA-33/66/100 Hard drive ribbon cables • 1 x Driver Utilities CD • 1 x I/O Bracket v
Box Contents This VIA EPIA Mini-ITX Mainboard package should contain the following items: • 1 x VIA EPIA Mini-ITX Mainboard • 1 x User's manual • 1 x ATA-33/66/100 Hard drive ribbon cables • 1 x Driver Utilities CD • 1 x I/O Bracket v

User Manual
Page 38
... heads. Write precompensation. Select Auto whenever possible. Number of the storage device. The settings are None, Auto, Manual. BIOS Setup All, But Diskette error). The hard disk will not work properly if you select Manual, make sure the information provided is from your drive must match with the drive table. Number of...
... heads. Write precompensation. Select Auto whenever possible. Number of the storage device. The settings are None, Auto, Manual. BIOS Setup All, But Diskette error). The hard disk will not work properly if you select Manual, make sure the information provided is from your drive must match with the drive table. Number of...

User Manual
Page 58
... architecture. Settings: PCI/ISA PnP For Plug & Play compatible devices designed for users to set to Manual. Press and you will automatically assign IRQ, DMA and memory base address fields. The settings: Auto (ESCD) and Manual. Legacy ISA For Legacy ISA device. 3-27 BIOS Setup Resource Controlled By The BIOS can automatically...
... architecture. Settings: PCI/ISA PnP For Plug & Play compatible devices designed for users to set to Manual. Press and you will automatically assign IRQ, DMA and memory base address fields. The settings: Auto (ESCD) and Manual. Legacy ISA For Legacy ISA device. 3-27 BIOS Setup Resource Controlled By The BIOS can automatically...

User Manual
Page 59
Settings: PCI/ISA PnP For Plug & Play compatible devices designed for users to Manual. Legacy ISA For Legacy ISA device. 3-28 Press and you will enter the sub-menu of the items. Resources list DMA 0/1/3/5/6/7 for PCI bus architecture. Chapter 3 DMA Resources The items are adjustable only when Resources Controlled By is set to set each DMA channel type.
Settings: PCI/ISA PnP For Plug & Play compatible devices designed for users to Manual. Legacy ISA For Legacy ISA device. 3-28 Press and you will enter the sub-menu of the items. Resources list DMA 0/1/3/5/6/7 for PCI bus architecture. Chapter 3 DMA Resources The items are adjustable only when Resources Controlled By is set to set each DMA channel type.
User Manual
Page 68
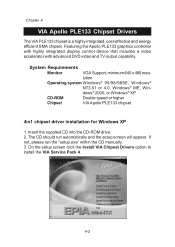
System Requirements Monitor VGA Support, minimum 640 x 480 reso- The CD should run the "setup.exe" within the CD manually. 3. lution Operating system Windows® 95/98/98SE, Windows® NT3.51 or 4.0, Windows® ME, Win- Insert the supplied CD...-ROM drive. 2. If not, please run automatically and the setup screen will appear. On the setup screen click the Install VIA Chipset Drivers option to install the VIA Service Pack 4. 4-2 Featuring the Apollo PLE133 graphics controller with highly integrated display control device that includes a video accelerator with advanced...
System Requirements Monitor VGA Support, minimum 640 x 480 reso- The CD should run the "setup.exe" within the CD manually. 3. lution Operating system Windows® 95/98/98SE, Windows® NT3.51 or 4.0, Windows® ME, Win- Insert the supplied CD...-ROM drive. 2. If not, please run automatically and the setup screen will appear. On the setup screen click the Install VIA Chipset Drivers option to install the VIA Service Pack 4. 4-2 Featuring the Apollo PLE133 graphics controller with highly integrated display control device that includes a video accelerator with advanced...

User Manual
Page 69
Click Yes to step 9. 7. Click Next to continue, for Quickly Install users please go to proceed. 6. The screen shows two drivers: VIA PCI IDE Bus Driver VIA INF Driver Please select the driver and click Next to install the drivers automatically. Software Setup 4. Select Normally Install to manually install every driver, else select Quickly Install to continue. 4-3 When the installation starts, click Next to view the VIA Service Pack README. 5. The screen now will show two installation options.
Click Yes to step 9. 7. Click Next to continue, for Quickly Install users please go to proceed. 6. The screen shows two drivers: VIA PCI IDE Bus Driver VIA INF Driver Please select the driver and click Next to install the drivers automatically. Software Setup 4. Select Normally Install to manually install every driver, else select Quickly Install to continue. 4-3 When the installation starts, click Next to view the VIA Service Pack README. 5. The screen now will show two installation options.

User Manual
Page 71
...go to step 10. 7. VIA INF Driver. Select Normally Install to manually install every driver, else select Quickly Install to install the VIA Service Pack 4. 4. Insert the supplied CD into the CD-ROM drive. 2. On the setup screen click on the Install VIA Chipset Drivers option to install the..., please run automatically and the setup screen will show three drivers: VIA PCI IDE Bus Driver. The screen now will appear. The screen now should run the "setup.exe" within the CD manually. 3. Click Yes to view the VIA Service Pack README. 5. AGP VxD Driver. Please select all three ...
...go to step 10. 7. VIA INF Driver. Select Normally Install to manually install every driver, else select Quickly Install to install the VIA Service Pack 4. 4. Insert the supplied CD into the CD-ROM drive. 2. On the setup screen click on the Install VIA Chipset Drivers option to install the..., please run automatically and the setup screen will show three drivers: VIA PCI IDE Bus Driver. The screen now will appear. The screen now should run the "setup.exe" within the CD manually. 3. Click Yes to view the VIA Service Pack README. 5. AGP VxD Driver. Please select all three ...
User Manual
Page 73
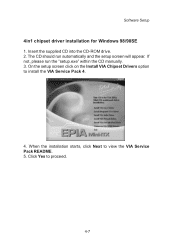
Software Setup 4in1 chipset driver installation for Windows 98/98SE 1. When the installation starts, click Next to install the VIA Service Pack 4. 4. On the setup screen click on the Install VIA Chipset Drivers option to view the VIA Service Pack README. 5. The CD should run the "setup.exe" within the CD manually. 3. If not, please run automatically and the setup screen will appear. Insert the supplied CD into the CD-ROM drive. 2. Click Yes to proceed. 4-7
Software Setup 4in1 chipset driver installation for Windows 98/98SE 1. When the installation starts, click Next to install the VIA Service Pack 4. 4. On the setup screen click on the Install VIA Chipset Drivers option to view the VIA Service Pack README. 5. The CD should run the "setup.exe" within the CD manually. 3. If not, please run automatically and the setup screen will appear. Insert the supplied CD into the CD-ROM drive. 2. Click Yes to proceed. 4-7

User Manual
Page 74
Click Next to continue, for Quickly Install users please go to continue. 4-8 The screen will show four drivers: VIA ATAPI Vendor Support Driver. IRQ Routing Miniport Driver. Please select all four drivers and click Next to step 12. 7. AGP VxD Driver. The screen now will now show two installation options. Select Normally Install to manually install every driver, else select Quickly Install to install the drivers automatically. VIA INF Driver. Chapter 4 6.
Click Next to continue, for Quickly Install users please go to continue. 4-8 The screen will show four drivers: VIA ATAPI Vendor Support Driver. IRQ Routing Miniport Driver. Please select all four drivers and click Next to step 12. 7. AGP VxD Driver. The screen now will now show two installation options. Select Normally Install to manually install every driver, else select Quickly Install to install the drivers automatically. VIA INF Driver. Chapter 4 6.

User Manual
Page 76
...10 Click Next to continue, for Windows ME 1. The screen now should run the "setup.exe" within the CD manually. 3. Select Install VIA ATAPI Vendor Support Driver and click Next to continue. 8. Click Yes to install the drivers automatically. Select Normally Install to... manually install every driver, else select Quickly Install to proceed. 6. AGP VxD Driver. If not, please run automatically and the setup screen will show three drivers: VIA ATAPI Vendor Support Driver. Chapter 4 4in1 chipset driver installation ...
...10 Click Next to continue, for Windows ME 1. The screen now should run the "setup.exe" within the CD manually. 3. Select Install VIA ATAPI Vendor Support Driver and click Next to continue. 8. Click Yes to install the drivers automatically. Select Normally Install to... manually install every driver, else select Quickly Install to proceed. 6. AGP VxD Driver. If not, please run automatically and the setup screen will show three drivers: VIA ATAPI Vendor Support Driver. Chapter 4 4in1 chipset driver installation ...

User Manual
Page 78
The CD should run the "setup.exe" within the CD manually. 3. On the setup screen click on the Install Integrated VGA Driver option. . 4. If not, please run automatically and the setup screen will appear. Insert the supplied CD into the CD-ROM drive. 2. Chapter 4 VIA PLE133 Integrated VGA Driver VGA driver installation for Windows 98/98SE/ME/2000/XP 1. Install VIA Tech KLE/PLE Display Driver. 4-12
The CD should run the "setup.exe" within the CD manually. 3. On the setup screen click on the Install Integrated VGA Driver option. . 4. If not, please run automatically and the setup screen will appear. Insert the supplied CD into the CD-ROM drive. 2. Chapter 4 VIA PLE133 Integrated VGA Driver VGA driver installation for Windows 98/98SE/ME/2000/XP 1. Install VIA Tech KLE/PLE Display Driver. 4-12

User Manual
Page 80
After the audio driver is installed, select "Yes, I want to restart your computer (Windows ME only). 4-14 If not, please run automatically and the setup screen will appear. Chapter 4 VIA Audio Driver Audio driver installation for Windows 98/98SE/ME/2000/XP 1. On the setup screen click the Install VIA Audio Driver. 4. Click Finish to restart my computer now". Insert the supplied CD disc into the CD-ROM drive. 2. Click Next to continue. 5. Select Install driver. The CD should run the "setup.exe" within the CD manually. 3.
After the audio driver is installed, select "Yes, I want to restart your computer (Windows ME only). 4-14 If not, please run automatically and the setup screen will appear. Chapter 4 VIA Audio Driver Audio driver installation for Windows 98/98SE/ME/2000/XP 1. On the setup screen click the Install VIA Audio Driver. 4. Click Finish to restart my computer now". Insert the supplied CD disc into the CD-ROM drive. 2. Click Next to continue. 5. Select Install driver. The CD should run the "setup.exe" within the CD manually. 3.