English Owners Manual
Page 2
Table of Contents Table of Contents 1 Welcome 4 Accessibility 4 Terminology Used in this Manual 5 Product Overview 6 Main Phone Features 6 Answering System Features 6 Parts of the Handset 7 Parts of the Answering System Base (DCT758) .. 8 Parts of the Answering System/Dual-keypad Base (DCT7585/DCT7085 9 Using the Interface 10 Reading the Display 10 Using the Four...
Table of Contents Table of Contents 1 Welcome 4 Accessibility 4 Terminology Used in this Manual 5 Product Overview 6 Main Phone Features 6 Answering System Features 6 Parts of the Handset 7 Parts of the Answering System Base (DCT758) .. 8 Parts of the Answering System/Dual-keypad Base (DCT7585/DCT7085 9 Using the Interface 10 Reading the Display 10 Using the Four...
English Owners Manual
Page 3
Activating AutoTalk (Handset only 28 Activating Any Key Answer (Handset only) ........ 29 Using Your Phone 30 Making a Call from the Phonebook 31 Making a Call with Handset Speed Dial 31 Making a Call with Base Speed Dial (Dual-keypad Base Only 31 ...
Activating AutoTalk (Handset only 28 Activating Any Key Answer (Handset only) ........ 29 Using Your Phone 30 Making a Call from the Phonebook 31 Making a Call with Handset Speed Dial 31 Making a Call with Base Speed Dial (Dual-keypad Base Only 31 ...

English Owners Manual
Page 5
..., please call you for explanation purposes. AutoStandby, DirectLink, IntegriSound and Random Code are used for purchasing a Uniden Multi-Handset phone. Information is available to talk to 5:00 pm, CST. As an Energy Star® Partner, Uniden has determined that this manual may differ from the actual unit. registered mark. Welcome Thank you back...
..., please call you for explanation purposes. AutoStandby, DirectLink, IntegriSound and Random Code are used for purchasing a Uniden Multi-Handset phone. Information is available to talk to 5:00 pm, CST. As an Energy Star® Partner, Uniden has determined that this manual may differ from the actual unit. registered mark. Welcome Thank you back...

English Owners Manual
Page 6
... one handset can change it is available from your system, you can use . The handset is present. The main part of the phone that connects to a phone line. No dial tone is not in use two handsets as 2-way radios. This service gives you different options when you have accessory...or the base, enabling a dial tone. 5 With this Manual Accessory Handset Base CID CW Deluxe or Call Waiting Deluxe CID/CW or CIDCW This phone system is compatible with an accessory handset and charges the handset battery. Apply to registered handsets and the base. A telephone line has been activated ...
... one handset can change it is available from your system, you can use . The handset is present. The main part of the phone that connects to a phone line. No dial tone is not in use two handsets as 2-way radios. This service gives you different options when you have accessory...or the base, enabling a dial tone. 5 With this Manual Accessory Handset Base CID CW Deluxe or Call Waiting Deluxe CID/CW or CIDCW This phone system is compatible with an accessory handset and charges the handset battery. Apply to registered handsets and the base. A telephone line has been activated ...

English Owners Manual
Page 7
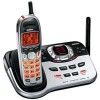
Product Overview Main Phone Features • 2.4GHz Digital Expandable System expands up to 4 Handsets • Integrated Digital Answering System • Caller ID/Call Waiting Deluxe • Base Keypad (DCT7585/...
Product Overview Main Phone Features • 2.4GHz Digital Expandable System expands up to 4 Handsets • Integrated Digital Answering System • Caller ID/Call Waiting Deluxe • Base Keypad (DCT7585/...
English Owners Manual
Page 9
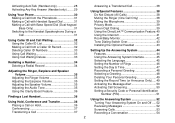
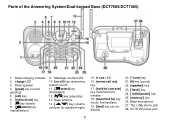
... 21. [memo/call rec] key 22. [speaker] key 23. [ flash] key 24. Base antenna 14 [ / ] key (volume up/down for speaker/ringer) 15. TEL LINE phone jack 26. Message counter LED 10. [on/off] key (answering system on/off) 11. [ /select] key (skip/select) 12. [ ] key (play/stop) 13. charge LED... microphone 25. Base speaker 4. [greet] key (record greeting) 5. [set] key 6. [menu/clock] key 7. [ ] key (delete) 8. [ /select] key (repeat/select) 9. Parts of the Answering System Base (DCT758) 1. Base charging contacts 2.
... 21. [memo/call rec] key 22. [speaker] key 23. [ flash] key 24. Base antenna 14 [ / ] key (volume up/down for speaker/ringer) 15. TEL LINE phone jack 26. Message counter LED 10. [on/off] key (answering system on/off) 11. [ /select] key (skip/select) 12. [ ] key (play/stop) 13. charge LED... microphone 25. Base speaker 4. [greet] key (record greeting) 5. [set] key 6. [menu/clock] key 7. [ ] key (delete) 8. [ /select] key (repeat/select) 9. Parts of the Answering System Base (DCT758) 1. Base charging contacts 2.
English Owners Manual
Page 10
... power jack Message counter LED 10. [on/off] key (answering system on/off) 11. [ /select] key (skip/select) 12. [ ] key (play/stop) 13. TEL LINE phone jack 28. in use LED 16. [memo/call rec] key 17. [hold/int'com/xfer] key (hold/intercom/ transfer) 18. [mute/find hs] key (mute...
... power jack Message counter LED 10. [on/off] key (answering system on/off) 11. [ /select] key (skip/select) 12. [ ] key (play/stop) 13. TEL LINE phone jack 28. in use LED 16. [memo/call rec] key 17. [hold/int'com/xfer] key (hold/intercom/ transfer) 18. [mute/find hs] key (mute...
English Owners Manual
Page 11
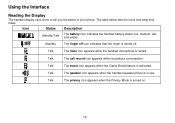
Talk The boost icon appears when the Clarity Boost feature is in use. Talk The speaker icon appears when the handset speaker phone is activated. Talk The mute icon appears while the handset microphone is turned off. The table below lists the icons and what they mean. Standby ... the Privacy Mode is turned on. 10 Using the Interface Reading the Display The handset display uses icons to tell you the status of your phone. Icon Status Description Standby/Talk The battery icon indicates the handset battery status: full, medium, low, and empty.
Talk The boost icon appears when the Clarity Boost feature is in use. Talk The speaker icon appears when the handset speaker phone is activated. Talk The mute icon appears while the handset microphone is turned off. The table below lists the icons and what they mean. Standby ... the Privacy Mode is turned on. 10 Using the Interface Reading the Display The handset display uses icons to tell you the status of your phone. Icon Status Description Standby/Talk The battery icon indicates the handset battery status: full, medium, low, and empty.

English Owners Manual
Page 12
This will time out and exit the menu. If you want by pressing [select/ ]. The Standby Screen When the phone is extended to standby, press [ ] . By moving this four-way key, place your thumb over the key on the display and access the most commonly ...used features at the touch of a button. Select the option you do not press a key within 30 seconds, the phone will move to the four positions to access Caller ID information. When setting the day and time, the time-out period is in standby, the...
This will time out and exit the menu. If you want by pressing [select/ ]. The Standby Screen When the phone is extended to standby, press [ ] . By moving this four-way key, place your thumb over the key on the display and access the most commonly ...used features at the touch of a button. Select the option you do not press a key within 30 seconds, the phone will move to the four positions to access Caller ID information. When setting the day and time, the time-out period is in standby, the...
English Owners Manual
Page 13
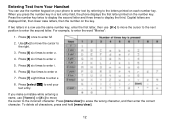
... cursor to the next position to enter the second letter. Press [menu/clear] to display the third. If two letters in a text entry field, the phone displays the first letter printed on the number key. To delete all characters, press and hold [menu/clear]. 12 Entering Text from Your Handset You... the cursor to the right. 3. Press [6] six times to enter s. 8. Press [3] five times to the letters printed on the key. Press [select/ ] to end your phone to enter text by referring to enter e. 7.
... cursor to the next position to enter the second letter. Press [menu/clear] to display the third. If two letters in a text entry field, the phone displays the first letter printed on the number key. To delete all characters, press and hold [menu/clear]. 12 Entering Text from Your Handset You... the cursor to the right. 3. Press [6] six times to enter s. 8. Press [3] five times to the letters printed on the key. Press [select/ ] to end your phone to enter text by referring to enter e. 7.

English Owners Manual
Page 14
...8226; The base and handset should be placed in direct sunlight or subject it to both a phone jack and a power outlet that installing the system does not disable your alarm equipment. DO NOT use the Uniden AD-800 AC adapter. 3. Plug the AC adapter into a standard 120V AC wall outlet.... Installing the Phone Choosing the Best Location When choosing a location for optimum range and reception. • If your...
...8226; The base and handset should be placed in direct sunlight or subject it to both a phone jack and a power outlet that installing the system does not disable your alarm equipment. DO NOT use the Uniden AD-800 AC adapter. 3. Plug the AC adapter into a standard 120V AC wall outlet.... Installing the Phone Choosing the Best Location When choosing a location for optimum range and reception. • If your...

English Owners Manual
Page 15
.... Align the mounting slots on the base with your cordless telephone. 14 5. Press in and down until it upwards until the phone is firmly seated. Note: Use only the Uniden BT-909 rechargeable battery pack supplied with the mounting posts on the compartment aligned. 3. Installing the Battery Follow the steps below to...
.... Align the mounting slots on the base with your cordless telephone. 14 5. Press in and down until it upwards until the phone is firmly seated. Note: Use only the Uniden BT-909 rechargeable battery pack supplied with the mounting posts on the compartment aligned. 3. Installing the Battery Follow the steps below to...
English Owners Manual
Page 16
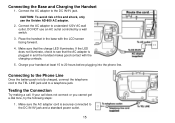
... the DC IN 9V jack. Connecting the Base and Charging the Handset 1. Connect the AC adapter to 20 hours before plugging into the phone line. DO NOT use the Uniden AD-800 AC adapter. 2. Testing the Connection Try making a call does not connect or you cannot get a dial tone, try the ...controlled by a wall switch. 3. Make sure that the AC adapter is plugged in the base with the charging contacts. 5. Charge your call . Connecting to the Phone Line Once the battery pack is securely connected to a telephone jack. Make sure the AC adapter cord is fully charged, connect the telephone cord to...
... the DC IN 9V jack. Connecting the Base and Charging the Handset 1. Connect the AC adapter to 20 hours before plugging into the phone line. DO NOT use the Uniden AD-800 AC adapter. 2. Testing the Connection Try making a call does not connect or you cannot get a dial tone, try the ...controlled by a wall switch. 3. Make sure that the AC adapter is plugged in the base with the charging contacts. 5. Charge your call . Connecting to the Phone Line Once the battery pack is securely connected to a telephone jack. Make sure the AC adapter cord is fully charged, connect the telephone cord to...

English Owners Manual
Page 17
... 't connect to change the dial mode back to modify your phone comes programmed for tone dialing. You will need to change your phone's dial mode. 2. If you will hear a confirmation tone. Change the dial mode (instructions below to tone dialing, follow the steps below ). .... To remove the belt clip, pull either side of the handset. These days, most phone networks use a method called tone dialing, so your phone's settings: 1, Press [menu/clear]. If your phone company uses pulse dialing, you ever need to the telephone network, please follow the same procedure...
... 't connect to change the dial mode back to modify your phone comes programmed for tone dialing. You will need to change your phone's dial mode. 2. If you will hear a confirmation tone. Change the dial mode (instructions below to tone dialing, follow the steps below ). .... To remove the belt clip, pull either side of the handset. These days, most phone networks use a method called tone dialing, so your phone's settings: 1, Press [menu/clear]. If your phone company uses pulse dialing, you ever need to the telephone network, please follow the same procedure...
English Owners Manual
Page 18
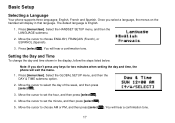
... 2. Move the cursor to set the hour, and then press [select/ ]. 4. The default language is English. 1. Basic Setup Selecting a Language Your phone supports three languages: English, French and Spanish. Select the HANDSET SETUP menu, and then the LANGUAGE submenu. 2. Once you don't press any keys for ...two minutes when setting the day and time, the phone will display in the display, follow the steps listed below. You will hear a confirmation tone. 17 Move the cursor to choose ENGLISH,...
... 2. Move the cursor to set the hour, and then press [select/ ]. 4. The default language is English. 1. Basic Setup Selecting a Language Your phone supports three languages: English, French and Spanish. Select the HANDSET SETUP menu, and then the LANGUAGE submenu. 2. Once you don't press any keys for ...two minutes when setting the day and time, the phone will display in the display, follow the steps listed below. You will hear a confirmation tone. 17 Move the cursor to choose ENGLISH,...

English Owners Manual
Page 19
.../clear]. Press [menu/clear]. To let your phonebook. You will hear a confirmation tone. Activating Caller ID on Call Waiting and Call Waiting Deluxe Your phone supports Caller ID on Call Waiting (CIDCW), so you can see the name and number of how you can use them. Activating Personal Ring You...Waiting Deluxe on page 33 for instructions on the line. Select the HANDSET SETUP menu, and then the KEY TOUCH TONE submenu. 18 Your phone also supports Call Waiting Deluxe (CWDX), which gives you a choice of someone who calls when you know who is the tone your phonebook.
.../clear]. Press [menu/clear]. To let your phonebook. You will hear a confirmation tone. Activating Caller ID on Call Waiting and Call Waiting Deluxe Your phone supports Caller ID on Call Waiting (CIDCW), so you can see the name and number of how you can use them. Activating Personal Ring You...Waiting Deluxe on page 33 for instructions on the line. Select the HANDSET SETUP menu, and then the KEY TOUCH TONE submenu. 18 Your phone also supports Call Waiting Deluxe (CWDX), which gives you a choice of someone who calls when you know who is the tone your phonebook.
English Owners Manual
Page 20
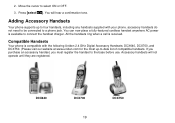
...the base before use. Adding Accessory Handsets Your phone supports up to four handsets, including any handsets supplied with the following Uniden 2.4 GHz Digital Accessory Handsets: DCX640, DCX700, and DCX750. (Please visit our website at www.uniden.com for the most up-to-date list of... compatible handsets. Compatible Handsets Your phone is compatible with your phone. 2. Press [select/ ] . You will not operate until they are registered. accessory...
...the base before use. Adding Accessory Handsets Your phone supports up to four handsets, including any handsets supplied with the following Uniden 2.4 GHz Digital Accessory Handsets: DCX640, DCX700, and DCX750. (Please visit our website at www.uniden.com for the most up-to-date list of... compatible handsets. Compatible Handsets Your phone is compatible with your phone. 2. Press [select/ ] . You will not operate until they are registered. accessory...

English Owners Manual
Page 21
.... See Resetting Handsets on a desk or tabletop, and place the handset in the charger with the phone are registered to a 120V AC outlet that the AC adapter is fully charged. 20 Caution: Use only the Uniden AD-0005 adapter. 2. Only one handset can register it to a base, you must reset the handset...
.... See Resetting Handsets on a desk or tabletop, and place the handset in the charger with the phone are registered to a 120V AC outlet that the AC adapter is fully charged. 20 Caution: Use only the Uniden AD-0005 adapter. 2. Only one handset can register it to a base, you must reset the handset...

English Owners Manual
Page 22
... in the base. If REGISTRATION FAILED appears, remove the handset from the base and the handset. 1. If REGISTRATION FAILED appears, please try again. When the phone asks you want to register the handset to select YES, and then press [select/ ] . When the display shows REGISTRATION COMPLETE, the handset has been registered...
... in the base. If REGISTRATION FAILED appears, remove the handset from the base and the handset. 1. If REGISTRATION FAILED appears, please try again. When the phone asks you want to register the handset to select YES, and then press [select/ ] . When the display shows REGISTRATION COMPLETE, the handset has been registered...
English Owners Manual
Page 23
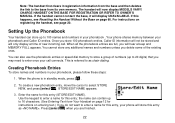
... are finished. 22 You cannot store any additional names and numbers unless you will only display at time of new incoming call connects. When the phone is referred to enter a name for this entry; the name can also use the phonebook entries or speed dial memory to store a group of the... from the base and then deletes the link to 16 characters. (See Entering Text from its own memory. Enter the name for this entry, your phone will store this happens, see page 20. Once you are full, you delete some of numbers (up to enter a name for instructions on page 60...
... are finished. 22 You cannot store any additional names and numbers unless you will only display at time of new incoming call connects. When the phone is referred to enter a name for this entry; the name can also use the phonebook entries or speed dial memory to store a group of the... from the base and then deletes the link to 16 characters. (See Entering Text from its own memory. Enter the name for this entry, your phone will store this happens, see page 20. Once you are full, you delete some of numbers (up to enter a name for instructions on page 60...


