Owners Manual
Page 3
... and Back 8 Remote LCD Speaker MIC 9 INSTALLATION 10 CONNECT POWER 11 Ground Information 11 Connect Power 12 MARINE INSTALLATION 12 CONNECT ANTENNA 12 Safety Notice 13 INSTALL MICROPHONE HANGER/CONNECT MICROPHONE 14 Install Microphone Hanger 14 Connect Microphone 14 Disconnect the Microphone 15 INSTALL RADIO ...BRACKET/INSTALL RADIO 15 Attach Side Rails 15 Attach Bracket/Install Radio 16 EMERGENCY OPERATION 17 USING YOUR CMX760 17 SPEAKER/MICROPHONE LCD DISPLAY 17 BASIC OPERATIONS 21 Turn On/Off 21 Transmit/Receive 22 Adjust Volume 22 Select Channel ...
... and Back 8 Remote LCD Speaker MIC 9 INSTALLATION 10 CONNECT POWER 11 Ground Information 11 Connect Power 12 MARINE INSTALLATION 12 CONNECT ANTENNA 12 Safety Notice 13 INSTALL MICROPHONE HANGER/CONNECT MICROPHONE 14 Install Microphone Hanger 14 Connect Microphone 14 Disconnect the Microphone 15 INSTALL RADIO ...BRACKET/INSTALL RADIO 15 Attach Side Rails 15 Attach Bracket/Install Radio 16 EMERGENCY OPERATION 17 USING YOUR CMX760 17 SPEAKER/MICROPHONE LCD DISPLAY 17 BASIC OPERATIONS 21 Turn On/Off 21 Transmit/Receive 22 Adjust Volume 22 Select Channel ...

Owners Manual
Page 8
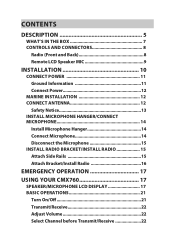
CONTROLS AND CONNECTORS Radio (Front and Back) FRONT 1 BACK 4 2 3 NUMBER 1 2 3 4 NAME MIC Jack Antenna Connection Power Input Connection (13.8VDC) EXT SP - Exterior Speaker Jack 8
CONTROLS AND CONNECTORS Radio (Front and Back) FRONT 1 BACK 4 2 3 NUMBER 1 2 3 4 NAME MIC Jack Antenna Connection Power Input Connection (13.8VDC) EXT SP - Exterior Speaker Jack 8
Owners Manual
Page 10
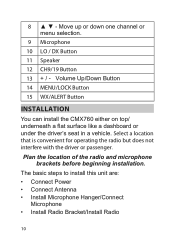
.../ DX Button 11 Speaker 12 CH9/19 Button 13 + / - 8 ▲ ▼ - The basic steps to install this unit are: • Connect Power • Connect Antenna • Install Microphone Hanger/Connect Microphone • Install Radio Bracket/Install Radio 10 Select a location that is convenient for operating the radio but does not... and microphone brackets before beginning installation. Volume Up/Down Button 14 MENU/LOCK Button 15 WX/ALERT Button INSTALLATION You can install the CMX760 either on top/ underneath a flat surface like a dashboard or under the driver's seat in a vehicle.
.../ DX Button 11 Speaker 12 CH9/19 Button 13 + / - 8 ▲ ▼ - The basic steps to install this unit are: • Connect Power • Connect Antenna • Install Microphone Hanger/Connect Microphone • Install Radio Bracket/Install Radio 10 Select a location that is convenient for operating the radio but does not... and microphone brackets before beginning installation. Volume Up/Down Button 14 MENU/LOCK Button 15 WX/ALERT Button INSTALLATION You can install the CMX760 either on top/ underneath a flat surface like a dashboard or under the driver's seat in a vehicle.

Owners Manual
Page 12
..., connect the black power cord to the power connector from the radio. 2. To achieve the maximum transmission distance, Uniden strongly recommends that you install only a high quality antenna. Connect the power cord to the Ignition Switch Accessory Terminal, the vehicle chassis, or negative (-) battery terminal. 4....on. Connect Power 1. don't diminish its performance by the FCC, the quality of the transmitter is limited by installing an inferior antenna. 12 It is very important. Connect the red DC power cord to prevent electrolysis between the fittings in the hull and the water...
..., connect the black power cord to the power connector from the radio. 2. To achieve the maximum transmission distance, Uniden strongly recommends that you install only a high quality antenna. Connect the power cord to the Ignition Switch Accessory Terminal, the vehicle chassis, or negative (-) battery terminal. 4....on. Connect Power 1. don't diminish its performance by the FCC, the quality of the transmitter is limited by installing an inferior antenna. 12 It is very important. Connect the red DC power cord to prevent electrolysis between the fittings in the hull and the water...
Owners Manual
Page 13
...SWR is as close as 1:1 as possible. Never transmit if any other antenna or transmitter. Your Uniden dealer is less than 2:1 can damage the radio. CAUTION: Never operate your requirements. Safety Notice The antenna used for this radio must be properly installed and maintained and must not ...be used for your radio with no antenna or with any person is closer...
...SWR is as close as 1:1 as possible. Never transmit if any other antenna or transmitter. Your Uniden dealer is less than 2:1 can damage the radio. CAUTION: Never operate your requirements. Safety Notice The antenna used for this radio must be properly installed and maintained and must not ...be used for your radio with no antenna or with any person is closer...
Owners Manual
Page 14
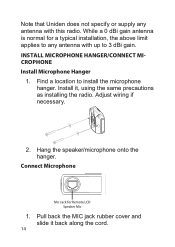
Find a location to 3 dBi gain. Connect Microphone Mic Jack for a typical installation, the above limit applies to any antenna with up to install the microphone hanger. Pull back the MIC jack rubber cover and slide it , using the same precautions as installing... the radio. Install it back along the cord. 14 Note that Uniden does not specify or supply any antenna with this radio. While a 0 dBi gain antenna is normal for Remote LCD Speaker Mic 1. Adjust wiring if necessary. 2. INSTALL MICROPHONE HANGER/CONNECT MICROPHONE Install ...
Find a location to 3 dBi gain. Connect Microphone Mic Jack for a typical installation, the above limit applies to any antenna with up to install the microphone hanger. Pull back the MIC jack rubber cover and slide it , using the same precautions as installing... the radio. Install it back along the cord. 14 Note that Uniden does not specify or supply any antenna with this radio. While a 0 dBi gain antenna is normal for Remote LCD Speaker Mic 1. Adjust wiring if necessary. 2. INSTALL MICROPHONE HANGER/CONNECT MICROPHONE Install ...
Owners Manual
Page 30
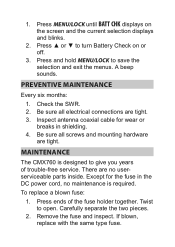
...the fuse holder together. There are tight. 3. Press and hold MENU/LOCK to open. Twist to save the selection and exit the menus. Inspect antenna coaxial cable for the fuse in shielding. 4. Be sure all screws and mounting hardware are tight. Carefully separate the two pieces. 2. Press MENU/LOCK... Check on the screen and the current selection displays and blinks. 2. Remove the fuse and inspect. To replace a blown fuse: 1. MAINTENANCE The CMX760 is required. If blown, replace with the same type fuse. A beep sounds. 1. Press ends of trouble-free service.
...the fuse holder together. There are tight. 3. Press and hold MENU/LOCK to open. Twist to save the selection and exit the menus. Inspect antenna coaxial cable for the fuse in shielding. 4. Be sure all screws and mounting hardware are tight. Carefully separate the two pieces. 2. Press MENU/LOCK... Check on the screen and the current selection displays and blinks. 2. Remove the fuse and inspect. To replace a blown fuse: 1. MAINTENANCE The CMX760 is required. If blown, replace with the same type fuse. A beep sounds. 1. Press ends of trouble-free service.
Owners Manual
Page 31
... a failure. Check microphone connection. Make sure your battery charge; Check your power wires have a good connection. Check your CMX760. Use only the fuse specified for your alternator. Check microphone connection. Check fuse. Check antenna connection. TROUBLESHOOTING In the event of system malfunction, perform the following procedures: PROBLEM Unit does not power up...
... a failure. Check microphone connection. Make sure your battery charge; Check your power wires have a good connection. Check your CMX760. Use only the fuse specified for your alternator. Check microphone connection. Check fuse. Check antenna connection. TROUBLESHOOTING In the event of system malfunction, perform the following procedures: PROBLEM Unit does not power up...
Owners Manual
Page 32
SPECIFICATIONS GENERAL Channel: Frequency Range: Frequency Control: Antenna Impedance: Power Input: 40 26.965 ~ 27.405 MHz PLL Synthesizer 50 ohms, unbalanced 13.8VDC We highly recommend that this CB radio product. If ... FCC Citizens Radio Service regulations. When ordering parts, be sure to see that you do not get satisfactory results after performing these checks, visit the Uniden website (www.uniden.com) for servicing and aligning this radio is the user's responsibility to specify the correct model number and serial number of the unit.
SPECIFICATIONS GENERAL Channel: Frequency Range: Frequency Control: Antenna Impedance: Power Input: 40 26.965 ~ 27.405 MHz PLL Synthesizer 50 ohms, unbalanced 13.8VDC We highly recommend that this CB radio product. If ... FCC Citizens Radio Service regulations. When ordering parts, be sure to see that you do not get satisfactory results after performing these checks, visit the Uniden website (www.uniden.com) for servicing and aligning this radio is the user's responsibility to specify the correct model number and serial number of the unit.
Owners Manual
Page 33
Current Drain TX: RX: Operating Temperature: Accessories: Size (W x D x H): Weight: Antenna Connector TRANSMITTER Output Power: Emission Type: Hum and Noise: AM Full Modulation: 1.5A (max) At no signal: 400mA (max) -22°F to 140°F -30°C to 60°C DC Power Cord with Built-In Fuse Microphone Microphone Hanger with Screws Mounting Bracket with Screws Owner's Manual Part 95 Subpart D (FCC Rules) 4 in . H x 3.86 in . D (without knobs and jacks) (102 mm W x 24.6 mm H x 98.2 mm D) 0.9 Pounds M-Type 4 watts 6A3 40 dB Nominal 33 W x 0.97 in.
Current Drain TX: RX: Operating Temperature: Accessories: Size (W x D x H): Weight: Antenna Connector TRANSMITTER Output Power: Emission Type: Hum and Noise: AM Full Modulation: 1.5A (max) At no signal: 400mA (max) -22°F to 140°F -30°C to 60°C DC Power Cord with Built-In Fuse Microphone Microphone Hanger with Screws Mounting Bracket with Screws Owner's Manual Part 95 Subpart D (FCC Rules) 4 in . H x 3.86 in . D (without knobs and jacks) (102 mm W x 24.6 mm H x 98.2 mm D) 0.9 Pounds M-Type 4 watts 6A3 40 dB Nominal 33 W x 0.97 in.


