
English Manual
Page 4
Set Upside-Down 29 Adjusting the Display Contrast 29 Set C-CH Output 29 Set GPS Format 29 Set GPS Baud Rate 30 Band Defaults 30 P25 LP Filter 30 Scanner Reset 31 PLANNING SYSTEMS, SITES, AND GROUPS 31 ENTERING TEXT 31 PROGRAMMING SYSTEMS 32 .../TGIDS 54 QUICKLY STORING A CONVENTIONAL FREQUENCY 54 QUICKLY STORING AN ID 55 MANUALLY PROGRAMMING CHANNEL FREQUENCIES/TGIDS 55 EDIT CHANNEL OPTIONS MENU 56 USING THE BCD996P2 WITH A GPS 60 LOCATION-BASED SCANNING 60 NON RADIO LOCATION-BASED...
Set Upside-Down 29 Adjusting the Display Contrast 29 Set C-CH Output 29 Set GPS Format 29 Set GPS Baud Rate 30 Band Defaults 30 P25 LP Filter 30 Scanner Reset 31 PLANNING SYSTEMS, SITES, AND GROUPS 31 ENTERING TEXT 31 PROGRAMMING SYSTEMS 32 .../TGIDS 54 QUICKLY STORING A CONVENTIONAL FREQUENCY 54 QUICKLY STORING AN ID 55 MANUALLY PROGRAMMING CHANNEL FREQUENCIES/TGIDS 55 EDIT CHANNEL OPTIONS MENU 56 USING THE BCD996P2 WITH A GPS 60 LOCATION-BASED SCANNING 60 NON RADIO LOCATION-BASED...
English Manual
Page 5
GPS DISPLAY MODE 62 GPS Review Location Mode 62 GPS REVIEW LOCATION MODE 66 PRIORITY/PRIORITY ID/PRIORITY PLUS SCAN 67 USING STARTUP KEYS 68 SCANNING SYSTEMS 69 USING NUMBER TAGS 72 OPTIMIZING P25 PERFORMANCE ...
GPS DISPLAY MODE 62 GPS Review Location Mode 62 GPS REVIEW LOCATION MODE 66 PRIORITY/PRIORITY ID/PRIORITY PLUS SCAN 67 USING STARTUP KEYS 68 SCANNING SYSTEMS 69 USING NUMBER TAGS 72 OPTIMIZING P25 PERFORMANCE ...
English Manual
Page 10
...on a set up to 10 settings (transmit frequency, tone frequencies) then select one for Close Call activity in search and Close Call modes. GPS (Location-Based) Alerts - Lets you include and/or assign quick keys to start a search range, Tone-Out search, or view the '... groups, and searches by assigning them to the repeater input when monitoring a channel on a repeater system. Location-Based Scanning - Using an optional GPS unit you select or automatically store all active frequencies from 9 different tone patterns, 15 volume settings, 7 colors, and 2 color patterns. Allows the...
...on a set up to 10 settings (transmit frequency, tone frequencies) then select one for Close Call activity in search and Close Call modes. GPS (Location-Based) Alerts - Lets you include and/or assign quick keys to start a search range, Tone-Out search, or view the '... groups, and searches by assigning them to the repeater input when monitoring a channel on a repeater system. Location-Based Scanning - Using an optional GPS unit you select or automatically store all active frequencies from 9 different tone patterns, 15 volume settings, 7 colors, and 2 color patterns. Allows the...
English Manual
Page 20
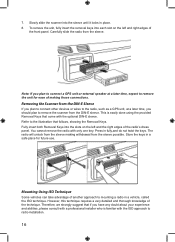
... remove the scanner from the DIN-E Sleeve If you plan to connect other devices or wires to the radio, such as a GPS unit, at a later time, you plan to connect a GPS unit or external speaker at a later time, expect to mounting a radio in place. 8. Carefully slide the radio from the sleeve making...
... remove the scanner from the DIN-E Sleeve If you plan to connect other devices or wires to the radio, such as a GPS unit, at a later time, you plan to connect a GPS unit or external speaker at a later time, expect to mounting a radio in place. 8. Carefully slide the radio from the sleeve making...
English Manual
Page 23
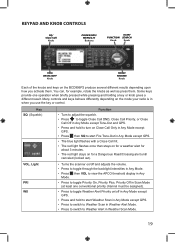
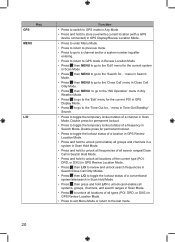
... Close Call DND, Close Call Priority, or Close Call Off in Any Mode except Tone-Out and GPS. • Press and hold to toggle Priority On, Priority Plus, Priority Off in Any Mode except GPS. • The blue light flashes with a Close Call hit. • The red light flashes once ... alert until canceled (locked out). KEYPAD AND KNOB CONTROLS SQ/ Close Call Knob PRI/WX/GPS/ MENU/L/O Buttons SCAN/ FUNCTION SEARCH Knob Knob VOL/ BACKLIGHT Knob HOLD/ RESUME Knob Each of the knobs and keys on the BCD996P2 produce several different results depending upon how you use the key or control.
... Close Call DND, Close Call Priority, or Close Call Off in Any Mode except Tone-Out and GPS. • Press and hold to toggle Priority On, Priority Plus, Priority Off in Any Mode except GPS. • The blue light flashes with a Close Call hit. • The red light flashes once ... alert until canceled (locked out). KEYPAD AND KNOB CONTROLS SQ/ Close Call Knob PRI/WX/GPS/ MENU/L/O Buttons SCAN/ FUNCTION SEARCH Knob Knob VOL/ BACKLIGHT Knob HOLD/ RESUME Knob Each of the knobs and keys on the BCD996P2 produce several different results depending upon how you use the key or control.
English Manual
Page 24
...' menu for the current POI in Search Mode. Double press for permanent lockout. • Press to toggle the temporary lockout status of a frequency in GPS Display Mode. • Press to go to the 'Tone-Out for...' menu in Tone-Out Standby/ Search. • Press to toggle the temporary ...lockout status of a conventional system/site/search in Scan Hold Mode. • Press then press and hold to store (overwrite) current location (with a GPS device connected) in GPS Display/Review Location Mode. • Press to enter Menu Mode. • Press to return to previous menu. • Press to go to a...
...' menu for the current POI in Search Mode. Double press for permanent lockout. • Press to toggle the temporary lockout status of a frequency in GPS Display Mode. • Press to go to the 'Tone-Out for...' menu in Tone-Out Standby/ Search. • Press to toggle the temporary ...lockout status of a conventional system/site/search in Scan Hold Mode. • Press then press and hold to store (overwrite) current location (with a GPS device connected) in GPS Display/Review Location Mode. • Press to enter Menu Mode. • Press to return to previous menu. • Press to go to a...
English Manual
Page 25
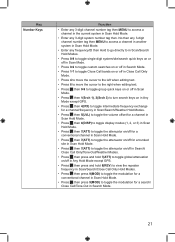
... 0-9 to toggle group quick keys on or off in Scan Mode. • Press then 1(Srch 1), 3(Srch 3) to turn search keys on in Any Mode except GPS. • Press then 4(IFX) to toggle intermediate frequency exchange for a channel/frequency in Scan/Search/Weather Hold Modes. • Press then 5(LVL) to toggle the.../ Close Call Only/Tone-Out/Weather Modes. • Press then press and hold 7(ATT) to toggle global attenuation on/off in Any Hold Mode except GPS. • Press then press and hold 8(REV) to view the repeater frequency in Scan/Search/Close Call Only Hold Modes. • Press then press 9(...
... 0-9 to toggle group quick keys on or off in Scan Mode. • Press then 1(Srch 1), 3(Srch 3) to turn search keys on in Any Mode except GPS. • Press then 4(IFX) to toggle intermediate frequency exchange for a channel/frequency in Scan/Search/Weather Hold Modes. • Press then 5(LVL) to toggle the.../ Close Call Only/Tone-Out/Weather Modes. • Press then press and hold 7(ATT) to toggle global attenuation on/off in Any Hold Mode except GPS. • Press then press and hold 8(REV) to view the repeater frequency in Scan/Search/Close Call Only Hold Modes. • Press then press 9(...
English Manual
Page 26
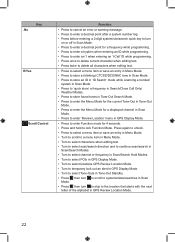
... to select channel or frequency in Scan/Search Hold Modes. • Turn to select POIs in GPS Display Mode. • Turn to select locations GPS Review Location Mode. • Turn to temporary lock out an alert in GPS Display Mode. • Turn to select Tone-Outs in Tone-Out Standby. • Press then... in Tone-Out Mode. • Press to enter the Menu Mode for a displayed channel in Scan Mode. • Press to enter 'Review Location' menu in GPS Display Mode. • Press to enter Function mode for 4 seconds. • Press and hold to the location that starts with the next letter of the...
... to select channel or frequency in Scan/Search Hold Modes. • Turn to select POIs in GPS Display Mode. • Turn to select locations GPS Review Location Mode. • Turn to temporary lock out an alert in GPS Display Mode. • Turn to select Tone-Outs in Tone-Out Standby. • Press then... in Tone-Out Mode. • Press to enter the Menu Mode for a displayed channel in Scan Mode. • Press to enter 'Review Location' menu in GPS Display Mode. • Press to enter Function mode for 4 seconds. • Press and hold to the location that starts with the next letter of the...

English Manual
Page 27
... in Scan Mode. • Press to hold to resume. 23 Key SCAN/SEARCH HOLD/RESUME Function • Press to start/continue/resume scanning in Scan/GPS Modes. • Press to start/continue/resume searching in Search Mode. • Press then SCAN/SEARCH to start a 'quick search' at the current frequency while...
... in Scan Mode. • Press to hold to resume. 23 Key SCAN/SEARCH HOLD/RESUME Function • Press to start/continue/resume scanning in Scan/GPS Modes. • Press to start/continue/resume searching in Search Mode. • Press then SCAN/SEARCH to start a 'quick search' at the current frequency while...
English Manual
Page 29
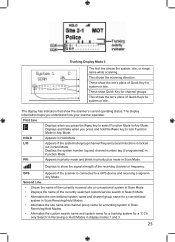
... in Hold Mode L/O Appears if the system/site/group/channel/frequency/search/location is connected to show Quick Key for system or site. Displays to a GPS device and receiving a signal in Any Mode. The display information helps you understand how your scanner operates. These show the signal strength of Quick Key... only Search' in Receiving or Hold Modes in Hold Mode. Trunking Display Mode 3 The first line shows the system, site, or range name while scanning. GPS Appears if the scanner is locked out in display modes 1 and 3. 25
... in Hold Mode L/O Appears if the system/site/group/channel/frequency/search/location is connected to show Quick Key for system or site. Displays to a GPS device and receiving a signal in Any Mode. The display information helps you understand how your scanner operates. These show the signal strength of Quick Key... only Search' in Receiving or Hold Modes in Hold Mode. Trunking Display Mode 3 The first line shows the system, site, or range name while scanning. GPS Appears if the scanner is locked out in display modes 1 and 3. 25

English Manual
Page 31
...is enabled waiting to be scanned. • - (dash) means nothing is assigned to ) the currently scanned quick key blinking in Any Mode except GPS and Tone-Out. Sixth Line GRP Displays the group quick keys (1-0) for a conventional frequency if programmed and blinks in CTCSS/DCS/NAC search mode ...on the left with (groups assigned to the quick key. • an * (asterisk) means the quick key is attenuated in Any Mode except GPS and Tone-Out. Conventional system/search display is on the right in Search/Receiving Modes. ATT displays if the search is turned off . WX ...
...is enabled waiting to be scanned. • - (dash) means nothing is assigned to ) the currently scanned quick key blinking in Any Mode except GPS and Tone-Out. Sixth Line GRP Displays the group quick keys (1-0) for a conventional frequency if programmed and blinks in CTCSS/DCS/NAC search mode ...on the left with (groups assigned to the quick key. • an * (asterisk) means the quick key is attenuated in Any Mode except GPS and Tone-Out. Conventional system/search display is on the right in Search/Receiving Modes. ATT displays if the search is turned off . WX ...
English Manual
Page 32
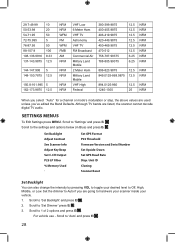
.... 1. Set Backlight Adjust Contrast See Scanner Info Adjust Key Beep Set C-CH Output P25 LP Filter % Memory Used Set GPS Format P25 Threshold Firmware Version and Serial Number Set Upside-Down Set GPS Baud Rate Disp. Although TV bands are going to hard-wire your scanner inside your desired level to Off...
.... 1. Set Backlight Adjust Contrast See Scanner Info Adjust Key Beep Set C-CH Output P25 LP Filter % Memory Used Set GPS Format P25 Threshold Firmware Version and Serial Number Set Upside-Down Set GPS Baud Rate Disp. Although TV bands are going to hard-wire your scanner inside your desired level to Off...
English Manual
Page 33
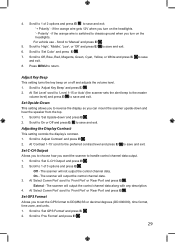
.... 1. Scroll to return. Scroll to reverse the display so you can mount the scanner upside-down ' and press E/ . 2. At 'Select Comm Port' scroll to 'Set GPS Format' and press E/ . 2. Scroll to 'Front Port' or 'Rear Port' and press E/ . Scroll to 'Set Color' and press E/ . 7. Scroll to 'Pos Format' and press E/ ....' scroll to the preferred contrast level and press E/ to DD,MM,SS or decimal degrees (DD.000000), time format, time zone, and units. 1. Set GPS Format Allows you turn on or off and adjusts the volume level. 1. if the orange wire gets 12V when you to set the...
.... 1. Scroll to return. Scroll to reverse the display so you can mount the scanner upside-down ' and press E/ . 2. At 'Select Comm Port' scroll to 'Set GPS Format' and press E/ . 2. Scroll to 'Front Port' or 'Rear Port' and press E/ . Scroll to 'Set Color' and press E/ . 7. Scroll to 'Pos Format' and press E/ ....' scroll to the preferred contrast level and press E/ to DD,MM,SS or decimal degrees (DD.000000), time format, time zone, and units. 1. Set GPS Format Allows you turn on or off and adjusts the volume level. 1. if the orange wire gets 12V when you to set the...
English Manual
Page 34
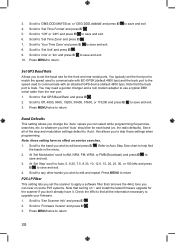
... 'Auto', this allows you can hear on some P25 systems. Note that the back port is male. Refer to Auto Step Size chart to 'Set GPS Baud Rate' and press E/ . 2. Scroll to 'Your Time Zone' and press E/ to return. Note that turning on service searches. 1. Press MENU twice to save and... Defaults This setting allows you change the 'Auto' values you to set the front port to match the speed used to communicate with an attached GPS device (default 4800 bps). Note: these setting have it. Scroll to any other bands you wish to communicate with BC-GPSK (default 4800 bps) ...
... 'Auto', this allows you can hear on some P25 systems. Note that the back port is male. Refer to Auto Step Size chart to 'Set GPS Baud Rate' and press E/ . 2. Scroll to 'Your Time Zone' and press E/ to return. Note that turning on service searches. 1. Press MENU twice to save and... Defaults This setting allows you change the 'Auto' values you to set the front port to match the speed used to communicate with an attached GPS device (default 4800 bps). Note: these setting have it. Scroll to any other bands you wish to communicate with BC-GPSK (default 4800 bps) ...
English Manual
Page 56
...press E/ . 6. The default setting is off. 1. Note: You can also toggle lockout by pressing then 9(MOD). Set Location Info allows you cycle power. See Set GPS Format first to 'All'. 1. At 'Set Latitude' press E/ . At 'Set Longitude' E/ . Enter the longitude and press E/ . 4. Scroll to determine if ...(in scan hold time (0-255 seconds) you select 0 for trunking sites, the scanner stays on the site and quickly pressing then L/O. At 'Set GPS Enable' press E/ . 7. Scroll to the next site. Set Lockout determines whether a site will scan the site before the delay expires, the scanner...
...press E/ . 6. The default setting is off. 1. Note: You can also toggle lockout by pressing then 9(MOD). Set Location Info allows you cycle power. See Set GPS Format first to 'All'. 1. At 'Set Latitude' press E/ . At 'Set Longitude' E/ . Enter the longitude and press E/ . 4. Scroll to determine if ...(in scan hold time (0-255 seconds) you select 0 for trunking sites, the scanner stays on the site and quickly pressing then L/O. At 'Set GPS Enable' press E/ . 7. Scroll to the next site. Set Lockout determines whether a site will scan the site before the delay expires, the scanner...

English Manual
Page 57
...group and press E/ . 4. At 'Program System' press E/ . 3. At 'Select System' scroll to the system where you want to scanning when done with a GPS unit attached. Press SCAN/SEARCH to return to edit a group and press E/ . 4. Enter the latitude and press E/ . 53 Scroll to 1000 ms and press E/... E/ to edit and press E/ . 6. Press MENU. 2. Continue at 'Edit Name' below and press E/ . 7. See Entering Text. See Set GPS Format first to the options below . 2. Scroll to set here. Set Location Info allows you to change the name of the transmission, up to 'Set...
...group and press E/ . 4. At 'Program System' press E/ . 3. At 'Select System' scroll to the system where you want to scanning when done with a GPS unit attached. Press SCAN/SEARCH to return to edit a group and press E/ . 4. Enter the latitude and press E/ . 53 Scroll to 1000 ms and press E/... E/ to edit and press E/ . 6. Press MENU. 2. Continue at 'Edit Name' below and press E/ . 7. See Entering Text. See Set GPS Format first to the options below . 2. Scroll to set here. Set Location Info allows you to change the name of the transmission, up to 'Set...

English Manual
Page 58
At 'Set GPS Enable' press E/ . 7. Scroll to exit. PROGRAMMING FREQUENCIES/TGIDS Once you have your channels. If you want to edit the channel settings or are done editing ...
At 'Set GPS Enable' press E/ . 7. Scroll to exit. PROGRAMMING FREQUENCIES/TGIDS Once you have your channels. If you want to edit the channel settings or are done editing ...
English Manual
Page 64
USING THE BCD996P2 WITH A GPS LOCATION-BASED SCANNING You can connect the scanner to a compatible GPS device and set the scanner to automatically unlock and lockout sites/ groups based on the location information and range settings you GPS unit with information the scanner provides. You can also temporarily lockout ... beeps and briefly displays 'GPS Connected' and (temporary) locks and unlocks all sites/groups (enabled for scan) are 'enabled for you to 125 miles from the point. The BCD996P2 uses the data, supplied by a site/ group, the scanner beeps and displays the name of minutes...
USING THE BCD996P2 WITH A GPS LOCATION-BASED SCANNING You can connect the scanner to a compatible GPS device and set the scanner to automatically unlock and lockout sites/ groups based on the location information and range settings you GPS unit with information the scanner provides. You can also temporarily lockout ... beeps and briefly displays 'GPS Connected' and (temporary) locks and unlocks all sites/groups (enabled for scan) are 'enabled for you to 125 miles from the point. The BCD996P2 uses the data, supplied by a site/ group, the scanner beeps and displays the name of minutes...

English Manual
Page 65
... below. Press MENU. 2. At 'Select Type' scroll to select the type then press E/ . To Edit an Existing Location: 1. Press MENU. 2. Press and hold GPS for GPS display modes. Scroll to 'New Location' and press E/ . Scroll to 'Program Location' and press E/ . 3. The default name is P (POI), X (dangerous crossing...name with editing. The default name is DRD (dangerous road), DXG (dangerous crossing), or POI (point of interest). Scroll to a GPS): 1. POI Edit Name Set Type Set Alert Set Location Info Set Range Set Lockout Delete Location New Location Dangerous Xing or Dangerous ...
... below. Press MENU. 2. At 'Select Type' scroll to select the type then press E/ . To Edit an Existing Location: 1. Press MENU. 2. Press and hold GPS for GPS display modes. Scroll to 'New Location' and press E/ . Scroll to 'Program Location' and press E/ . 3. The default name is P (POI), X (dangerous crossing...name with editing. The default name is DRD (dangerous road), DXG (dangerous crossing), or POI (point of interest). Scroll to a GPS): 1. POI Edit Name Set Type Set Alert Set Location Info Set Range Set Lockout Delete Location New Location Dangerous Xing or Dangerous ...

English Manual
Page 66
... 'Set Level' scroll to 'Level 1-15 or Auto' (the scanner sets the alert beep to 'Set Type' and press E/ . 2. Press MENU to return. 62 GPS DISPLAY MODE GPS Review Location Mode Edit Name the default name is P (POI), X (dangerous crossing), R (dangerous road), then YYMMDD hhmmss that location. 1. Press MENU to return. Scroll..., or White and press E/ . 7. Scroll to the 'Program Location' menu for that indicates the year, month, date, and time you stored the location point with a GPS. 1.
... 'Set Level' scroll to 'Level 1-15 or Auto' (the scanner sets the alert beep to 'Set Type' and press E/ . 2. Press MENU to return. 62 GPS DISPLAY MODE GPS Review Location Mode Edit Name the default name is P (POI), X (dangerous crossing), R (dangerous road), then YYMMDD hhmmss that location. 1. Press MENU to return. Scroll..., or White and press E/ . 7. Scroll to the 'Program Location' menu for that indicates the year, month, date, and time you stored the location point with a GPS. 1.

