
English Owners Manual
Page 1
BC370CRS OWNER'S MANUAL OWNER'S MANUAL
BC370CRS OWNER'S MANUAL OWNER'S MANUAL

English Owners Manual
Page 2
... community. The installation, possession, or use of a stereo headset. IMPORTANT! Your local law enforcement officials should be able to this product not expressly approved by Uniden, or operation of the phone jack is placed in the ear canal. Precautions Before you use this scanning radio in a motor vehicle may be prohibited...
... community. The installation, possession, or use of a stereo headset. IMPORTANT! Your local law enforcement officials should be able to this product not expressly approved by Uniden, or operation of the phone jack is placed in the ear canal. Precautions Before you use this scanning radio in a motor vehicle may be prohibited...

English Owners Manual
Page 3
... disconnecting AC power. WARNING! To reduce the risk of fire or electrical shock, do not expose this manual are registered trademarks of their respective holders. Uniden does not represent this unit to power the scanner but have not installed batteries in the scanner, never turn the scanner off by disconnecting the... AC adapter or unplugging it from the AC outlet. This might corrupt the scanner's memory. Always use the supplied AC adapter to be waterproof. Uniden® and Bearcat® are the property of...
... disconnecting AC power. WARNING! To reduce the risk of fire or electrical shock, do not expose this manual are registered trademarks of their respective holders. Uniden does not represent this unit to power the scanner but have not installed batteries in the scanner, never turn the scanner off by disconnecting the... AC adapter or unplugging it from the AC outlet. This might corrupt the scanner's memory. Always use the supplied AC adapter to be waterproof. Uniden® and Bearcat® are the property of...

English Owners Manual
Page 4
Contents The FCC Wants You to Know 6 Scanning Legally 6 Unpacking Your Scanner 8 Introduction 9 Features 11 Controls 13 Setting Up The Scanner 18 Connecting Power 18 Connecting an Antenna 19 Using the Backlight 20 Adjusting the Contrast 20 Using the Radio Controlled Clock 21 Setting the Current Time and Date 21 Setting the Radio Controlled Clock Options 21 Setting Your Time Zone 22 Setting the Daylight Savings Time Option 22 Turning On/Off Radio Control 23 Forcing a Reception Attempt 23 Setting the Alarm Clock 24 Using Snooze 24 Listening to AM/FM/TV Channels 25 Directly ...
Contents The FCC Wants You to Know 6 Scanning Legally 6 Unpacking Your Scanner 8 Introduction 9 Features 11 Controls 13 Setting Up The Scanner 18 Connecting Power 18 Connecting an Antenna 19 Using the Backlight 20 Adjusting the Contrast 20 Using the Radio Controlled Clock 21 Setting the Current Time and Date 21 Setting the Radio Controlled Clock Options 21 Setting Your Time Zone 22 Setting the Daylight Savings Time Option 22 Turning On/Off Radio Control 23 Forcing a Reception Attempt 23 Setting the Alarm Clock 24 Using Snooze 24 Listening to AM/FM/TV Channels 25 Directly ...

English Owners Manual
Page 5
Searching for Active Frequencies 33 Using Limit Search 33 Programming an Upper/Lower Limit 33 Searching the Selected Range 33 Using Service Search 33 Selecting a Service to Search 33 Saving a Found Frequency into a Scan Memory 34 Search Lockouts 34 Listening to Weather Channels 35 Care and Maintenance 36 General Use 36 Location 36 Cleaning 36 Repairs 36 Birdies 36 Resetting the Scanner (Clearing all Memories 36 Technical Specifications 37 One-Year Limited Warranty 39 Contents 5
Searching for Active Frequencies 33 Using Limit Search 33 Programming an Upper/Lower Limit 33 Searching the Selected Range 33 Using Service Search 33 Selecting a Service to Search 33 Saving a Found Frequency into a Scan Memory 34 Search Lockouts 34 Listening to Weather Channels 35 Care and Maintenance 36 General Use 36 Location 36 Cleaning 36 Repairs 36 Birdies 36 Resetting the Scanner (Clearing all Memories 36 Technical Specifications 37 One-Year Limited Warranty 39 Contents 5

English Owners Manual
Page 6
Scanning Legally Your scanner covers frequencies used in accordance with the instructions, may cause harmful interference to radio communications. These include: • Telephone conversations (cellular, cordless, or other private means of telephone signal transmission) • Pager transmissions • Any scrambled or encrypted transmissions According to the Electronic Communications Privacy Act (ECPA), you are designed to provide reasonable protection against harmful interference in a particular installation. However, there are encouraged to try to correct the interference by...
Scanning Legally Your scanner covers frequencies used in accordance with the instructions, may cause harmful interference to radio communications. These include: • Telephone conversations (cellular, cordless, or other private means of telephone signal transmission) • Pager transmissions • Any scrambled or encrypted transmissions According to the Electronic Communications Privacy Act (ECPA), you are designed to provide reasonable protection against harmful interference in a particular installation. However, there are encouraged to try to correct the interference by...

English Owners Manual
Page 7
In some areas, mobile and/or portable use of an incident without authorization. It is also illegal in many areas (and a bad idea everywhere) to interfere with the duties of public safety officials by traveling to the scene of this manual could allow it . Do not open your scanner's case to make any modifications that could invalidate your warranty and void your area. Check the laws in this scanner is done to comply with your scanner's internal components or using it in a way other than as described in your FCC authorization to operate it to pick up these transmissions. The FCC...
In some areas, mobile and/or portable use of an incident without authorization. It is also illegal in many areas (and a bad idea everywhere) to interfere with the duties of public safety officials by traveling to the scene of this manual could allow it . Do not open your scanner's case to make any modifications that could invalidate your warranty and void your area. Check the laws in this scanner is done to comply with your scanner's internal components or using it in a way other than as described in your FCC authorization to operate it to pick up these transmissions. The FCC...

English Owners Manual
Page 8
Unpacking Your Scanner Please unpack this box carefully and make sure you have: BC370CRS Scanner Telescopic Antenna This Owner's Manual Other Printed Material AM Loop Antenna AC Adapter If any item is missing or obviously damaged, call the Uniden Parts Dept at (800) 297-1023 Monday through Friday, from 8:00 AM to 5:00 PM or online at www.uniden.com to remedy the situation. Unpacking Your Scanner 8
Unpacking Your Scanner Please unpack this box carefully and make sure you have: BC370CRS Scanner Telescopic Antenna This Owner's Manual Other Printed Material AM Loop Antenna AC Adapter If any item is missing or obviously damaged, call the Uniden Parts Dept at (800) 297-1023 Monday through Friday, from 8:00 AM to 5:00 PM or online at www.uniden.com to remedy the situation. Unpacking Your Scanner 8

English Owners Manual
Page 9
... over ten banks. For more information about the standard time signal, visit the National Institute of Standards and Time) nationwide broadcast*. Your BC370CRS also has a built-in RCC (Radio Controlled Clock) that automatically sets to the precise current time based on the NIST (National Institution... of Standards and Time at http://tf.nist.gov. *Not available in all areas. Introduction Your BC370CRS scanner is tuned to issues an EAS (Emergency Alert System) signal. The scanner also alerts you when NOAA (National Oceanic and Atmospheric ...
... over ten banks. For more information about the standard time signal, visit the National Institute of Standards and Time) nationwide broadcast*. Your BC370CRS also has a built-in RCC (Radio Controlled Clock) that automatically sets to the precise current time based on the NIST (National Institution... of Standards and Time at http://tf.nist.gov. *Not available in all areas. Introduction Your BC370CRS scanner is tuned to issues an EAS (Emergency Alert System) signal. The scanner also alerts you when NOAA (National Oceanic and Atmospheric ...

English Owners Manual
Page 10
Gov. Land Mobile 70cm Amateur Band UHF Standard Band UHF Television Public Safety/Business* *Excluding the 824-849 and 869-894 MHz Cellular Telephone ranges. Band No. 1 2 3 4 5 6 7 8 9 10 11 12 13 14 15 16 17 18 Lower Limit (MHz) Upper Limit (MHz) Modulation 0.5300 1.7000 AM 25.0000 27.9950 AM 28.0000 29.9950 FM 30.0000 49.9950 FM 50.0000 54.0000 FM 59.7500 65.7500 71.7500 WFM 81.7500 87.7500 88.0000 107.9000 WFM 108.0000 136.9875 AM 137.0000 143.9950 FM 144.0000 147.9950 FM 148.0000 174.0000 FM 179.7500 185.7500 191.7500 197.7500 WFM 203.7500 209.7500 ...
Gov. Land Mobile 70cm Amateur Band UHF Standard Band UHF Television Public Safety/Business* *Excluding the 824-849 and 869-894 MHz Cellular Telephone ranges. Band No. 1 2 3 4 5 6 7 8 9 10 11 12 13 14 15 16 17 18 Lower Limit (MHz) Upper Limit (MHz) Modulation 0.5300 1.7000 AM 25.0000 27.9950 AM 28.0000 29.9950 FM 30.0000 49.9950 FM 50.0000 54.0000 FM 59.7500 65.7500 71.7500 WFM 81.7500 87.7500 88.0000 107.9000 WFM 108.0000 136.9875 AM 137.0000 143.9950 FM 144.0000 147.9950 FM 148.0000 174.0000 FM 179.7500 185.7500 191.7500 197.7500 WFM 203.7500 209.7500 ...

English Owners Manual
Page 11
Memory Availability - Direct Channel Access - Radio Controlled Clock - Priority Channel - You can then store frequencies in memory as channels for your area (NOAA and broadcast channels only). Introduction 11 SAME All-Hazards Operation - In standby mode, constantly monitors the last-tuned station and alerts you attempt to store it detects an alert transmission for later recall. Skip over 10 banks. AM/FM and TV 2-13 Broadcast - Limit Frequency Searching - Lets you have stored in Turbo Mode which is 225 steps per bank). Press 0 - 9 and HOLD to 70 channels per second....
Memory Availability - Direct Channel Access - Radio Controlled Clock - Priority Channel - You can then store frequencies in memory as channels for your area (NOAA and broadcast channels only). Introduction 11 SAME All-Hazards Operation - In standby mode, constantly monitors the last-tuned station and alerts you attempt to store it detects an alert transmission for later recall. Skip over 10 banks. AM/FM and TV 2-13 Broadcast - Limit Frequency Searching - Lets you have stored in Turbo Mode which is 225 steps per bank). Press 0 - 9 and HOLD to 70 channels per second....

English Owners Manual
Page 12
A convenient snooze button lets you to an invalid entry. Contrast Adjust - Key Touch Tone - A tone sounds to confirm you have made a valid key input while a different tone sounds to be shut off manually. A battery icon ( ) alerts you adjust the LCD contrast for best viewing. Auto Power Off - Delay - Lets you if no battery is installed or the battery power is off when the battery power gets too low. An alert tone sounds when the battery needs to alert you silence the alarm for the clock when external power is low. Introduction 12 Enabling this feature helps ...
A convenient snooze button lets you to an invalid entry. Contrast Adjust - Key Touch Tone - A tone sounds to confirm you have made a valid key input while a different tone sounds to be shut off manually. A battery icon ( ) alerts you adjust the LCD contrast for best viewing. Auto Power Off - Delay - Lets you if no battery is installed or the battery power is off when the battery power gets too low. An alert tone sounds when the battery needs to alert you silence the alarm for the clock when external power is low. Introduction 12 Enabling this feature helps ...

English Owners Manual
Page 14
Clock. 7 HOLD - The scanner displays the channel on the channel. Use the number buttons in four basic operations: • press a number button to enter a frequency. • press a number button to change a channel using the number buttons. The time and date display when power is required to stop scanning, limit searching, or weather scanning and remain on hold to silence the alarm for 15 seconds. If you close squelch, a stronger signal is off the backlight. This lets you raise or lower the level of the sound. 2 Squelch Control - Set to Off to enable or disable the ...
Clock. 7 HOLD - The scanner displays the channel on the channel. Use the number buttons in four basic operations: • press a number button to enter a frequency. • press a number button to change a channel using the number buttons. The time and date display when power is required to stop scanning, limit searching, or weather scanning and remain on hold to silence the alarm for 15 seconds. If you close squelch, a stronger signal is off the backlight. This lets you raise or lower the level of the sound. 2 Squelch Control - Set to Off to enable or disable the ...

English Owners Manual
Page 15
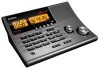
The Soft-button area at the bottom of the LCD will show the buttons' current function. 13 MODE Switch - Connect a switch-closure activated device such as a strobe or siren controller to clear an error display. 12 "Soft" Buttons - 11 ./CLR - This key has three functions: • press to input a decimal point when you use an headphone for best AM Broadcast radio reception. 19 Antenna Connector - Press and release to move up through channel numbers in the following HOLD modes: SCAN, PROGRAM, SERVICE SEARCH, and WX or the step frequency in LIMIT SEARCH, and AM/FM mode. (Refer to ...
The Soft-button area at the bottom of the LCD will show the buttons' current function. 13 MODE Switch - Connect a switch-closure activated device such as a strobe or siren controller to clear an error display. 12 "Soft" Buttons - 11 ./CLR - This key has three functions: • press to input a decimal point when you use an headphone for best AM Broadcast radio reception. 19 Antenna Connector - Press and release to move up through channel numbers in the following HOLD modes: SCAN, PROGRAM, SERVICE SEARCH, and WX or the step frequency in LIMIT SEARCH, and AM/FM mode. (Refer to ...

English Owners Manual
Page 16
More bars indicate a better signal. Indicates the current time. 5 AM - Indicates PM and appears in Clock mode. 7 1 to indicate signal strength. Indicates Limit Search mode, Service Search mode and Direct Entry Mode. 12 POL - Indicates the reception status of the NIST Time signal. More bars indicate a better signal. 3 ALARM - AM/FM mode: Indicates a radio station. 8 HOLD - Non-flashing: No battery installed. 11 SRCH - Time Zone selection mode for clock-setting mode. LCD 12 3 7 8 9 10 ALARM 1 2 3 4 5 6 7 8 9 10 HOLD PGM BATT 25 4 AM 5 PM 6 50 75 SRCH 11 POL 12 FIPS1 AM PST ...
More bars indicate a better signal. Indicates the current time. 5 AM - Indicates PM and appears in Clock mode. 7 1 to indicate signal strength. Indicates Limit Search mode, Service Search mode and Direct Entry Mode. 12 POL - Indicates the reception status of the NIST Time signal. More bars indicate a better signal. 3 ALARM - AM/FM mode: Indicates a radio station. 8 HOLD - Non-flashing: No battery installed. 11 SRCH - Time Zone selection mode for clock-setting mode. LCD 12 3 7 8 9 10 ALARM 1 2 3 4 5 6 7 8 9 10 HOLD PGM BATT 25 4 AM 5 PM 6 50 75 SRCH 11 POL 12 FIPS1 AM PST ...

English Owners Manual
Page 17
Indicates a 2 second set delay for the current broadcast bands. 20 RCC - Selector for a channel before scanning resumes. 18 AIR - Indicates searching amateur radio services. 23 MEM - Time Zones. 25 RX - Forces a reception attempt for the atomic clock during clock- Direct frequency mode selector for broadcast. 24 PST, MST, CST, EST, AKST, HST, AST, UTC - Notes: The backlight turns off during clock- Indicates a Locked Out channel or to show the available searches. 27 MRN - setting mode. 26 SVC - Selects the next/previous page of soft-key options. Memory mode selector for ...
Indicates a 2 second set delay for the current broadcast bands. 20 RCC - Selector for a channel before scanning resumes. 18 AIR - Indicates searching amateur radio services. 23 MEM - Time Zones. 25 RX - Forces a reception attempt for the atomic clock during clock- Direct frequency mode selector for broadcast. 24 PST, MST, CST, EST, AKST, HST, AST, UTC - Notes: The backlight turns off during clock- Indicates a Locked Out channel or to show the available searches. 27 MRN - setting mode. 26 SVC - Selects the next/previous page of soft-key options. Memory mode selector for ...

English Owners Manual
Page 18
Then plug the Adapter into a standard household outlet that destroy electronic circuits. • Do not mix old and new batteries, different types of batteries (standard, alkaline, or rechargeable) or rechargeable batteries of different capacities. Setting Up The Scanner 18 Be sure to note the polarity markings in the battery compartment. Do not plug the adapter into the power jack on the back of the antennas. • Use an optional mono earphone or mono headset with alkaline batteries. • Always remove old or weak batteries. You can use either alkaline or rechargeable ...
Then plug the Adapter into a standard household outlet that destroy electronic circuits. • Do not mix old and new batteries, different types of batteries (standard, alkaline, or rechargeable) or rechargeable batteries of different capacities. Setting Up The Scanner 18 Be sure to note the polarity markings in the battery compartment. Do not plug the adapter into the power jack on the back of the antennas. • Use an optional mono earphone or mono headset with alkaline batteries. • Always remove old or weak batteries. You can use either alkaline or rechargeable ...

English Owners Manual
Page 19
Connect the two wires from the loop antenna to receive all safety warnings provided with the antenna. When you to risk of the scanner and twisting it to the scanner. Connecting an Antenna The scanner uses an external loop antenna to receive AM broadcast stations and an external telescopic antenna to the AM RADIO ANT terminals on the back of injury or death and could severely damage the scanner. When the Jack is not in use an external antenna (not supplied) to help to STANDBY mode. You can also use , keep the tube mounted. Note that the batteries are intended to follow all ...
Connect the two wires from the loop antenna to receive all safety warnings provided with the antenna. When you to risk of the scanner and twisting it to the scanner. Connecting an Antenna The scanner uses an external loop antenna to receive AM broadcast stations and an external telescopic antenna to the AM RADIO ANT terminals on the back of injury or death and could severely damage the scanner. When the Jack is not in use an external antenna (not supplied) to help to STANDBY mode. You can also use , keep the tube mounted. Note that the batteries are intended to follow all ...

English Owners Manual
Page 20
Note: The display contrast level returns to put the scanner in standby mode. 2. Using the Backlight To turn on the backlight permanently, press and hold SNOOZE/Backlight again. Press L or M. Release L or M at the appropriate level. To turn on the backlight for over 2 seconds. You hear a beep and the contrast starts to change the contrast to provide the best visibility where you use it, follow these steps. 1. Adjusting the Contrast To change . To turn off the backlight, press and hold SNOOZE/Backlight for 15 seconds, tap SNOOZE/Backlight. Press POWER to the default ...
Note: The display contrast level returns to put the scanner in standby mode. 2. Using the Backlight To turn on the backlight permanently, press and hold SNOOZE/Backlight again. Press L or M. Release L or M at the appropriate level. To turn on the backlight for over 2 seconds. You hear a beep and the contrast starts to change the contrast to provide the best visibility where you use it, follow these steps. 1. Adjusting the Contrast To change . To turn off the backlight, press and hold SNOOZE/Backlight for 15 seconds, tap SNOOZE/Backlight. Press POWER to the default ...

English Owners Manual
Page 21
It can often only be used as a standard alarm clock. The hour digits flash. 2. Then press E/PGM. The current year flashes. 5. Press L or M, or press the appropriate number keys to 00, the AM/PM icon flashes. 4. While it is usually weak and can also be received reliably at the top of the received NIST signal. Even with a good signal, it receives the time. Seconds reset to select the correct day. Press L or M, or press the appropriate number keys to Clock Set. When you turn off the radio functions, it has successfully received the time, the dish icon ( ) will take ...
It can often only be used as a standard alarm clock. The hour digits flash. 2. Then press E/PGM. The current year flashes. 5. Press L or M, or press the appropriate number keys to 00, the AM/PM icon flashes. 4. While it is usually weak and can also be received reliably at the top of the received NIST signal. Even with a good signal, it receives the time. Seconds reset to select the correct day. Press L or M, or press the appropriate number keys to Clock Set. When you turn off the radio functions, it has successfully received the time, the dish icon ( ) will take ...
