English Owners Manual
Page 2
... 10 Testing the Connection 11 Changing the dial mode 12 Expanding Your Phone 13 Adding accessory handsets 13 Registering accessory handsets 13 Using Multiple Bases 14 Registering the handset to another base 14 Selecting the base 15 Getting to Know Your New Phone 16 Features 16 Answering system features 16 Terminology Used in this Manual... Storing Caller ID or Redial Numbers in the Phonebook 27 Deleting a Single Phonebook Entry 27 Deleting all Phonebook Entries 28 Copying Phonebook Entries to Another Station...... 28 2
... 10 Testing the Connection 11 Changing the dial mode 12 Expanding Your Phone 13 Adding accessory handsets 13 Registering accessory handsets 13 Using Multiple Bases 14 Registering the handset to another base 14 Selecting the base 15 Getting to Know Your New Phone 16 Features 16 Answering system features 16 Terminology Used in this Manual... Storing Caller ID or Redial Numbers in the Phonebook 27 Deleting a Single Phonebook Entry 27 Deleting all Phonebook Entries 28 Copying Phonebook Entries to Another Station...... 28 2
English Owners Manual
Page 3
Customizing Your Handsets 29 Changing the Handset Banner 29 Selecting a Ring Tone 29 Activating AutoTalk 30 Activating Any Key Answer 30 Using Your Phone 30 During a Power Failure 30 Making and Receiving Calls 31 Making a Call from the Phonebook 32 Chain dialing from the phonebook 32 Switching to the ...
Customizing Your Handsets 29 Changing the Handset Banner 29 Selecting a Ring Tone 29 Activating AutoTalk 30 Activating Any Key Answer 30 Using Your Phone 30 During a Power Failure 30 Making and Receiving Calls 31 Making a Call from the Phonebook 32 Chain dialing from the phonebook 32 Switching to the ...
English Owners Manual
Page 4
... Identification Number (PIN).......... 49 Dialing in to your answering system 49 Wall Mounting the Base 51 Maintenance 53 Specifications 53 Battery Information 53 Battery life 53 Low battery alert 54 ... line filter or DSL filter........ 59 Resetting the Handset 59 Resetting the Handset Without the Base 60 Changing the Line Mode for Multiple Extensions.... 61 Traveling Out of Range 61 Liquid ...Setting the Record Time (or Announce only 45 Activating the Message Alert 45 Activating the Base Call Screen 45 Using the Answering System 46 Turning Your Answering System On and Off..............
... Identification Number (PIN).......... 49 Dialing in to your answering system 49 Wall Mounting the Base 51 Maintenance 53 Specifications 53 Battery Information 53 Battery life 53 Low battery alert 54 ... line filter or DSL filter........ 59 Resetting the Handset 59 Resetting the Handset Without the Base 60 Changing the Line Mode for Multiple Extensions.... 61 Traveling Out of Range 61 Liquid ...Setting the Record Time (or Announce only 45 Activating the Message Alert 45 Activating the Base Call Screen 45 Using the Answering System 46 Turning Your Answering System On and Off..............
English Owners Manual
Page 5
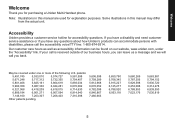
...030,819 5 Note: Illustrations in this manual are used for accessibility questions. If your call is received outside of the following U.S. Accessibility Uniden provides a customer service hotline for explanation purposes. Some illustrations in this manual may differ from the actual unit. If you have a ...disability and need customer service assistance or if you back. Welcome Welcome Thank you for purchasing a Uniden Multi-Handset phone. May be found on our website, www.uniden.com, under one or more of our business hours, you can leave us a message and we will ...
...030,819 5 Note: Illustrations in this manual are used for accessibility questions. If your call is received outside of the following U.S. Accessibility Uniden provides a customer service hotline for explanation purposes. Some illustrations in this manual may differ from the actual unit. If you have a ...disability and need customer service assistance or if you back. Welcome Welcome Thank you for purchasing a Uniden Multi-Handset phone. May be found on our website, www.uniden.com, under one or more of our business hours, you can leave us a message and we will ...
English Owners Manual
Page 6
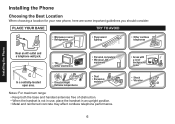
... the Best Location When choosing a location for your new phone, here are some important guidelines you should consider: PLACE YOUR BASE TRY TO AVOID • Microwave ovens • Refrigerators • Fluorescent lighting • Other cordless telephones Installing the Phone Near an AC outlet and a telephone wall jack. • TVs • Other electronics • Personal...
... the Best Location When choosing a location for your new phone, here are some important guidelines you should consider: PLACE YOUR BASE TRY TO AVOID • Microwave ovens • Refrigerators • Fluorescent lighting • Other cordless telephones Installing the Phone Near an AC outlet and a telephone wall jack. • TVs • Other electronics • Personal...
English Owners Manual
Page 7
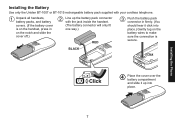
Installing the Phone Installing the Battery Use only the Uniden BT-1007 or BT-1015 rechargeable battery pack supplied with the jack inside the handset. (The battery connector will only fit one way.) RED Push the battery pack connector in firmly. (You should hear it up the battery pack connector with your cordless telephone...
Installing the Phone Installing the Battery Use only the Uniden BT-1007 or BT-1015 rechargeable battery pack supplied with the jack inside the handset. (The battery connector will only fit one way.) RED Push the battery pack connector in firmly. (You should hear it up the battery pack connector with your cordless telephone...
English Owners Manual
Page 8
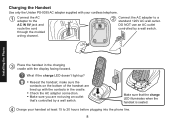
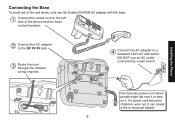
... sure that 's controlled by a wall switch. Connect the AC adapter to 20 hours before plugging into the phone line. 8 Installing the Phone Place the handset in the cradle. Charge your cordless telephone. DO NOT use an AC outlet controlled by a wall switch. Reseat the handset; What if the ...charge LED doesn't light up with the contacts in the charging cradle with the display facing forward. Check the AC adapter connection. Charging the Handset Use only the Uniden ...
... sure that 's controlled by a wall switch. Connect the AC adapter to 20 hours before plugging into the phone line. 8 Installing the Phone Place the handset in the cradle. Charge your cordless telephone. DO NOT use an AC outlet controlled by a wall switch. Reseat the handset; What if the ...charge LED doesn't light up with the contacts in the charging cradle with the display facing forward. Check the AC adapter connection. Charging the Handset Use only the Uniden ...
English Owners Manual
Page 9
... avoid risk of the phone and the base corded handset. Connect the AC adapter to a standard 120V AC wall outlet. DO NOT use the Uniden PS-0008 AC adapter with the base. Route the cord through the molded wiring channel. Connect the coiled cord to the left side of fire and shock, only use... an AC outlet controlled by a wall switch. Connect the AC adapter to the DC IN 9V jack. Installing the Phone Don...
... avoid risk of the phone and the base corded handset. Connect the AC adapter to a standard 120V AC wall outlet. DO NOT use the Uniden PS-0008 AC adapter with the base. Route the cord through the molded wiring channel. Connect the coiled cord to the left side of fire and shock, only use... an AC outlet controlled by a wall switch. Connect the AC adapter to the DC IN 9V jack. Installing the Phone Don...

English Owners Manual
Page 10
... filter, telephone-line-based Internet services can interfere with standard phones. 10 Route the cord through your phone line? Do you have DSL or any high-speed Internet service delivered through the molded wiring channel. What if Check TEL Line appears on the base or handset display? ...Telephone cord Telephone wall jack DSL filter Check the telephone cord connection. Try putting a DSL filter between the base and the wall jack. Installing the Phone Connecting to the Phone Line Connect the telephone cord to a ...
... filter, telephone-line-based Internet services can interfere with standard phones. 10 Route the cord through your phone line? Do you have DSL or any high-speed Internet service delivered through the molded wiring channel. What if Check TEL Line appears on the base or handset display? ...Telephone cord Telephone wall jack DSL filter Check the telephone cord connection. Try putting a DSL filter between the base and the wall jack. Installing the Phone Connecting to the Phone Line Connect the telephone cord to a ...

English Owners Manual
Page 11
... static? What if there is a lot of those? What if the call , and then press END to the . Testing the Connection Pick up . Installing the Phone What if the display doesn't show Talk. Make a quick test call doesn't go through? Note: Make sure you can 't hear a dial tone? DC IN ... sure the battery pack is fully charged. • Make sure the AC adapter cord is the base near any accessory handsets that were packaged with your phone. 11 What if I can get a dial tone on the base. You should hear a dial tone, and the display should show Talk? • Check the battery ...
... static? What if there is a lot of those? What if the call , and then press END to the . Testing the Connection Pick up . Installing the Phone What if the display doesn't show Talk. Make a quick test call doesn't go through? Note: Make sure you can 't hear a dial tone? DC IN ... sure the battery pack is fully charged. • Make sure the AC adapter cord is the base near any accessory handsets that were packaged with your phone. 11 What if I can get a dial tone on the base. You should hear a dial tone, and the display should show Talk? • Check the battery ...

English Owners Manual
Page 12
...need to change your phone's dial mode. If you don't get a dial tone or can communicate with the telephone network in step 3. These days, most base networks use a method called tone dialing, so your phone comes programmed for tone dialing. NOW YOU ARE READY TO USE YOUR PHONE! 12 If you ...will hear a confirmation tone. If your phone company uses pulse dialing, you ever need to change ...
...need to change your phone's dial mode. If you don't get a dial tone or can communicate with the telephone network in step 3. These days, most base networks use a method called tone dialing, so your phone comes programmed for tone dialing. NOW YOU ARE READY TO USE YOUR PHONE! 12 If you ...will hear a confirmation tone. If your phone company uses pulse dialing, you ever need to change ...
English Owners Manual
Page 13
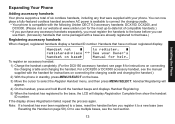
... a handset has ever been registered to a base, reset the handset before you can use multiple bases, see Resetting the Handset on page 59). You can now place a fully-featured cordless handset anywhere AC power is available to connect the charging cradle. • Your phone is compatible with the following Uniden DECT 6.0 accessory handsets: DCX150, DCX200, and...
... a handset has ever been registered to a base, reset the handset before you can use multiple bases, see Resetting the Handset on page 59). You can now place a fully-featured cordless handset anywhere AC power is available to connect the charging cradle. • Your phone is compatible with the following Uniden DECT 6.0 accessory handsets: DCX150, DCX200, and...
English Owners Manual
Page 14
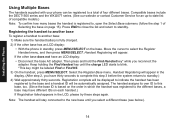
...8226; With the phone in the LCD, please try these steps again. Handset Registering will appear in the display. (After step 2, you reconnect the adapter. Then press and hold the Find Handset key* while you have thirty seconds to complete this base, too. (Since the base ID is based on the order... series and the WXI2077 series. (See our website or contact Customer Service for an up-to-date list of four different bases. Registering the handset to another base To register a handset to blink. *This key might be automatically assigned. Keep holding the Find Handset key until the charge...
...8226; With the phone in the LCD, please try these steps again. Handset Registering will appear in the display. (After step 2, you reconnect the adapter. Then press and hold the Find Handset key* while you have thirty seconds to complete this base, too. (Since the base ID is based on the order... series and the WXI2077 series. (See our website or contact Customer Service for an up-to-date list of four different bases. Registering the handset to another base To register a handset to blink. *This key might be automatically assigned. Keep holding the Find Handset key until the charge...
English Owners Manual
Page 15
... search for a new base if the base it's currently connected is not found , the handset will return to check messages from the handset. 1) With the phone in standby, press MENU/SELECT. If the base is unavailable or out of range. Installing the Phone Selecting the base After you register your ...handset to more than one base with an answering machine, you want to connect to, or ...
... search for a new base if the base it's currently connected is not found , the handset will return to check messages from the handset. 1) With the phone in standby, press MENU/SELECT. If the base is unavailable or out of range. Installing the Phone Selecting the base After you register your ...handset to more than one base with an answering machine, you want to connect to, or ...
English Owners Manual
Page 16
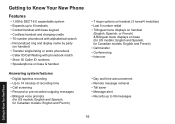
...Phone Features • 1.9GHz DECT 6.0 expandable system • Expands up to 59 messages. for Canadian models: English and French) • 7 ringer options on handset (3 tones/4 melodies) • Last 5 number redial • Trilingual menu displays on handset. (English, Spanish, or French). & Bilingual menu displays on base...8226; Toll saver • Message alert • Records up to Know Your New Phone 16 Getting to 6 handsets • Corded handset with base keypad • Cordless handset and charging cradle • 70-number phonebook with alphabetical search • Personalized ...
...Phone Features • 1.9GHz DECT 6.0 expandable system • Expands up to 59 messages. for Canadian models: English and French) • 7 ringer options on handset (3 tones/4 melodies) • Last 5 number redial • Trilingual menu displays on handset. (English, Spanish, or French). & Bilingual menu displays on base...8226; Toll saver • Message alert • Records up to Know Your New Phone 16 Getting to 6 handsets • Corded handset with base keypad • Cordless handset and charging cradle • 70-number phonebook with alphabetical search • Personalized ...
English Owners Manual
Page 17
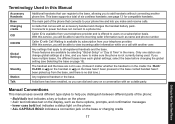
...and charges the handset battery pack. Only one station can change global settings at a time, and you have multiple bases, the different bases have to users on a subscription basis. The handset and the base are available by subscription from the base, and there is not currently being used. ...outside party. Any settings that can dial and carry on the base hasn't been pressed or the base corded handset hasn't been picked up from your phone line and lets you distinguish between different parts of six cordless handsets; These features are not in use. (It doesn't matter...
...and charges the handset battery pack. Only one station can change global settings at a time, and you have multiple bases, the different bases have to users on a subscription basis. The handset and the base are available by subscription from the base, and there is not currently being used. ...outside party. Any settings that can dial and carry on the base hasn't been pressed or the base corded handset hasn't been picked up from your phone line and lets you distinguish between different parts of six cordless handsets; These features are not in use. (It doesn't matter...
English Owners Manual
Page 18
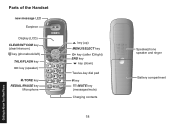
Getting to Know Your New Phone Parts of the Handset new message LED Earpiece Display (LCD) CLEAR/INT'COM key (clear/intercom) key (phonebook/left) TALK/FLASH key key (speaker) /TONE key REDIAL/PAUSE key Microphone key (up) MENU/SELECT key key (caller ID/right) END key key (down) Twelve-key dial pad # key /MUTE key (messages/mute) Charging contacts 18 Speakerphone speaker and ringer Battery compartment
Getting to Know Your New Phone Parts of the Handset new message LED Earpiece Display (LCD) CLEAR/INT'COM key (clear/intercom) key (phonebook/left) TALK/FLASH key key (speaker) /TONE key REDIAL/PAUSE key Microphone key (up) MENU/SELECT key key (caller ID/right) END key key (down) Twelve-key dial pad # key /MUTE key (messages/mute) Charging contacts 18 Speakerphone speaker and ringer Battery compartment
English Owners Manual
Page 19
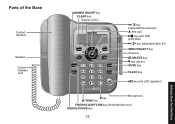
Parts of the Base Corded handset Speaker Coiled handset cord ANSWER ON/OFF key CLEAR key Display (LCD) CLEAR SELECT MENU ON/OFF ANSWER HOLD FIND 1 INTCOM REDIAL 4 GHI PAUSE 7 PQ RS VOLUME+/- 2 ABC DELETE 3 DEF MUTE 5 JKL 8 TUV 6 MNO 9 WX YZ FLASH TONE 0 OPER / key (repeat/left/phonebook) key (up) key and LED (play/stop) / key (skip/right/caller ID) MENU/SELECT key Antenna DELETE key key (down) MUTE key FLASH key key and LED (speaker) MIC # key /TONE key Microphone FIND/HOLD/INT'COM key (find/hold/intercom) REDIAL/PAUSE key 19 Getting to Know Your New Phone
Parts of the Base Corded handset Speaker Coiled handset cord ANSWER ON/OFF key CLEAR key Display (LCD) CLEAR SELECT MENU ON/OFF ANSWER HOLD FIND 1 INTCOM REDIAL 4 GHI PAUSE 7 PQ RS VOLUME+/- 2 ABC DELETE 3 DEF MUTE 5 JKL 8 TUV 6 MNO 9 WX YZ FLASH TONE 0 OPER / key (repeat/left/phonebook) key (up) key and LED (play/stop) / key (skip/right/caller ID) MENU/SELECT key Antenna DELETE key key (down) MUTE key FLASH key key and LED (speaker) MIC # key /TONE key Microphone FIND/HOLD/INT'COM key (find/hold/intercom) REDIAL/PAUSE key 19 Getting to Know Your New Phone

English Owners Manual
Page 20
... During a call Status of your answering system Day of the week and time Number of the week. The speaker icon appears when the speaker phone is muted. Base In standby Status of your voice mailbox. The voice mail icon appears when you have messages waiting in use. The T-coil icon appears when...
... During a call Status of your answering system Day of the week and time Number of the week. The speaker icon appears when the speaker phone is muted. Base In standby Status of your voice mailbox. The voice mail icon appears when you have messages waiting in use. The T-coil icon appears when...

English Owners Manual
Page 21
... way: • To open the Caller ID list. Open the • Press the top of the key to increase the ringer volume phonebook (while the phone is not in standby) or speaker volume (while you to move the cursor down. • To select the highlighted option, press Menu/Select. • To... is in use and the handsets are on a call ). Using the Interface Using the Four-way Function Key Your handset and base have multiple bases, be sure to select the correct base before changing the menu options. 21 If you have a four-way function key that allows you are within range of the...
... way: • To open the Caller ID list. Open the • Press the top of the key to increase the ringer volume phonebook (while the phone is not in standby) or speaker volume (while you to move the cursor down. • To select the highlighted option, press Menu/Select. • To... is in use and the handsets are on a call ). Using the Interface Using the Four-way Function Key Your handset and base have multiple bases, be sure to select the correct base before changing the menu options. 21 If you have a four-way function key that allows you are within range of the...