
Operation Manual
Page 1
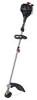
... (U.S.) or www.troybilt.ca (Canada). We reserve the right to obtain a list of printing. Operator's Manual Electric Start Capable 4-Cycle Trimmer TB6044 XP TABLE OF CONTENTS Service 1 Safety 2 Know Your Unit 5 Specifications 5 Assembly 6 Oil and Fuel 8 Starting and Stopping 10 Operation 12 Maintenance 13 Cleaning and Storage 17 Troubleshooting 18 Warranty 20 SAVE THESE...
... (U.S.) or www.troybilt.ca (Canada). We reserve the right to obtain a list of printing. Operator's Manual Electric Start Capable 4-Cycle Trimmer TB6044 XP TABLE OF CONTENTS Service 1 Safety 2 Know Your Unit 5 Specifications 5 Assembly 6 Oil and Fuel 8 Starting and Stopping 10 Operation 12 Maintenance 13 Cleaning and Storage 17 Troubleshooting 18 Warranty 20 SAVE THESE...

Operation Manual
Page 2
... by themselves eliminate any pressure in the states of children, bystanders and pets; Encourage bystanders to others. Forest Land and in the tank before starting the unit. Failure to relieve any danger. Do not operate the unit with the controls and proper use . DO NOT smoke. •... must be accompanied and guided by law that are approached, stop the engine and allow it to follow all adjustments or repairs before starting the engine. These can kill. Replace damaged parts. Never remove the fuel tank cap or add fuel when the engine is to the...
... by themselves eliminate any pressure in the states of children, bystanders and pets; Encourage bystanders to others. Forest Land and in the tank before starting the unit. Failure to relieve any danger. Do not operate the unit with the controls and proper use . DO NOT smoke. •... must be accompanied and guided by law that are approached, stop the engine and allow it to follow all adjustments or repairs before starting the engine. These can kill. Replace damaged parts. Never remove the fuel tank cap or add fuel when the engine is to the...

Operation Manual
Page 3
... Use only original equipment manufacturer (OEM) replacement parts and accessories for damage. Be in daylight or good artificial light. • Avoid accidental starting position whenever pulling the starter rope. Keep a firm grip on both trimming lines extended and the proper line installed. Take extra care when ... stationary when the engine is delayed or when walking from grass, leaves, excessive grease or carbon build up. • If the unit starts to another. • If you loan this unit. Keep the engine and muffler free from one location to vibrate abnormally, stop the...
... Use only original equipment manufacturer (OEM) replacement parts and accessories for damage. Be in daylight or good artificial light. • Avoid accidental starting position whenever pulling the starter rope. Keep a firm grip on both trimming lines extended and the proper line installed. Take extra care when ... stationary when the engine is delayed or when walking from grass, leaves, excessive grease or carbon build up. • If the unit starts to another. • If you loan this unit. Keep the engine and muffler free from one location to vibrate abnormally, stop the...
Operation Manual
Page 4
... E85 FUEL IN THIS UNIT WARNING: It has been proven that may get extremely hot from operation. SYMBOL MEANING • ON/OFF STOP CONTROL ON / START / RUN • ON/OFF STOP CONTROL OFF or STOP • PRIMER BULB Push primer bulb, fully and slowly, 10 times. • THROWN OBJECTS AND ROTATING...
... E85 FUEL IN THIS UNIT WARNING: It has been proven that may get extremely hot from operation. SYMBOL MEANING • ON/OFF STOP CONTROL ON / START / RUN • ON/OFF STOP CONTROL OFF or STOP • PRIMER BULB Push primer bulb, fully and slowly, 10 times. • THROWN OBJECTS AND ROTATING...
Operation Manual
Page 5
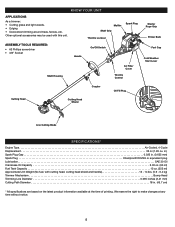
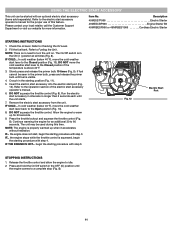
...: • #2 Phillips screwdriver • 3/8" Socket Handle On/Off Switch Shaft Housing Air Filter Cover Throttle Control Starter Rope Grip Primer Bulb Fuel Cap Cold Weather Start Lever Cutting Head Coupler Cutting Head Shield Oil Fill Plug Line Cutting Blade SPECIFICATIONS* Engine Type Air-Cooled, 4-Cycle Displacement 32 cc (1.95 cu.
...: • #2 Phillips screwdriver • 3/8" Socket Handle On/Off Switch Shaft Housing Air Filter Cover Throttle Control Starter Rope Grip Primer Bulb Fuel Cap Cold Weather Start Lever Cutting Head Coupler Cutting Head Shield Oil Fill Plug Line Cutting Blade SPECIFICATIONS* Engine Type Air-Cooled, 4-Cycle Displacement 32 cc (1.95 cu.
Operation Manual
Page 8
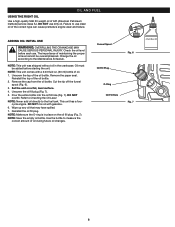
... Hole Fig. 7 8 OIL AND FUEL USING THE RIGHT OIL Use a high-quality SAE 30 weight oil of the oil bottle. Check the oil level before starting the unit. Remove the paper seal. Pour the entire bottle into the oil fill hole (Fig. 7). cycle engine. DO NOT use dirty oil. NOTE: This...
... Hole Fig. 7 8 OIL AND FUEL USING THE RIGHT OIL Use a high-quality SAE 30 weight oil of the oil bottle. Check the oil level before starting the unit. Remove the paper seal. Pour the entire bottle into the oil fill hole (Fig. 7). cycle engine. DO NOT use dirty oil. NOTE: This...
Operation Manual
Page 9
NEVER add fuel additives directly to avoid injury from the fuel container and the fueling site before starting the engine. 9 Ignited vapors may have spilled. 5. Position the unit with the fuel cap facing up any spilled fuel immediately. NOTE: Do not ... stop the engine and allow it to federal, state and local regulations. WARNING: Remove the fuel cap slowly to the unit's fuel tank. Do not start the engine until fuel vapors dissipate. 1. Avoid creating a source of performance problems. Use only fresh, clean unleaded gasoline. Using Fuel Additives Use a fuel ...
NEVER add fuel additives directly to avoid injury from the fuel container and the fueling site before starting the engine. 9 Ignited vapors may have spilled. 5. Position the unit with the fuel cap facing up any spilled fuel immediately. NOTE: Do not ... stop the engine and allow it to federal, state and local regulations. WARNING: Remove the fuel cap slowly to the unit's fuel tank. Do not start the engine until fuel vapors dissipate. 1. Avoid creating a source of performance problems. Use only fresh, clean unleaded gasoline. Using Fuel Additives Use a fuel ...

Operation Manual
Page 10
...... To avoid serious injury, the operator and the unit must be lethal in the ON ( I ) / Start Throttle Lockout STARTING INSTRUCTIONS 1. In cold weather (below 40°F), move the cold weather start lever to the Open position (Fig. 10). 6. DO NOT squeeze the throttle control. The unit may be... unit on. Press and hold the On/Off switch in the OFF (O) position until fuel is above 40°F. 3. begin the starting the unit. Refer to warm up when it accelerates without hesitation. Press the throttle lockout and squeeze the throttle control (Fig. 8). WARNING:...
...... To avoid serious injury, the operator and the unit must be lethal in the ON ( I ) / Start Throttle Lockout STARTING INSTRUCTIONS 1. In cold weather (below 40°F), move the cold weather start lever to the Open position (Fig. 10). 6. DO NOT squeeze the throttle control. The unit may be... unit on. Press and hold the On/Off switch in the OFF (O) position until fuel is above 40°F. 3. begin the starting the unit. Refer to warm up when it accelerates without hesitation. Press the throttle lockout and squeeze the throttle control (Fig. 8). WARNING:...
Operation Manual
Page 11
... an additional 30 to the Closed position if the temperature is squeezed, begin the starting position (Fig. 11). 5. DO NOT move the cold weather start accessory (items sold separately). USING THE ELECTRIC START ACCESSORY This unit can be used during this feature. If fuel cannot be seen ...in the ON ( I ) position at all times (Fig. 8). the engine does not start lever to 60 seconds. begin the starting procedure with step 3. Item No. Allow the engine to idle. 2. the engine stops while the throttle control is above 40°F. ...
... an additional 30 to the Closed position if the temperature is squeezed, begin the starting position (Fig. 11). 5. DO NOT move the cold weather start accessory (items sold separately). USING THE ELECTRIC START ACCESSORY This unit can be used during this feature. If fuel cannot be seen ...in the ON ( I ) position at all times (Fig. 8). the engine does not start lever to 60 seconds. begin the starting procedure with step 3. Item No. Allow the engine to idle. 2. the engine stops while the throttle control is above 40°F. ...
Operation Manual
Page 13
... the line is complete. WARNING: Never use the trimming line described in the table. The line may cause the engine to prevent the unit from starting accidentally. Turn the bump knob clockwise to the unit. Push the line through the cutting head until about these required maintenance procedures at 38 hours...
... the line is complete. WARNING: Never use the trimming line described in the table. The line may cause the engine to prevent the unit from starting accidentally. Turn the bump knob clockwise to the unit. Push the line through the cutting head until about these required maintenance procedures at 38 hours...

Operation Manual
Page 16
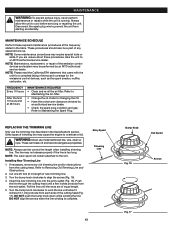
... and let the engine idle. Stop the engine and allow it clockwise until the engine idles smoothly (Fig. 24). 3. Clean around the spark plug. Start the engine. WARNING: Do not sand blast, scrape or clean spark plug electrodes. If the spark plug is cracked, fouled or dirty, replace it with... a 5/8-inch socket, turning it to Starting and Stopping. 2. NOTE: If using a torque wrench, torque to reduce the idle speed (Fig. 24). Remove the spark plug from the spark plug. 2. Inspect ...
... and let the engine idle. Stop the engine and allow it clockwise until the engine idles smoothly (Fig. 24). 3. Clean around the spark plug. Start the engine. WARNING: Do not sand blast, scrape or clean spark plug electrodes. If the spark plug is cracked, fouled or dirty, replace it with... a 5/8-inch socket, turning it to Starting and Stopping. 2. NOTE: If using a torque wrench, torque to reduce the idle speed (Fig. 24). Remove the spark plug from the spark plug. 2. Inspect ...
Operation Manual
Page 17
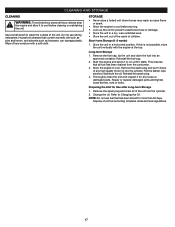
... not use or damage. • Store the unit in a horizontal position. Remove the fuel cap, tip the unit and drain the fuel into the cylinder. Start the engine and allow it to cool before storing. • Lock up the unit to Changing the Oil.
... not use or damage. • Store the unit in a horizontal position. Remove the fuel cap, tip the unit and drain the fuel into the cylinder. Start the engine and allow it to cool before storing. • Lock up the unit to Changing the Oil.

Operation Manual
Page 18
... tank is empty The primer bulb was not pressed enough The fuel is old (over 30 days) The spark plug is fouled The cold weather start lever is in the closed position SOLUTION Fill the fuel tank with fresh fuel Press the primer bulb 10 times or until fuel is visible... Drain the fuel tank and add fresh fuel Replace the spark plug Move the cold weather start lever to the open position THE ENGINE WILL NOT IDLE The air filter is dirty The fuel is old (over 30 days) The idle speed...
... tank is empty The primer bulb was not pressed enough The fuel is old (over 30 days) The spark plug is fouled The cold weather start lever is in the closed position SOLUTION Fill the fuel tank with fresh fuel Press the primer bulb 10 times or until fuel is visible... Drain the fuel tank and add fresh fuel Replace the spark plug Move the cold weather start lever to the open position THE ENGINE WILL NOT IDLE The air filter is dirty The fuel is old (over 30 days) The idle speed...
Parts Diagram
Page 1
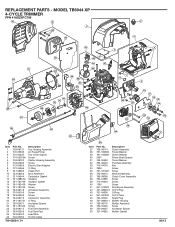
MODEL TB6044 XP 4-CYCLE TRIMMER PPN 41ADZ6PC766 46 47 1 48 49 2 5 37 38 39 27 41 6 3 4 50 42 43 45 44 40 36 35 34 33 31 30 ... 753-05259 753-06167 746-05053 769-08524 / 01 Description Top Housing Assembly Air Purge Primer Top Cover Gasket Screw Starter Housing Assembly Screw Electric Start Adapter O-Ring Intake Port Boot Assembly Carburetor Gasket Insulator Insulator Gasket Washer Screw Aircleaner Assembly Screw Screw Carburetor Assembly O-Ring Aircleaner Spacer Screw Fuel Tank...
MODEL TB6044 XP 4-CYCLE TRIMMER PPN 41ADZ6PC766 46 47 1 48 49 2 5 37 38 39 27 41 6 3 4 50 42 43 45 44 40 36 35 34 33 31 30 ... 753-05259 753-06167 746-05053 769-08524 / 01 Description Top Housing Assembly Air Purge Primer Top Cover Gasket Screw Starter Housing Assembly Screw Electric Start Adapter O-Ring Intake Port Boot Assembly Carburetor Gasket Insulator Insulator Gasket Washer Screw Aircleaner Assembly Screw Screw Carburetor Assembly O-Ring Aircleaner Spacer Screw Fuel Tank...


