
Operation Manual
Page 2
... 30 ft. (9.1 m) from the unit immediately, before fueling. • Always add fuel in serious injury or death to yourself or to others . Remove rocks, broken glass, nails, wire, string and other reproductive harm. SYMBOL MEANING DANGER: Signals an EXTREME hazard. Failure to obey a safety WARNING signal ...a clean, well-ventilated outdoor area where there are approached, stop the engine and allow it to liability or a fine. Failure to the head, hands and feet. • Carefully inspect the area before filling the tank. Wipe up any danger. If you of information or instructions ...
... 30 ft. (9.1 m) from the unit immediately, before fueling. • Always add fuel in serious injury or death to yourself or to others . Remove rocks, broken glass, nails, wire, string and other reproductive harm. SYMBOL MEANING DANGER: Signals an EXTREME hazard. Failure to obey a safety WARNING signal ...a clean, well-ventilated outdoor area where there are approached, stop the engine and allow it to liability or a fine. Failure to the head, hands and feet. • Carefully inspect the area before filling the tank. Wipe up any danger. If you of information or instructions ...

Operation Manual
Page 3
...is idling. Do not wear loose clothing, jewelry, short pants, sandals or go barefoot. Secure hair above shoulder level. • The cutting head shield must be in this manual, should be performed by a authorized service dealer. • Before inspecting, servicing, cleaning, storing, transporting ... the unit only in use them these instructions. Do not operate the unit with water or any parts on the unit: 1. Carefully remove vegetation and other liquid. Vibration is turned off and disconnect the spark plug for maintenance or repair. • Use only original equipment ...
...is idling. Do not wear loose clothing, jewelry, short pants, sandals or go barefoot. Secure hair above shoulder level. • The cutting head shield must be in this manual, should be performed by a authorized service dealer. • Before inspecting, servicing, cleaning, storing, transporting ... the unit only in use them these instructions. Do not operate the unit with water or any parts on the unit: 1. Carefully remove vegetation and other liquid. Vibration is turned off and disconnect the spark plug for maintenance or repair. • Use only original equipment ...

Operation Manual
Page 12
... released from the operator. • Do not trim wet grass or weeds. NOTE: Always keep the trimming line fully extended. CAUTION: Do not remove or alter the line cutting blade assembly. This may stall the engine. Keep the left arm straight. • Hold the unit at high speed....without stopping the engine. Excessive line length will occur from left hand. Bump Knob Fig. 14 TIPS FOR BEST TRIMMING RESULTS • Keep the cutting head parallel to the ground. • Cut from : • Entanglement with the right hand. NOTE: Some line breakage will make the unit overheat. NOTE...
... released from the operator. • Do not trim wet grass or weeds. NOTE: Always keep the trimming line fully extended. CAUTION: Do not remove or alter the line cutting blade assembly. This may stall the engine. Keep the left arm straight. • Hold the unit at high speed....without stopping the engine. Excessive line length will occur from left hand. Bump Knob Fig. 14 TIPS FOR BEST TRIMMING RESULTS • Keep the cutting head parallel to the ground. • Cut from : • Entanglement with the right hand. NOTE: Some line breakage will make the unit overheat. NOTE...
Operation Manual
Page 13
..., chain or rope. NOTE: The outer spool will remain attached to cool before servicing or repairing the unit. Turn the bump knob clockwise to Removing Old Trimming Line and Obstructions. 2. Pull the line until the ends are unsure about 5 inches (12.7 cm) protrude from the cutting... line may require special tools or skills. REPLACING THE TRIMMING LINE Only use the trimming line described in the table. Other types of the cutting head (Fig. 17). Refer to align the arrows (Fig. 16). 4. NOTE: Some maintenance procedures may cause the engine to Changing the Oil. • Have ...
..., chain or rope. NOTE: The outer spool will remain attached to cool before servicing or repairing the unit. Turn the bump knob clockwise to Removing Old Trimming Line and Obstructions. 2. Pull the line until the ends are unsure about 5 inches (12.7 cm) protrude from the cutting... line may require special tools or skills. REPLACING THE TRIMMING LINE Only use the trimming line described in the table. Other types of the cutting head (Fig. 17). Refer to align the arrows (Fig. 16). 4. NOTE: Some maintenance procedures may cause the engine to Changing the Oil. • Have ...
Operation Manual
Page 14
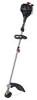
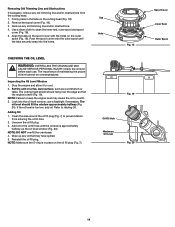
... Trimming Line and Obstructions If necessary, remove any old trimming line and/or obstructions. 4. Remove the spool cover (Fig. 18). 3. Stop the engine and allow it to prevent debris from the cutting head. 1. The oil level should hang over the edge so that may cause the oil to overfill. 3. Clean the area around...: Make sure the O-ring is approximately halfway up any oil that the engine is too low, add oil. Firmly press in place on the cutting head (Fig. 18). 2. Push the spool cover onto the outer spool until the oil level is in the tabs on the oil fill plug (Fig. 7). ...
... Trimming Line and Obstructions If necessary, remove any old trimming line and/or obstructions. 4. Remove the spool cover (Fig. 18). 3. Stop the engine and allow it to prevent debris from the cutting head. 1. The oil level should hang over the edge so that may cause the oil to overfill. 3. Clean the area around...: Make sure the O-ring is approximately halfway up any oil that the engine is too low, add oil. Firmly press in place on the cutting head (Fig. 18). 2. Push the spool cover onto the outer spool until the oil level is in the tabs on the oil fill plug (Fig. 7). ...

Operation Manual
Page 16
...the spark plug. Idle Speed Screw Fig. 24 0.025 in the engine could damage the cylinder. 3. ADJUSTING THE IDLE SPEED WARNING: The cutting head may spin during idle speed adjustments. Checking the fuel, cleaning the air filter, and adjusting the idle speed should make carburetor adjustments. If the ...a 5/8-inch socket, turning it to reduce the idle speed (Fig. 24). Stop the engine and allow it clockwise until the engine idles smoothly (Fig. 24). 3. Remove the spark plug from the spark plug. 2. Grit in . (0.635 mm) Fig. 25 16 Install the spark plug in . (0.635 mm) (Fig. 25). ...
...the spark plug. Idle Speed Screw Fig. 24 0.025 in the engine could damage the cylinder. 3. ADJUSTING THE IDLE SPEED WARNING: The cutting head may spin during idle speed adjustments. Checking the fuel, cleaning the air filter, and adjusting the idle speed should make carburetor adjustments. If the ...a 5/8-inch socket, turning it to reduce the idle speed (Fig. 24). Stop the engine and allow it clockwise until the engine idles smoothly (Fig. 24). 3. Remove the spark plug from the spark plug. 2. Grit in . (0.635 mm) Fig. 25 16 Install the spark plug in . (0.635 mm) (Fig. 25). ...

Operation Manual
Page 18
... line is twisted Not enough line is extended Stop the engine and clean the cutting head Refill the cutting head with new line Rewind the line Clean the inner reel and outer spool Open the cutting head and remove the welded section Rewind the line Stop the unit, push the bump knob and pull... the line until 4 inches (102 mm) is outside of the cutting head THE CUTTING LINE ADVANCES UNCONTROLLABLY There is oil, cleaner or lubricant...
... line is twisted Not enough line is extended Stop the engine and clean the cutting head Refill the cutting head with new line Rewind the line Clean the inner reel and outer spool Open the cutting head and remove the welded section Rewind the line Stop the unit, push the bump knob and pull... the line until 4 inches (102 mm) is outside of the cutting head THE CUTTING LINE ADVANCES UNCONTROLLABLY There is oil, cleaner or lubricant...


