
Operation Manual
Page 1
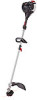
.... Operator's Manual Electric Start Capable 4-Cycle Professional Trimmer TB6042 XP TABLE OF CONTENTS Service Information 1 Rules for Safe Operation 2 Know Your Unit 4 Assembly Instructions 4 Oil and Fuel Information 5 Starting and Stopping Instructions 6 Operating Instructions 7 Maintenance and Repair Instructions 8 Cleaning and Storage 10 Optional Accessory 10 Troubleshooting Chart 10 Specifications 10 Warranty Information 32...
.... Operator's Manual Electric Start Capable 4-Cycle Professional Trimmer TB6042 XP TABLE OF CONTENTS Service Information 1 Rules for Safe Operation 2 Know Your Unit 4 Assembly Instructions 4 Oil and Fuel Information 5 Starting and Stopping Instructions 6 Operating Instructions 7 Maintenance and Repair Instructions 8 Cleaning and Storage 10 Optional Accessory 10 Troubleshooting Chart 10 Specifications 10 Warranty Information 32...
Operation Manual
Page 2
... avoid serious personal injury. Make all children, bystanders, and pets outside a 50 feet (15 m) radius; Always loosen the fuel tank cap slowly to install the Accessory Part #753-06334 Muffler Assembly. Also wear ear/hearing protection when operating this tool for the purpose intended. Do not extend the trimming line beyond...
... avoid serious personal injury. Make all children, bystanders, and pets outside a 50 feet (15 m) radius; Always loosen the fuel tank cap slowly to install the Accessory Part #753-06334 Muffler Assembly. Also wear ear/hearing protection when operating this tool for the purpose intended. Do not extend the trimming line beyond...
Operation Manual
Page 3
... the operator's manual for damage. To prevent serious injury, do so can result in conjunction with water or any unauthorized parts or accessories could lead to serious injury to the user, or damage to cut, trim or edge. Do not run the engine at high speed...unit. Use of children. • Never douse or squirt the unit with other attachments. • Use only original equipment manufacturer replacement parts and accessories for a short time. • SHARP BLADE WARNING: Sharp blade on this unit. You may appear on cutting attachment shield. These parts get ...
... the operator's manual for damage. To prevent serious injury, do so can result in conjunction with water or any unauthorized parts or accessories could lead to serious injury to the user, or damage to cut, trim or edge. Do not run the engine at high speed...unit. Use of children. • Never douse or squirt the unit with other attachments. • Use only original equipment manufacturer replacement parts and accessories for a short time. • SHARP BLADE WARNING: Sharp blade on this unit. You may appear on cutting attachment shield. These parts get ...

Operation Manual
Page 4
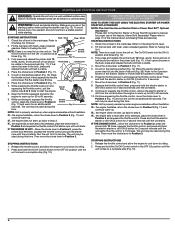
... Cutting mount bracket, making sure to the unit. (Fig. 5) Fig. 3 Support Clip Cutting Head Line Cutting Blade Adjustment Tab Fig. 4 Support Fitting Fig. 5 4 Other optional accessories may be used. Put the shoulder support on the rear of the lower clip then push or pull the loose end of the strap length...
... Cutting mount bracket, making sure to the unit. (Fig. 5) Fig. 3 Support Clip Cutting Head Line Cutting Blade Adjustment Tab Fig. 4 Support Fitting Fig. 5 4 Other optional accessories may be used. Put the shoulder support on the rear of the lower clip then push or pull the loose end of the strap length...
Operation Manual
Page 6
...on . Press and hold the electric starter or drill ON (I ) 1. NOTE: This Unit Can Use an Electric Start or Power Start Bit™ Optional Accessory! NOTE: There is no need to a complete stop (Fig. 10). 6 Move the choke lever to Position 2 (Fig. 11). 8. The unit may... operator's manual for 2-5 minutes. Refer to Position 3. Then move the choke lever to the Operation section of this manual about purchasing these accessories.) STARTING INSTRUCTIONS 1. IF THE ENGINE IS HOT... Continue to squeeze the throttle control, remove the electric starter or drill from the unit and...
...on . Press and hold the electric starter or drill ON (I ) 1. NOTE: This Unit Can Use an Electric Start or Power Start Bit™ Optional Accessory! NOTE: There is no need to a complete stop (Fig. 10). 6 Move the choke lever to Position 2 (Fig. 11). 8. The unit may... operator's manual for 2-5 minutes. Refer to Position 3. Then move the choke lever to the Operation section of this manual about purchasing these accessories.) STARTING INSTRUCTIONS 1. IF THE ENGINE IS HOT... Continue to squeeze the throttle control, remove the electric starter or drill from the unit and...
Operation Manual
Page 10
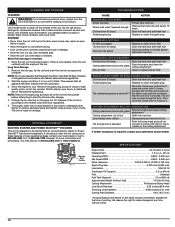
... cool before attempting to start the trimmer after storage. 4. Run the unit for storage. The unit is designed to make changes at the top. OPTIONAL ACCESSORY ELECTRIC STARTER AND POWER START BIT™ FEATURES This unit is ready for 2-5 minutes. in. (25 cc) Operating RPM 6,800 - 9,300 rpm Idle Speed RPM...
... cool before attempting to start the trimmer after storage. 4. Run the unit for storage. The unit is designed to make changes at the top. OPTIONAL ACCESSORY ELECTRIC STARTER AND POWER START BIT™ FEATURES This unit is ready for 2-5 minutes. in. (25 cc) Operating RPM 6,800 - 9,300 rpm Idle Speed RPM...