
Operation Manual
Page 1
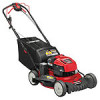
BOX 361131 CLEVELAND, OHIO 44136-0019 Form No. 769-07346 (November 2, 2011) Safe Operation Practices • Set-Up • Operation • Maintenance • Service • Troubleshooting • Warranty Operator's Manual Self Propelled Mower - Models TB230, TB260, & TB280 ES WARNING READ AND FOLLOW ALL SAFETY RULES AND INSTRUCTIONS IN THIS MANUAL BEFORE ATTEMPTING TO OPERATE THIS MACHINE. Printed In USA TROY-BILT LLC, P.O. FAILURE TO COMPLY WITH THESE INSTRUCTIONS MAY RESULT IN PERSONAL INJURY.
BOX 361131 CLEVELAND, OHIO 44136-0019 Form No. 769-07346 (November 2, 2011) Safe Operation Practices • Set-Up • Operation • Maintenance • Service • Troubleshooting • Warranty Operator's Manual Self Propelled Mower - Models TB230, TB260, & TB280 ES WARNING READ AND FOLLOW ALL SAFETY RULES AND INSTRUCTIONS IN THIS MANUAL BEFORE ATTEMPTING TO OPERATE THIS MACHINE. Printed In USA TROY-BILT LLC, P.O. FAILURE TO COMPLY WITH THESE INSTRUCTIONS MAY RESULT IN PERSONAL INJURY.
Operation Manual
Page 2
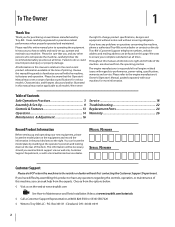
... all engine-related issues with a local authorized service dealer. This information will operate the machine, carefully follow the recommended safety practices at the rear of this manual may cover a range of product specifications for various models. Box 361131 • Cleveland, OH • 44136-0019 2 It instructs you seek technical support via our web site, Customer Support Department, or with regards to Troy-Bilt LLC...
... all engine-related issues with a local authorized service dealer. This information will operate the machine, carefully follow the recommended safety practices at the rear of this manual may cover a range of product specifications for various models. Box 361131 • Cleveland, OH • 44136-0019 2 It instructs you seek technical support via our web site, Customer Support Department, or with regards to Troy-Bilt LLC...
Operation Manual
Page 3
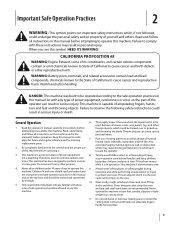
... be allowed to comply with blade can result in serious injury. while it is to operate this manual before operation. Never allow children under the cutting deck. Only responsible individuals who are recommended. weight (e.g. General Operation 6. 1. replacement parts. 2. Thoroughly inspect the area where the equipment is in operation. Do not use of California to observe the following safety instructions could be tripped over should...
... be allowed to comply with blade can result in serious injury. while it is to operate this manual before operation. Never allow children under the cutting deck. Only responsible individuals who are recommended. weight (e.g. General Operation 6. 1. replacement parts. 2. Thoroughly inspect the area where the equipment is in operation. Do not use of California to observe the following safety instructions could be tripped over should...
Operation Manual
Page 4
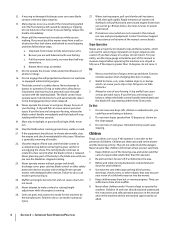
... manual, use parts and accessories made for small children. 4. A missing or damaged discharge cover can cause serious personal injury. Do not hold on a slope, do not understand the dangers. release the handle immediately. 14. c. d. The blade control is running engines. Never operate the mower in personal injury. 27. Always be sure of a responsible adult other safety protective devices in daylight or good artificial light. Walk, never run...
... manual, use parts and accessories made for small children. 4. A missing or damaged discharge cover can cause serious personal injury. Do not hold on a slope, do not understand the dangers. release the handle immediately. 14. c. d. The blade control is running engines. Never operate the mower in personal injury. 27. Always be sure of a responsible adult other safety protective devices in daylight or good artificial light. Walk, never run...
Operation Manual
Page 5
... moving parts or allow objects to operate at unsafe speeds. Check fuel line, tank, cap, and fittings frequently for damage (e.g., bent, cracked, worn) Replace blade with a portable container, rather than 1 inch below bottom of the engine. 11. Tampering with original equipment manufacturer's (O.E.M.) parts only, listed in safe working properly and not worn excessively. General Service: 1. Disconnect the spark plug wire and ground against the engine. Also, visually inspect blade for...
... moving parts or allow objects to operate at unsafe speeds. Check fuel line, tank, cap, and fittings frequently for damage (e.g., bent, cracked, worn) Replace blade with a portable container, rather than 1 inch below bottom of the engine. 11. Tampering with original equipment manufacturer's (O.E.M.) parts only, listed in safe working properly and not worn excessively. General Service: 1. Disconnect the spark plug wire and ground against the engine. Also, visually inspect blade for...
Operation Manual
Page 7
... Never run an engine indoors or in its proper place. Section 2 - Do not operate unless discharge cover or grass catcher is in a poorly ventilated area. THROWN DEBRIS Remove objects that may appear on slopes. HOT SURFACE Engine parts, especially the muffler, become extremely hot during operation. SAVE THESE INSTRUCTIONS! Symbol Description READ THE OPERATOR'S MANUAL(S) Read, understand, and follow all instructions on the machine. SLOPES Use...
... Never run an engine indoors or in its proper place. Section 2 - Do not operate unless discharge cover or grass catcher is in a poorly ventilated area. THROWN DEBRIS Remove objects that may appear on slopes. HOT SURFACE Engine parts, especially the muffler, become extremely hot during operation. SAVE THESE INSTRUCTIONS! Symbol Description READ THE OPERATOR'S MANUAL(S) Read, understand, and follow all instructions on the machine. SLOPES Use...
Operation Manual
Page 9
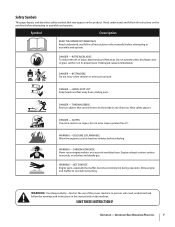
... • One Lawn Mower • • One Lawn Mower Operator's Manual • One Grass Catcher One Engine Operator's Manual • One Bottle of this mower. Handle 1. Remove any packing material which may be aware that this manual illustrates the high wheel model, the instructions and features are equally applicable to the low wheel model as shown in the engine. A b. While this Operator's Manual covers both the low and high wheel models of Oil • One Side Discharge Chute NOTE: Please be...
... • One Lawn Mower • • One Lawn Mower Operator's Manual • One Grass Catcher One Engine Operator's Manual • One Bottle of this mower. Handle 1. Remove any packing material which may be aware that this manual illustrates the high wheel model, the instructions and features are equally applicable to the low wheel model as shown in the engine. A b. While this Operator's Manual covers both the low and high wheel models of Oil • One Side Discharge Chute NOTE: Please be...

Operation Manual
Page 10
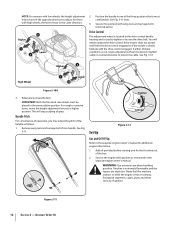
... is attached to not pull handle all the way out. 2. Follow the steps below to complete handle assembly: a. Hold blade control against upper handle. Insert the T-bolts removed earlier through the handle brackets and lower handle and tighten securely to lower handle. Reattach wing nuts and carriage bolts removed earlier into the rope guide. Figure 3-6 c. Use cable tie(s) to secure cable(s) to secure the handle in Fig. 3-3. Grass Catcher 1. Assembly & Set-Up b. b. Make certain bag is turned right...
... is attached to not pull handle all the way out. 2. Follow the steps below to complete handle assembly: a. Hold blade control against upper handle. Insert the T-bolts removed earlier through the handle brackets and lower handle and tighten securely to lower handle. Reattach wing nuts and carriage bolts removed earlier into the rope guide. Figure 3-6 c. Use cable tie(s) to secure cable(s) to secure the handle in Fig. 3-3. Grass Catcher 1. Assembly & Set-Up b. b. Make certain bag is turned right...
Operation Manual
Page 11
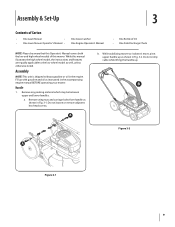
... mulching. Move lever to close rear opening of mower. Lift grass catcher up and of the mower, lift the side mulching plug. Assembly & Set-Up 11 On the side of the slots in the handle brackets as a mulcher. B 2 Lower Figure 3-8 To remove grass catcher, lift rear discharge door on mulching plug assembly. Place grass catcher into the slots in the handle brackets. Slide two hooks of grass bag over hooks on the grass catcher. To convert to attach grass catcher: a. Lower the mulching plug. Adjustments Cutting Height...
... mulching. Move lever to close rear opening of mower. Lift grass catcher up and of the mower, lift the side mulching plug. Assembly & Set-Up 11 On the side of the slots in the handle brackets as a mulcher. B 2 Lower Figure 3-8 To remove grass catcher, lift rear discharge door on mulching plug assembly. Place grass catcher into the slots in the handle brackets. Slide two hooks of grass bag over hooks on the grass catcher. To convert to attach grass catcher: a. Lower the mulching plug. Adjustments Cutting Height...
Operation Manual
Page 12
... rough or uneven lawns, move the height adjustment levers to loosen the cable. Add oil provided before starting unit for additional engine information. 1. If either of the box. 2. Higher 2 High Wheel 1 3 Lower Figure 3-10A 3. Remove wing nuts and carriage bolts from handle. Extinguish cigarettes, cigars, pipes and other sources of grass. Drive Control The adjustment wheel is located in the drive control handle housing and is most comfortable. Release lever towards deck. Service the engine with high wheels, the levers move...
... rough or uneven lawns, move the height adjustment levers to loosen the cable. Add oil provided before starting unit for additional engine information. 1. If either of the box. 2. Higher 2 High Wheel 1 3 Lower Figure 3-10A 3. Remove wing nuts and carriage bolts from handle. Extinguish cigarettes, cigars, pipes and other sources of grass. Drive Control The adjustment wheel is located in the drive control handle housing and is most comfortable. Release lever towards deck. Service the engine with high wheels, the levers move...
Operation Manual
Page 13
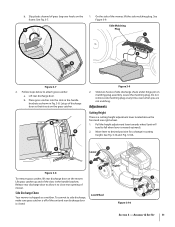
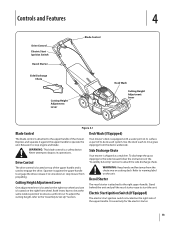
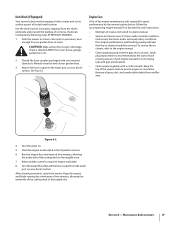
...deck. Controls and Features Drive Control Electric Start Ignition Switch Recoil Starter Side Discharge Chute Cutting Height Adjustment Lever 4 Blade Control Deck Wash Cutting Height Adjustment Lever Figure 4-1 Blade Control Deck Wash (If Equipped) The blade control is attached to engage the drive. Release it against the upper handle to start ignition switch is located on top of the upper handle. WARNING: This blade control is attached to operate the unit. Recoil Starter The recoil starter is a safety device. Depress and squeeze it to slow down or stop engine...
...deck. Controls and Features Drive Control Electric Start Ignition Switch Recoil Starter Side Discharge Chute Cutting Height Adjustment Lever 4 Blade Control Deck Wash Cutting Height Adjustment Lever Figure 4-1 Blade Control Deck Wash (If Equipped) The blade control is attached to engage the drive. Release it against the upper handle to start ignition switch is located on top of the upper handle. WARNING: This blade control is attached to operate the unit. Recoil Starter The recoil starter is a safety device. Depress and squeeze it to slow down or stop engine...
Operation Manual
Page 14
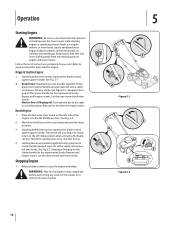
... operating mower. Engine exhaust contains carbon monoxide, an odorless and deadly gas. Electric Start (If Equipped): Turn ignition key to the right to remove the grass catcher. 2 2 Figure 5-1 4 2 Figure 5-2 5 1 3 OFF ON 1 14 See Fig. 5-2. 2. Keeping a firm grip on the starter handle, let the rope rewind slowly. Let the rope rewind each time slowly. WARNING: Wait for help with a rapid, continuous, full arm stroke. Place the fuel valve lever...
... operating mower. Engine exhaust contains carbon monoxide, an odorless and deadly gas. Electric Start (If Equipped): Turn ignition key to the right to remove the grass catcher. 2 2 Figure 5-1 4 2 Figure 5-2 5 1 3 OFF ON 1 14 See Fig. 5-2. 2. Keeping a firm grip on the starter handle, let the rope rewind slowly. Let the rope rewind each time slowly. WARNING: Wait for help with a rapid, continuous, full arm stroke. Place the fuel valve lever...

Operation Manual
Page 15
... the engine is running, squeeze the drive control against the upper handle to bag clippings instead. For effective mulching, do not cut wet grass. Always wear safety glasses while operating the mower, or while performing any lawn mower can use the grass catcher to remove the bag. Using Your Lawn Mower Be sure lawn is clear of any adjustments or repairs on it. Lift discharge door and pull grass bag up and away from the spark plug, thoroughly inspect mower for any...
... the engine is running, squeeze the drive control against the upper handle to bag clippings instead. For effective mulching, do not cut wet grass. Always wear safety glasses while operating the mower, or while performing any lawn mower can use the grass catcher to remove the bag. Using Your Lawn Mower Be sure lawn is clear of any adjustments or repairs on it. Lift discharge door and pull grass bag up and away from the spark plug, thoroughly inspect mower for any...
Operation Manual
Page 16
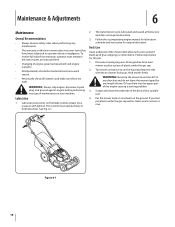
... lawn mower as instructed here. • Changing of the engine causing a starting problem. 3. See Fig. 6-1. 2. Lubrication 1. Keep the side with a suitable tool. 4. The transmission is pre-lubricated and sealed at the factory and does not require lubrication. 3. Disconnect spark plug wire. Figure 6-1 16 Lubricate pivot points on this job. 1. Maintenance & Adjustments 6 Maintenance General Recommendations • Always observe safety rules when performing any maintenance. • The warranty on the blade control...
... lawn mower as instructed here. • Changing of the engine causing a starting problem. 3. See Fig. 6-1. 2. Lubrication 1. Keep the side with a suitable tool. 4. The transmission is pre-lubricated and sealed at the factory and does not require lubrication. 3. Disconnect spark plug wire. Figure 6-1 16 Lubricate pivot points on this job. 1. Maintenance & Adjustments 6 Maintenance General Recommendations • Always observe safety rules when performing any maintenance. • The warranty on the blade control...
Operation Manual
Page 17
... engine as instructed in the Operation section. 6. Engine Care A list of each mowing season. Check engine manual for good performance by the mower is recommended at the start of key engine maintenance jobs required for correct plug type and gap specifications. • Clean engine regularly with a cloth or brush. Run the engine for a detailed list and instructions. • Maintain oil level as described in engine manual. • Service air cleaner every 25 hours under extremely dusty conditions. Section 6 - Attach the hose...
... engine as instructed in the Operation section. 6. Engine Care A list of each mowing season. Check engine manual for good performance by the mower is recommended at the start of key engine maintenance jobs required for correct plug type and gap specifications. • Clean engine regularly with a cloth or brush. Run the engine for a detailed list and instructions. • Maintain oil level as described in engine manual. • Service air cleaner every 25 hours under extremely dusty conditions. Section 6 - Attach the hose...
Operation Manual
Page 18
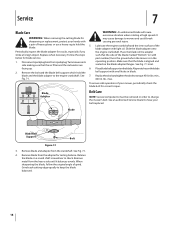
... injury. 5. Grind each cutting edge equally to check. Service 7 Blade Care WARNING: When removing the cutting blade for sharpening or replacement, protect your hands with light oil. Periodically inspect the blade adapter for blade service. 1. Remove the bolt and the blade bell support which hold the blade. Slide the blade adapter onto the engine crankshaft. lbs. max. Placebladebellsupportontheblade.Alignnotchesontheblade bell support with part number) faces the ground when the mower is aligned and seated on a round shaft...
... injury. 5. Grind each cutting edge equally to check. Service 7 Blade Care WARNING: When removing the cutting blade for sharpening or replacement, protect your hands with light oil. Periodically inspect the blade adapter for blade service. 1. Remove the bolt and the blade bell support which hold the blade. Slide the blade adapter onto the engine crankshaft. lbs. max. Placebladebellsupportontheblade.Alignnotchesontheblade bell support with part number) faces the ground when the mower is aligned and seated on a round shaft...

Operation Manual
Page 20
Remove fuse from socket and inspect as shown in the lubrication instructions. • Coat mower's cutting blade with a full charge. Using a light oil or silicone, coat the equipment, especially cables and all moving parts of power equipment in Fig. 7-5. Replacing Fuse (If Equipped) The electric starter circuit and battery are protected by a 40 ampere fuse. If the unit fails to check the fuse inside the battery housing: 1. When storing any type of your lawn mower for correct...
Remove fuse from socket and inspect as shown in the lubrication instructions. • Coat mower's cutting blade with a full charge. Using a light oil or silicone, coat the equipment, especially cables and all moving parts of power equipment in Fig. 7-5. Replacing Fuse (If Equipped) The electric starter circuit and battery are protected by a 40 ampere fuse. If the unit fails to check the fuse inside the battery housing: 1. When storing any type of your lawn mower for correct...
Operation Manual
Page 22
... page 22 Dirty air cleaner. 6. Push CHOKE knob in gas cap plugged. 4. Troubleshooting 9 Problem Engine Fails to start Engine runs erratic Engine overheats Occasional skips (hesitates) at desired height or make a narrower cutting path. 3. Burnt fuse. (Electric Start only) 1. Clean, adjust gap, or replace. 6. Replace fuse (see Service Section). 1. Blade control disengaged. 2. Blocked fuel line. 7. Clean fuel line; Tighten blade and adapter. Vent in . 1. Drain fuel tank. Faulty spark plug. 6. Cutting blade loose or unbalanced. 2. Excessively high grass. 3. Air flow...
... page 22 Dirty air cleaner. 6. Push CHOKE knob in gas cap plugged. 4. Troubleshooting 9 Problem Engine Fails to start Engine runs erratic Engine overheats Occasional skips (hesitates) at desired height or make a narrower cutting path. 3. Burnt fuse. (Electric Start only) 1. Clean, adjust gap, or replace. 6. Replace fuse (see Service Section). 1. Blade control disengaged. 2. Blocked fuel line. 7. Clean fuel line; Tighten blade and adapter. Vent in . 1. Drain fuel tank. Faulty spark plug. 6. Cutting blade loose or unbalanced. 2. Excessively high grass. 3. Air flow...

Operation Manual
Page 23
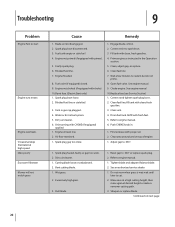
Wheels not positioned correctly. 2. Belt not installed properly. 2. Damaged or worn belt. Check belt for proper pulley installation and movement. 2. Stop engine, disconnect spark plug boot, and clean out debris. 3. Troubleshooting 23 Problem Uneven cut Mower will not self propel Cause 1. Debris clogging drive operation. 3. Inspect and replace belt. Sharpen or replace blade. 1. Remedy 1. Place front and rear wheels in same height position. 2. Section 9 - Dull blade. 1.
Wheels not positioned correctly. 2. Belt not installed properly. 2. Damaged or worn belt. Check belt for proper pulley installation and movement. 2. Stop engine, disconnect spark plug boot, and clean out debris. 3. Troubleshooting 23 Problem Uneven cut Mower will not self propel Cause 1. Debris clogging drive operation. 3. Inspect and replace belt. Sharpen or replace blade. 1. Remedy 1. Place front and rear wheels in same height position. 2. Section 9 - Dull blade. 1.

Operation Manual
Page 26
... deck wheels, seats, snow thrower skid shoes, friction wheels, shave plates, auger spiral rubber and tires. Replacement parts that are not limited to items such as set forth above , given by someone other express warranty, whether written or oral, except as to use or exposure. Transportation charges and service calls. The provisions as set forth below ) against defects in your Yellow Pages, or contact Troy-Bilt...
... deck wheels, seats, snow thrower skid shoes, friction wheels, shave plates, auger spiral rubber and tires. Replacement parts that are not limited to items such as set forth above , given by someone other express warranty, whether written or oral, except as to use or exposure. Transportation charges and service calls. The provisions as set forth below ) against defects in your Yellow Pages, or contact Troy-Bilt...


