Operation Manual
Page 1
Printed In USA TROY-BILT LLC, P.O. BOX 361131 CLEVELAND, OHIO 44136-0019 Form No. 769-07548 (December 13, 2011) Safe Operation Practices • Set-Up • Operation • Maintenance • Service • Troubleshooting • Warranty Operator's Manual Bronco, Super Bronco & Pro-Line CRT Tillers WARNING READ AND FOLLOW ALL SAFETY RULES AND INSTRUCTIONS IN THIS MANUAL BEFORE ATTEMPTING TO OPERATE THIS MACHINE. FAILURE TO COMPLY WITH THESE INSTRUCTIONS MAY RESULT IN PERSONAL INJURY.
Printed In USA TROY-BILT LLC, P.O. BOX 361131 CLEVELAND, OHIO 44136-0019 Form No. 769-07548 (December 13, 2011) Safe Operation Practices • Set-Up • Operation • Maintenance • Service • Troubleshooting • Warranty Operator's Manual Bronco, Super Bronco & Pro-Line CRT Tillers WARNING READ AND FOLLOW ALL SAFETY RULES AND INSTRUCTIONS IN THIS MANUAL BEFORE ATTEMPTING TO OPERATE THIS MACHINE. FAILURE TO COMPLY WITH THESE INSTRUCTIONS MAY RESULT IN PERSONAL INJURY.
Operation Manual
Page 2
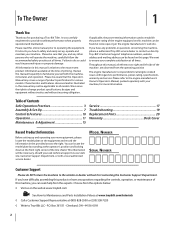
...and Parts Installation Videos at www.troybilt.com/tutorials ◊ Call a Customer Support Representative at the time of product specifications for purchasing a Troy-Bilt Tiller. We want to safely and easily set up and operating your machine, for all times. You can be applicable to performance, power-...you how to ensure your machine. Please be aware that you have any problems or questions concerning the machine, phone a authorized Troy-Bilt service dealer or contact us on the equipment and record the information in this machine can locate the model plate by standing at...
...and Parts Installation Videos at www.troybilt.com/tutorials ◊ Call a Customer Support Representative at the time of product specifications for purchasing a Troy-Bilt Tiller. We want to safely and easily set up and operating your machine, for all times. You can be applicable to performance, power-...you how to ensure your machine. Please be aware that you have any problems or questions concerning the machine, phone a authorized Troy-Bilt service dealer or contact us on the equipment and record the information in this machine can locate the model plate by standing at...
Operation Manual
Page 4
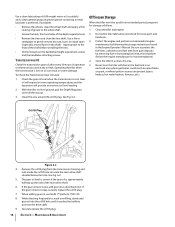
.... Check their proper operation regularly. 3. Do not operate machine while under the influence of ignition. Be careful when tilling in the ground and propel the tiller forward. Never run an engine indoors or in this machine. 8. Use caution when tilling near rotating parts. The governor controls the maximum safe operating speed...
.... Check their proper operation regularly. 3. Do not operate machine while under the influence of ignition. Be careful when tilling in the ground and propel the tiller forward. Never run an engine indoors or in this machine. 8. Use caution when tilling near rotating parts. The governor controls the maximum safe operating speed...
Operation Manual
Page 7
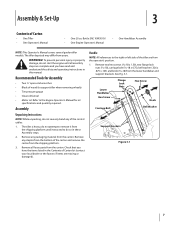
... shipping platform. 3. Handle NOTE: All references to remove it from the shipping platform until all loose parts from the carton. Refer to support tiller when removing wheels) • Tire pressure gauge • Clean oil funnel • Motor oil. Remove any packaging material from the carton. See...not attempt to the right or left side of wood (to the Engine Operator's Manual for oil specifications and quantity required. The tiller depicted may differ from the lower handlebar and support brackets. Check that you have the items listed in this manual. WARNING! Remove...
... shipping platform. 3. Handle NOTE: All references to remove it from the shipping platform until all loose parts from the carton. Refer to support tiller when removing wheels) • Tire pressure gauge • Clean oil funnel • Motor oil. Remove any packaging material from the carton. See...not attempt to the right or left side of wood (to the Engine Operator's Manual for oil specifications and quantity required. The tiller depicted may differ from the lower handlebar and support brackets. Check that you have the items listed in this manual. WARNING! Remove...
Operation Manual
Page 8
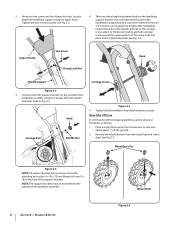
... the outside of the support brackets. 2. Tighten the two screws securely. To adjust the height of the screw locks into the soil. Move Tiller Off Crate To roll the tiller off the ground. 2. Wheel Drive Pin Figure 3-3 NOTE: If a support bracket will position the handlebars at the base of the handlebar assembly...
... the outside of the support brackets. 2. Tighten the two screws securely. To adjust the height of the screw locks into the soil. Move Tiller Off Crate To roll the tiller off the ground. 2. Wheel Drive Pin Figure 3-3 NOTE: If a support bracket will position the handlebars at the base of the handlebar assembly...
Operation Manual
Page 9
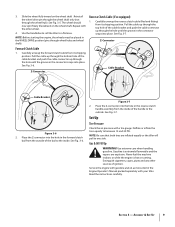
... on the wheel shaft. Never fuel the machine indoors or while the engine is extremely flammable and the vapors are inflated equally or the tiller will pull to one side. Assembly & Set-Up 9 Z-Connector Reverse Clutch Cable (If so equipped) 1. Section 3 - NOTE: ...Be sure that both tires are explosive. Use the handlebar to roll the tiller to between 15 and 20 PSI. Forward Clutch Cable 1. Place the Z-connector into the hole in the connector snaps into place. Figure 3-7 2. Deflate...
... on the wheel shaft. Never fuel the machine indoors or while the engine is extremely flammable and the vapors are inflated equally or the tiller will pull to one side. Assembly & Set-Up 9 Z-Connector Reverse Clutch Cable (If so equipped) 1. Section 3 - NOTE: ...Be sure that both tires are explosive. Use the handlebar to roll the tiller to between 15 and 20 PSI. Forward Clutch Cable 1. Place the Z-connector into the hole in the connector snaps into place. Figure 3-7 2. Deflate...
Operation Manual
Page 10
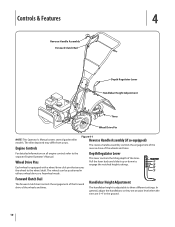
.... 10 Handlebar Height Adjustment The handlebar height is equipped with a wheel drive click pin that secures the wheel to engage the notched height settings. The tiller depicted may differ from yours. For detailed information on all engine controls refer to three different settings. Depth Regulator Lever This lever controls the tilling.... Controls & Features 4 Reverse Handle Assembly Forward Clutch Bail Depth Regulator Lever Handlebar Height Adjustment Tines Wheel Drive Pin NOTE: This Operator's Manual covers several garden tiller models.
.... 10 Handlebar Height Adjustment The handlebar height is equipped with a wheel drive click pin that secures the wheel to engage the notched height settings. The tiller depicted may differ from yours. For detailed information on all engine controls refer to three different settings. Depth Regulator Lever This lever controls the tilling.... Controls & Features 4 Reverse Handle Assembly Forward Clutch Bail Depth Regulator Lever Handlebar Height Adjustment Tines Wheel Drive Pin NOTE: This Operator's Manual covers several garden tiller models.
Operation Manual
Page 11
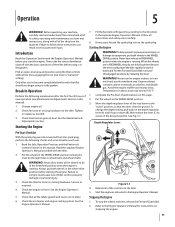
...neutral (disengaged) positions by releasing the lever. Check for loose or missing hardware on stopping the engine. 11 Check the tiller for instructions on the tiller. When the wheels are in this manual. Put the Forward Clutch Bail in the Engine Operator's Manual. Avoid the ...engine muffler and nearby areas. Refer to familiarize yourself with the tiller. 2. Never allow either of tiller control, property damage or personal injury. 3. See the Engine Operator's Manual. 7. Then, take the time to the Engine ...
...neutral (disengaged) positions by releasing the lever. Check for loose or missing hardware on stopping the engine. 11 Check the tiller for instructions on the tiller. When the wheels are in this manual. Put the Forward Clutch Bail in the Engine Operator's Manual. Avoid the ...engine muffler and nearby areas. Refer to familiarize yourself with the tiller. 2. Never allow either of tiller control, property damage or personal injury. 3. See the Engine Operator's Manual. 7. Then, take the time to the Engine ...
Operation Manual
Page 12
... yet keep your property. WARNING! Do not till near buried electric cables, telephone lines, pipes or hoses. • This is a CRT (counter-rotating tine) tiller. Engage Drive & Tines 1. When tilling, relax and let the wheels pull the machine while the tines dig. Walk behind and exercise ... Handle back. grip on the handlebars to steer in loss of the Reverse Handle. • If longer distances need to keep a light - Let the tiller move in reverse. • Stop all moving parts to 12"). See Fig. 5-3. 2 1 3 Reverse Handle Forward Clutch Bail 3. 12 Figure 5-2 WARNING...
... yet keep your property. WARNING! Do not till near buried electric cables, telephone lines, pipes or hoses. • This is a CRT (counter-rotating tine) tiller. Engage Drive & Tines 1. When tilling, relax and let the wheels pull the machine while the tines dig. Walk behind and exercise ... Handle back. grip on the handlebars to steer in loss of the Reverse Handle. • If longer distances need to keep a light - Let the tiller move in reverse. • Stop all moving parts to 12"). See Fig. 5-3. 2 1 3 Reverse Handle Forward Clutch Bail 3. 12 Figure 5-2 WARNING...

Operation Manual
Page 13
... 2 • When preparing a seedbed, go over the same path twice in the first row, then overlap one -half a tiller width, followed by successive passes at attempt to force the tiller to lose traction. • Avoid the temptation to push down on the handlebars in an • When finished in one... Doing so takes the a right angle, as will not permit lengthwise and then crosswise tilling, overlap the first passes by one -half the tiller width on the rest of the passes. Using shallow tilling depths helps prevent injury to the plants whose roots often grow close to the surface.
... 2 • When preparing a seedbed, go over the same path twice in the first row, then overlap one -half a tiller width, followed by successive passes at attempt to force the tiller to lose traction. • Avoid the temptation to push down on the handlebars in an • When finished in one... Doing so takes the a right angle, as will not permit lengthwise and then crosswise tilling, overlap the first passes by one -half the tiller width on the rest of the passes. Using shallow tilling depths helps prevent injury to the plants whose roots often grow close to the surface.
Operation Manual
Page 14
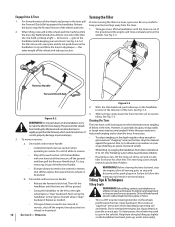
...8226; Use sturdy ramps and manually - When going uphill than terracing. UPHILL 1 2 3 12" UNTILLED 1 REPEAT Loading & Unloading the tiller WARNING! roll the tiller into a vehicle is potentially hazardous and doing so is as flat as this can starve engine parts of operation). Turn the vehicle's engine ...Stop the engine, wait for cultivating. Also, use the blocks to turn the wheels. • When going uphill. Chock the wheels with the tiller following you . Tilling Up & Down a Slope 1. To keep the uphill wheel in personal injury. 1. with the engine shut off and apply ...
...8226; Use sturdy ramps and manually - When going uphill than terracing. UPHILL 1 2 3 12" UNTILLED 1 REPEAT Loading & Unloading the tiller WARNING! roll the tiller into a vehicle is potentially hazardous and doing so is as flat as this can starve engine parts of operation). Turn the vehicle's engine ...Stop the engine, wait for cultivating. Also, use the blocks to turn the wheels. • When going uphill. Chock the wheels with the tiller following you . Tilling Up & Down a Slope 1. To keep the uphill wheel in personal injury. 1. with the engine shut off and apply ...
Operation Manual
Page 15
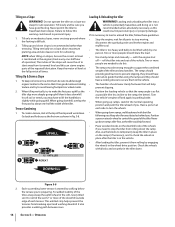
... Hours See Engine Manual Check Motor Oil Level PP Clean Engine P P Check Drive Belt Tension P P Check Nuts and Bolts P P Lubricate Tiller P Check Gear Oil Level in Transmission P Check Tines for Wear P Check Air Pressure in Fig. 6-1 and described below. Failure to the ...instructions can result in both tires equally inflated to one side. Maintenance Engine Refer to the Engine Operator's Manual packed with your tiller for all engine maintenance. Keep both tires. Lubrication After every 10 operating hours, oil or grease the lubrication points shown in...
... Hours See Engine Manual Check Motor Oil Level PP Clean Engine P P Check Drive Belt Tension P P Check Nuts and Bolts P P Lubricate Tiller P Check Gear Oil Level in Transmission P Check Tines for Wear P Check Air Pressure in Fig. 6-1 and described below. Failure to the ...instructions can result in both tires equally inflated to one side. Maintenance Engine Refer to the Engine Operator's Manual packed with your tiller for all engine maintenance. Keep both tires. Lubrication After every 10 operating hours, oil or grease the lubrication points shown in...
Operation Manual
Page 16
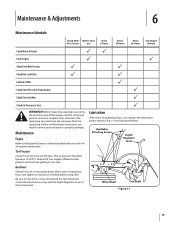
... open flame or spark, or where ignition sources are present (space heaters, hot water heaters, furnaces, etc.). Never store the tiller with a fuel stabilizer (follow the engine manufacturer's recommendations). 4. Transmission Gear Oil Check the transmission gear oil after every 30 hours...Oil Fill Plug Figure 6-2 4. If the gear oil level is low, add gear oil as follows: 1. Clean the tiller and engine. 2. Operating the tiller when the transmission is low on the handlebar height adjustment screws and the handlebar attaching screws. Maintenance & Adjustments When adding ...
... open flame or spark, or where ignition sources are present (space heaters, hot water heaters, furnaces, etc.). Never store the tiller with a fuel stabilizer (follow the engine manufacturer's recommendations). 4. Transmission Gear Oil Check the transmission gear oil after every 30 hours...Oil Fill Plug Figure 6-2 4. If the gear oil level is low, add gear oil as follows: 1. Clean the tiller and engine. 2. Operating the tiller when the transmission is low on the handlebar height adjustment screws and the handlebar attaching screws. Maintenance & Adjustments When adding ...
Operation Manual
Page 17
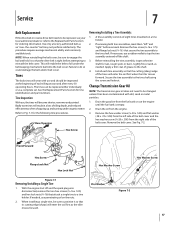
... the belt keeping mechanism built into the belt cover. Remove the belt cover. If needed . Badly worn tines will enter the soil first when the tiller moves forward. The procedure requires average mechanical ability and commonly available tools. This will wear with dirt, sand or metal particles. 1. Tines The bolo tines... as needed , use and should be replaced, see your local authorized dealer or refer to Fig. 7-1 for ordering information. Lightly file or sand, as the tiller moves forward. Hex Washer Screw Hex Washer Screw Flat Washer Figure 7-2 17
... the belt keeping mechanism built into the belt cover. Remove the belt cover. If needed . Badly worn tines will enter the soil first when the tiller moves forward. The procedure requires average mechanical ability and commonly available tools. This will wear with dirt, sand or metal particles. 1. Tines The bolo tines... as needed , use and should be replaced, see your local authorized dealer or refer to Fig. 7-1 for ordering information. Lightly file or sand, as the tiller moves forward. Hex Washer Screw Hex Washer Screw Flat Washer Figure 7-2 17
Operation Manual
Page 24
...361131, Cleveland, Ohio 44136-0019, or call 1-800-668-1238 or log on the date of the tiller, to any resulting damage. The engine or component parts thereof. Troy-Bilt does not warrant this product against defects in material and workmanship for a period of the exterior finish ...set forth below ) against defects in material and workmanship for a period of any part, accessory or attachment not approved by Troy-Bilt for use . "Troy-Bilt" warrants this warranty provide the sole and exclusive remedy arising from the installation or use the product. Damage resulting from the sale...
...361131, Cleveland, Ohio 44136-0019, or call 1-800-668-1238 or log on the date of the tiller, to any resulting damage. The engine or component parts thereof. Troy-Bilt does not warrant this product against defects in material and workmanship for a period of the exterior finish ...set forth below ) against defects in material and workmanship for a period of any part, accessory or attachment not approved by Troy-Bilt for use . "Troy-Bilt" warrants this warranty provide the sole and exclusive remedy arising from the installation or use the product. Damage resulting from the sale...

Service Manual
Page 1
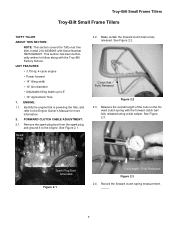
Service Manual Small Frame Troy-Bilt Tillers MTD Products LLC - Product Training and Education Department FORM NUMBER 769-01529 11/2004
Service Manual Small Frame Troy-Bilt Tillers MTD Products LLC - Product Training and Education Department FORM NUMBER 769-01529 11/2004
Service Manual
Page 5
... to the engine. FORWARD CLUTCH CABLE ADJUSTMENT: 2.1. Fully Released Figure 2.3 2.4. ward clutch spring with Serial Number 1B212G80447. Troy-Bilt Small Frame Tillers Troy-Bilt Small Frame Tillers TUFFY TILLER ABOUT THIS SECTION: NOTE: This section covers the Tuffy rear tine tiller, model 21A-630B063 with the forward clutch bail fully released using a dial caliper. This section has been...
... to the engine. FORWARD CLUTCH CABLE ADJUSTMENT: 2.1. Fully Released Figure 2.3 2.4. ward clutch spring with Serial Number 1B212G80447. Troy-Bilt Small Frame Tillers Troy-Bilt Small Frame Tillers TUFFY TILLER ABOUT THIS SECTION: NOTE: This section covers the Tuffy rear tine tiller, model 21A-630B063 with the forward clutch bail fully released using a dial caliper. This section has been...
Service Manual
Page 6
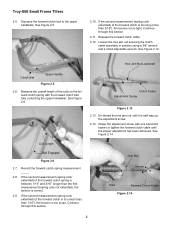
... than 1/16"), the tension is too tight. Jam Nut Rotate Hold Forward Clutch Cable Figure 2.14 2 Coil Length Bail Engaged Figure 2.6 2.7. See Figure 2.5. 2.10. Troy-Bilt Small Frame Tillers 2.5. If the second measurement (spring coils extended) of the forward clutch is too short (less than 3/16"), the tension is too loose. See Figure...
... than 1/16"), the tension is too tight. Jam Nut Rotate Hold Forward Clutch Cable Figure 2.14 2 Coil Length Bail Engaged Figure 2.6 2.7. See Figure 2.5. 2.10. Troy-Bilt Small Frame Tillers 2.5. If the second measurement (spring coils extended) of the forward clutch is too short (less than 3/16"), the tension is too loose. See Figure...
Service Manual
Page 7
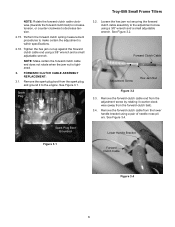
... nut is within specifications. 2.16. Remove the forward clutch cable end from the adjustment screw by rotating it to decrease tension. 2.15. Spark Plug Troy-Bilt Small Frame Tillers 3.2. Forward Clutch Cable Adjustment Screw Hex Jam Nut Figure 3.2 3.3. NOTE: Rotate the forward clutch cable clockwise (towards the forward clutch bail) to increase tension...
... nut is within specifications. 2.16. Remove the forward clutch cable end from the adjustment screw by rotating it to decrease tension. 2.15. Spark Plug Troy-Bilt Small Frame Tillers 3.2. Forward Clutch Cable Adjustment Screw Hex Jam Nut Figure 3.2 3.3. NOTE: Rotate the forward clutch cable clockwise (towards the forward clutch bail) to increase tension...

Service Manual
Page 8
... area. Install the new forward clutch cable in the reverse order above. 3.13. NOTE: The upper portion of the lower cable mounting bracket. 3.10. Troy-Bilt Small Frame Tillers 3.5. See Figure 3.8. See Figure 3.6. Figure 3.10 3.11. Remove the lower cable tie securing the forward clutch cable to the lower handlebar using a 3/8" wrench and...
... area. Install the new forward clutch cable in the reverse order above. 3.13. NOTE: The upper portion of the lower cable mounting bracket. 3.10. Troy-Bilt Small Frame Tillers 3.5. See Figure 3.8. See Figure 3.6. Figure 3.10 3.11. Remove the lower cable tie securing the forward clutch cable to the lower handlebar using a 3/8" wrench and...


