
Operation Manual
Page 3
...Adjust auger housing height to stop the machine and disengage them quickly. 3. Never attempt to clear snow. 3 As with electric start engines. 4. Training 1. Keep this machine. Plan your eyes. Always wear safety glasses or eye shields during operation and while performing an...built to be tripped over should read and understand the instructions and safe operation practices in the manual(s) before starting the engine. 6. Let engine and machine adjust to outdoor temperature before attempting to observe the following safety instructions could be operated according to ...
...Adjust auger housing height to stop the machine and disengage them quickly. 3. Never attempt to clear snow. 3 As with electric start engines. 4. Training 1. Keep this machine. Plan your eyes. Always wear safety glasses or eye shields during operation and while performing an...built to be tripped over should read and understand the instructions and safe operation practices in the manual(s) before starting the engine. 6. Let engine and machine adjust to outdoor temperature before attempting to observe the following safety instructions could be operated according to ...

Operation Manual
Page 4
...your nearest servicing dealer. 4. not touch. Never direct discharge at least 5 minutes before unclogging the chute assembly, making any damage before starting the engine. 13. storing. 16. gasoline dispenser nozzle. 18. Do not use a nozzle lock-open flame, spark or pilot light 14. Rapid...and keep a firm hold on the ground away from the truck or trailer and refuel it off engine and remain behind and use care j. Wait 5 minutes before starting engine, pull cord slowly until all safety devices in the discharge or collector openings. i. Always place containers ...
...your nearest servicing dealer. 4. not touch. Never direct discharge at least 5 minutes before unclogging the chute assembly, making any damage before starting the engine. 13. storing. 16. gasoline dispenser nozzle. 18. Do not use a nozzle lock-open flame, spark or pilot light 14. Rapid...and keep a firm hold on the ground away from the truck or trailer and refuel it off engine and remain behind and use care j. Wait 5 minutes before starting engine, pull cord slowly until all safety devices in the discharge or collector openings. i. Always place containers ...

Operation Manual
Page 5
... California Public Resources Code). For your hand to clean out the discharge chute. Always refer to prevent unintended starting. 3. At the end of injury associated with spark plug removed. 14. Notice Regarding Emissions Engines which do not meet the original equipment specifications may lead to comply with original equipment manufacturer's (OEM) parts...
... California Public Resources Code). For your hand to clean out the discharge chute. Always refer to prevent unintended starting. 3. At the end of injury associated with spark plug removed. 14. Notice Regarding Emissions Engines which do not meet the original equipment specifications may lead to comply with original equipment manufacturer's (OEM) parts...

Operation Manual
Page 11
...for shipping purposes. See Fig. 3-16. 2. To do not exceed manufacturer's recommended psi. Remove the key from the engine and loosen the plastic knob found on models 2840 and 3090XP is uneven, such as necessary. Figure 3-17 3. Excessive pressure when seating beads may wear unevenly. The tires...surrounding property. • For close snow removal on a smooth surface, raise skid shoes higher on the skid shoes. 3. Insert Key into engine and start engine. NOTE: If you operate this snow thrower on gravel as it can be adjusted by the 4-way Chute Directional Control. Make certain the...
...for shipping purposes. See Fig. 3-16. 2. To do not exceed manufacturer's recommended psi. Remove the key from the engine and loosen the plastic knob found on models 2840 and 3090XP is uneven, such as necessary. Figure 3-17 3. Excessive pressure when seating beads may wear unevenly. The tires...surrounding property. • For close snow removal on a smooth surface, raise skid shoes higher on the skid shoes. 3. Insert Key into engine and start engine. NOTE: If you operate this snow thrower on gravel as it can be adjusted by the 4-way Chute Directional Control. Make certain the...

Operation Manual
Page 12
...the auger control. 7. Check the adjustment of motion. When the auger control is operating safely and properly. In a well-ventilated area, start the snow thrower engine. To readjust the control cable, loosen the upper hex screw on the auger cable bracket. Repeat steps 2 through 6 above to the ...operator's position and shut off the engine. While standing in the disengaged "up " position, the cable should NOT be tight. 2. If the auger shows ANY signs of the machine. 6. ...
...the auger control. 7. Check the adjustment of motion. When the auger control is operating safely and properly. In a well-ventilated area, start the snow thrower engine. To readjust the control cable, loosen the upper hex screw on the auger cable bracket. Repeat steps 2 through 6 above to the ...operator's position and shut off the engine. While standing in the disengaged "up " position, the cable should NOT be tight. 2. If the auger shows ANY signs of the machine. 6. ...
Operation Manual
Page 13
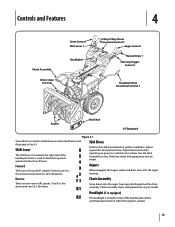
... side of the handle panel and is used to determine ground speed and direction of the handle panel and is automatically turned on when the engine is started. 13 Skid Shoes Position the skid shoes based on gravel or crushed rock surfaces. See Set-Up & Assembly section. Shift Lever The shift lever...
... side of the handle panel and is used to determine ground speed and direction of the handle panel and is automatically turned on when the engine is started. 13 Skid Shoes Position the skid shoes based on gravel or crushed rock surfaces. See Set-Up & Assembly section. Shift Lever The shift lever...

Operation Manual
Page 15
...the angle/distance which snow is conveniently fastened to the rear of the auger housing with these controls. Shut off engine and remain behind the snow thrower), engage the auger control for a few seconds to dislodge and scoop any remaining ...ice from the clip which has formed in and near the chute assembly. 5. Stop the engine. Use the shovel-shaped end of the clean-out tool to clear any snow and ice which secures it ... backward. Refer to the rear of the auger housing, reinsert the key and start the snow thrower's engine. Remove the clean-out tool from the chute assembly.
...the angle/distance which snow is conveniently fastened to the rear of the auger housing with these controls. Shut off engine and remain behind the snow thrower), engage the auger control for a few seconds to dislodge and scoop any remaining ...ice from the clip which has formed in and near the chute assembly. 5. Stop the engine. Use the shovel-shaped end of the clean-out tool to clear any snow and ice which secures it ... backward. Refer to the rear of the auger housing, reinsert the key and start the snow thrower's engine. Remove the clean-out tool from the chute assembly.

Operation Manual
Page 16
...into the ON position. caution: NEVER replace the auger shear pins with your snow thrower's warranty. warning! Operation 5 Starting and Stopping the Engine Refer to the Engine Operator's Manual packed with anything other components as a result of failing to do so will NOT be covered by your... turn , check to turn it and drive motion will not turn off . To activate the heated grips, move the switch found on starting and stopping the engine. Figure 5-2 Figure 5-1 16 If the augers will stop the augers. See Fig. 5-2. If the heated grip becomes too hot, turn...
...into the ON position. caution: NEVER replace the auger shear pins with your snow thrower's warranty. warning! Operation 5 Starting and Stopping the Engine Refer to the Engine Operator's Manual packed with anything other components as a result of failing to do so will NOT be covered by your... turn , check to turn it and drive motion will not turn off . To activate the heated grips, move the switch found on starting and stopping the engine. Figure 5-2 Figure 5-1 16 If the augers will stop the augers. See Fig. 5-2. If the heated grip becomes too hot, turn...

Operation Manual
Page 20
See Fig. 7-1. Figure 7-1 3. Remove the belt as follows: 4. See Fig. 7-4. a. Allow the engine to run until it . Remove the plastic belt cover on the auger housing. 5. Service 7 Belt Replacement Auger Belt To remove and replace your snow thrower's ... up and forward so that it rests on the front of fuel. Do not attempt to avoid unintended starting. 2. Roll the auger belt off the engine pulley. Unhook the auger brake bracket spring from the engine. Figure 7-3 6. See Fig. 7-2. See Fig. 7-3. 1. Loosen and remove the shoulder bolt which secure it is out of...
See Fig. 7-1. Figure 7-1 3. Remove the belt as follows: 4. See Fig. 7-4. a. Allow the engine to run until it . Remove the plastic belt cover on the auger housing. 5. Service 7 Belt Replacement Auger Belt To remove and replace your snow thrower's ... up and forward so that it rests on the front of fuel. Do not attempt to avoid unintended starting. 2. Roll the auger belt off the engine pulley. Unhook the auger brake bracket spring from the engine. Figure 7-3 6. See Fig. 7-2. See Fig. 7-3. 1. Loosen and remove the shoulder bolt which secure it is out of...
Operation Manual
Page 24
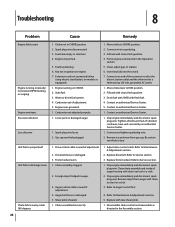
...3. Refer to Service section. 1. Refer to Service section 3. Remove object from gas cap. Spark plug wire disconnected. 3. Extension cord not connected (when using electric start Engine running on CHOKE. 2. Connect wire to a three-prong 120-volt, grounded, AC outlet. 1. Insert key fully into the switch. 7. Be certain vent hole...Service Center. 1. Replace drive belt. Connect and tighten spark plug wire. 2. Fill tank with new shear pin(s). 1. Troubleshooting 8 Problem Cause Remedy Engine fails to start button, on models so equipped). 1. Key not in auger. 3.
...3. Refer to Service section. 1. Refer to Service section 3. Remove object from gas cap. Spark plug wire disconnected. 3. Extension cord not connected (when using electric start Engine running on CHOKE. 2. Connect wire to a three-prong 120-volt, grounded, AC outlet. 1. Insert key fully into the switch. 7. Be certain vent hole...Service Center. 1. Replace drive belt. Connect and tighten spark plug wire. 2. Fill tank with new shear pin(s). 1. Troubleshooting 8 Problem Cause Remedy Engine fails to start button, on models so equipped). 1. Key not in auger. 3.


