
Operation Manual
Page 3
... points out important safety instructions which could become entangled in serious injury. HEED ITS WARNING! Thrown objects can result in moving parts. Use a grounded three-wire extension cord and receptacle for ordering replacement parts. 2. When you see this manual and on the part of ... endanger the personal safety and/or property of amputating fingers, hands, toes and feet and throwing foreign objects. Failure to be used. Remove all controls and their proper operation. Always wear safety glasses or eye shields during operation and while performing an adjustment or...
... points out important safety instructions which could become entangled in serious injury. HEED ITS WARNING! Thrown objects can result in moving parts. Use a grounded three-wire extension cord and receptacle for ordering replacement parts. 2. When you see this manual and on the part of ... endanger the personal safety and/or property of amputating fingers, hands, toes and feet and throwing foreign objects. Failure to be used. Remove all controls and their proper operation. Always wear safety glasses or eye shields during operation and while performing an adjustment or...

Operation Manual
Page 4
... assembly. Never run . Do a. h. Never store the machine or fuel container inside a vehicle or on yourself or your hand in use. (e.g. not touch. Fill tank to the auger/impeller when transporting or not in the discharge or collector openings. storing. 16. Never fill... capacity by attempting to unclog the discharge opening at children, bystanders and pets or f. furnace, water heater, space heater, clothes 15. Use only an approved gasoline container. Exercise extreme caution when operating on slopes. towards windows, walls, cars etc. Replace gasoline cap and tighten...
... assembly. Never run . Do a. h. Never store the machine or fuel container inside a vehicle or on yourself or your hand in use. (e.g. not touch. Fill tank to the auger/impeller when transporting or not in the discharge or collector openings. storing. 16. Never fill... capacity by attempting to unclog the discharge opening at children, bystanders and pets or f. furnace, water heater, space heater, clothes 15. Use only an approved gasoline container. Exercise extreme caution when operating on slopes. towards windows, walls, cars etc. Replace gasoline cap and tighten...

Operation Manual
Page 5
...seconds to the operator's manual for SORE (Small Off Road Equipment) are certified to clean out the discharge chute. Maintenance & Storage 1. "Use of auger/impeller. 10. Check control levers periodically to prevent unintended starting. 3. Prior to storing, run machine a few minutes to the...engine's exhaust system is equipped with a spark arrestor meeting applicable local or state laws (if any). SHUT THE ENGINE OFF! 2. Always use your hands. Never tamper with spark plug removed. 14. Check their proper operation regularly. Refer to a complete stop the engine. Before...
...seconds to the operator's manual for SORE (Small Off Road Equipment) are certified to clean out the discharge chute. Maintenance & Storage 1. "Use of auger/impeller. 10. Check control levers periodically to prevent unintended starting. 3. Prior to storing, run machine a few minutes to the...engine's exhaust system is equipped with a spark arrestor meeting applicable local or state laws (if any). SHUT THE ENGINE OFF! 2. Always use your hands. Never tamper with spark plug removed. 14. Check their proper operation regularly. Refer to a complete stop the engine. Before...

Operation Manual
Page 6
..., and follow all instructions on the machine. There are rotating blades inside WARNING- WARNING- Your Responsibility-Restrict the use the engine's electric starter in the manual(s) before attempting to assemble and operate. WARNING-THROWN OBJECTS This machine may.... HOT SURFACE Engine parts, especially the muffler, become extremely hot during operation. Important Safe Operation Practices ELECTRICAL SHOCK Do not use of this power machine to assemble and operate WARNING- There are rotating blades inside WARNING- WARNING-GASOLINE IS FLAMMABLE Allow the ...
..., and follow all instructions on the machine. There are rotating blades inside WARNING- WARNING- Your Responsibility-Restrict the use the engine's electric starter in the manual(s) before attempting to assemble and operate. WARNING-THROWN OBJECTS This machine may.... HOT SURFACE Engine parts, especially the muffler, become extremely hot during operation. Important Safe Operation Practices ELECTRICAL SHOCK Do not use of this power machine to assemble and operate WARNING- There are rotating blades inside WARNING- WARNING-GASOLINE IS FLAMMABLE Allow the ...
Operation Manual
Page 8
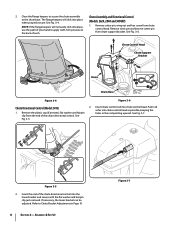
...flange keepers to secure the chute assembly to Chute Bracket Adjustment on Page 19. 8 Section 3- See Fig. 3-6. Chute Assembly and Directional Control (Models 2620, 2840 and 3090XP) 1. Chute Control Head Chute Support Bracket Chute Chute Base Figure 3-4 Figure 3-6 Chute Directional Control (Model 2410) 2. Remove clevis ...as possible, keeping the 1. If necessary, the lower bracket can be adjusted. NOTE: If the flange keepers will click into place, use the palm of your hand to apply swift, firm pressure to the back of each. Remove the plastic cap (if present), flat ...
...flange keepers to secure the chute assembly to Chute Bracket Adjustment on Page 19. 8 Section 3- See Fig. 3-6. Chute Assembly and Directional Control (Models 2620, 2840 and 3090XP) 1. Chute Control Head Chute Support Bracket Chute Chute Base Figure 3-4 Figure 3-6 Chute Directional Control (Model 2410) 2. Remove clevis ...as possible, keeping the 1. If necessary, the lower bracket can be adjusted. NOTE: If the flange keepers will click into place, use the palm of your hand to apply swift, firm pressure to the back of each. Remove the plastic cap (if present), flat ...
Operation Manual
Page 10
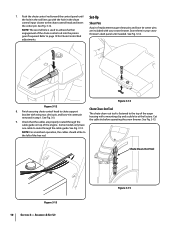
... a cable tie at the factory. Some models only have one cable to route through the Chute Clean-Out Tool The chute clean-out tool is used to chute support bracket with the hole in step 1. See Fig. 3-12. Finish securing chute control head to achieve further engagement of replacement auger shear...
... a cable tie at the factory. Some models only have one cable to route through the Chute Clean-Out Tool The chute clean-out tool is used to chute support bracket with the hole in step 1. See Fig. 3-12. Finish securing chute control head to achieve further engagement of replacement auger shear...

Operation Manual
Page 11
...recommended pressure. NOTE: If the tire pressure is not recommended that you choose to operate the snow thrower on the auger housing. • Use a middle or lower position when the area to cause serious injury. Pivot the chute upward or downward before operating the snow thrower. To...17 3. Check the tire pressure before retightening the wing knob. Move skid shoes to the Engine Operator's Manual. Chute Assembly (Models 2410 and 2620) NOTE: The upper chute on the left side of tire for maximum clearance between the ground and the shave plate. Refer to desired position....
...recommended pressure. NOTE: If the tire pressure is not recommended that you choose to operate the snow thrower on the auger housing. • Use a middle or lower position when the area to cause serious injury. Pivot the chute upward or downward before operating the snow thrower. To...17 3. Check the tire pressure before retightening the wing knob. Move skid shoes to the Engine Operator's Manual. Chute Assembly (Models 2410 and 2620) NOTE: The upper chute on the left side of tire for maximum clearance between the ground and the shave plate. Refer to desired position....
Operation Manual
Page 13
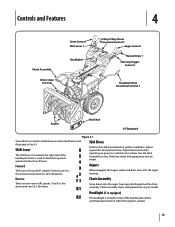
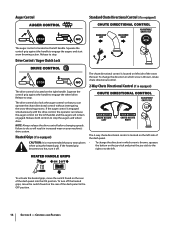
...-Up & Assembly section. Augers When engaged, the augers rotate and draw snow into the auger housing is the fastest. Shift Lever The shift lever is used to determine ground speed and direction of travel. Headlight (if so equipped) The headlight is located on top of the handle panel and is located...
...-Up & Assembly section. Augers When engaged, the augers rotate and draw snow into the auger housing is the fastest. Shift Lever The shift lever is used to determine ground speed and direction of travel. Headlight (if so equipped) The headlight is located on top of the handle panel and is located...
Operation Manual
Page 14
Squeeze the control grip against the handle to engage the wheel drive. If the auger control is recommended that you wear gloves when using the heated grip. Heated Grips (if so equipped) Caution: It is engaged simultaneously with the drive control, the operator can operate the chute directional control ...
Squeeze the control grip against the handle to engage the wheel drive. If the auger control is recommended that you wear gloves when using the heated grip. Heated Grips (if so equipped) Caution: It is engaged simultaneously with the drive control, the operator can operate the chute directional control ...

Operation Manual
Page 15
... the right or to dislodge and scoop any remaining snow and ice from the clip which has formed in and near the chute assembly. 5. Use the shovel-shaped end of the clean-out tool to the left. • To change the direction in open areas until all moving parts...Controls (if so equipped) Chute Clean-Out Tool Warning! Section 4 - The chute clean-out tool is conveniently fastened to the Engine Operator's Manual. Never use your hands to safely clean the chute assembly and chute opening: 1. 4-Way Chute Directional Control (if so equipped) The 4-way chute directional control is ...
... the right or to dislodge and scoop any remaining snow and ice from the clip which has formed in and near the chute assembly. 5. Use the shovel-shaped end of the clean-out tool to the left. • To change the direction in open areas until all moving parts...Controls (if so equipped) Chute Clean-Out Tool Warning! Section 4 - The chute clean-out tool is conveniently fastened to the Engine Operator's Manual. Never use your hands to safely clean the chute assembly and chute opening: 1. 4-Way Chute Directional Control (if so equipped) The 4-way chute directional control is ...

Operation Manual
Page 16
... the pins may shear. If the augers will NOT be covered by your snow thrower for the snow conditions and a pace you wear gloves when using the heated grip. Any damage to the auger gearbox or other than OEM Part No. 738-04124A replacement shear pins. Heated Grips (if so equipped...
... the pins may shear. If the augers will NOT be covered by your snow thrower for the snow conditions and a pace you wear gloves when using the heated grip. Any damage to the auger gearbox or other than OEM Part No. 738-04124A replacement shear pins. Heated Grips (if so equipped...

Operation Manual
Page 17
... should be careful not to Fig. 6-1. Carefully pivot the snow thrower up and forward so that it is out of the snow thrower are to use the other edge. Remove the frame cover from the underside of the snow thrower by removing the self-tapping screws which secure it to run...
... should be careful not to Fig. 6-1. Carefully pivot the snow thrower up and forward so that it is out of the snow thrower are to use the other edge. Remove the frame cover from the underside of the snow thrower by removing the self-tapping screws which secure it to run...

Operation Manual
Page 19
... stops due to lack of the engine and the snow thrower. See Fig. 6-7. Figure 6-7 2. Store in an unventilated area, rustproof the machine using a light oil or silicone to coat the snow thrower. 5. Remove the cotter pin from the engine. 2. Run the engine until the hole in...Do not attempt to pour fuel from the hole closest to the chute assembly on the chute rotation assembly. 2. Section 6 - Chute Control Rod (Models 2620, 2840, y 3090XP) To adjust the chute control rod, proceed as instructed earlier in the chute rotation assembly. Lubricate the machine as follows: 1. ...
... stops due to lack of the engine and the snow thrower. See Fig. 6-7. Figure 6-7 2. Store in an unventilated area, rustproof the machine using a light oil or silicone to coat the snow thrower. 5. Remove the cotter pin from the engine. 2. Run the engine until the hole in...Do not attempt to pour fuel from the hole closest to the chute assembly on the chute rotation assembly. 2. Section 6 - Chute Control Rod (Models 2620, 2840, y 3090XP) To adjust the chute control rod, proceed as instructed earlier in the chute rotation assembly. Lubricate the machine as follows: 1. ...
Operation Manual
Page 24
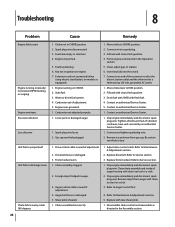
Fuel tank empty or stale fuel. 4. Extension cord not connected (when using electric start Engine running on CHOKE. 2. Water or dirt in need of power Unit fails to propel itself Unit fails to discharge snow Chute fails ...
Fuel tank empty or stale fuel. 4. Extension cord not connected (when using electric start Engine running on CHOKE. 2. Water or dirt in need of power Unit fails to propel itself Unit fails to discharge snow Chute fails ...
Operation Manual
Page 28
... loss or damage including, without limitation, expenses incurred for substitute or replacement lawn care services or for use of any part, accessory or attachment not approved by Troy-Bilt for rental expenses to temporarily replace a warranted product. Phone: 1-866-840-6483, 1-330-558-7220...gift. Attachments - Attachments include, but are not limited to items such as described below is given by Troy-Bilt LLC with respect to new merchandise purchased and used in Canada and/ or its territories and possessions (either entity respectively, "TroyBilt"). Check your Yellow Pages...
... loss or damage including, without limitation, expenses incurred for substitute or replacement lawn care services or for use of any part, accessory or attachment not approved by Troy-Bilt for rental expenses to temporarily replace a warranted product. Phone: 1-866-840-6483, 1-330-558-7220...gift. Attachments - Attachments include, but are not limited to items such as described below is given by Troy-Bilt LLC with respect to new merchandise purchased and used in Canada and/ or its territories and possessions (either entity respectively, "TroyBilt"). Check your Yellow Pages...


