Operation Manual
Page 7
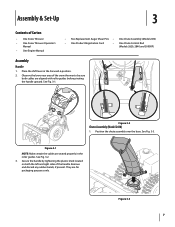
... Carton • One Snow Thrower • One Snow Thrower Operator's Manual • One Engine Manual • Two Replacement Auger Shear Pins • One Chute Assembly (Model 2410) • One Product Registration Card • One Chute Control Rod (Models 2620, 2840 and 3090XP) Assembly Handle 1. Figure 3-3 7 Place the shift lever in the roller guides.
... Carton • One Snow Thrower • One Snow Thrower Operator's Manual • One Engine Manual • Two Replacement Auger Shear Pins • One Chute Assembly (Model 2410) • One Product Registration Card • One Chute Control Rod (Models 2620, 2840 and 3090XP) Assembly Handle 1. Figure 3-3 7 Place the shift lever in the roller guides.
Operation Manual
Page 10
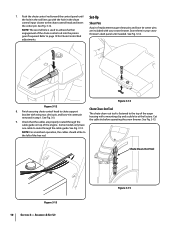
...second hole is fastened to the top of the auger housing with wing nut, clevis pin, and bow-tie cotter pin removed in the chute control input closest to the chute control head and insert the cotter pin. See Fig. 3-3. 9. Some models only have one cable to route through the ...Tool Figure 3-13 10 Section 3- See Fig. 3-12. See Fig. 3-13. cable guide on top of replacement auger shear pins and bow tie cotter pins are properly routed through the cable guide. Set-Up Shear Pins A pair of the engine. Check that the cables are included with the hole in step 1. See Fig. 3-14....
...second hole is fastened to the top of the auger housing with wing nut, clevis pin, and bow-tie cotter pin removed in the chute control input closest to the chute control head and insert the cotter pin. See Fig. 3-3. 9. Some models only have one cable to route through the ...Tool Figure 3-13 10 Section 3- See Fig. 3-12. See Fig. 3-13. cable guide on top of replacement auger shear pins and bow tie cotter pins are properly routed through the cable guide. Set-Up Shear Pins A pair of the engine. Check that the cables are included with the hole in step 1. See Fig. 3-14....

Operation Manual
Page 16
...warning! Heated Grips (if so equipped) Caution: It is designed so that you 're comfortable with. 2. caution: NEVER replace the auger shear pins with anything other components as a result of the six forward (F) positions or two reverse (R) positions. Any damage to the auger gearbox or...Engine Refer to the Engine Operator's Manual packed with your snow thrower's warranty. Squeeze the drive control against the left . Replacing Shear Pins The augers are secured to the spiral shaft with steering trigger controls) With the drive control engaged, squeeze the right steering trigger ...
...warning! Heated Grips (if so equipped) Caution: It is designed so that you 're comfortable with. 2. caution: NEVER replace the auger shear pins with anything other components as a result of the six forward (F) positions or two reverse (R) positions. Any damage to the auger gearbox or...Engine Refer to the Engine Operator's Manual packed with your snow thrower's warranty. Squeeze the drive control against the left . Replacing Shear Pins The augers are secured to the spiral shaft with steering trigger controls) With the drive control engaged, squeeze the right steering trigger ...

Operation Manual
Page 18
... the drive control as follows: 1. See Fig. 6-3. Proceed as follows: 1. Retighten the upper hex screw. 5. Maintenance & Adjustments Auger Shaft At least once a season, remove the shear pins from the auger shaft. It should not roll freely. 3. Check the adjustment of the drive control as follows: 1. With the drive control released, move the...
... the drive control as follows: 1. See Fig. 6-3. Proceed as follows: 1. Retighten the upper hex screw. 5. Maintenance & Adjustments Auger Shaft At least once a season, remove the shear pins from the auger shaft. It should not roll freely. 3. Check the adjustment of the drive control as follows: 1. With the drive control released, move the...
Operation Manual
Page 24
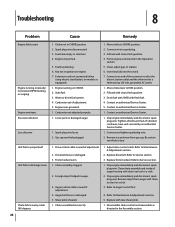
...Unit fails to propel itself Unit fails to discharge snow Chute fails to easily rotate 180 degrees 24 1. Fill tank with new shear pin(s). 1. Drain fuel tank. Contact an authorized Service Center. 1. Tighten all bolts and nuts. Foreign object lodged in CHOKE position... tool or a stick. 3. Insert key fully into the switch. 7. If vibration continues, have unit serviced by an authorized Service Center. 1. Shear pin(s) sheared. 1. Replace drive belt. Refer to Service section 3. Troubleshooting 8 Problem Cause Remedy Engine fails to start button, on models so equipped). 1. ...
...Unit fails to propel itself Unit fails to discharge snow Chute fails to easily rotate 180 degrees 24 1. Fill tank with new shear pin(s). 1. Drain fuel tank. Contact an authorized Service Center. 1. Tighten all bolts and nuts. Foreign object lodged in CHOKE position... tool or a stick. 3. Insert key fully into the switch. 7. If vibration continues, have unit serviced by an authorized Service Center. 1. Shear pin(s) sheared. 1. Replace drive belt. Refer to Service section 3. Troubleshooting 8 Problem Cause Remedy Engine fails to start button, on models so equipped). 1. ...
Operation Manual
Page 25
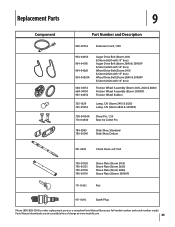
... Drive Belt (Storm 2840 & 3090XP & Storm 2620 with 16" tires) Wheel Drive Belt (Storm 2410 & Storm 2620 with 15" tires) Wheel Drive Belt (Storm 2840 & 3090XP & Storm 2620 with 16" tires) Friction Wheel Assembly (Storm 2410, 2620 & 2840) Friction Wheel Assembly (Storm 3090XP) Friction Wheel Rubber 725-1629 725-05352 Lamp, 12V (Storm 2410 & 2620) Lamp, 12V (Storm 2840 & 3090XP) 738-04124A 714-04040 Shear Pin, 1.50...
... Drive Belt (Storm 2840 & 3090XP & Storm 2620 with 16" tires) Wheel Drive Belt (Storm 2410 & Storm 2620 with 15" tires) Wheel Drive Belt (Storm 2840 & 3090XP & Storm 2620 with 16" tires) Friction Wheel Assembly (Storm 2410, 2620 & 2840) Friction Wheel Assembly (Storm 3090XP) Friction Wheel Rubber 725-1629 725-05352 Lamp, 12V (Storm 2410 & 2620) Lamp, 12V (Storm 2840 & 3090XP) 738-04124A 714-04040 Shear Pin, 1.50...

